Can You Recover Files from Command Prompt
Windows CMD, referred to as command or Command Prompt, is a versatile utility that can be used to manage disks, computer configurations, and folders and carry out other operations. Then, you may wonder if it is possible to recover files using CMD. The answer is absolutely yes.
Recover deleted files from Recycle Bin using Command Prompt
I got a black screen after deleting files from the WindowsApps folder. Now I’m thinking about recovering those files using the command prompt in WinRE. If feasible, what commands should I enter at the prompt? – DougieHYanswers.microsoft.com
In fact, there are several command lines that can be used to recover files in different situations. You should understand those command lines and execute the proper one based on your case. In the following content, I will explain those command lines in detail to show you how to recover hidden or lost files with command lines.
Case 1. Recover Hidden Files Using CMD
In some cases, files are hidden instead of actually lost from your device. Those files might be hidden by viruses, mistaken operations, device issues, or other issues, resulting in an illusion of data loss. To discover those hidden files by running CMD, you can work with the next steps.
Step 1. Press Win + R to open the Run window.
Step 2. Type cmd into the dialog and press Shift + Ctrl + Enter to run Command Prompt as administrator.
Step 3. Type attrib -h -r -s /s /d [drive-letter]:\*.* and press Enter to execute the command. You should replace the [drive-letter] parameter with the actual letter of the disk where the hidden files are stored. For instance, to show hidden files in disk E, the command line should be attrib -h -r -s /s /d E:\*.*.
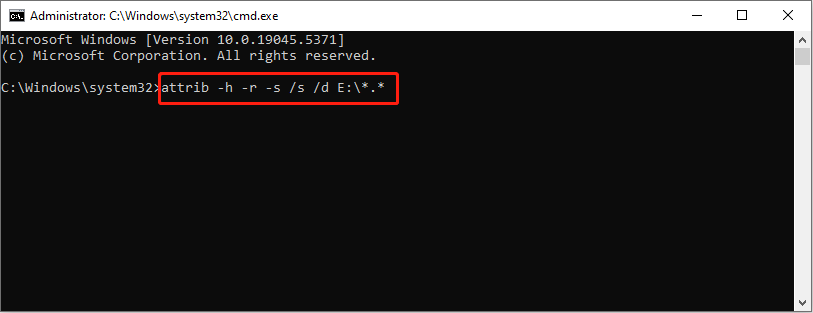
What do those parameters mean?
- -h: Clear the hidden attribute of the target files. This attribute must be cleared before you change other ones.
- -r: Clear the read-only attribute of the chosen files.
- -s: Clear the system file attribute of the mating files.
- /s: Execute the attrib command line to the target files in the current directory and all the subdirectories.
- /d: Apply the attrib command to directories.
- *.*: Include all types of files on the target disk.
Case 2. Recover Deleted Files Using CMD
If you cannot find the wanted files after removing the hidden attribute, those files are likely to be lost. Depending on whether your files are permanently lost, you can choose different command lines to recover files.
#1. Recover Deleted Files Using Recycle Bin Command Line
Generally, files deleted from the internal hard drive will be sent to the Recycle Bin. However, some of you may experience errors on File Explorer or the Recycle Bin, which prevents you from accessing the Recycle Bin properly. In this case, you can attempt to recover files from the Recycle Bin by running the command line. Let’s continue for more specific information.
Step 1. Press Win + R to launch the Run window.
Step 2. Type cmd into the dialog and press Enter to launch the Command Prompt window.
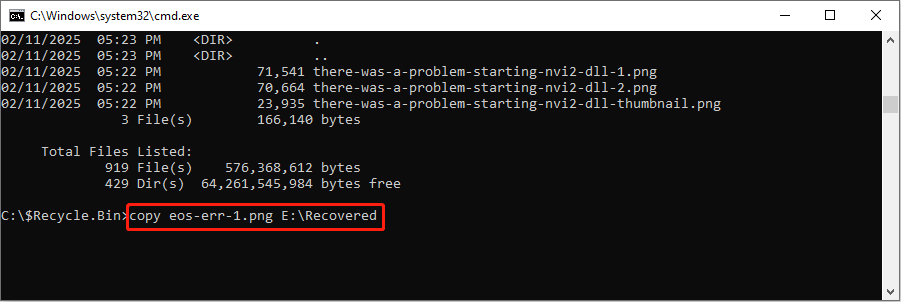
Step 3. Type cd C:\$Recycle.bin and hit Enter to access the Recycle Bin folder.
Step 4. Type dir */s and hit Enter to display all the deleted files.
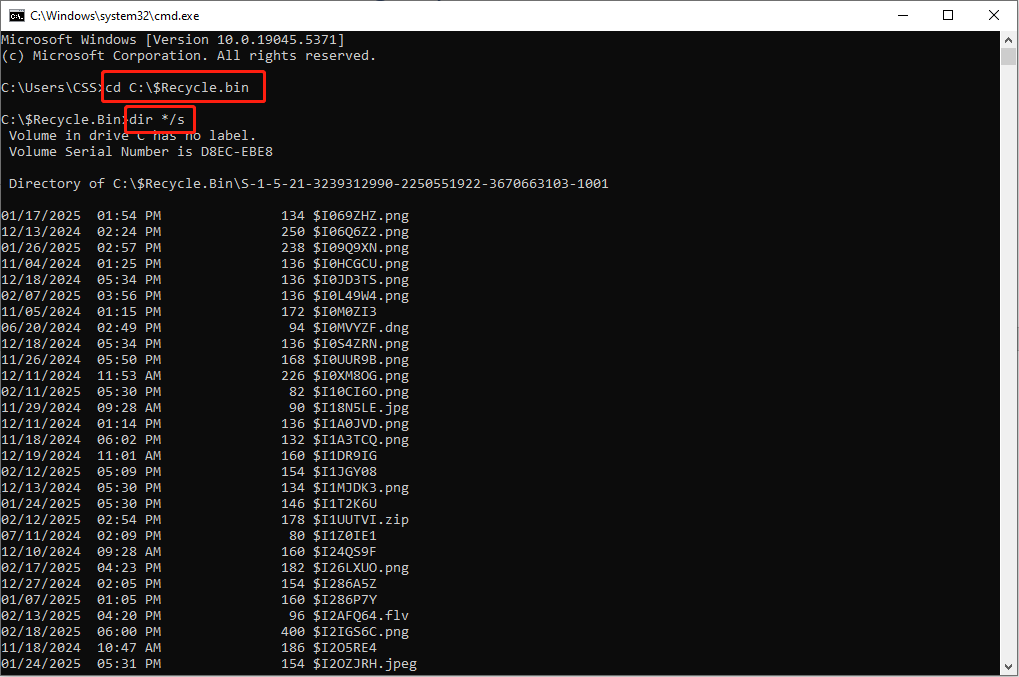
Step 5. Type copy [file-name] [location] and press Enter to recover the deleted file from the Recycle Bin. For instance, if I want to recover the eos-err-1603-1.png photo to the Recovered folder on the E drive, the command line should be copy eos-err-1603-1.png E:\Recovered.
If your Recycle Bin works properly, here is a simple command line for you to open the Recycle Bin directly.
Step 1. Open the Command Prompt utility on your computer.
Step 2. Type Start Shell:RecycleBinFolder and press Enter to launch the Recycle Bin.
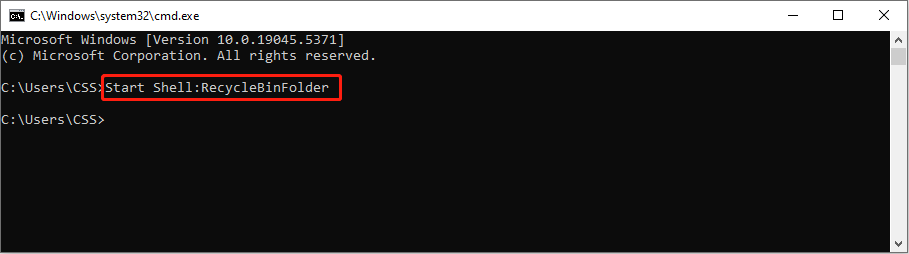
Then, you can browse the files and right-click on the target file to choose Restore, which will recover it to the original file path.
#2. Recover Permanently Deleted Files Using WINFR
How about the permanently deleted files? The Windows File Recovery tool, developed by Microsoft, makes sense in this case.
This is a command-line-like utility that can recover permanently lost files from local storage devices, including internal and external hard drives, SD cards, and USB drives. Please note that this tool cannot retrieve files from the Recycle Bin, cloud storage, and network drive.
You can obtain this tool from the Microsoft Store and then start to recover files with Windows File Recovery command.
Step 1. Type Command Prompt into the Windows Search bar and right-click on the best-matched option to choose Run as administrator.
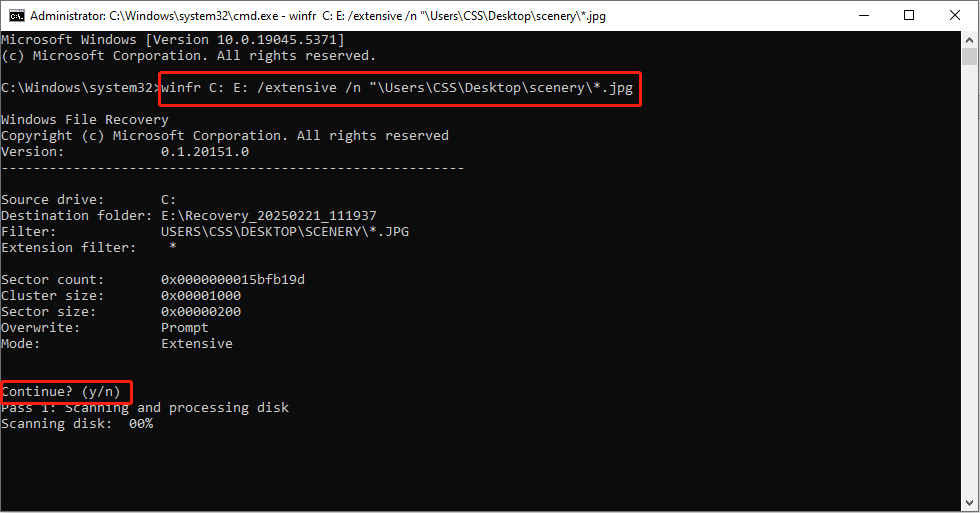
Step 2. Type winfr source-drive: destination-folder: [/mode] [/switches] and press Enter to run this command line. You need to read the following detailed information and change the parameters properly according to your case.
- Source-drive: The drive where the lost files were stored.
- Destination-folder: The location where you want to save the recovered files.
- [/mode]: Here are two modes to choose from: the regular mode is used when scanning intact and undamaged NTFS drives; the extensive mode is used to scan all file systems.
- [/switch]: The different switches change the scan scope. Here are three switches: 1) the /n switch refers to recovering a specific file which should plus with file extension, file name, or file path; 2) the /? switch shows all the syntax and switches for general users; 3) the /! switch summarizes all the syntax and switches for advanced users.
For instance, to recover JPG photos from a folder on the Desktop to the E drive, the command line should be winfr C: E: /extensive /n “\Users\CSS\Desktop\scenery\*.jpg”.
Step 3. Press y to confirm. Your computer will start to scan the target folder and list the scan result to you.
Step 4. When the process is completed, type y to view the recovered files directly.
Case 3. Recover Files Using CMD from an Inaccessible Hard Drive
Various causes can lead to an inaccessible hard drive, including bad sectors, a corrupted file system, insufficient permissions, and more. An inaccessible hard drive doesn’t allow you to open the stored data as well. Fortunately, if the inaccessible drive is caused by logical errors, you can recover files from Command Prompt and repair the disk.
Running the CHKDSK command line can check and repair disk errors and isolate bad sectors, making the hard drive become usable again. Here is how to run the CHKDSK command line.
Step 1. Press Win + R and type cmd into the dialog.
Step 2. Press Ctrl + Shift + Enter simultaneously to run Command Prompt as administrator.
Step 3. Type CHKDSK [drive-letter] /f /r /x and press Enter to execute it. You should replace the [drive-letter] parameter with the actual drive letter of the inaccessible hard drive.
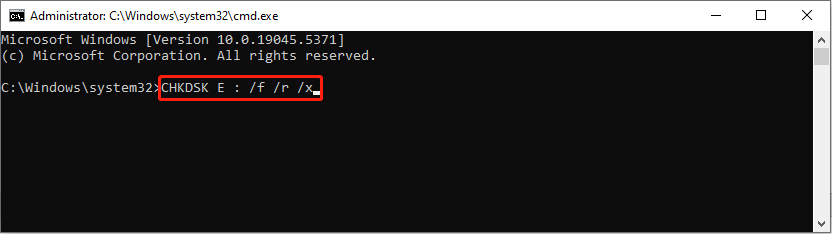
What are the functions of those parameters?
- /f: Fix errors of the chosen disk. If the selected disk is running currently, the command will execute when the computer starts next.
- /r: Locate bad sectors on the chosen disk and recover readable information from the bad sectors. The parameter includes the functions of /f.
- /x: Force the volume to dismount.
If the inaccessible hard drive is, unfortunately, where the operating system is installed, you are unable to boot up the computer properly. But don’t worry; you can still open the Command Prompt utility from the Windows Recovery Environment to recover files and repair disk errors.
Step 1. Press the Power button to start your computer.
Step 2. When the computer starts to boot, press and hold the Power button to turn it off. Repeat the two steps two times and you will see the Automatic Repair interface.
Step 3. Click Advanced options, and then choose Startup Settings.
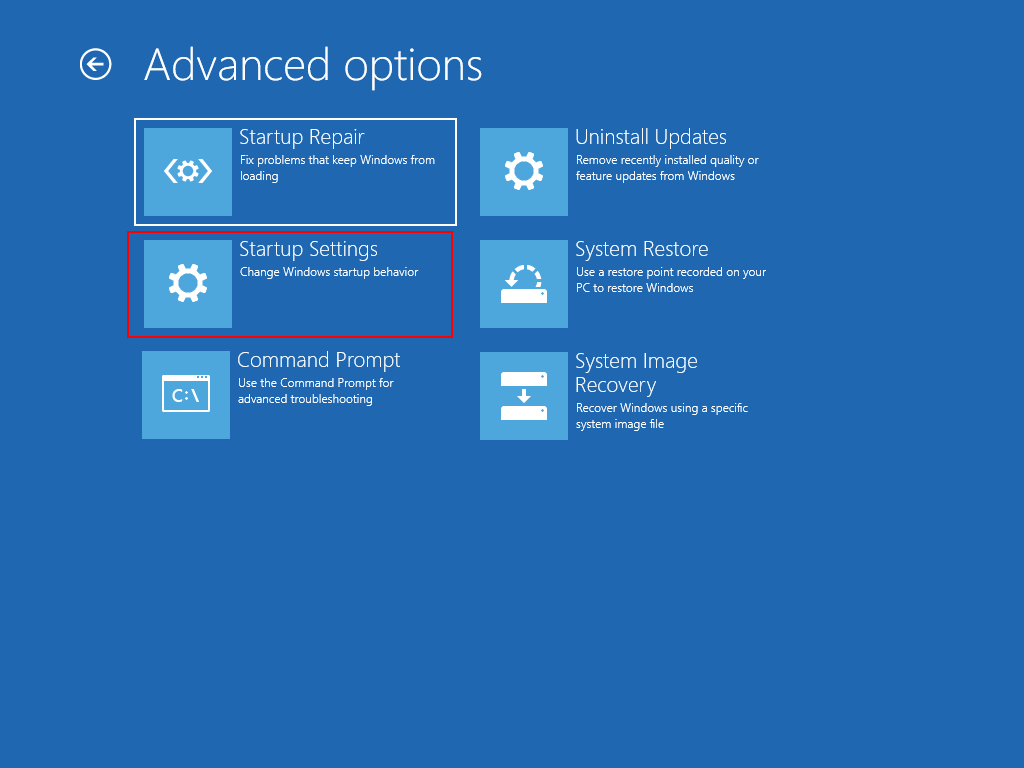
Step 4. In the following window, choose Restart. Press F6 to choose the Enable Safe Mode with Command Prompt option.
When the Command Prompt window is launched, execute the CHKDSK command line to get the files back.
Alternative: Recover Files Using MiniTool Power Data Recovery
Despite the versatile functions of Command Prompt, running this utility to recover data still has many limitations. Additionally, it is difficult for common computer users to deal with the complex command lines and Command Prompt interfaces.
Thus, I’d like to provide you with one more portable option, MiniTool Power Data Recovery. This software has simple and concise interfaces and data recovery operations, and even data recovery green hands can master it quickly.
MiniTool Power Data Recovery is designed to handle the data recovery task under diverse cases, including mistaken deletion, corrupted hard drives, unbootable computers, virus infections, etc. Get the free edition of this software by clicking the download button below, and then start to recover files with a few clicks.
MiniTool Power Data Recovery FreeClick to Download100%Clean & Safe
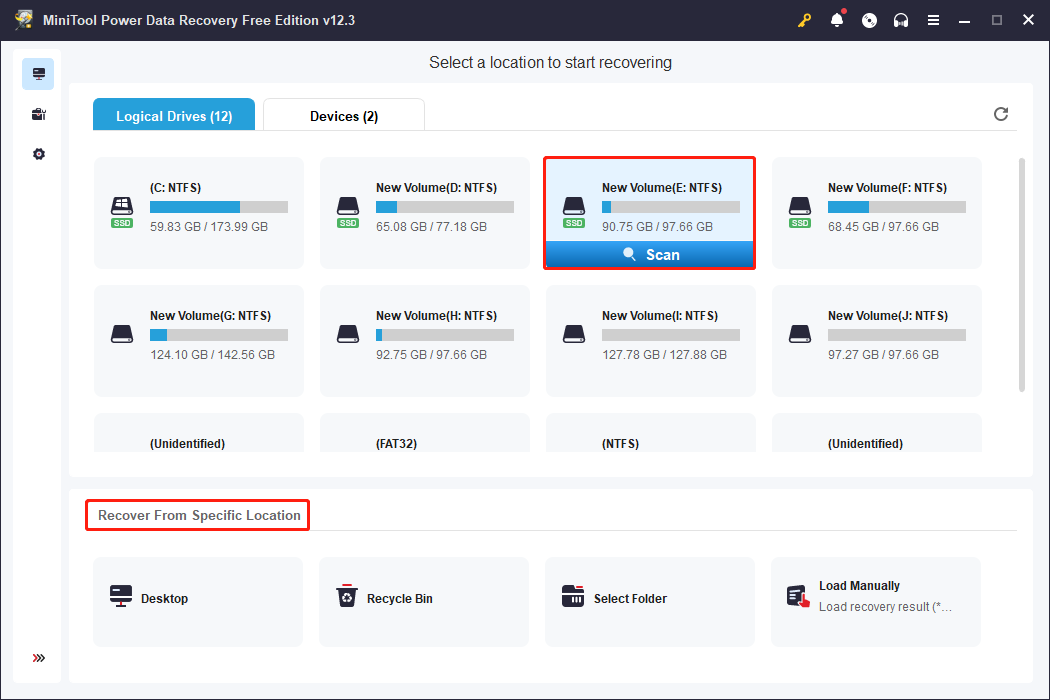
Step 1. Scan the target location
After installation, you can launch the software to enter the main interface. Note that if you need to recover files from an external device, connect it and ensure the device is recognized by your computer.
Under the Logical Drives section, choose the partition where the lost files were stored and click Scan. Optionally, you can choose to scan a specific location, such as a Desktop, Recycle Bin, or a certain folder, to shorten the scan duration to a large extent.
Step 2. Locate the target files
Wait for the scan process to complete. All the found files are displayed under the Path tab by default on the result page. As there are piles of files on the result page, it is wise to make full use of multiple features, such as Filter, Type, and Search to narrow down the file list effectively.
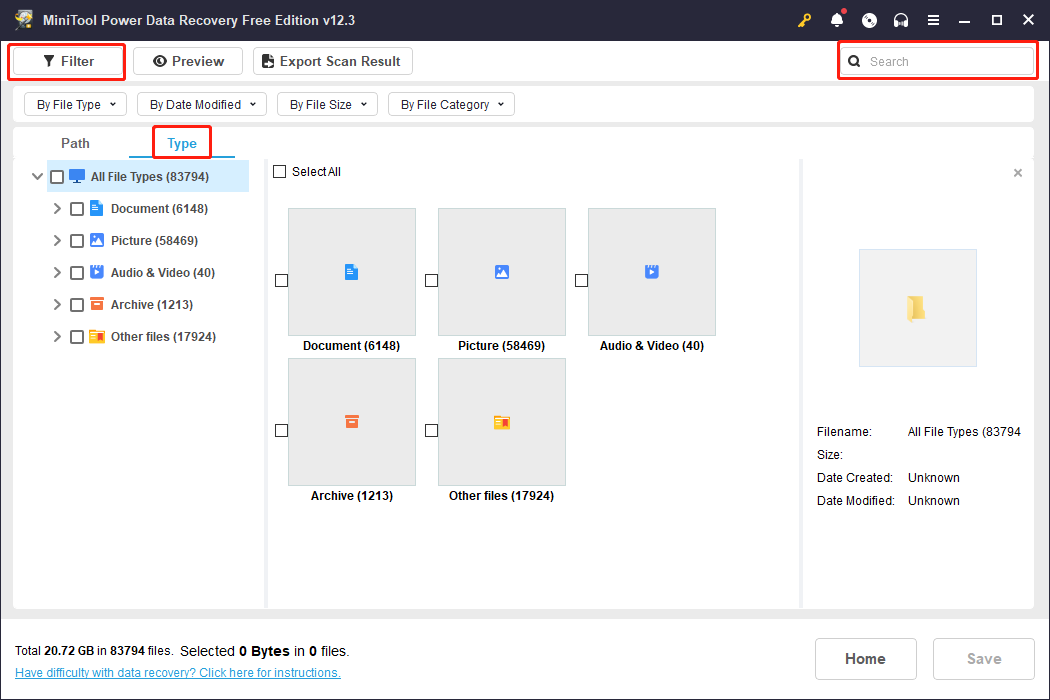
Afterward, double-click on a file to verify the file content instead of recovering it immediately. Photos, videos, audio, documents, and other types of files are supported for previewing.

Step 3. Recover the demanded files
Add checkmarks in front of the wanted files and click Save. In the prompt window, you should choose a new destination for the recovered files. Saving files to the original file path may overwrite the lost data, causing data recovery to fail.

Additionally, the MiniTool Power Data Recovery Free can only restore 1GB of files. To break the file recovery limit, you need to upgrade the software to an advanced edition. MiniTool has developed multiple editions with different functions. Go to the License Comparison page to have a close look at each edition and choose one that suits your case best.
MiniTool ShadowMaker TrialClick to Download100%Clean & Safe
To Sum Up
After reading this post, you can learn how to recover files using CMD in different data loss scenarios, such as recovering hidden or permanently deleted files. However, such a command line tool might be difficult for common computer users owing to the complicated parameters and diverse command syntaxes. Hence, MiniTool Power Data Recovery is highly recommended for you to simplify the data recovery process.
If you encounter any problems using MiniTool Power Data Recovery, please feel free to contact us via [email protected].
User Comments :