Problem: Please Insert a Disk into USB Drive
“Flash Drive Errors ‘Please insert a disk into USB Drive D:’ and has no media. I have a 1 TB flash drive that I've been storing a lot of files on recently. I had an issue with a game where the update was very slow, so I thought that moving the game into the flash drive might help. Ever since then, the flash drive says 'no media’ and doesn't let me open it (the error that was previously specified shows up as well).”answers.microsoft.com
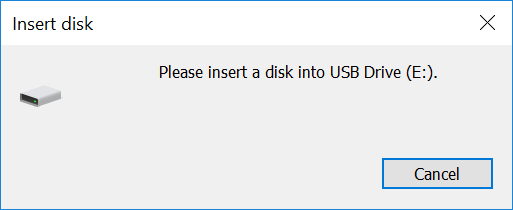
“Please insert a disk into USB Drive” is a common USB error, causing your USB flash drive or pen drive to be inaccessible or unreadable by Windows. At times, this error shows as the “please insert a disk into removable drive” message.
It indicates that your flash drive is malfunctioning, not properly connected, or has become corrupted. In this case, your PC may be unable to access the USB files due to the drive not being recognized. Meanwhile, when you check the properties of the USB drive, both the “Used space” and “Free space” indicators display 0 bytes. In Disk Management, the USB drive appears as “No Media.”
Under this circumstance, you may ask: Why does the computer keep saying “Please insert a disk into USB Drive”?
Part 1. Possible Causes for “Please Insert a Disk into USB Drive” Error
There are several reasons why the computer shows the Insert a Disk error message after connecting the USB drive, ranging from simple connection issues to compatibility issues:
- The flash drive is not properly connected to the computer due to an incorrect insertion of the USB drive, a damaged cable, or a malfunctioning computer interface.
- The drive letter for the USB disk is already being used by another disk or partition.
- In the event of logical corruption, the USB drive may contain corrupt files, resulting in the “Please insert a disk into USB Drive” error.
- The space on the USB drive is allocated but has not yet been formatted to a compatible file system.
- The USB drive may be infected with viruses or malware.
- The PC’s controller might be incapable of loading the firmware for the flash drive you are using.
- You are using outdated drivers to detect USB drives.
- The USB drive is physically damaged.
- The file system on the USB drive is not compatible with the current Windows operating system.
- …
Part 2. How to Recover Data from an Inaccessible USB Drive
Suppose there is some important data in your USB drive. The first step to take before proceeding with the specific methods is recovering data from the inaccessible USB drive. MiniTool Power Data Recovery, the top free data recovery tool, can play a huge role.
Why Opt for MiniTool Power Data Recovery?
MiniTool Power Data Recovery stands out among other secure data recovery services primarily for these reasons:
- It is highly effective in addressing various situations of inaccessible disks or file loss, such as an inaccessible hard drive, a RAW disk, an unreadable SD card, or a formatted disk, among others. This file recovery software can easily locate both deleted and lost files as well as existing ones.
- It boasts impressive compatibility with numerous file systems and disk types, supporting the recovery of files from HDDs, SSDs, external hard drives, USB flash drives, SD cards, CD/DVDs, etc., and works with file systems, including FAT12, FAT16, FAT32, exFAT, NTFS, and others.
- It can recover a wide variety of data types, including documents, images, videos, emails, audio files, and much more.
- It ensures that the original inaccessible files and the USB drive remain untouched during the scanning and recovery process.
- It features a user-friendly interface and easy operations, allowing for quick and easy file recovery. Additionally, the tool offers the ability to recover up to 1 GB of files at no cost.
Now, click the button below to download MiniTool Power Data Recovery. After that, launch the program to recover data from an inaccessible USB drive.
MiniTool Power Data Recovery FreeClick to Download100%Clean & Safe
How to Recover Data from an Inaccessible USB Drive Using MiniTool Power Data Recovery?
Step 1. Choose the USB drive to scan.
On the main interface of this MiniTool file recovery tool, all your disk partitions will be visible in the Logical Drives tab. Locate the inaccessible USB drive by identifying its drive letter and storage size. Next, hover your mouse over the target partition and click Scan. The disk scanning process will begin right away.

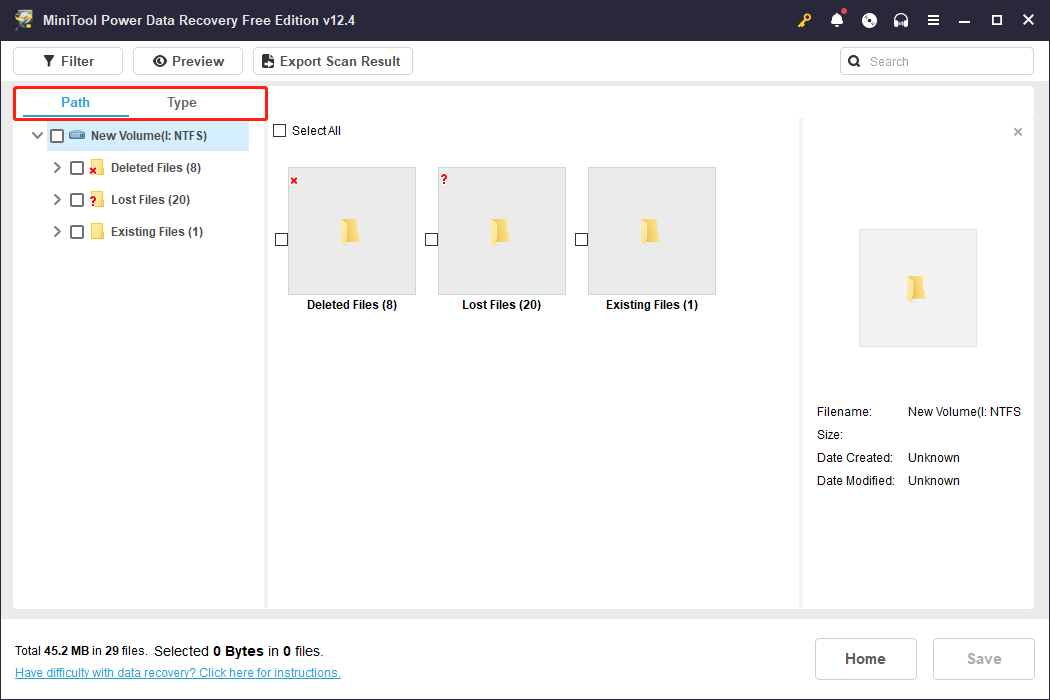
Step 2. Search for and preview the files.
Once the full scan is complete, the deleted, lost, and existing files on the USB drive will be organized in a tree structure under Path by default. You’ll likely have the option to expand the relevant folder and restore an entire folder while keeping the original file structure intact. Alternatively, you can switch to the Type category to view your files sorted by file type or even file format.
Additionally, there are two more helpful features available to assist with file discovery:
- Filter: This option can be found in the top left corner. By clicking it, you can filter out unnecessary files by criteria such as file type, size, modification date, and category.
- Search: The search box is located in the upper right corner. You can find a specific file or folder by entering its name and pressing Enter. Remember to directly save the required files from the search results window, as going back to the scan results window will clear the search results.

Step 3. Select and save the desired files.
Finally, ensure that all selected files are checked, and then click the Save button. You will then be prompted to choose a location to store the recovered files. Just select a drive different from the USB drive and click OK to initiate the recovery of the selected items.
Part 3. How to Fix Please Insert a Disk into USB Drive on Windows
After recovering data from the inaccessible USB drive, you may want to learn how to fix this vexing issue effectively. Faced with the “please insert a disk into USB drive” error on Windows, you can attempt the following methods to restore it to normal.
Fix 1. Use a Different USB Port and Cable
When the issue is simply caused by an incorrect connection, reconnecting the drive to your computer or using a different port and cable can often resolve the problem. Make sure that the connection is secure and that the USB drive is not physically damaged or warped.
If possible, plug the USB drive into a port that is directly on the motherboard instead of one on the computer case. Meanwhile, consider linking your USB drive to your computer via the rear USB ports, which are patched to the motherboard straightforwardly.
Alternatively, you can choose to use a cable to connect your USB drive to your PC to check out whether the issue is related to the drive itself.
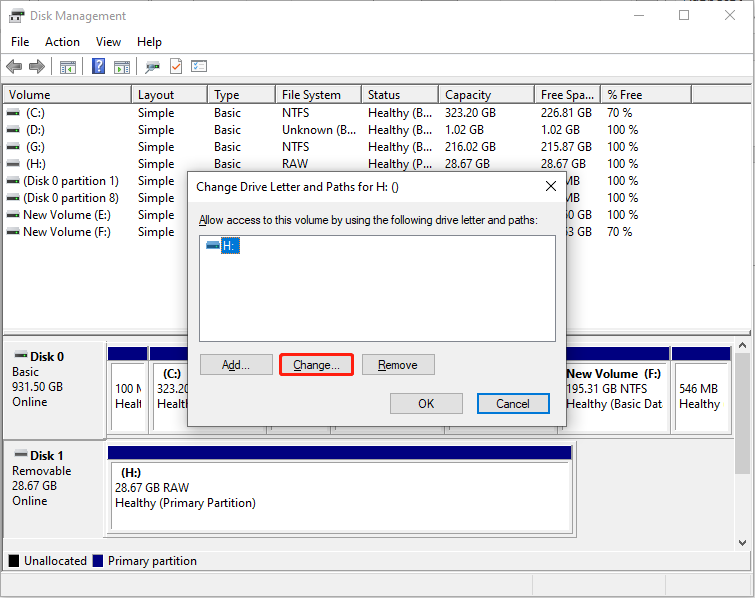
Fix 2. Assign a New Drive Letter Manually
If the current drive letter of your connected USB drive is occupied by other drives or partitions on your PC, you can also not access files or folders on the USB drive and receive the “Please insert a disk into USB drive” error message. You can assign a new drive letter manually by following the steps below:
- Press Win + X to access the Power User menu and select Disk Management.
- Right-click on the drive that is having issues, then choose Change Drive Letter and Paths.
- In the pop-up window, click the Change button and select a unique drive letter. Then click OK to save the changes.
Fix 3. Update/Reinstall the USB Driver
Updating or reinstalling the USB driver is a basic troubleshooting approach that can resolve compatibility issues between the drive and your computer. Now, follow the steps outlined below to update or reinstall the driver.
>> To update the driver:
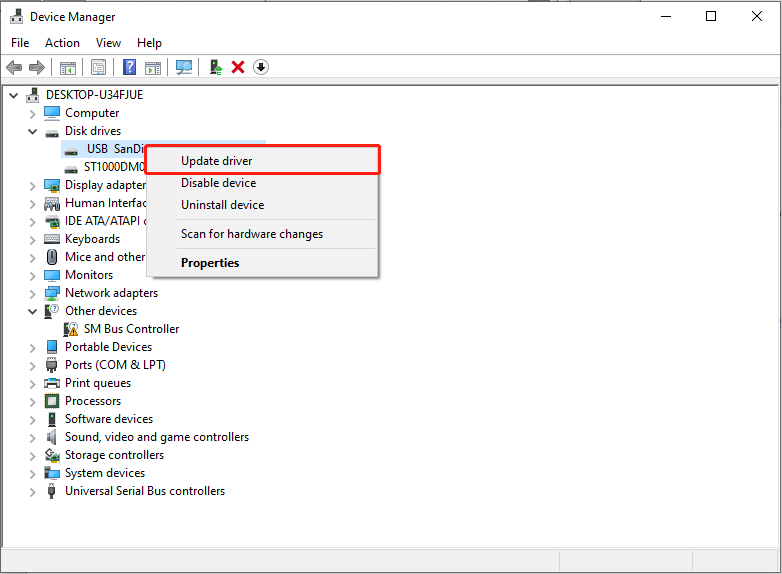
Step 1. To open Device Manager, you need to right-click the Start button on the taskbar and select Device Manager.
Step 2. Double-click the Disk drivers option to expand the drives category.
Step 3. Locate the desired USB drive based on its device name, right-click on it, and select Update driver. Then, follow the instructions to complete the process.
>> To reinstall the driver:
Step 1. Open Device Manager and expand the Disk drivers section.
Step 2. Right-click the desired USB and select Uninstall device.
Step 3. When prompted for confirmation to remove the device, click Uninstall.
Step 4. After this is completed, restart your computer, and the appropriate driver will be installed automatically.
Fix 4. Create a New Partition
When you try to access a USB drive that has unallocated space in Windows Explorer, you will encounter “Please insert a disk into Removable Drive” error. To resolve this issue, you need to partition the drive so it can be used for data storage. Here are two ways to complete this task.
Way 1. Via Disk Management
Step 1. Press Win + X to access the Power User menu and select Disk Management.
Step 2. Right-click on the USB drive that has unallocated space and select New Simple Volume.

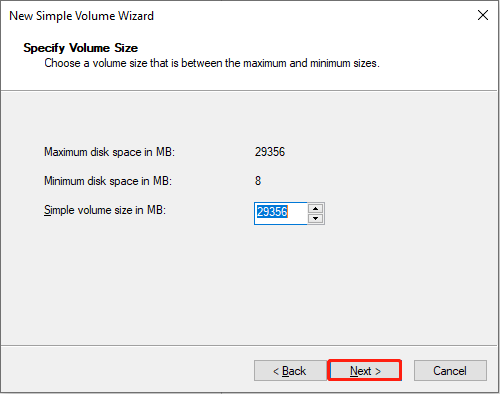
Step 3. On the welcome screen of the New Simple Volume Wizard, click Next.
Step 4. On the following screen, specify the Simple Volume Size and then click Next. It’s recommended to keep this option at its default setting.
Step 5. Select a drive letter from the drop-down list and click Next.
Step 6. Choose the formatting options based on your preferences. You can also leave this screen at its default settings. Finally, click on Finish.
Way 2. Via MiniTool Partition Wizard
If you are looking for the simplest way to create a new partition, you can use MiniTool Partition Wizard to do this job. This professional and free partition manager can help repair file system errors effectively.
Step 1. Click the button below to download MiniTool Partition Wizard. Then, launch it to enter its home page.
MiniTool Partition Wizard FreeClick to Download100%Clean & Safe
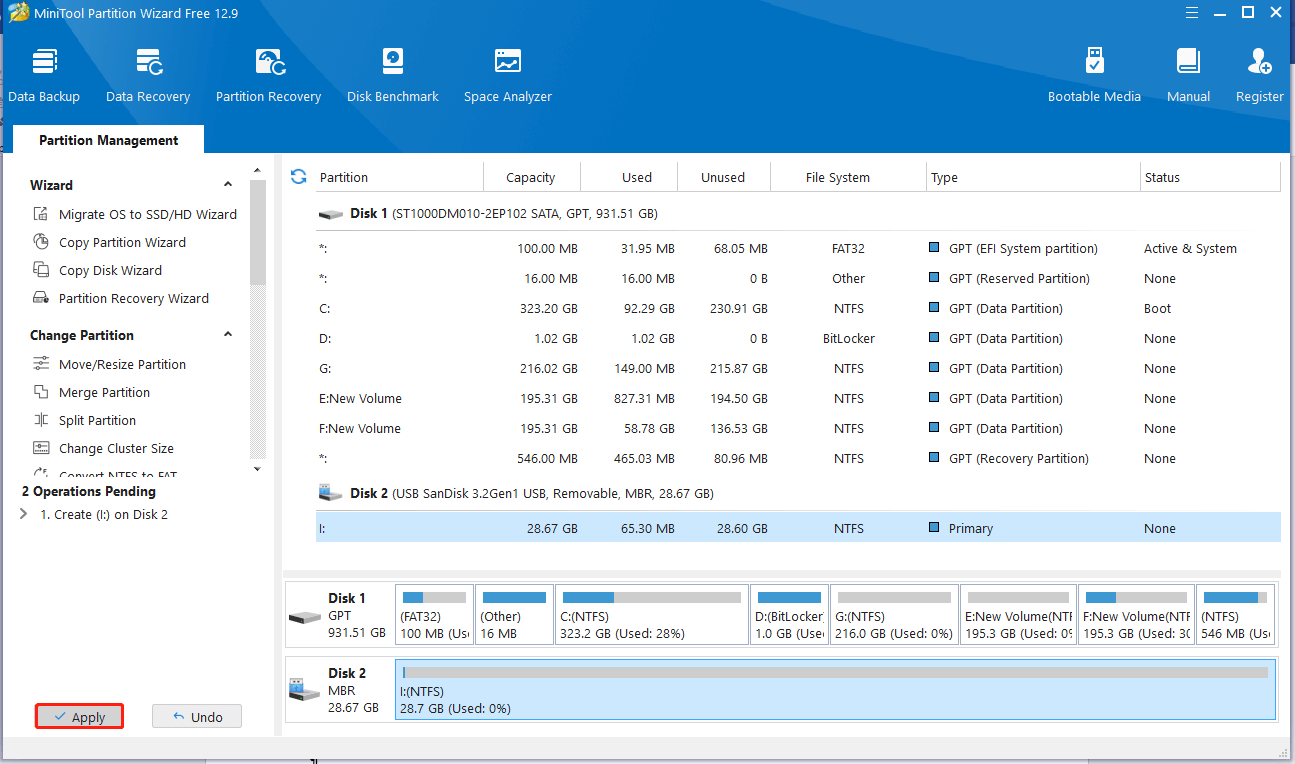
Step 2. Choose the USB drive that has the unallocated space and click Create Partition from the left menu.

Step 3. In this interface, confirm the following parameters: Partition Label, Type, Drive Letter, File System, Cluster Size, Volume, Location, and Alignment Method.
2. A logical partition aligned to a cylinder has 8 MB of unallocated space, while a primary partition does not.
With no changes, the default parameters are retained. Click the OK button to return to the main interface.

Step 4. You can preview a new partition that will be created. Click the Apply button to confirm the creation.
Fix 5. Scan for Hardware Changes
The “Scan for hardware changes” function is utilized to review and load any modifications made to your hardware by prompting the system to re-evaluate connected hardware, which can help fix Please insert a disk into USB drive.
Here’s how to use Scan for hardware changes:
Step 1. Press Win + S to open the Windows Search bar, type Device Manager in the box, and press Enter.
Step 2. Locate your USB drive, right-click on it, and select Scan for hardware changes.
Step 3. Verify if your disk is functioning properly once again.
This feature can work in several situations, as below:
- The USB drive was not set up correctly during the first connection.
- Drivers for the USB controller or drive may be outdated, corrupted, or incorrectly configured.
- USB ports may be in a low-power or suspended state.
- Recent driver updates may not have been fully implemented or acknowledged.
- The drive was disconnected without being safely ejected, leading to recognition problems.
- The USB controller is unable to establish communication with the drive.
Fix 6. Run the Hardware and Devices Troubleshooter
Executing the Hardware and Devices troubleshooter in Windows can potentially resolve issues with a faulty USB drive. To run the troubleshooter, follow these steps:
- Press Win + I to open Windows Settings and navigate to Updates & Security.
- Click on Troubleshoot and then select the Additional troubleshooters option.
- Choose Hardware and Devices, click the Run the troubleshooter button to initiate the troubleshooter, and be patient.
- Follow the instructions displayed on your screen and reboot your computer.
Fix 7. Fix an Inaccessible USB Drive Using Diskpart
Diskpart is a powerful command-line utility included in Windows operating systems that allows users to manage disks, partitions, and volumes. It can be particularly useful for troubleshooting and fixing issues related to removable disks or drives, such as please insert a disk into USB drive.
Step 1. Type cmd in the Windows Search bar, right-click the Command Prompt, and choose Run as administrator. In the UAC interface, click Yes.
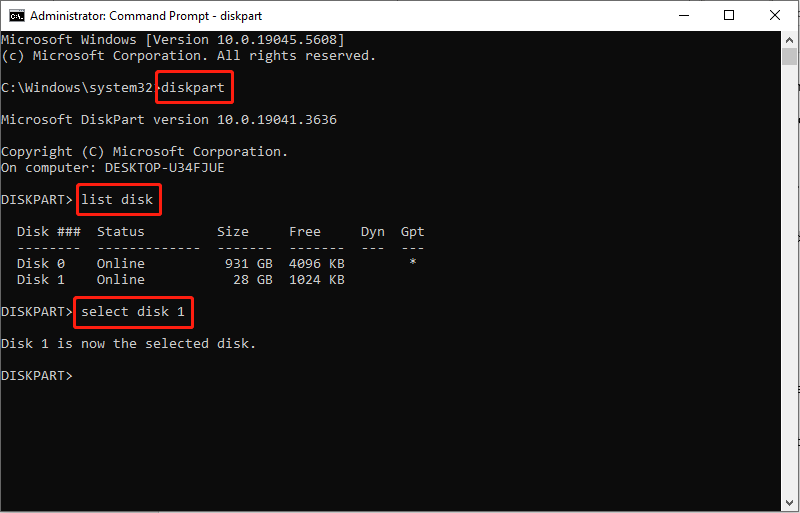
Step 2. Type diskpart and press Enter.
Step 3: Then, type the command: list disk and press Enter.
Step 4. To select your USB drive, type the command: select disk X (replace the X to your UBS drive’s drive number listed on the above result) and press Enter. Here, I choose Drive 1 as an example.
Step 6. After selecting the USB drive, type the command: clean and press Enter. This command will wipe the USB drive data and remove all partitions, leaving the disk with unallocated space.
Step 7. Type the command: create partition primary and press Enter.
Step 8. Once see the “DiskPart succeeded in creating the specific partition” message, type the command: format fs=FAT32 and press Enter to complete the formatting process. If you want to use exFAT, you can type the command: format fs=exFAT.

Step 9. Wait until the process is done and check if the “please insert a disk into USB drive” error is gone.
Fix 8. Format the USB Drive
When working with RAW partitions, it’s necessary to format the USB drive to fix the error that states please insert a disk into the USB drive.
- Open Disk Management from the Manage menu.
- Right-click on the USB drive and choose Format.
- Select the file system, like NTFS/FAT32, and rename the device. Check the box of Perform a quick format.
- Click OK to start the format process.

Final Blurb
Several easy and efficient solutions to fix “Please insert a disk into USB drive” are outlined above. You can try them out to restore your USB drive to normal use. It’s important to note that before carrying out actions that could lead to data loss, be sure to use MiniTool Power Data Recovery to retrieve your data first to prevent any irreversible loss.
If you experience any difficulties with the MiniTool software or have any inquiries regarding it, please feel free to contact [email protected] for help.
About The Author

Position: Columnist
Sandy became an English editor after graduation. She is devoted to finding effective solutions for diverse IT problems and provides articles on data recovery, data backup, and computer partitions and drives. In her spare time, she likes listening to music and playing games.
User Comments :