Phenomenon: USB Flash Drive Turns RAW
The USB flash drive’s strong portability and compatibility make it a popular storage medium. It is commonly employed to save or transfer videos, photos, documents, and other types of data. Lately, I have noticed many forum posts highlighting an issue: the USB flash drive shows RAW, and these users are looking for methods to recover data from a RAW USB flash drive.
What does a RAW USB flash drive mean? You must know that every storage device, including USB drives, needs to use a specific file system to be detected by your device. File systems, such as NTFS, exFAT, and FAT32, allow your device drive to recognize and operate your USB drive. If the file system malfunctions or becomes corrupted, your USB drive will be categorized as RAW, indicating that the file system of your USB is unavailable.
It is a common issue that a USB flash drive becomes RAW, which prevents users from accessing the files on the device. Thus, to resolve a RAW USB flash drive, you must take the first step to carry out a RAW USB data recovery and subsequently repair the RAW USB.
USB Flash Drive Becomes RAW — Symptoms & Reasons
Before showing what you should do, you may wonder: what causes the RAW USB drive, and what is the signal that USB becomes RAW? Here are some typical indicators of a RAW USB flash drive:
- The USB will indicate a RAW or unknown file system.
- The Windows device may fail to recognize the drive or show the RAW message when you connect the USB to your PC.
- The computer may present other error messages like “You need to format the disk before you can use it”, “Disk is not formatted. Do you want to format now?”, or “Sector not found.”
- The PC may indicate that you have 0 bytes used and 0 bytes free for your USB.
- …
There are various factors that can cause USB flash drives to become raw, as follows:
- Improper flash drive ejection: Improper flash drive removal can corrupt data if you eject the USB drive during a writing process.
- Physical damage: USB drives are also susceptible to physical damage from drops, extreme temperatures, moisture, and dust, which can lead to various issues, including the inability to access the drive, file corruption, and even complete data loss.
- Formatting issues: Disconnecting the USB during the formatting process or experiencing a power interruption can halt the procedure at such an unfortunate time that Windows may not be able to detect any usable data.
- Virus infection: Certain types of malware can corrupt the file system architecture, leading a USB flash drive to be recognized as RAW.
- File system incompatibility: Connecting a USB drive formatted with an unsupported file system to a Windows system may cause it to be displayed as RAW since Windows is unable to read that format.
- Corruption of the file system: Logical faults within the file allocation tables or directory structure can also result in your USB flash drive being identified as RAW.
When you encounter this problem, the first thing you should do is recover files from a RAW USB flash drive. Do not format it, even if your PC recommends it. Formatting the drive may overwrite your data, which could complicate or even prevent recovery.
3 Steps to Recover Data from a RAW USB Flash Drive on Windows
When it comes to recovering files from a RAW USB drive, MiniTool Power Data Recovery is the best option to consider. This professional and user-friendly RAW USB recovery software is designed for users of Windows 11/10/8/8.1, facilitating file recovery from a variety of storage devices, including USB drives, HDDs, SSDs, SD cards, and even CDs/DVDs.
For RAW USB drives, irrespective of whether the partition is missing entirely or the file system is corrupted, MiniTool Power Data Recovery can execute a thorough scan of the disk sectors to find any existing, lost, and deleted files. It accommodates all primary file systems like FAT32, NTFS, exFAT, and others. Furthermore, it recognizes a diverse array of file types, such as documents, photos, videos, audio files, and various other common data formats.
What adds to its user-friendly nature is not just its easy-to-navigate interface but also its free recovery limit. With the MiniTool Power Data Recovery free version, you can recover up to 1 GB of data at no cost.
MiniTool Power Data Recovery FreeClick to Download100%Clean & Safe
If you are not familiar with the RAW USB data recovery process, we provide easy-to-follow instructions on how to recover your files using MiniTool Power Data Recovery. Just follow.
Step 1. Connect and Scan the RAW USB Flash Drive
Make sure your RAW USB drive is properly connected to your computer. Once entering the main interface of MiniTool Power Data Recovery, the USB drive will be displayed under Logical Drives and marked with a USB icon. What’s more, as a RAW USB, it will be shown as Unidentified in this tool. Find it and click the Scan button on it to start scanning for files.
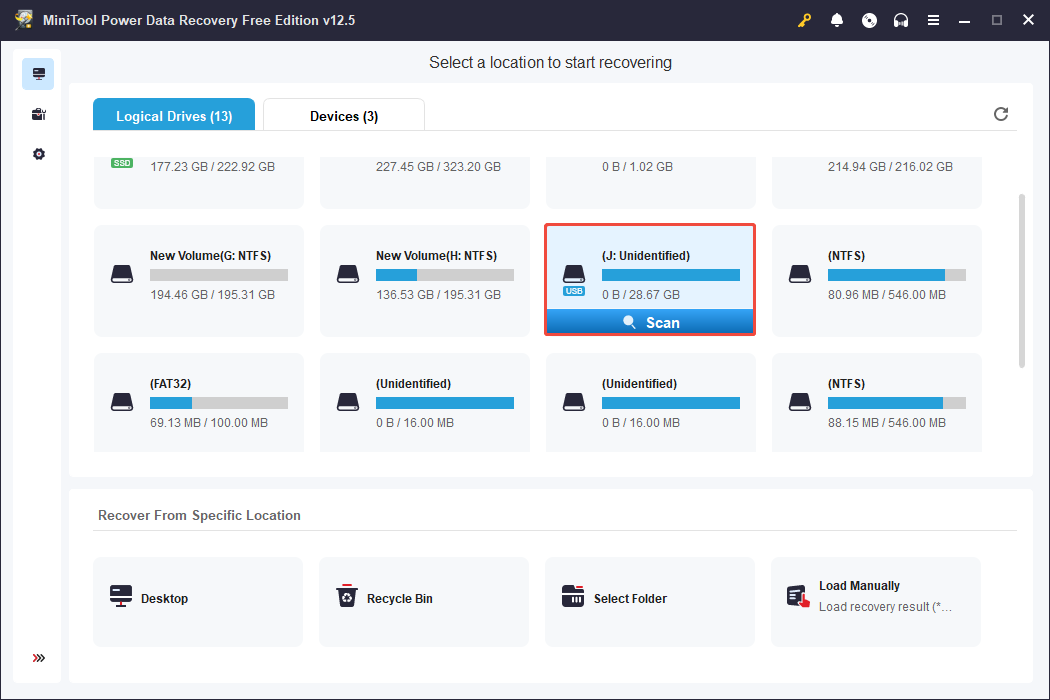
The software will thoroughly scan the USB drive for any files. You need to wait for the process to complete to ensure the best recovery results.
Step 2. Locate and Preview the Desired Files
Upon completing the full scan, you can browse through the resulting files to find the ones you need. To streamline this process and enable quicker file recovery, I will provide a detailed overview of several key features of this software. You can select the functions that best fit your particular circumstances.
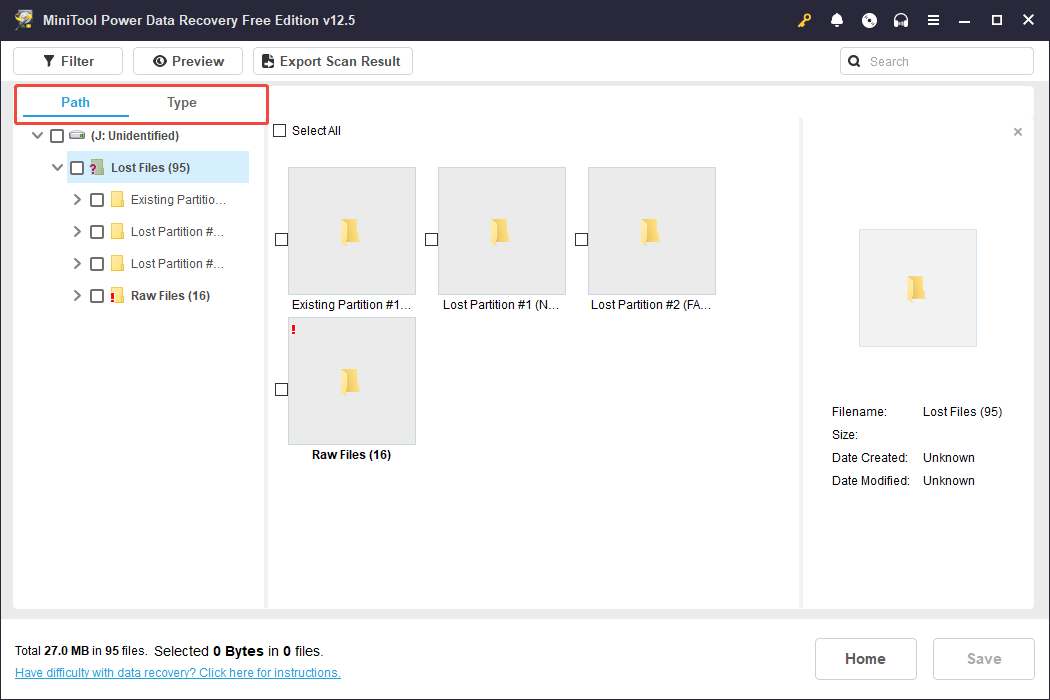
- Path: This is the default location where all detected or lost files are showcased. The files are organized in layers within a comprehensive tree file structure. However, depending on the reason your USB drive became RAW, numerous files might have lost their original organization and names, appearing uniformly under RAW Files.
- Type: Located next to Path, this category allows you to filter files by type, such as Document, Picture, Audio & Video, E-mail, etc., as well as by specific file formats like docx, xlsx, ppt, pdf, jpg, png, mp4, mp3, and others.
Additionally, you can right-click on any file in the display area on the right to alternate the file viewing mode between Change to List View and Change to Thumbnail View. Viewing files in thumbnail mode is particularly beneficial for recovering videos and photos.
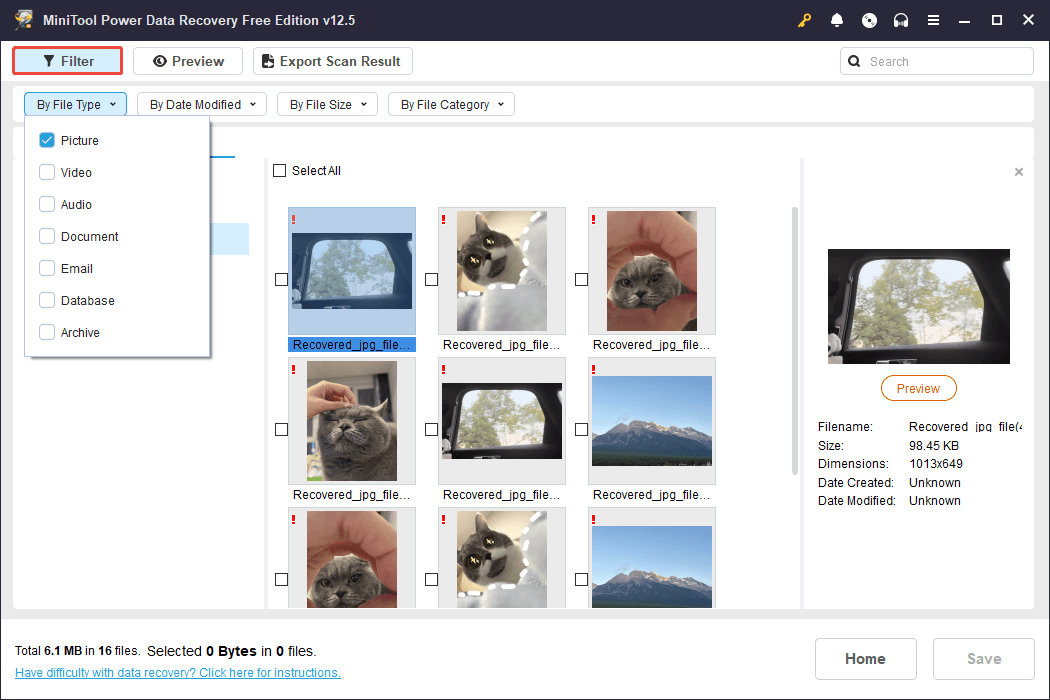
If you’re looking to view files based on both their type and their path, the Filter feature is ideal. It enables you to filter for specific file types while also setting additional necessary filtering criteria, such as file size, the date of last modification, and file category. Of course, it is recommended that you set all the conditions at once before starting to locate the target files to avoid repeated operations.
The Search feature utilizes the keyword you input in the search box to locate files and folders whose names include that keyword. Keep in mind that if files have lost their original names due to file system mistakes or other issues, they won’t be retrievable by this method.
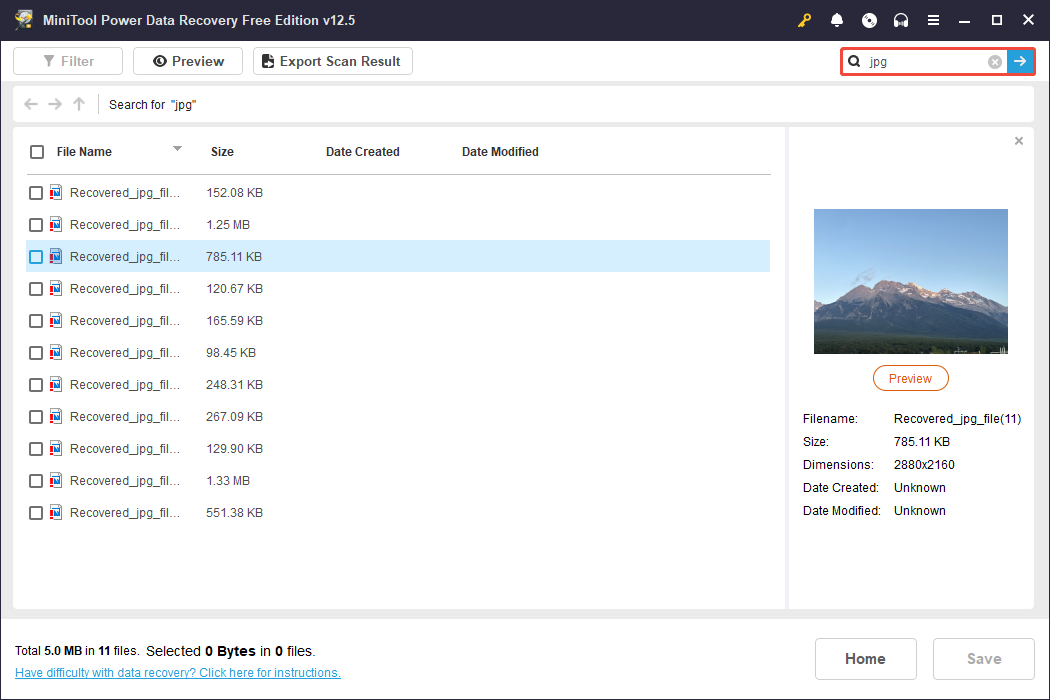
Previewing files before recovery is a crucial step to prevent restoring files that are unopenable or irrelevant. This software allows free previewing of most file types without limitations. You can preview a file by either double-clicking it or selecting it first and then clicking on Preview.
Step 3. Save All Wanted Files to Another Location
Finally, review the files and confirm that you’ve selected all the files you wish to recover. Next, click Save, select a secure location in the pop-up window, and click OK to initiate the saving process for the recovered files. It’s advisable not to save the recovered files back onto the original USB drive, as it requires repairs, and doing so could result in the overwritten data being lost.

It is worth noting that the free version of this tool only allows users to recover 1 GB of files for free. If the files that you want to get back are more than 1 GB, you can upgrade to the advanced edition.
How to Fix a RAW USB Flash Drive on Windows
After learning how to recover data from a USB flash drive, it is time to repair the RAW USB flash drive so you can keep using it later on.
Fix 1. Use the Error Checking Utility
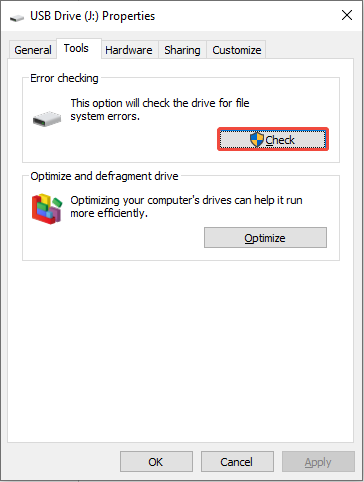
A simple method to repair a raw USB drive is by using the Error Checking utility via File Explorer. This application provides various tools that can assist in addressing minor problems that result in the raw condition. To check the device using File Explorer, follow the steps outlined below:
- Press Win + E to open the File Explorer and go to the This PC tab.
- Right-click your RAW USB and select Properties.
- Navigate to the Tools tab.
- Click the Check button under the Error checking section. The program will scan and fix issues.
You can run it multiple times to find all potential problems. If this doesn’t work, move on to the next solution.
Fix 2. Run CHKDSK
CHKDSK is a built-in tool in Windows designed to check and repair disk issues. It is commonly the second option for addressing RAW USB devices since it is free and can identify file system problems and fix bad sectors.
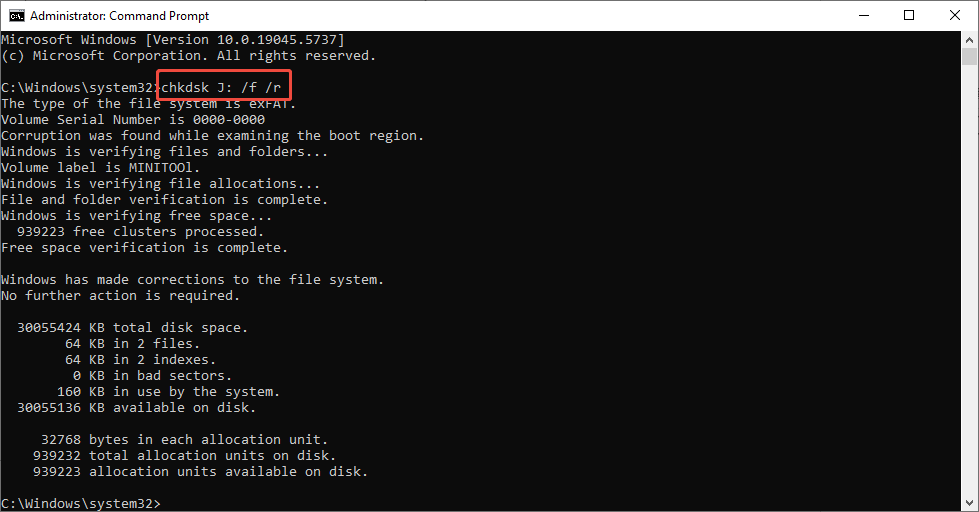
Step 1. Type cmd in the Windows search bar. When the Command Prompt appears, right-click on it and select Run as administrator.
Step 2. In the Command Prompt window, type chkdsk drive letter: /f /r and hit Enter to run it. Make sure to substitute the “drive letter” part with the actual letter corresponding to your USB drive.
Fix 3. Use Diskpart
Another method to resolve the RAW USB drive is to use the DiskPart tool to clean the USB volume and then create a new partition to replace the original one. After that, you will be able to format the drive. Follow the steps below to complete these tasks.
Step 1. Press Win + S to open the Windows search box and type cmd. When the Command Prompt option pops up, select Run as administrator under it.
Step 2. If you are prompted by the UAC window, click Yes to continue.
Step 3. In the Command Prompt window, type the following command lines and press Enter after each of them.
- diskpart
- list disk
- select disk x (you should replace x with the actual disk number of your USB drive)

Step 4. Type the command: clean and press Enter.
Step 5. Next, type the command: create partition primary and press Enter.
Step 6. Once see the “DiskPart succeeded in creating the specific partition” message, type the command: format fs=NTFS and press Enter to complete the formatting process.
Fix 4. Format the RAW USB
You can format your RAW USB to choose an appropriate file system by using the built-in features in Windows File Explorer.
Step 1. Plug the RAW USB drive into your computer.
Step 2. Access This PC/My Computer. Right-click on the RAW USB drive and choose Format.
Step 3. Change the file system, assign a new name to the USB drive, check the box of Quick Format, and then click Start to fix the RAW USB drive to NTFS/FAT32. After that, it can be used again.

Wrapping It Up
After reading this article, you may know how to recover data from a RAW USB flash drive and several ways to repair it. If the above methods fail, your USB flash drive may be severely damaged. Consider taking it to a professional repair center for data recovery and disk repair.
For any questions or suggestions regarding the use of MiniTool Power Data Recovery, you can feel free to contact us via [email protected]. Thanks in advance!
About The Author

Position: Columnist
Sandy became an English editor after graduation. She is devoted to finding effective solutions for diverse IT problems and provides articles on data recovery, data backup, and computer partitions and drives. In her spare time, she likes listening to music and playing games.
User Comments :