

You can format a hard drive or solid-state drive using File Explorer, Disk Management, DiskPart, PowerShell, or a third-party partition manager. If you accidentally formatted a disk, stop using it and use data recovery software to scan it for lost files.
Quick Answer: How Do You Format a Hard Drive
On Windows 11/10, the easiest method to format a non-system drive is File Explorer: open File Explorer > This PC, right-click the target drive, select Format, choose a file system, select Quick Format if appropriate, and click Start.
For drives that are not visible in File Explorer, use Disk Management. Advanced users can use DiskPart or PowerShell.
Back up important files before formatting. Formatting a partition can make its existing files inaccessible.
If a drive is inaccessible or mistakenly formatted, use data recovery software like MiniTool Power Data Recovery to recover files.
________________________________________________________________________________
A hard drive is used in computers or laptops to save various forms of data.
When installing a new hard drive or wanting to delete your drive entirely for that “fresh” sensation, formatting your drive will be necessary.
Formatting refers to the procedure of creating a file system on a volume or partition, enabling the operating system to save and access data on it.
A file system provides a method for structuring and accessing information stored on a hard drive or other forms of storage. It comes into existence when the volume is formatted.
However, before diving into the main instructions, let’s first talk about the most typical scenarios where formatting your hard drive is required.
When Do You Need to Format a Hard Drive?
Formatting a hard drive isn’t overly complicated, but doing it correctly is crucial. There are several scenarios where reformatting the hard drive becomes essential.
Let’s take a look at some common scenarios:
- Reinstalling the operating system: If you are planning to reinstall the OS, you will need to format the C Drive beforehand.
- Modifying the file system: When you need to change your hard drive’s file system, or the file system is incompatible, formatting is required.
- Creating a new partition: When establishing a new partition on your hard drive, you should format it before storing files.
- Virus infection: If your external hard drive has been attacked by a virus, you will need to format it before using it with an uninfected machine.
- External hard drive errors: When you connect your external HDD to the PC, error messages may pop up, like “You need to format the disk in drive X: before you can use it.” Typically, formatting the drive is the best solution to eliminate these error messages.
- Selling your device: If you intend to sell your old computer or laptop, it is necessary to format the hard drive.
No matter your reason for formatting your hard drive, the most important thing you need to take into account is determining which file system you will utilize.
Therefore, let’s explore which file system is the best choice.
What File System Can You Choose While Formatting a Hard Drive?
Operating Systems utilize file systems to save data on storage devices. If you are using Windows, NTFS is a suitable option.
There isn’t a universal file system that all hard drives share, so the file system used is determined by the drive and the Operating System of the computer.
Below, we have included a useful table to provide you with more information about these file systems you may want to consider.
| File System | Best For | Main Limitation |
| NTFS | Windows internal drives and Windows-only storage | Limited compatibility with some non-Windows devices |
| exFAT | External drives shared between Windows and macOS | Does not provide all NTFS features |
| FAT32 | Older devices and broad compatibility | Maximum individual file size is 4 GB |
| ReFS | Specific Windows editions and advanced storage scenarios | Not the default choice for ordinary Windows users |
How to Format a Hard Drive on Windows
If you want to format an external drive on Windows 11/10 or reformat an internal disk, you can utilize any of the methods below to partition it and establish a new file system.
Let’s jump into the specific and hassle-free methods to format a hard drive.
Way 1. From Windows File Explorer
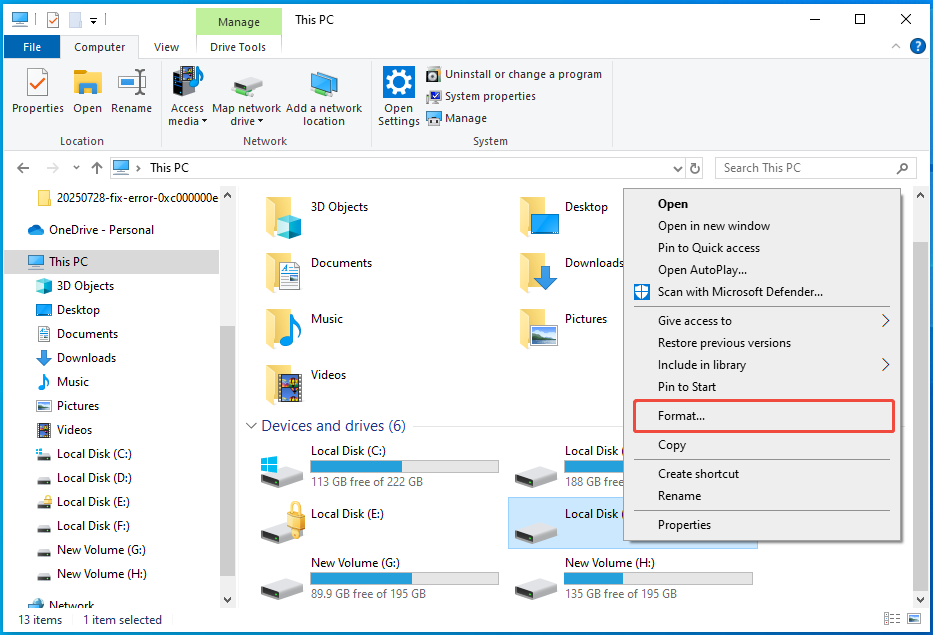
File Explorer offers the simplest method for formatting an HDD on Windows 11/10, as well as any other internal or external storage device. Here’s what to do:
Step 1. Press Win + E to open the File Explorer.
Step 2. Click on This PC. You will view all the drive partitions.
Step 3. Right-click on the partition you wish to format.
Step 4. Choose Format from the options presented.
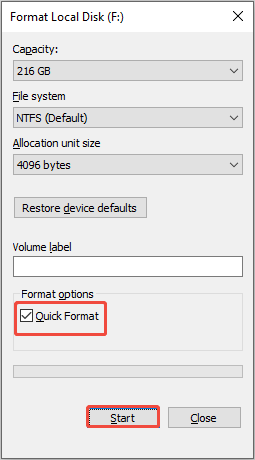
Step 5. Select the file system. If the drive is used within the Windows environment, opt for NTFS. For external drives, choose FAT32 or exFAT.
Step 6. Check the Quick Format option. This will only take a few seconds to complete the formatting process.
Step 7. Press Start and then click OK to confirm the formatting operation on the partition.
Quick Format vs. Full Format: What’s the Difference
| Quick Format | Full Format | |
| Speed | Much faster | Much slower |
| File system | Creates a new file system structure | Creates a new file system structure and performs additional disk processing |
| Existing data | May remain recoverable until overwritten | Recovery is generally much less likely |
| Best for | Normal reformatting of a healthy drive | Situations requiring a more thorough formatting process |
Way 2. Use Disk Management
You can utilize Disk Management to format a new hard drive on Windows or to reformat an existing one. This Windows tool is also great for deleting disks and creating new partitions.
Follow the instructions to format your internal or external hard drive using Disk Management:
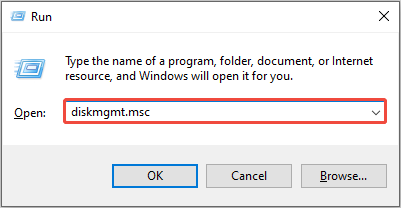
Step 1. Press Win + R together to open the Run command window.
Step 2. Type diskmgmt.msc and press Enter to access Disk Management.
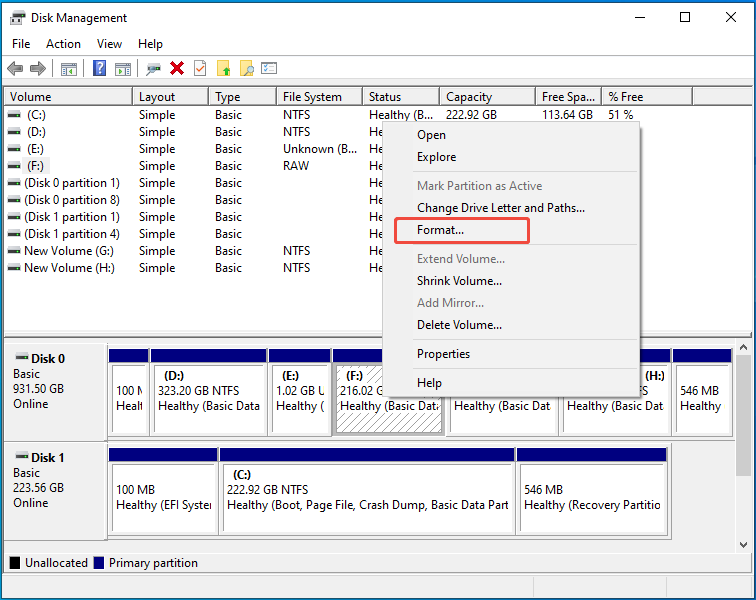
Step 3. Make sure it’s connected to your PC if it’s an external drive. Right-click on the selected disk and choose Format.
Step 4. Provide a name for the volume, select a file system, check the Perform a quick format option, and click OK.
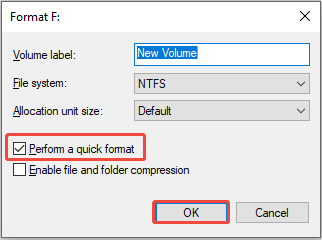
Step 5. Click OK in the pop-up window to finish the formatting operation.
Way 3. Use CMD
The DiskPart command-line tool for disk partitioning provides specific management capabilities for various computer drives, such as partitions, disks, virtual hard disks, and volumes. Utilizing DiskPart to format drives is an ideal option for advanced Windows users.
Just follow the steps outlined below carefully:
Step 1: Simultaneously press Win + R to open the Run window.
Step 2. Type diskpart in the window and then click OK.
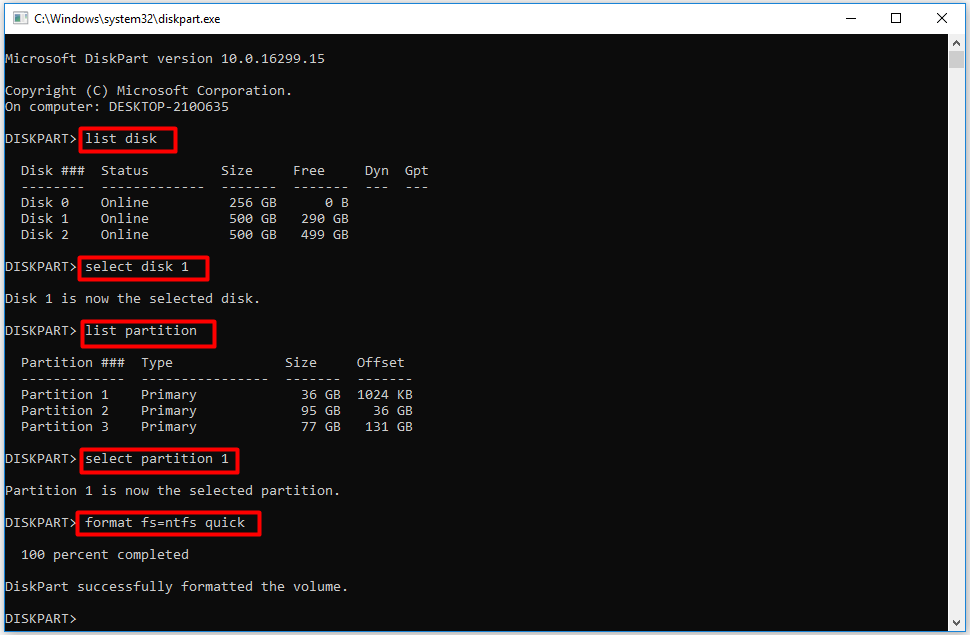
Step 3: Input a series of commands on the DiskPart screen. Press the Enter key after typing each command. The commands to be entered are as follows:
- list disk
- select disk X (X stands for the drive you want to format)
- list partition
- select partition X (X stands for the partition you want to format)
- format fs=ntfs quick
Way 4. Use PowerShell
PowerShell is a command-line shell and scripting language designed for managing system configurations and automating various tasks, among other applications.
To format a new hard drive on Windows 11/10 using PowerShell, follow these steps:
Step 1. Type PowerShell in the Windows search bar and choose Run as administrator.
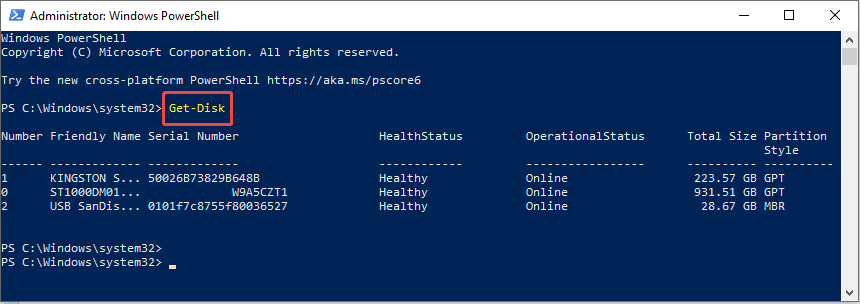
Step 2. Execute the Get-Disk cmdlet to view all connected drives.
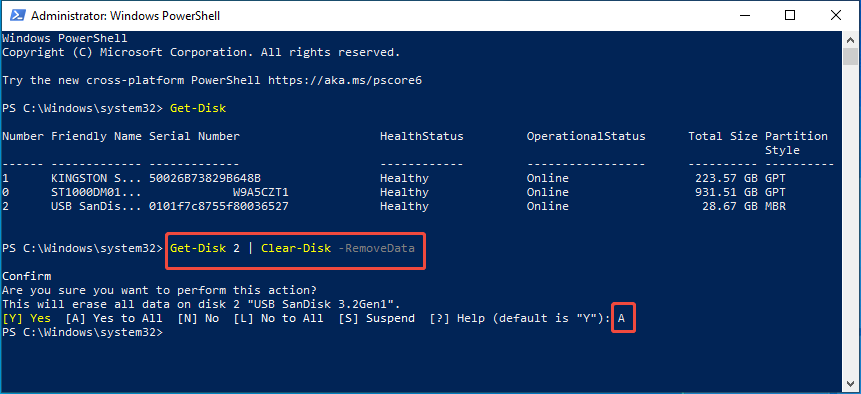
Step 3. To erase data before formatting unless the disk is new, run this cmdlet while replacing “2” with the appropriate number: Get-Disk 2 | Clear-Disk -RemoveData. Confirm by typing A and hitting Enter.
Step 4. Type this cmdlet to get the disk ready for formatting and press Enter: Initialize-Disk -Number 2 (substituting with your disk’s number).
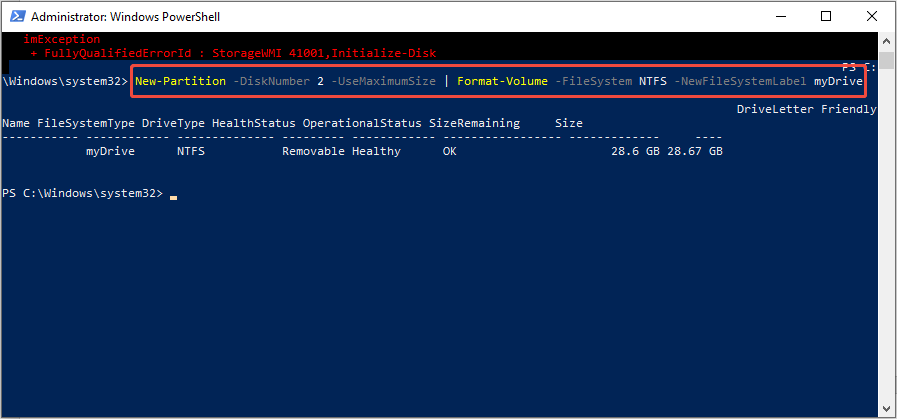
Step 5. To format your drive, use this cmdlet: New-Partition -DiskNumber 2 -UseMaximumSize | Format-Volume -FileSystem NTFS -NewFileSystemLabel myDrive. Make sure to use the right number; you can change NTFS to another file system and myDrive to a different label.
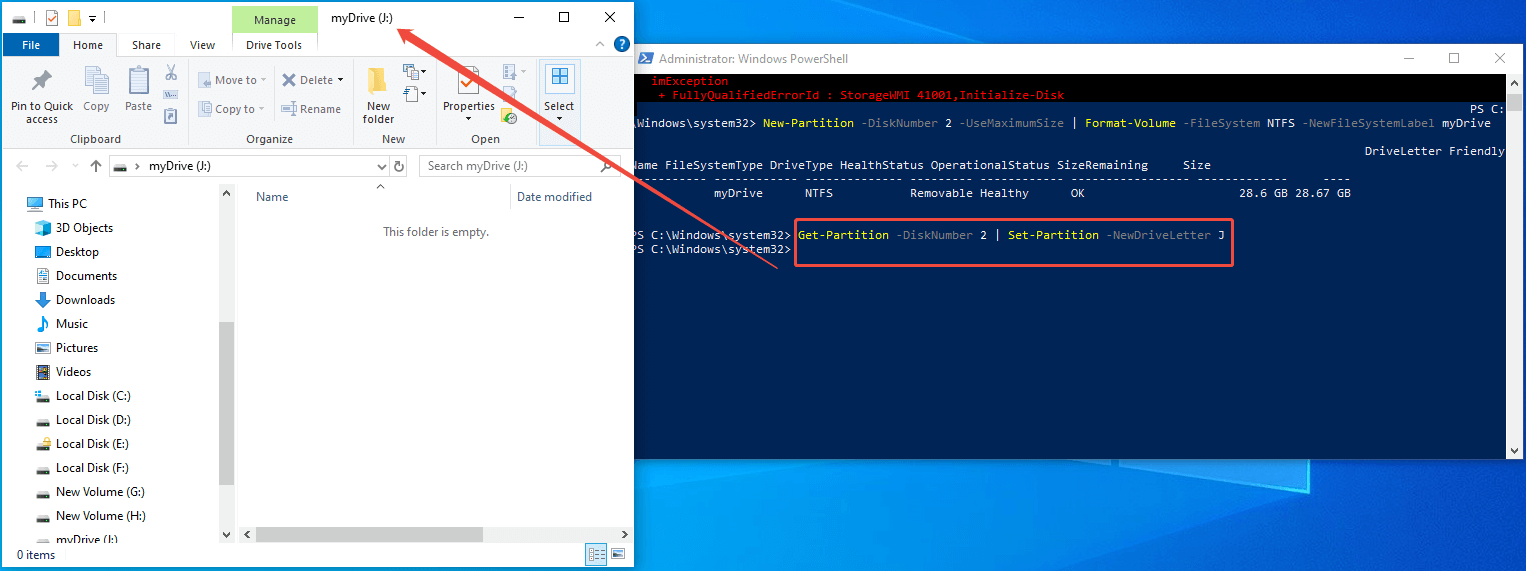
Step 6. Finally, run this cmdlet to assign a new drive letter: Get-Partition -DiskNumber 2 | Set-Partition -NewDriveLetter J (select any available letter).
Way 5. Use MiniTool Partition Wizard
Formatting an internal or external hard drive is quite easy using MiniTool Partition Wizard. This is a professional partition management tool that supports formatting a hard drive to NTFS, FAT32, exFAT, or other file systems.
MiniTool Partition Wizard FreeClick to Download100%Clean & Safe
Here’s how to format a hard drive using MiniTool Partition Wizard.
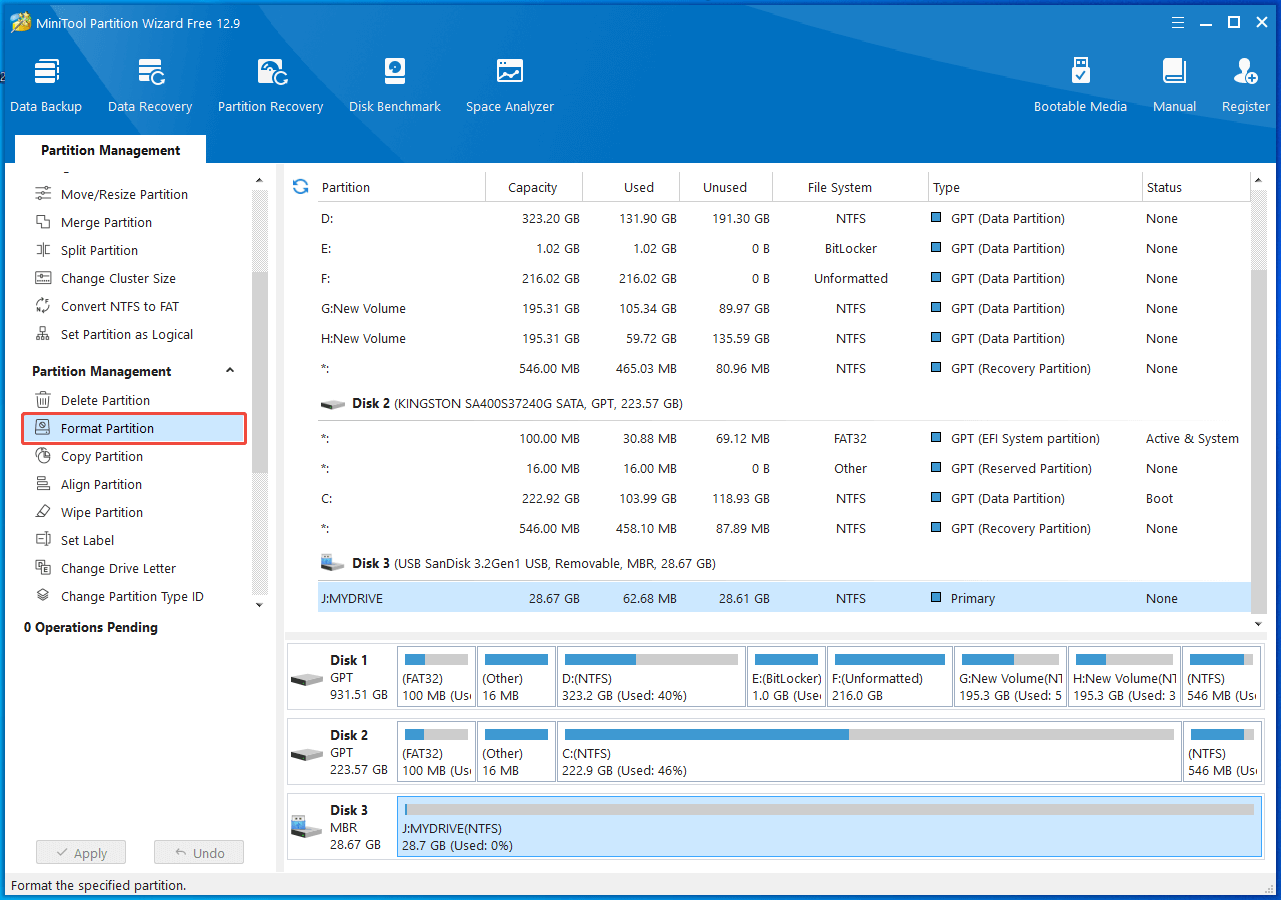
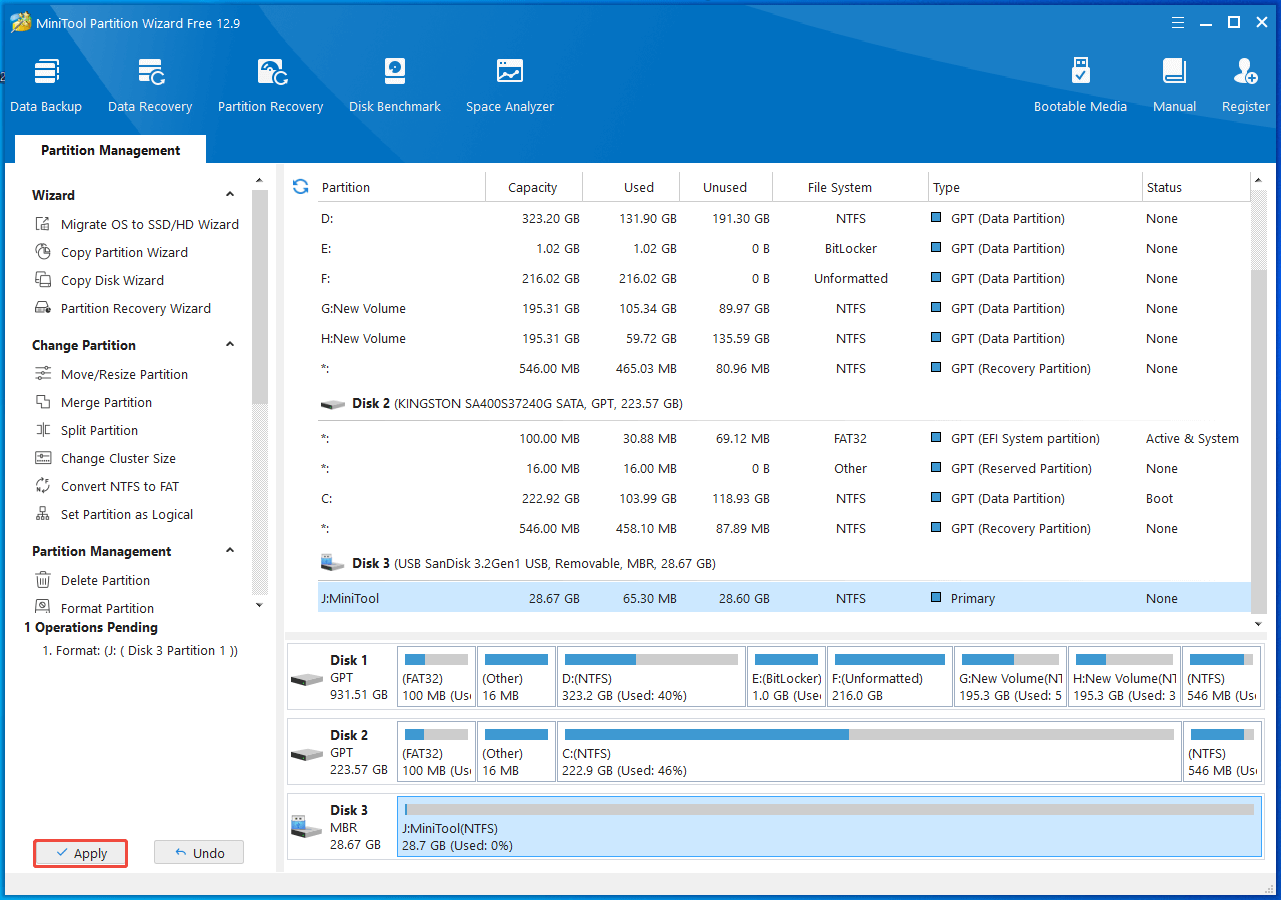
Step 1: Open MiniTool Partition Wizard to access its main interface. Select the hard drive you wish to format and then click on the Format Partition option in the action panel.
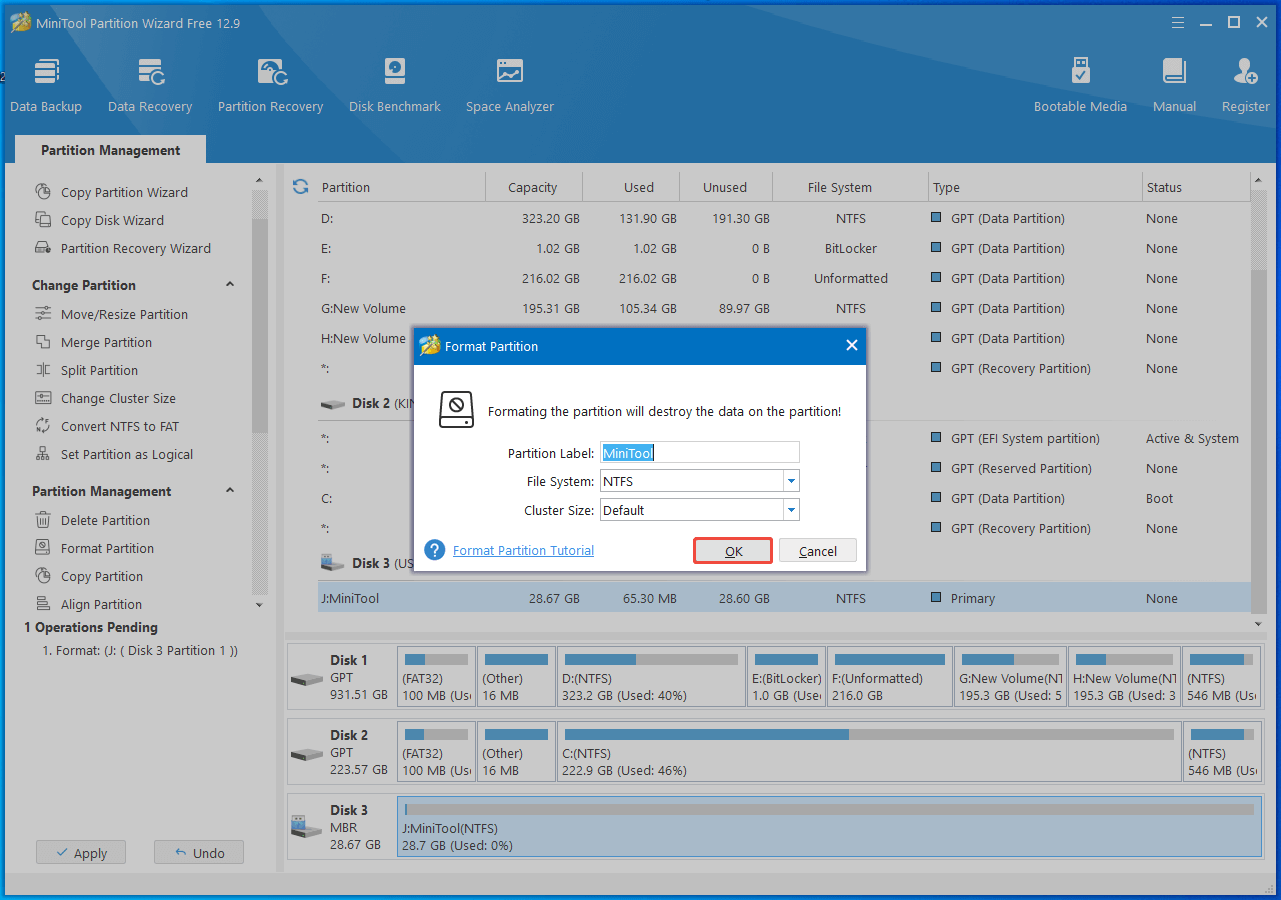
Step 2: After specifying the partition label and the desired file system, click the OK button to proceed with the process.
Step 3: Lastly, click Apply to carry out the pending operation.
How to Change FAT32 to NTFS Without Formatting
The Convert command available in Windows allows you to switch the file system of a volume from FAT or FAT32 to NTFS without the need to format the volume or risk losing any data. Here’s how to utilize it:
Step 1. Press the Windows + X keys to open the Power User menu and select Windows PowerShell (Admin) from the list.
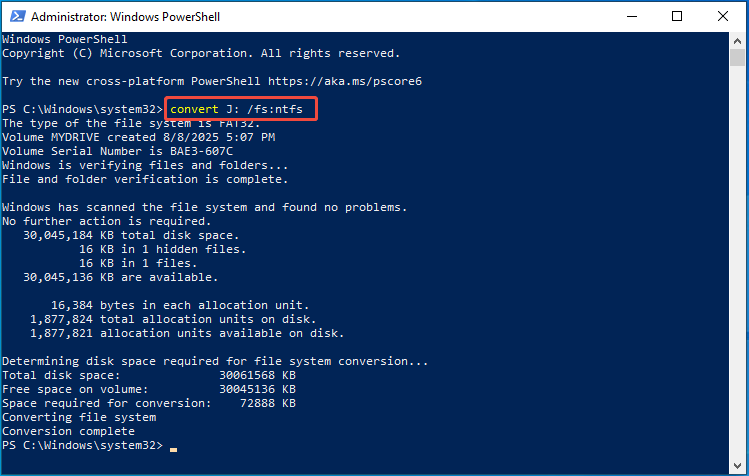
Step 2. Type the following command to change a FAT or FAT32 drive to NTFS: convert x: /fs:ntfs (ensure to replace ‘x:’ with the letter assigned to your hard drive)
Step 3. Press Enter to initiate the conversion process.
In addition, MiniTool Partition Wizard supports converting FAT to NTFS (free) or converting NTFS to FAT (paid) without losing data.
MiniTool Partition Wizard FreeClick to Download100%Clean & Safe
How to Recover Data from a Formatted Hard Drive
After formatting your external/internal hard drive, you can find that it is empty. To recover files from a formatted hard drive, MiniTool Power Data Recovery can assist.
It is a data recovery software intended for Windows users to recover files from various storage devices, such as hard drives, SSDs, USB flash drives, SD cards, CDs/DVDs, and more.
It is capable of recovering a diverse array of file types, including documents, photos, videos, audio files, emails, archives, and others.
The software provides a free edition, but it only permits the recovery of up to 1 GB of data without cost. If you only need to recover a handful of files, the free edition should suffice. However, for recovering more than 1 GB, you will have to upgrade the software.
MiniTool Power Data Recovery FreeClick to Download100%Clean & Safe
Follow these steps below to recover your files from the hard drive.
Step 1. Select the Internal/External Hard Drive to Scan
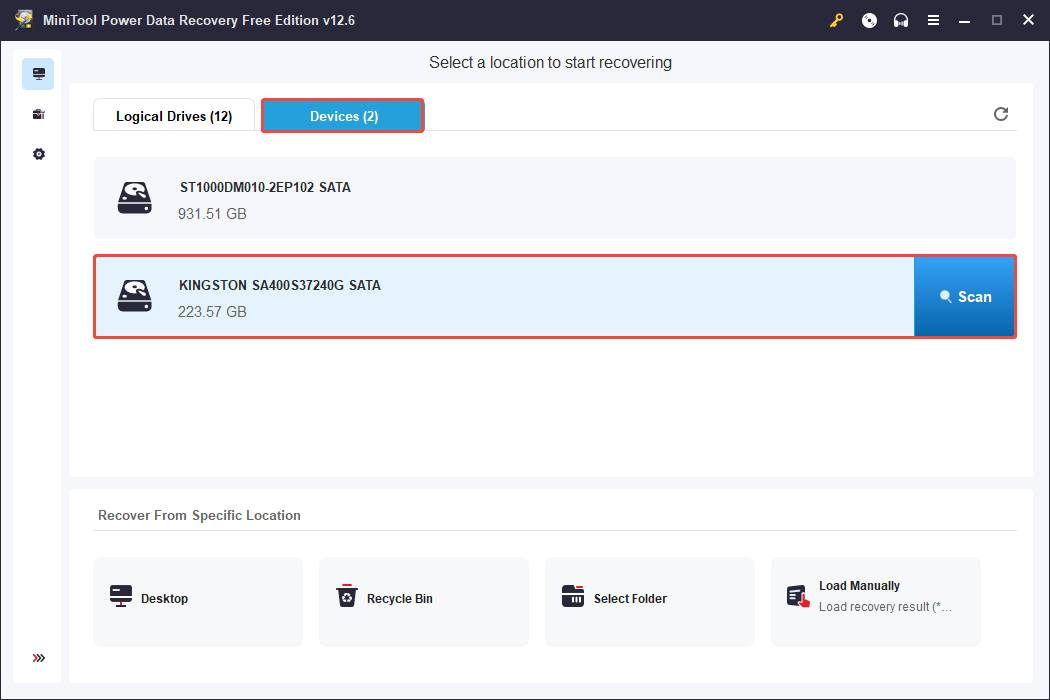
Launch the application. In the main interface, you should find the partitions for your external/internal hard drive displayed in the Logical Drives section.
To scan the whole hard drive, you can switch to the Devices tab. From there, select the drive from which you want to recover files and click Scan.
Step 2. Find and Preview Required Files
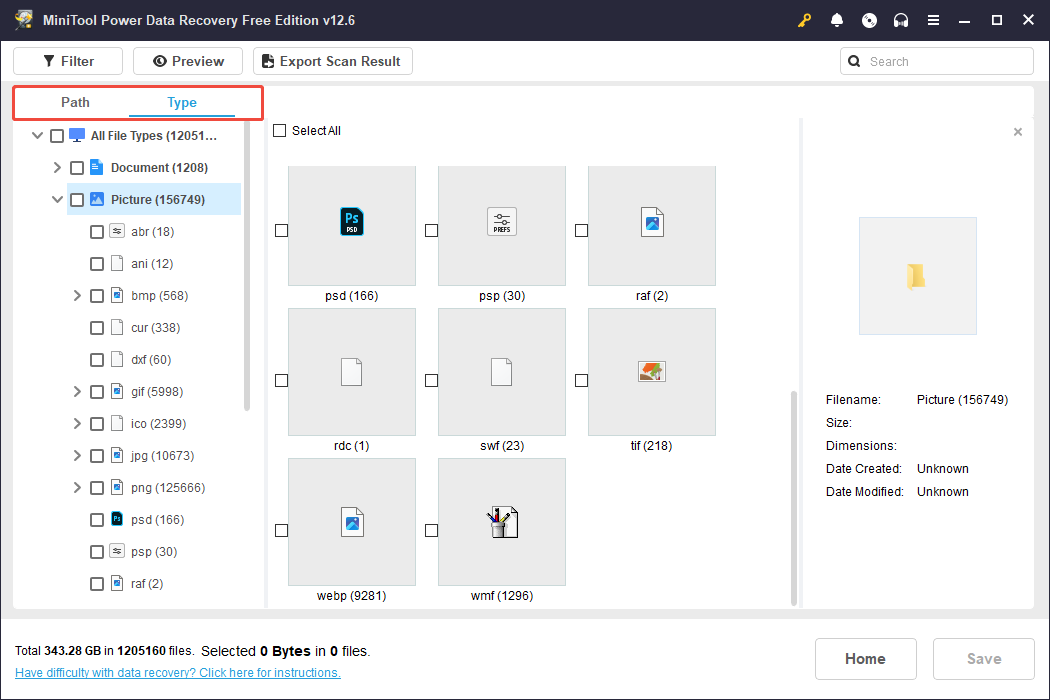
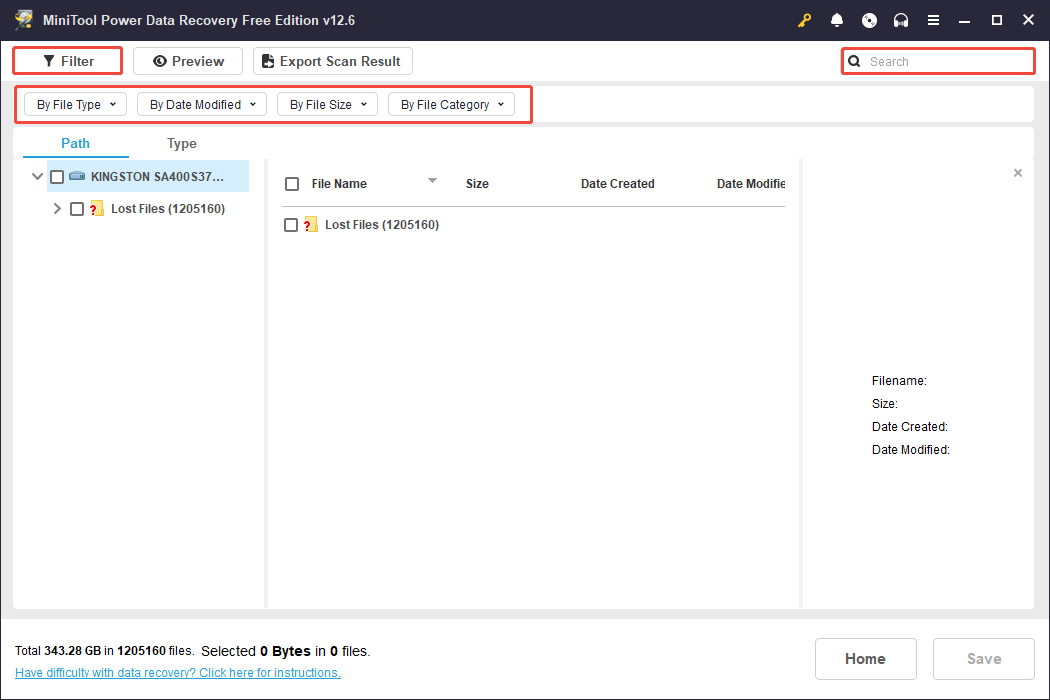
After the scan has finished, you can begin searching for the files you wish to restore. The MiniTool data recovery tool provides two ways to view files: Path and Type.
- In the Path view, you can expand directories to see your files organized by their original folder structure.
- In the Type view, you can explore your files categorized by their type and format. To recover photos, you should concentrate on the Picture section found under All File Types.
Moreover, the Filter and Search features can also help you find your files faster.
- Filter: Filter out unwanted files by file type, file modification date, file size, and file category.
- Search: Input keywords of your file name in the search box and press Enter to search for it.
Step 3. Save Desired Files
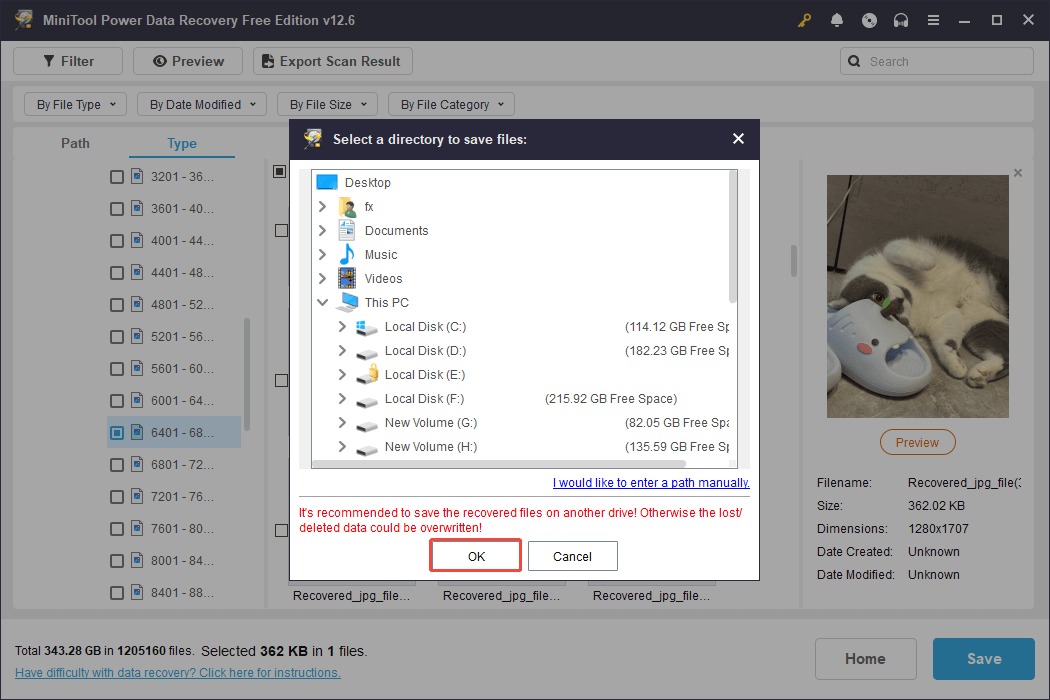
Ensure that all the files you wish to recover are selected. Then, click the Save button located in the bottom right corner. In the pop-up window, choose a secure location and click OK to save them.
Wrap Up
Now you should know how to format a hard drive on Windows, whether it is internal or external. You can choose to format your drive from the File Explorer, Disk Management, use CMD, PowerShell, or a third-party formatter.
After formatting your hard drive, you can try using the professional and robust data recovery tool – MiniTool Power Data Recovery, to recover your formatted drive data.
If you encounter any problems or have any questions about MiniTool software, please send an email to the support team via [email protected].
Format a Hard Drive FAQs
Whether to format your hard drive as FAT32 or NTFS on Windows 11 depends on the storage size of your drive. FAT32 can handle volumes with a maximum size of 32 GB and files no larger than 4 GB. In contrast, NTFS supports volumes up to 256 TB and files that can reach 18 EB. Additionally, NTFS offers features like file compression, encryption, and access permissions.
About The Author

Position: Columnist
Shirley holds a bachelor’s degree in English and has been an editor at the MiniTool Team for many years. She specializes in IT-related content, with a focus on data recovery, file backup, disk management, and other technical topics. She is committed to delivering clear, accurate, and practical solutions to help users resolve common computer issues.
User Comments :