Quick Answer: Can You Recover and How to Recover InDesign Files
Yes, InDesign files (with the .indd extension) can often be recovered even after deletion, crashes, formatting, or unexpected shutdowns. Adobe InDesign automatically creates temporary recovery data.
Additionally, permanently deleted INDD files may still be restored using professional data recovery tools. Here are the fastest ways to recover InDesign files:
- Recover unsaved work from the InDesign AutoRecover folder
- Restore deleted INDD files from the Recycle Bin
- Recover previous versions from backups or Creative Cloud
- Use data recovery software to recover lost InDesign project files
When Can InDesign Files Be Recovered?
The chances of getting the InDesign file back depend heavily on how it was lost. Here is the breakdown of when you can breathe a sigh of relief and when you might need to start bracing yourself for a redo.
Files can be recovered if:
- The INDD file was recently deleted and has not been overwritten by new data.
- Adobe InDesign crashed, or the computer shut down before the file was saved properly.
- AutoRecover files, temporary files, or cache data still exist.
- Backup copies, previous versions, or Creative Cloud history are available.
- The file was lost from an external hard drive, USB flash drive, or SD card that is still recognized by Windows.
- The storage device is accessible and does not have severe physical damage.
Files are hard to recover if:
- You manually closed the file and selected Don’t Save.
- The InDesign Recovery folder, temporary files, or backups were deleted or cleared by cleanup software.
- The deleted INDD file was overwritten, securely erased, or affected by SSD TRIM.
- The drive was heavily used or reformatted multiple times after data loss.
- The INDD file has severe corruption that prevents Adobe InDesign from reading it.
- The storage device has serious file system corruption or physical damage.
- The original file was renamed or moved while InDesign was crashing, causing recovery data inconsistency.
Method 1. Recover Unsaved InDesign Files (Auto Recovery)
Best for: InDesign crashes or unexpected shutdowns
InDesign features a built-in Auto Recovery tool that automatically creates temporary files every minute. Thus, if your application crashes or the power cuts out, simply recover lost InDesign documents via InDesign Auto Recovery.
When you relaunch InDesign after a crash, a recovery prompt appears. Click Yes to restore your document. The restored file will display [Recovered] in its title bar.
If the automatic prompt does not appear, do the following steps to find it:
- In InDesign, go to Edit > Preferences > File Handling.
- Look for the Document Recovery Data section and click Browse.
- Open the folder to find your unsaved data. It usually features a pre-crash timestamp.
- Open the recovered file and save it immediately.

Method 2. Recover InDesign Files from Temporary Files
Best for: Files not saved but temporary data exists
Windows may also store temporary copies in the Temp folder. Therefore, search the Windows temp folders to recover unsaved InDesign files.
If the automatic prompt fails to appear:
- Press Win + E to open File Explorer.
- Search for .tmp files.
- Locate files related to InDesign.
- Rename the file extension to .indd.
- Try opening it in InDesign.
Method 3. Restore Deleted InDesign Files from Recycle Bin
Best for: Recently deleted files
Recycle Bin is a built-in Windows tool that retains deleted files until the bin is emptied or the storage limit is reached. Thus, if you accidently deleted an InDesign file, the easiest way to recover it is to check the Recycle Bin.
Step 1. Double-click the Recycle Bin icon on the desktop.
Step 2. Look for files with the following extensions:
- .indd
- .idml
- .indt
Step 3. Once you find the deleted InDesign file, right-click the file and select Restore. Then, Windows will return the file to its original folder automatically.
After restoration, open the recovered file in Adobe InDesign and check whether the document content is complete. Next, save a new copy of the file to avoid accidental overwriting or deletion.
Method 4. Recover InDesign Files via MiniTool Power Data Recovery
Best for: Files deleted permanently or lost after formatting
Even after deletion, files often remain on the disk until overwritten. A recovery tool can detect and restore them.
Thus, if your InDesign file is permanently deleted, lost after formatting, or missing from the Recycle Bin, use MiniTool Power Data Recovery to scan the drive and recover deleted InDesign documents.
This secure data recovery software perfectly fits all Windows operating systems and is capable of carrying out file recovery tasks regardless of the file format. Here’s how to use it to recover deleted files:
Test Environment:
- OS: Windows 10 22H2
- File System: NTFS
- Storage Device: KINGSTON SSD (TRIM disabled).
- Test File Type: Some files with .indd extensions.
- File Loss Scenario: File deletion by pressing Delete.
Recovery Steps:
Step 1. Download and install MiniTool Power Data Recovery on your computer.
MiniTool Power Data Recovery FreeClick to Download100%Clean & Safe
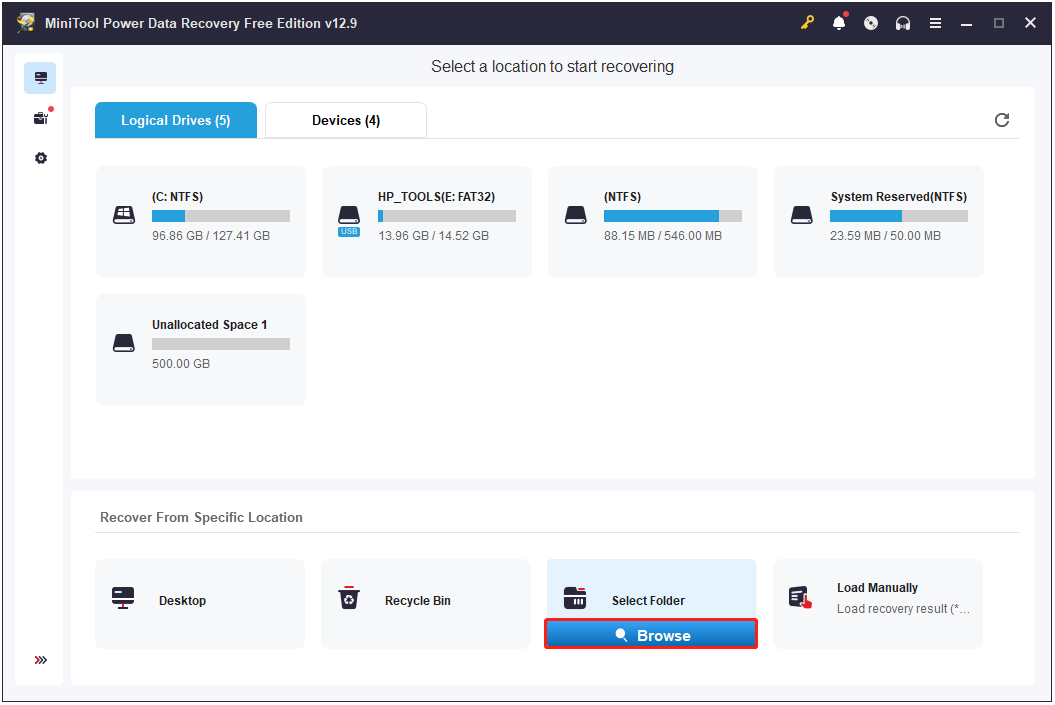
Step 2. Launch this software, move your cursor to Select Folder, and click Browse.
Step 3. Navigate to the folder you want to scan, select the folder, and click Select Folder to confirm.
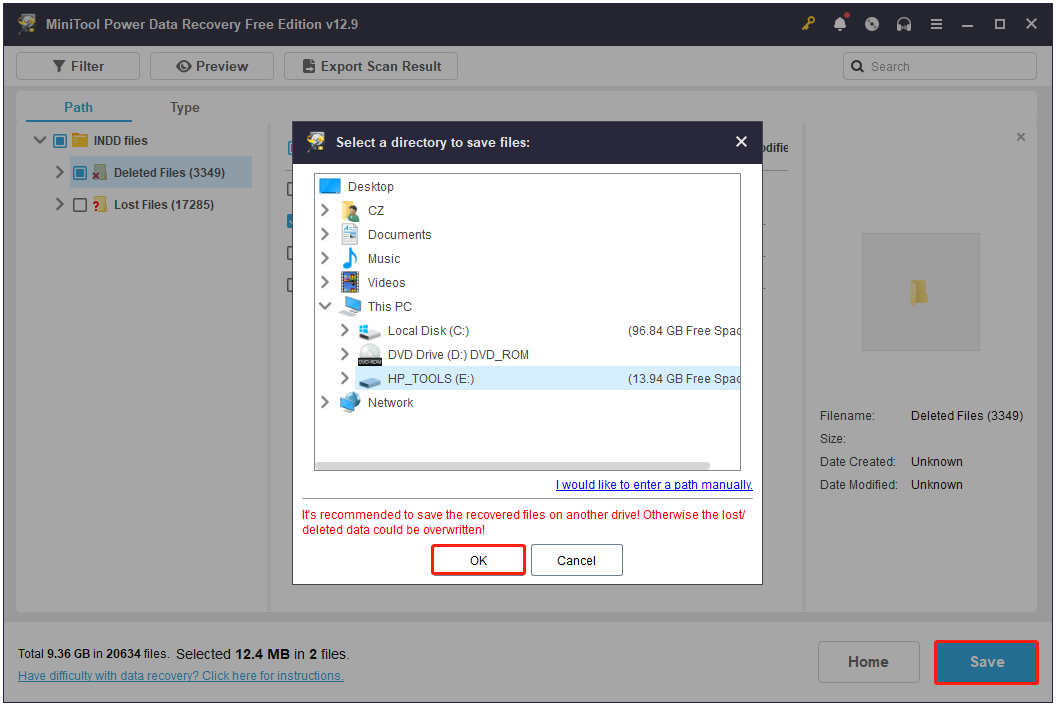
Step 4. Once the scan process is complete, select the required INDD files and click Save. Then, choose a save path that is different from the original one and click OK to confirm.
The free edition limits recovery to 1GB of files. Exceeding this limit requires a software upgrade to complete the InDesign file recovery. Visit the License Comparison page to select an edition that fulfills your requirements.
Conclusion:
Tests demonstrate that MiniTool Power Data Recovery excels at restoring INDD files from SSDs with TRIM disabled. Because the free edition limits data recovery to 1GB, it is best suited for restoring a small number of files at no cost.
Method 5. Recover Previous Versions (Windows File History)
Best for: Overwritten or modified files
If you have enabled Windows Backup or File History before the InDesign file is overwritten or modified, Windows may let you restore the previous version of the InDesign file or folder.
Step 1. Open File Explorer and navigate to the folder that contains your InDesign files.
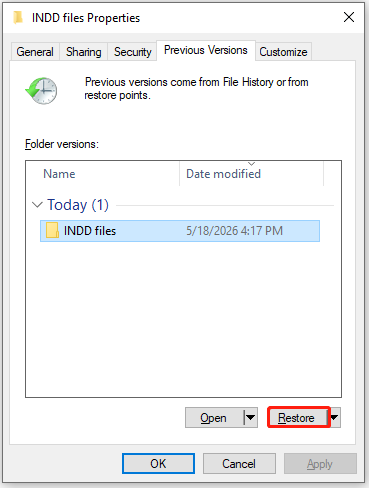
Step 2. Right-click your INDD file/folder and select Properties.
Step 3. Click the Previous Versions tab.
Step 4. Select a version with a timestamp you prefer and click Restore.
Once done, launch Adobe InDesign, open the restored .indd file to ensure the layout opens correctly.
Method 6. Recover from Backup (Cloud or Local)
Best for: Users with backups
If you have backed up your InDesign files in cloud storage (Adobe Creative Cloud, OneDrive, etc.) or local storage, recovering an InDesign file from a backup is available.
# 1. Recover InDesign files from Adobe Creative Cloud
Step 1. Open the Creative Cloud desktop app or log in to the web portal.
Step 2. Navigate to Files and select Your files or Cloud documents.
Step 3. Find the .indd file you need, click the three dots next to it, and then select Version History.
Step 4. Find the timestamp you need, click the three dots, and choose Restore to this version or Download.
# 2. Recover InDesign files from Third-Party Cloud Services (OneDrive, Google Drive, Dropbox)
Here I task Google Drive as an example:
Step 1. Log in to your Google Drive account via a web browser.
Step 2. In Google Drive, select My Drive from the left.
Step 3. Open the folder where the InDesign file was stored. Additionally, check these paths:
- Trash
- Version history
Step 4. Select a safe, pre-loss file version and click Download.
# 3. Recover InDesign files from Local Backup
Step 1. Connect the backup device.
Step 2. Open the backup folder or backup application.
Step 3. Locate the InDesign project file.
Step 4. Copy or restore the file to your computer.
Step 5. Open the recovered file in Adobe InDesign.
Method 7. Fix Corrupted InDesign Files
Best for: Files that won’t open
If the InDesign files are corrupted on your computer, try these fixes to bypass corruption issues:
- Open the file as a copy
- Export or open as IDML format
- Reset InDesign preferences
- Check for problematic fonts, images, or links
- Move pages into a new document
Here’s the detailed breakdown:
# 1. Open the file as a Copy
Opening a copy often bypasses the corruption trigger. Thus, in InDesign, go to File > Open > select your file > Open Copy. This creates an Untitled version you can save as a new file.
# 2. Export or Open as IDML/INX Format
IDML/INX formats remove hidden corruption.
- If the file opens: Click File > Export > InDesign Markup (IDML). Then, reopen the IDML > Save as new INDD.
- If the file opens only on another computer: Try opening on a different OS. Then export to IDML/INX.
# 3. Reset InDesign Preferences
Corrupted preferences can prevent files from opening. Therefore, do the following steps to restore the ability to open previously corrupted files.
- Relaunch InDesign.
- Immediately hold: Ctrl + Alt + Shift.
- Click Yes when asked to delete preferences.
# 4. Check for Problematic Fonts, Images, or Links
A single bad asset can corrupt the whole file. Try these tips to repair corrupted files:
- Remove any recently added fonts or images.
- Check for missing or broken links.
- Remove damaged EPS or PSD assets.
- Clear unused swatches and styles.
- Open an older backup to identify the changes.
# 5. Move Pages into a New Document
Corruption typically occurs in a specific instance, such as a single page, an object, or a master page. Moving pages into a new document may also help to fix corrupted InDesign files.
Step 1. Create a new blank document.
Step 2. Open the damaged file, go to Pages Panel > Move Pages.
Step 3. Transfer pages in small batches. If InDesign crashes during transfer:
- Identify the problematic page
- Rebuild only that section manually
Scenario-Based Recovery Guide
| Situation | Best Method |
| InDesign crashed | Auto Recovery |
| File not saved | Temp files |
| File deleted | Recycle Bin |
| File permanently deleted | MiniTool Power Data Recovery |
| File overwritten | Previous Versions |
| File corrupted | Repair methods |
Pro Tips to Prevent InDesign File Loss
Although InDesign file recovery is often possible through autosave, backups, or recovery tools, severe corruption and overwrite scenarios may still lead to permanent data loss. The following best practices can help protect InDesign projects and minimize future recovery risks.
- Save incremental versions instead of overwriting the same file repeatedly.
- Export IDML backups regularly for easier recovery and compatibility.
- Use automatic cloud or local backups to protect important projects.
- Avoid editing files directly from USB drives or network locations.
- Keep fonts, plugins, and InDesign updated to reduce corruption risks.
- Monitor SSD/HDD health and maintain enough free disk space.
- Save frequently during long editing sessions.
- Use the “Package” feature before transferring or archiving projects.
Recover InDesign Files FAQ
However, if InDesign crashes repeatedly, these files stay in the recovery folder until overwritten or manually removed. On some systems, temporary data can persist for days or weeks if the app never completes a clean startup.
It shrinks or expands the frame to match the exact dimensions of the content inside. This eliminates the need to manually resize frames using your mouse.
Conclusion
Losing an InDesign project does not always mean the file is gone forever. Whether the file is unsaved, accidentally deleted, corrupted, or lost after a crash, there are still multiple ways to recover InDesign files on Windows.
This guide covers solutions like built-in recovery, backup restoration, and MiniTool Power Data Recovery for data loss. To maximize success, stop using the affected drive immediately and start recovery promptly.
If you encounter any issues or have any suggestions while using the MiniTool software, please contact [email protected].
User Comments :