

This guide explains how to recover deleted or unsaved Word documents on Windows. It covers built-in tools like Ctrl + Z, Recycle Bin, AutoRecover, and File History, as well as free data recovery software. It also provides practical tips to prevent future data loss.
Quick Answer:
The methods to recover Word documents vary depending on how they were lost.
1. Recently deleted Word files
If the file was deleted recently, you can restore it from the Recycle Bin or use Ctrl + Z to undo the deletion.
2. Permanently deleted files
If the file is permanently deleted, you will need to use data recovery software or restore it from backups.
3. Unsaved Word documents
If the document was not saved, use Word’s AutoRecover feature to retrieve it.
_______________________________________________________________________________
Many users lose Word documents due to accidental deletion or computer shutdowns. The good news is that deleted and unsaved Word files can often be recovered. This guide shows reliable methods to restore Word documents in different situations.
How to Recover Deleted Word Documents on Windows
Word documents can be lost due to various reasons, including mistaken deletion, virus infection, device formatting, and more. Sometimes, you can recover deleted Word documents easily with Windows utilities, whereas you need to seek help from professional tools in some cases.
This section will show you different approaches to recover deleted Word documents in different scenarios.
#1. Undo Document Deletion Using Ctrl + Z
If the Word document was deleted just recently, Windows may still keep the action in the current session history. In this case, you can restore it immediately using the built-in undo shortcut.
This approach is effective when:
- No new operations overwrite the undo history
- No system restart has occurred after document deletion
- The file was not deleted by using Shift + Delete
Steps to recover deleted Word documents:
Open the folder where the Word document was originally stored and press Ctrl + Z on your keyboard.
Wait a moment and check if the deleted file reappears.
#2. Recover Deleted Word Documents from Recycle Bin
For Windows computer users, files deleted from the internal hard disk will be sent to the Recycle Bin and kept in this folder in case of recovery in the future.
Therefore, you can easily restore deleted Word documents there.
This method works when:
- The file was deleted normally (not Shift + Delete)
- The file was deleted from an internal hard disk (not a USB drive or external hard drive)
- The Recycle Bin has not been emptied
- The file size does not exceed the Recycle Bin limit
Steps to recover documents from the Recycle Bin:
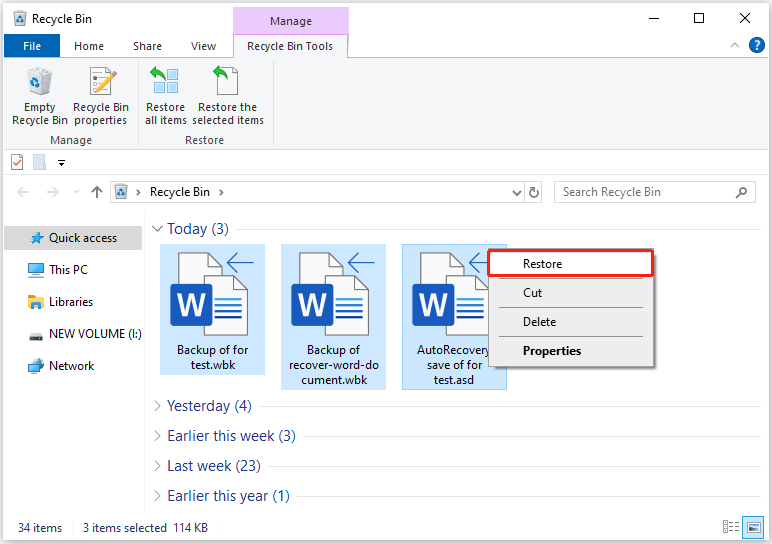
Open the Recycle Bin from the desktop and locate the target Word documents.
Once found the files, select them and right-click to choose Restore. Files will be recovered to the original file path.
#3. Recover Deleted Word Documents with MiniTool Power Data Recovery
If you delete documents from external devices, such as USB drives, SD cards, external hard drives, memory sticks, etc., you are unable to find them in the Recycle Bin as well.
Those documents are permanently removed from the device. But you can recover permanently deleted files with the help of professional data recovery software like MiniTool Power Data Recovery.
This Word document recovery software helps to restore Word or Excel files deleted from diverse devices as long as the data is not overwritten.
This tool also supports recovering files deleted from internal hard drives and the Recycle Bin.
Download MiniTool Power Data Recovery and follow the steps below to recover 1 GB of Word documents for free:
MiniTool Power Data Recovery FreeClick to Download100%Clean & Safe
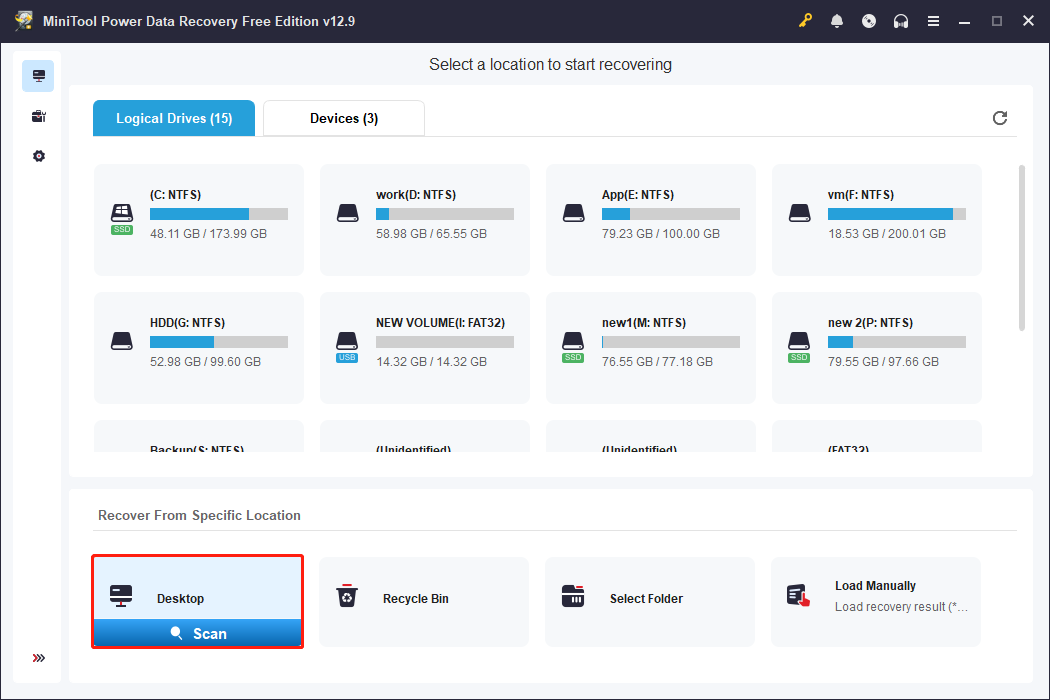
Step 1. Launch the software. In the main interface, you need to choose the partition where the lost documents were stored and click Scan.
The scan duration may take a few minutes to an hour depending on disk size, disk condition, and the amount of data. Wait until the process is complete.
Step 2. On the result page, files are listed according to their paths. Finding the required files by expanding those folders layer by layer can be a tiresome task, especially when there are numerous files. You can use features like Filter and Search to locate the desired items quickly.
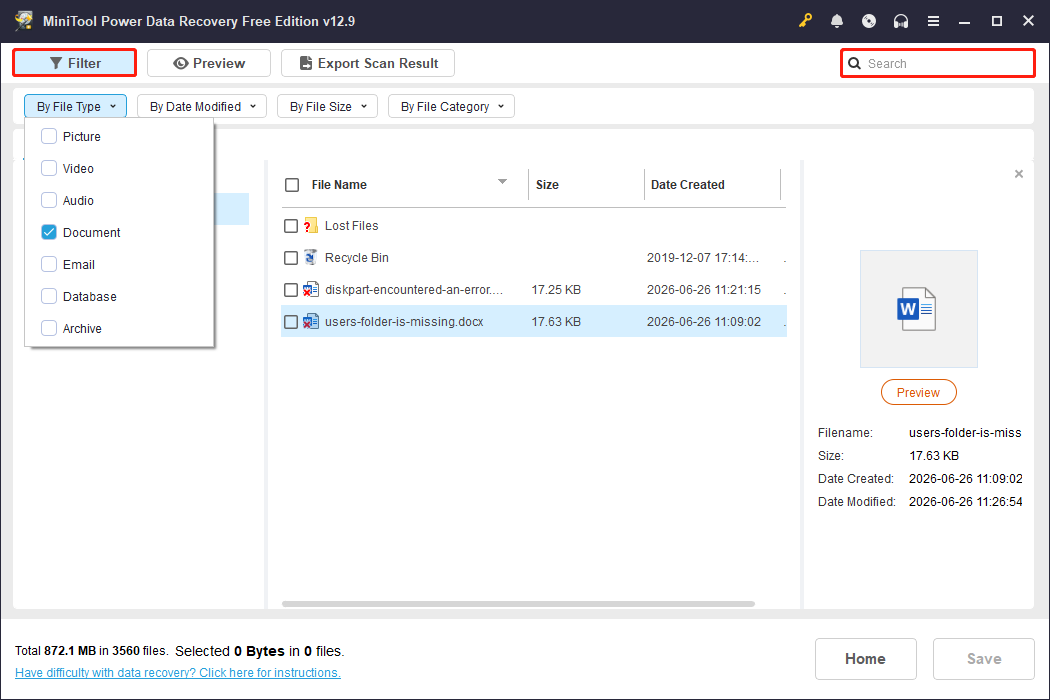
Step 3. Double-click on the chosen file to preview it. The Preview function supports documents, pictures, videos, audio, and other types of files.
Afterward, select the files you want to recover and click Save. Restore files to a new destination to avoid data overwriting.

MiniTool Power Data Recovery Free enables you to restore no more than 1GB of files. To break this limit, you need to update to an advanced edition.
The License Comparison page lists the functions of different editions. You can jump to the page to select one based on your requirements.
#4. Restore Deleted Documents from Backups
If a Word document has been deleted or lost, it may still be recoverable from a previously created backup. Windows and some third-party backup tools can store earlier versions of files for recovery.
This method works when:
- File History or Windows Backup and Restore has been enabled in advance
- The file has been uploaded to cloud services
- The file has not been permanently deleted from all backup locations
Steps to restore previous versions of a Word document:
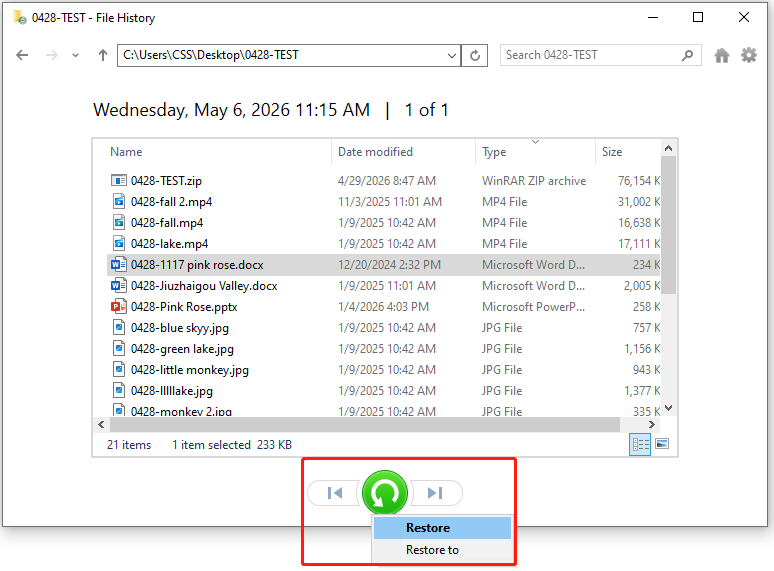
Step 1. Search for Restore your files with File History using Windows Search and open it.
Step 2. Check whether there are previous versions of the lost files. Use the arrow buttons at the bottom to switch between previous and next versions.
Step 3. When you find a previous version, double-click it to preview. If it is the one you need, click Restore to recover it to the original location, or right-click and select Restore To to save it to another location.

How to Recover Unsaved Word Documents on Windows
You may lose your unsaved Word document without any sign due to application crashes, device shutdown, or other reasons.
Keep calm since Word comes with several features that can help you recover unsaved Word documents quickly.
#1. Recover Unsaved Word Documents Using the AutoRecover Feature
If you lose your Word document without saving the changes because of a sudden crash on your computer or the Microsoft Word application, the AutoRecover feature helps you to get the files back.
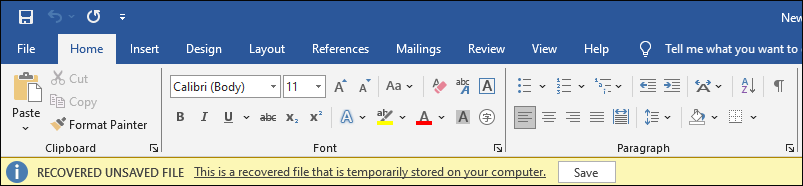
You can just reopen the unsaved document on your computer. Generally, the auto-recovered version of the document will open at the same time.
At the top of the auto-recovered document, there is an alert message that says, “This is a recovered file that is temporarily stored on your computer”. If you want to restore the unsaved version, click Save to save the file.
#2. Recover Word Documents with the AutoSave Feature
As we explained before, the Auto-save feature will save the current document automatically in accordance with the set save interval.
This function stores several versions of the current editing document. Therefore, when you want to revert the document to the previous version, use the feature.
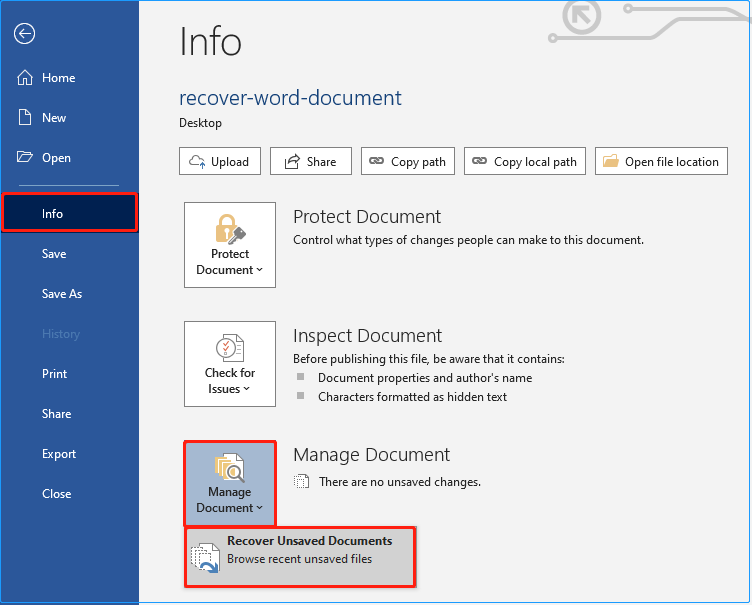
Step 1. Click File at the top toolbar and choose Info at the left sidebar.
Step 2. Click Manage Document > Recover Unsaved Documents. You will be directed to the Word AutoRecover location: C:\Users\UserName\AppData\Roaming\Microsoft\Word.
Browse the list and check whether there are any .asd files that contain unsaved content. If found, open and save them.
Useful Tips to Protect Word Documents
To prevent Word documents from being lost or deleted, you can follow these key protection measures:
1. Enable AutoSave
Turn on AutoSave in Microsoft Word. These features automatically save temporary versions of your document while you are working, helping to reduce data loss caused by program crashes or unexpected shutdowns.
How to turn on AutoSave:
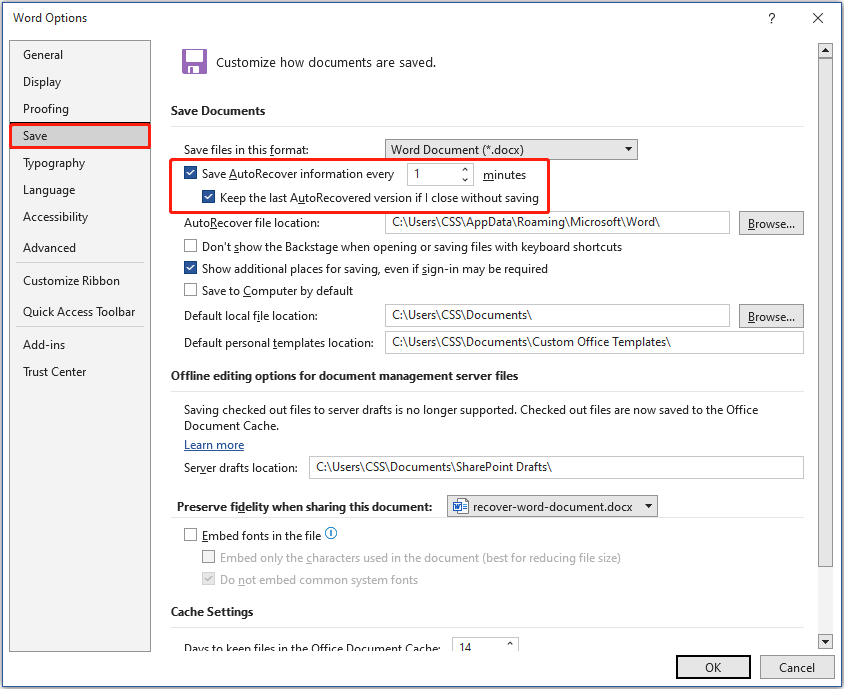
Step 1. Open Microsoft Word and click File > Options.
Step 2. Go to the Save tab and check Save AutoRecover information every X minutes and set a preferred time interval.
Also check this option: Keep the last autosaved version if I close without saving.
Step 3. Click OK to apply the settings.
2. Enable Backup Copy Feature
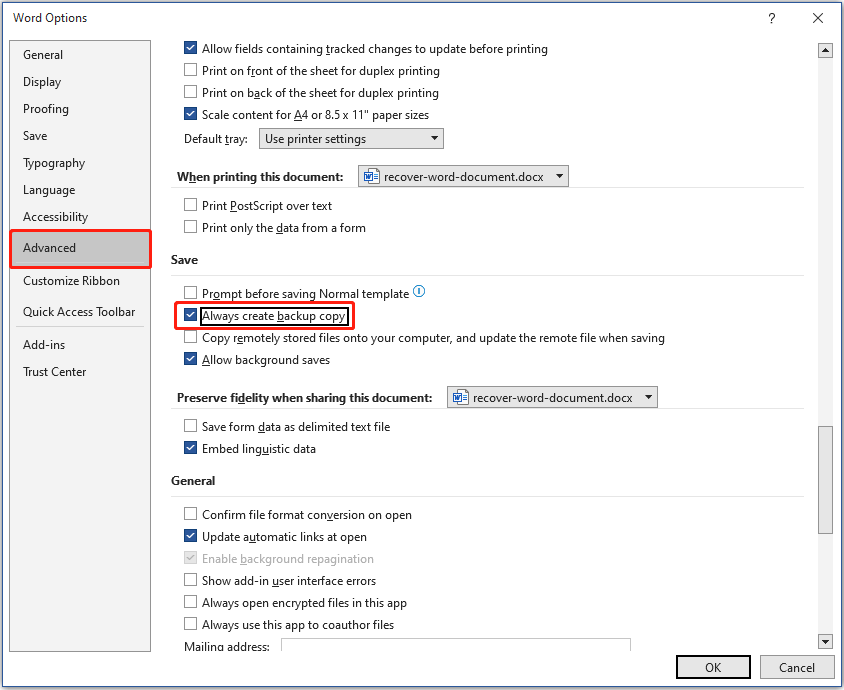
The “Always create backup copy” feature is also useful. Once enabled, Windows will automatically generate a .wbk backup file after the document has been saved for the second time.
The secondary file stays one step behind your current work. This acts as a safety net if you accidentally ruin or delete your main file.
How to enable the backup copy feature:
Step 1. In Word, click File > Options.
Step 2. Click Advanced, and then check the Always create backup copy box.
3. Back Up Important Files Manually
To prevent permanent data loss, it is necessary to save copies of important files to cloud storage or an external drive. Keeping multiple backups in different locations ensures that your documents can still be recovered even if the original file is lost or corrupted.
MiniTool ShadowMaker is a reliable choice that backs up files, folders, partitions, disks, and systems easily.
You can get the trial edition to experience its backup features for free within 30 days.
MiniTool ShadowMaker TrialClick to Download100%Clean & Safe
Recover Word Documents FAQ
In the meantime, the recovered versions can also appear in the Document Recovery pane when Word restarts.
Summary
After reading this post, you are supposed to know how to recover Word documents when they are unsaved or deleted. You should use different approaches to tackle the issue in different situations.
If you have any problems when using MiniTool software, please feel free to contact us by emailing [email protected].
About The Author

Position: Columnist
Shirley holds a bachelor’s degree in English and has been an editor at the MiniTool Team for many years. She specializes in IT-related content, with a focus on data recovery, file backup, disk management, and other technical topics. She is committed to delivering clear, accurate, and practical solutions to help users resolve common computer issues.
User Comments :