

Windows Defender may delete files due to potential threats or false positive detections. If Windows Defender deleted your files, check the Protection History first to restore quarantined items. If the files are no longer available, use professional data recovery software to recover permanently removed files.
Quick Answer: How to Restore Files Removed by Windows Defender
If Windows Defender deleted your files, follow these steps:
1. Check Windows Defender Protection History
- Open Windows Security and go to Virus & threat protection > Protection history.
- Find the file in Quarantined Items and restore it to your computer.
2. Recover Permanently Removed Files with Data Recovery Software
If the file is not available in Protection History, Windows Defender may have already removed it. In this case, use reliable data recovery software to scan the drive and recover deleted files.
MiniTool Power Data Recovery FreeClick to Download100%Clean & Safe
To improve the chance of recovery, stop using the affected drive immediately after discovering that Windows Defender deleted important files, as new data may overwrite recoverable files.
Why Did Windows Defender Delete My Files
Common reasons why Windows Defender deleted your files include:
- Suspicious file behavior: A program or file performs actions similar to malware, causing Windows Defender to block or remove it.
- File downloaded from an untrusted source: Windows Defender may remove files that appear unsafe.
- False positive detection: Windows Defender mistakenly identifies a safe file as a threat.
- Outdated virus definitions: Older security intelligence may incorrectly classify a harmless file.
In most cases, Windows Defender does not immediately erase files permanently. It usually moves suspicious files to quarantine first. However, files can become unavailable if they are removed from quarantine or automatically deleted from your computer.

How to Recover Files Deleted by Windows Defender
When Windows Defender deleted your files, the recovery method depends on what happened to the files.
First, determine whether the files were quarantined or permanently removed:
- If Windows Defender quarantined the files, you can usually restore them from Windows Security.
- If Windows Defender removed the files completely, you need file recovery software to scan the storage device and retrieve recoverable data.
Method 1. Restore Quarantined Files from Windows Defender
Restoring quarantined files is the first method you should try because it is safer and does not require third-party recovery tools.
Here is how to restore quarantined files in Windows Defender:
Step 1. Press Win + I to launch Windows Settings.
Step 2. Head to Update & Security > Windows Security > Virus & threat protection.
Step 3. In the prompt window, find and click Protection history on the right pane.
Step 4. Click Filter to expand the dropdown menu, then you need to choose Quarantined Items to look through the file list.
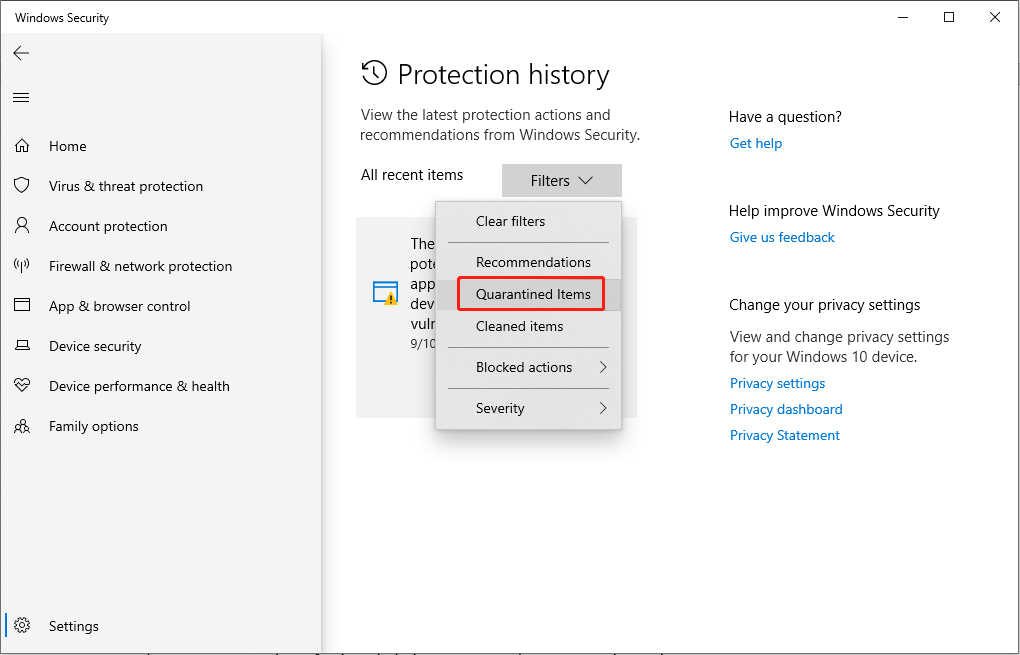
Step 5. Find if the missing files are listed here. If yes, select them and click Restore to recover them to the original file path.
If the detected item list is empty, you should suspect that Windows Defender has already removed the quarantined items.
Method 2. Recover Files Removed by Windows Defender
If Windows Defender permanently removed your files and they cannot be found in quarantine, the files may still exist on your storage device until they are overwritten.
Data recovery software can scan the drive for deleted file records and recover files that are still recoverable.
MiniTool Power Data Recovery is a Windows file recovery tool designed to recover deleted or lost files from Windows computers. It can help recover files removed by Windows Defender, including documents, photos, videos, audio files, and other commonly used file types.
The free edition of the software supports 1 GB of data recovery free.
MiniTool Power Data Recovery FreeClick to Download100%Clean & Safe
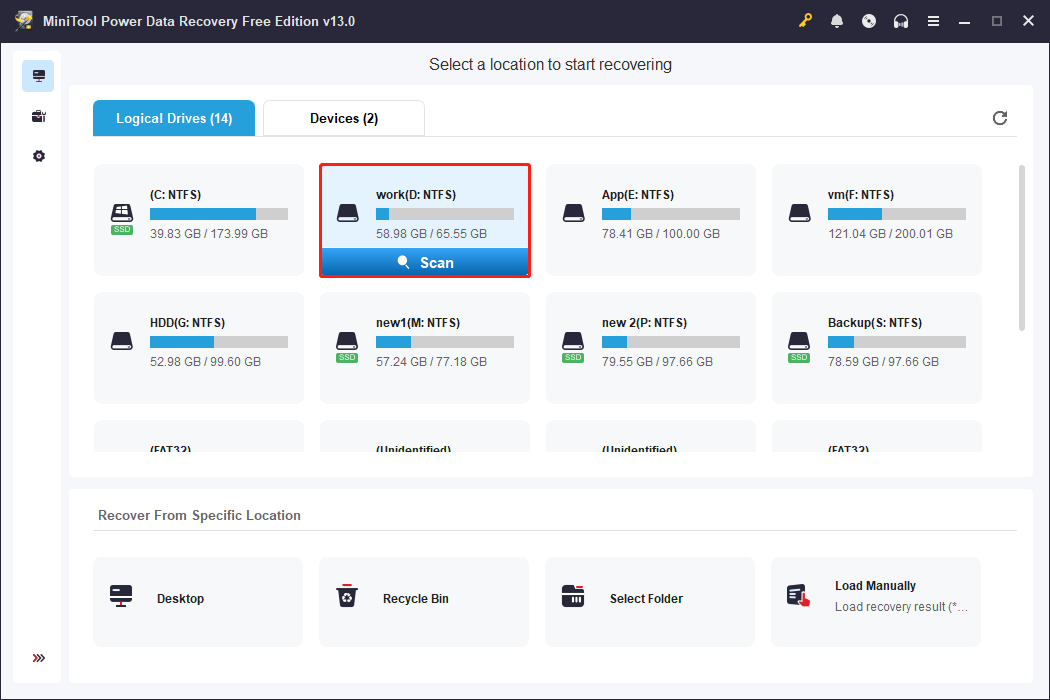
Step 1. Scan the partition
Launch the software to enter the main interface. All the partitions are listed in the Logical Drives section. You can choose the partition where the deleted files are stored before deleting and click the Scan button.
Step 2. Find required files
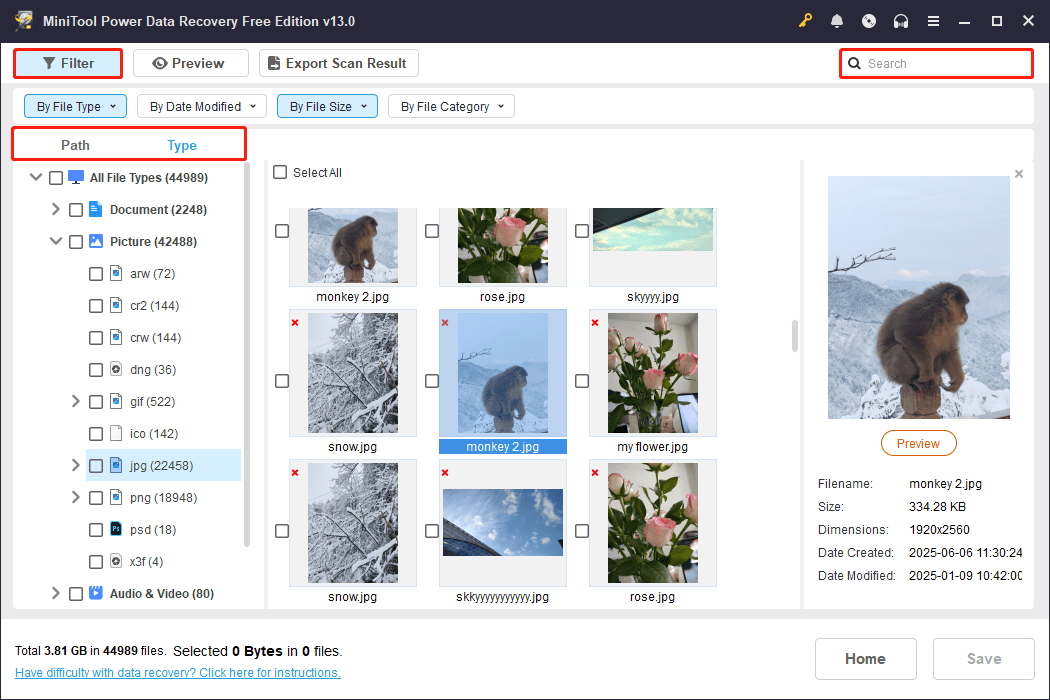
After scanning, recoverable files are classified by their paths. You can expand the folder one by one to find the wanted items.
Here are several features on the result page that you can utilize to improve the data recovery efficiency.
- Filter: Click the Filter button to set the filter conditions, including file size, file category, file type, and file last modified date.
- Type: Change to the Type tab to check files by their types and file formats. This function plays a significant role when you need to recover a specific type of file.
- Search: Facilitate the Search feature to look for a certain file by its name. You can use a full or partial file name.
Step 3. Save wanted items
Select all the files you want to restore and click Save. Remember to save them to another location to avoid overwriting existing data.
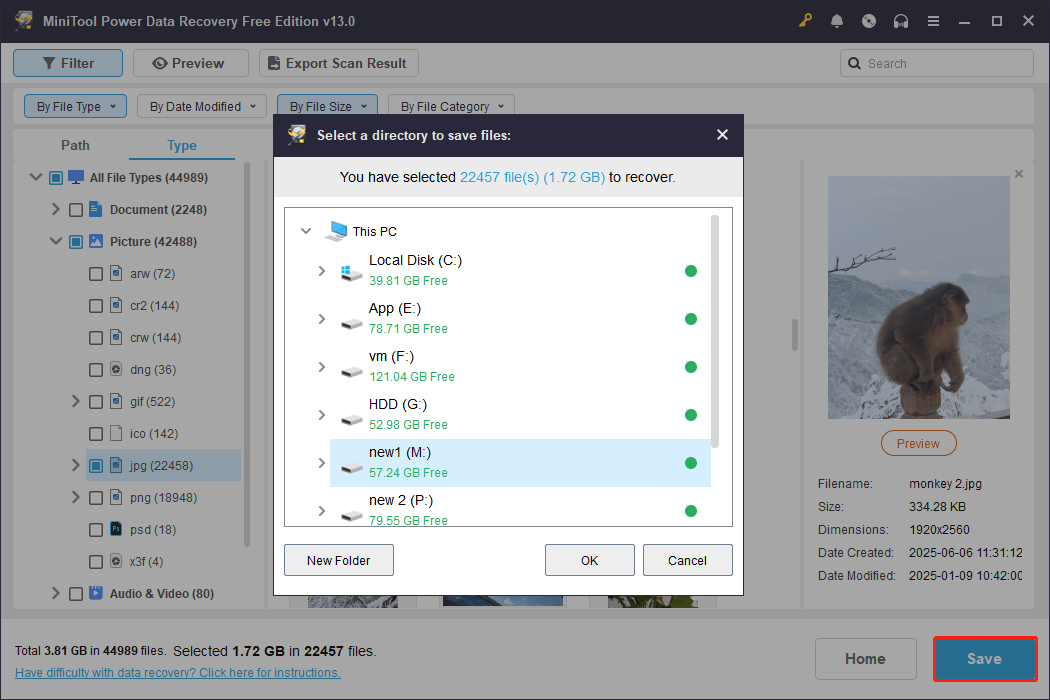
MiniTool Power Data Recovery Free only provides 1GB of free data recovery capacity. To restore more files, you should get a premium edition.
How to Stop Windows Defender from Deleting Files
When Windows Defender repeatedly deletes safe files, you can take several measures to prevent this from happening again.
For trusted files that are incorrectly detected, adding an exclusion can prevent future removal. Keeping Windows Defender updated can reduce detection errors, while downloading files from reliable sources helps avoid unnecessary security warnings.
Below are several effective methods to stop Windows Defender from deleting files.
Method 1. Add an Exclusion in Windows Defender
Instead of disabling security protection completely, you can tell Windows Defender to ignore specific files, folders, file types, or processes that you know are safe.
This method is recommended when Windows Defender repeatedly detects the same legitimate file as a threat.
Step 1. Press Win + S to launch Windows Search.
Step 2. Type Virus & threat protection into the search box and press Enter to open the window.
Step 3. Click Manage settings under the Virus & threat protection settings section.
Step 4. Scroll down to locate the Exclusion section and click Add or remove exclusions to perform more operations.

Step 5. In the following window, you can click the Add an exclusion button to select File, Folder, File Type, or Process based on your requirements.
If you want to remove an option from the exclusion list, you can select it and choose Remove.
Method 2. Keep Windows Defender Updated
Microsoft regularly releases security intelligence updates to improve threat detection accuracy and fix known detection issues.
Keeping Windows Defender updated can help reduce false positive detections and improve overall protection.
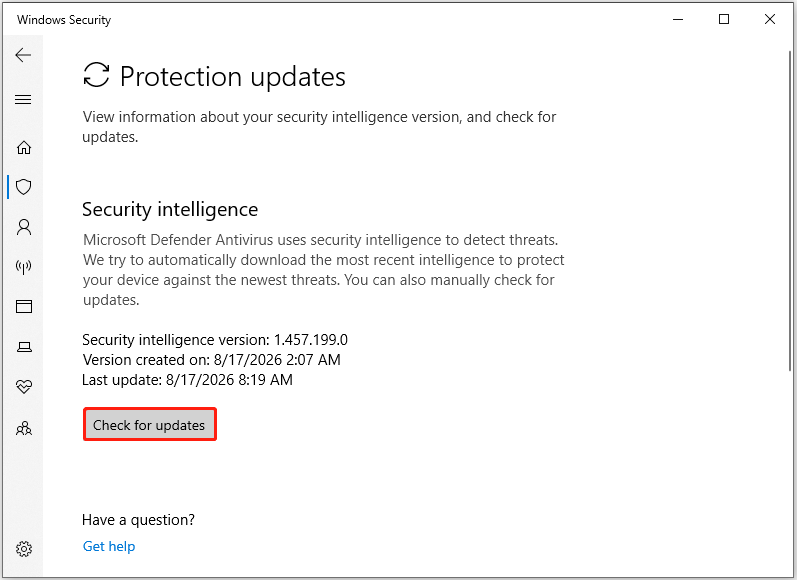
Step 1. Open Settings and navigate to Update & Security > Windows Security > Virus & threat protection.
Step 2. Under the Virus & threat protection updates section, click Check for updates.
Step 3. Click the Check for updates button to download and install the latest security intelligence updates if available.
Method 3. Turn off Real-Time Protection Temporarily (Not Recommended)
Disabling Windows Defender is another way for you to prevent Windows Defender from deleting files. However, you should think twice before carrying out this measure as it may expose your computer to various viruses and malware attacks.
Step 1. Press Win + I to open Windows Settings.
Step 2. Navigate to Update & Security > Windows Security > Virus & threat protection.
Step 3. Turn off the Real-time protection option.

Method 4. Download Files from Safe Sources
Files downloaded from unknown websites, unofficial software repositories, or suspicious links are more likely to be flagged by Windows Defender. Downloading files from trusted sources can reduce the chance of encountering malware warnings or false detections.

Conclusion
Undeniably, Windows Defender is a very useful antivirus program in most cases. However, it could misidentify important files as threats and delete them. “Windows Defender deleted my files” is not a rare issue.
Like other data loss cases, the first thing you should do after you find Windows Defender has deleted your files by mistake is to stop using the target drive.
Next, check the quarantined files in Windows Defender and restore them. If they are permanently deleted, use MiniTool Power Data Recovery to scan your drive and restore files.
Should you have any questions when using MiniTool software, please contact the support team at [email protected].
About The Author

Position: Columnist
Shirley holds a bachelor’s degree in English and has been an editor at the MiniTool Team for many years. She specializes in IT-related content, with a focus on data recovery, file backup, disk management, and other technical topics. She is committed to delivering clear, accurate, and practical solutions to help users resolve common computer issues.
User Comments :