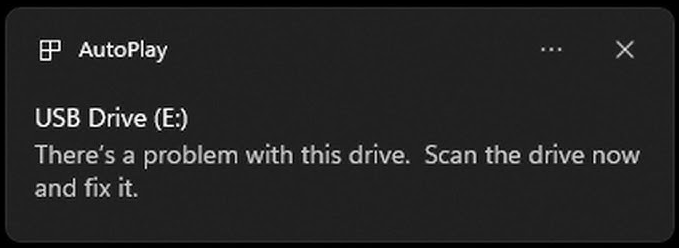
It is common to encounter an error message that appears stating, “There’s a problem with this drive. Scan the drive now and fix it.” when a removable drive is connected to your computer.
User Case:
“I’m using a drive. When I plug it into my laptop, I get the following messages in sequence: ‘There’s a problem with this drive USB. Scan the drive now and fix it.’ I activate the software to scan the drive, but it finds no problem with it. What I do know is that I am losing data from three spreadsheets. Any thoughts as to what’s wrong?”forums.sandisk.com
When this problem occurs, you might face these scenarios:
- The removable disk stays accessible even when the error notification shows up on a Windows PC and continues to appear afterward. Back up your files in case of data loss.
- The removable disk may become unreachable, requiring you to resolve the error to recover the saved data.
Before proceeding with the solutions outlined in this post, we explored the typical situations that can lead to this error.
What Causes the “There Is a Problem with This Drive” Error
There are always underlying reasons for any disk error, and this case is no different. The message “There is a problem with this drive” can stem from multiple reasons.
Here are some typical causes:
- Improper removal of the USB drive
- Infection by a virus or malware on the drive
- Bad sectors
- Compatibility issues
- Outdated drivers
- Corruption of the file system or physical damage
- An incomplete copy and paste process
- Etc.
Regardless of the reason for the problem, if you receive the prompt immediately upon connecting the drive, you should consider it a warning. Your data may be at risk, and the issue should be addressed promptly.
In the following section, several effective methods are listed to fix the USB drive error.

How to Fix the There Is a Problem with This Drive Error
Before delving into the more intricate solutions, start by trying a few simple methods.
- Reboot the computer.
- Check the drive for any visible physical damage.
If none of these options resolve the issue, head to the fixes provided next.
Method 1. Reconnect the Drive
Begin by plugging the drive into a different USB port or trying it on another computer.
For example, if you’re using USB 3.0, make sure to use the specific port on your computer.
If the issue continues, it may suggest that the drive itself is faulty instead of the computer. In this case, try the following solutions.
Method 2. Run Scan and Fix
When the error message “There is a problem with this drive” appears, a prompt may pop up asking if you’d like to scan and repair the removable disk.
You can follow the on-screen recommended instructions to scan and fix your drive:
Step 1. Select Scan and fix (recommended) to check for any errors.
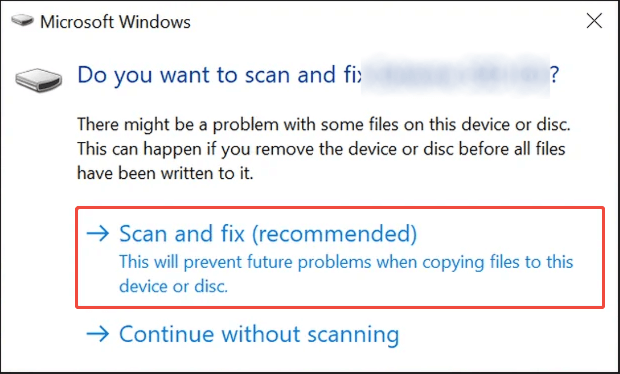
Step 2. If any errors are detected, click Repair drive.
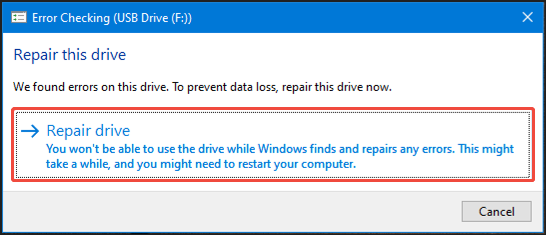
Step 3. After the process is complete, close the window and restart the computer to see if the issue has been resolved.
Kind Reminder: Use the Error Checking Tool
If you didn’t see the interface above asking whether to scan and repair the disk, you can utilize an alternative method to check the drive for errors.
Step 1. Press Win + E to launch File Explorer, then select This PC from the left sidebar.
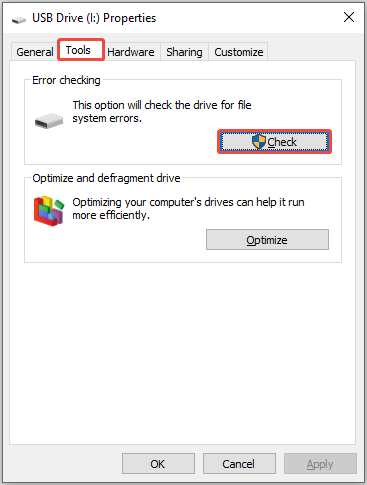
Step 2. Right-click on the problematic drive and choose Properties.
Step 3. Go to the Tools tab, then click on the Check button located under Error checking.
Step 4. In the pop-up window, click Scan and repair drive, and then follow the on-screen instructions to complete the repair process.
Step 5. Reboot the PC.
If you encounter the error “there was a problem scanning this drive,” try some of the following methods instead.
Method 3. Run Hardware and Devices Troubleshooter
The Hardware and Devices troubleshooter is a built-in utility in Windows. This tool is useful for fixing issues and errors related to external storage devices.
It can help resolve the “There is a problem with this drive” and “There was a problem scanning this drive” errors.
Below are the steps to utilize the Hardware and Devices troubleshooter tool on Windows:
Step 1. Press Win + R to open the Run dialog box, type msdt.exe -id DeviceDiagnostic in the box, and press Enter.
Step 2. In the pop-up Hardware and Devices window, click Advanced, and ensure the box of Apply repairs automatically is ticked.
Step 3. Click the Next button to begin the pending task and resolve the problems it identifies through the provided information and guidelines.

Method 4. Update or Reinstall the Device Driver
Outdated or corrupt drivers can lead to communication issues between the drive and the operating system, resulting in the “There is a problem with this drive” error.
Updating or reinstalling the driver may resolve the problem.
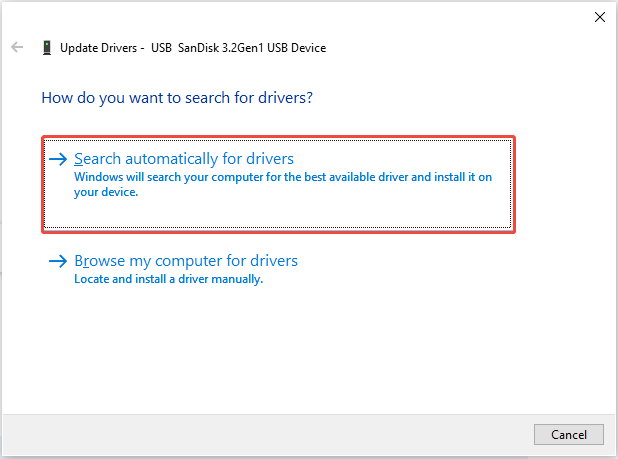
>> Update the Driver:
Step 1. Right-click Start and click Device Manager to open it.
Step 2. Expand the Disk drives category, then right-click the target device and select Update driver.
Step 3. In the pop-up window, select Search automatically for drivers. Then, follow the on-screen guide to update the USB driver to the latest version.
>> Reinstall the Driver:
Step 1. Press Win + X to open the Power User menu and select Device Manager.
Step 2. Expand the Disk drives option, right-click the target device, and select Uninstall device.

Step 3. In the small pop-up window, click on Uninstall to begin the removal of the driver.
Step 4. Reboot your computer. After that, Windows will automatically install the most recent version of the driver on your PC.
If your PC still pops up the “There is a problem with this drive” error message after updating or reinstalling the driver, consider running CHKDSK to check the file system on your drive.
Method 5. Run CHKDSK to Repair the Drive
As mentioned above, drive errors you encounter, including “There is a problem with this drive” may be due to bad sectors.
In this situation, execute CHKDSK through Command Prompt (Admin) to check the file system and its metadata for any logical or physical issues on the drive.
If you run CHKSDK without any parameters, it will only show the drive’s status without correcting any errors. Therefore, it’s necessary to utilize it with parameters like /f, /r, /x, or /b.
Follow the breakdown below to run CHKDSK to resolve the “There is a problem with this drive” error:
Step 1. Click the search icon on the taskbar and type cmd into the search field. Then, right-click Command Prompt and select Run as administrator.
Step 2. In the following window, type chkdsk *: /f /r /x and press Enter to execute it. Ensure you replace * with the correct drive letter for your drive.
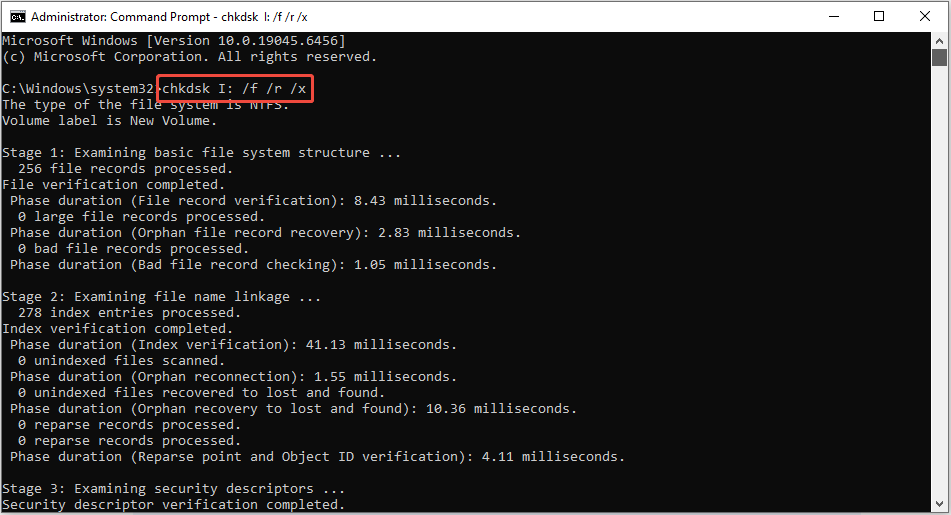
Step 3. Wait for the process to complete. This command will automatically detect and resolve any errors found.
After applying this solution, check if the error message is gone and whether you can use the removable drive normally.
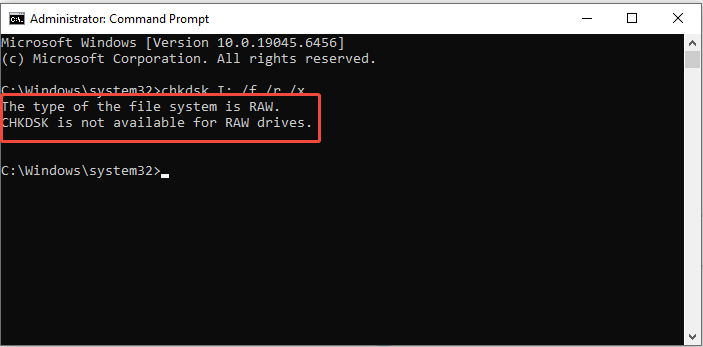
If you receive the error message saying “CHKDSK is not available for RAW drives“ as the picture below shows, you may consider formatting the drive to fix the “There is a problem with this drive” error.
Method 6. Format the USB Drive to Normal
The last but not least solution is formatting the drive to fix the “There is a problem with this drive” error.
>> Format the Drive in the File Explorer:
Step 1. Press Win + E to launch the File Explorer and then go to This PC.
Step 2. Right-click the problematic drive and select Format.
Step 3. In the pop-up interface, select the file system, allocation unit size, and volume label.
Step 4. Check the Quick Format option. Next, click the Start button.

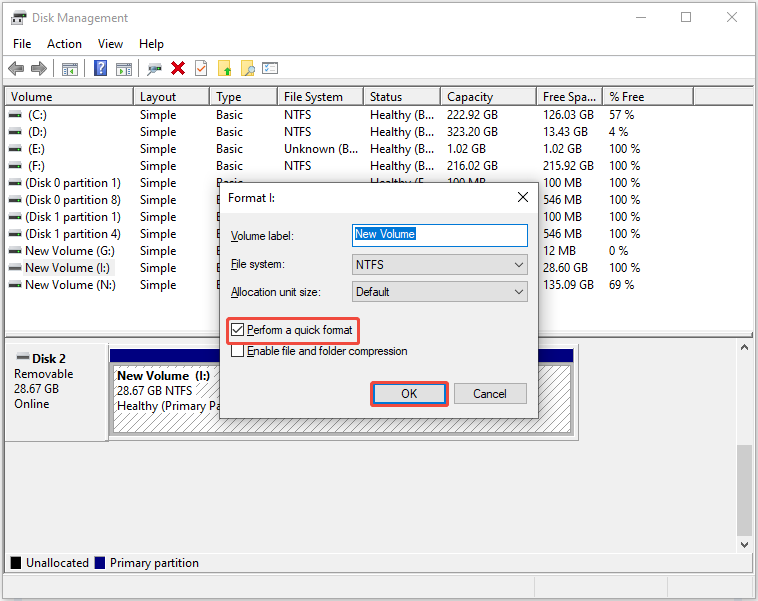
>> Format the Drive in the Disk Management:
Step 1. Type Disk Management in the Windows Search box and press Enter.
Step 2. In the new Disk Management interface, locate and right-click your target device, then choose Format.
Step 3. In the pop-up interface, select the file system, allocation unit size, and volume label.
Step 4. Check the box of Perform a quick format, and then click OK.
After formatting, you can use your drive normally, but the data in it is lost.
If you haven’t formatted it yet and the drive is inaccessible, or if you want to recover formatted drive data, read the following part to learn how to rescue them.
How to Recover Data from an Inaccessible or Formatted Drive
To recover your files from an inaccessible or formatted USB drive, use professional data recovery software like MiniTool Power Data Recovery.
MiniTool Power Data Recovery is specifically designed to recover deleted or lost files such as photos, videos, documents, and more.
It is capable of recovering files from HDDs, SSDs, USB drives, SD cards, and other storage media.
The software offers free disk scanning, a free file preview, and allows you to recover up to 1 GB of data for free.
Now, download, install, and open this free data recovery tool to recover your files.
MiniTool Power Data Recovery FreeClick to Download100%Clean & Safe
Follow these steps below to recover data from an inaccessible/formatted drive using MiniTool Power Data Recovery:
Step 1. On the home page of the recovery software, you will locate the Logical Drives tab. Select your target removable drive’s partition, which is marked with a USB icon, and click the Scan button to start the scanning process.
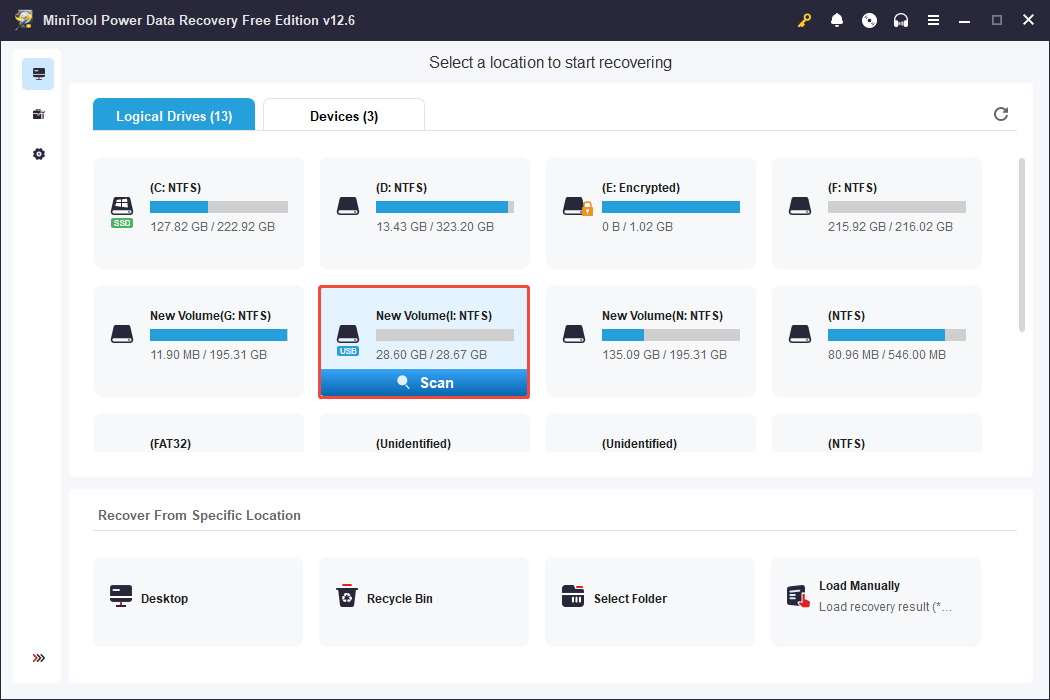
To get complete results, allow it to complete the process on its own.
Step 2. After the scan is complete, you can see the Path section. In this tab, expand the folders, including the Deleted Files folder, the Lost Files folder, and the Existing Files folder, to locate wanted files.
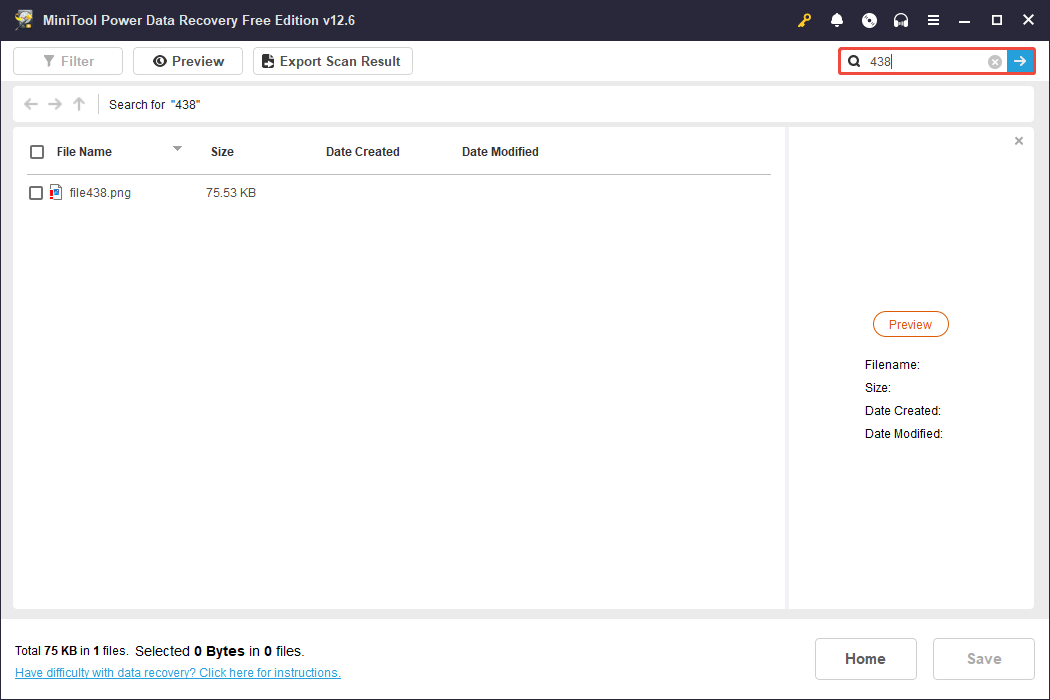
To find a specific file type, go to the Type tab, which classifies files by file type and data format.
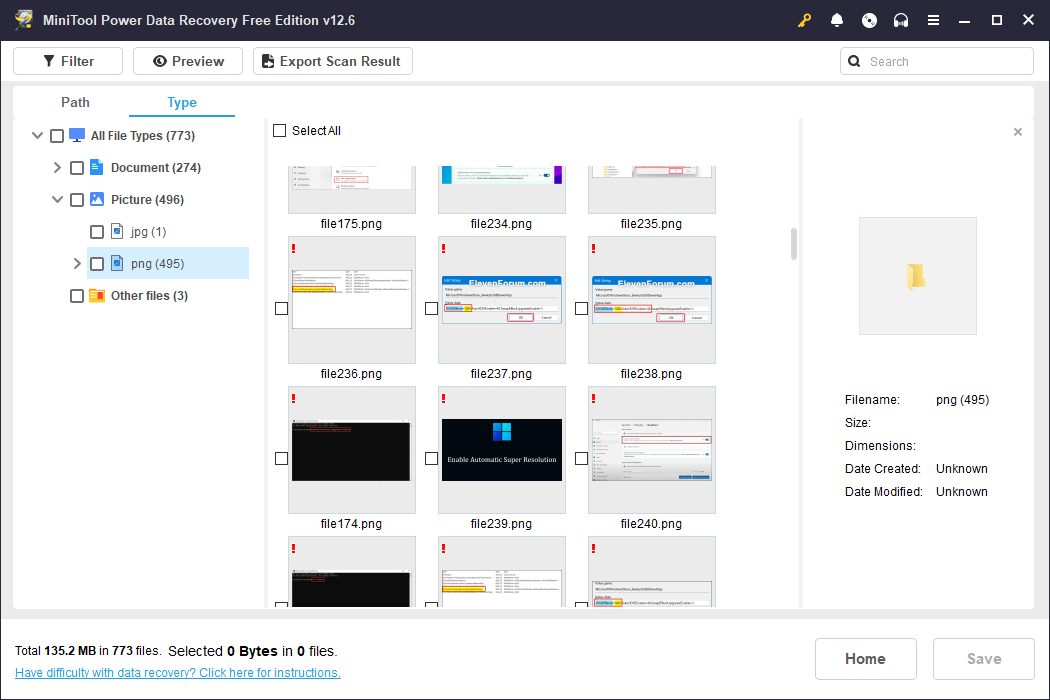
You can also utilize other features to find your files more efficiently:
- Filter: Filter files by file type, date modified, file size, or file category.
- Search: Locate specific files by typing either a full or partial file name.
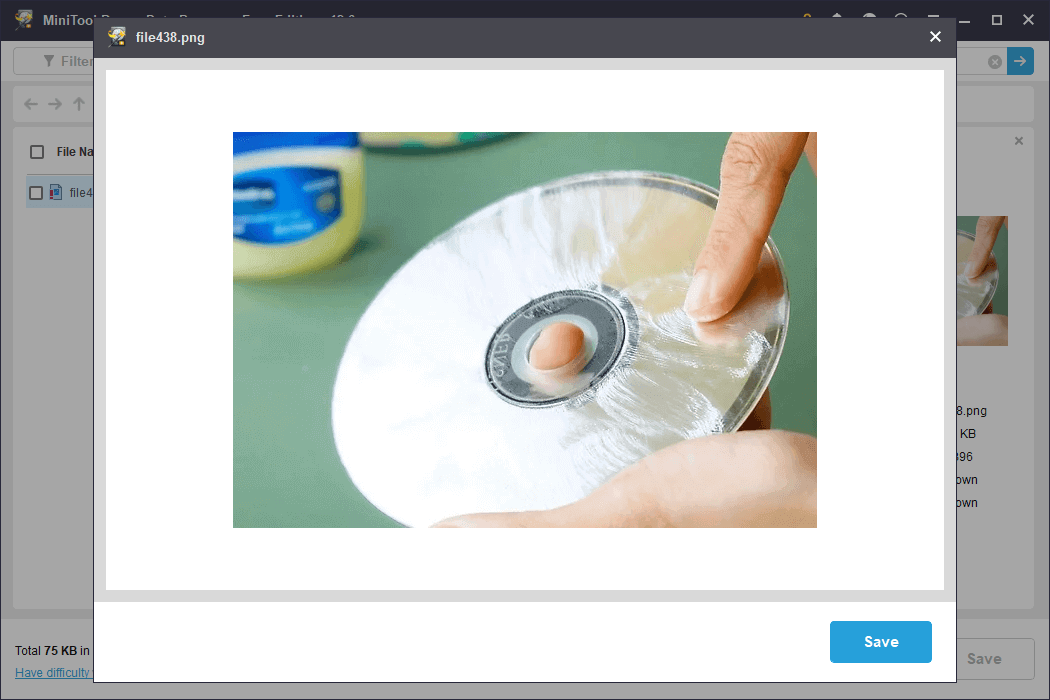
To prevent wasting the 1 GB of free data recovery capacity, double-click on each file you wish to preview.
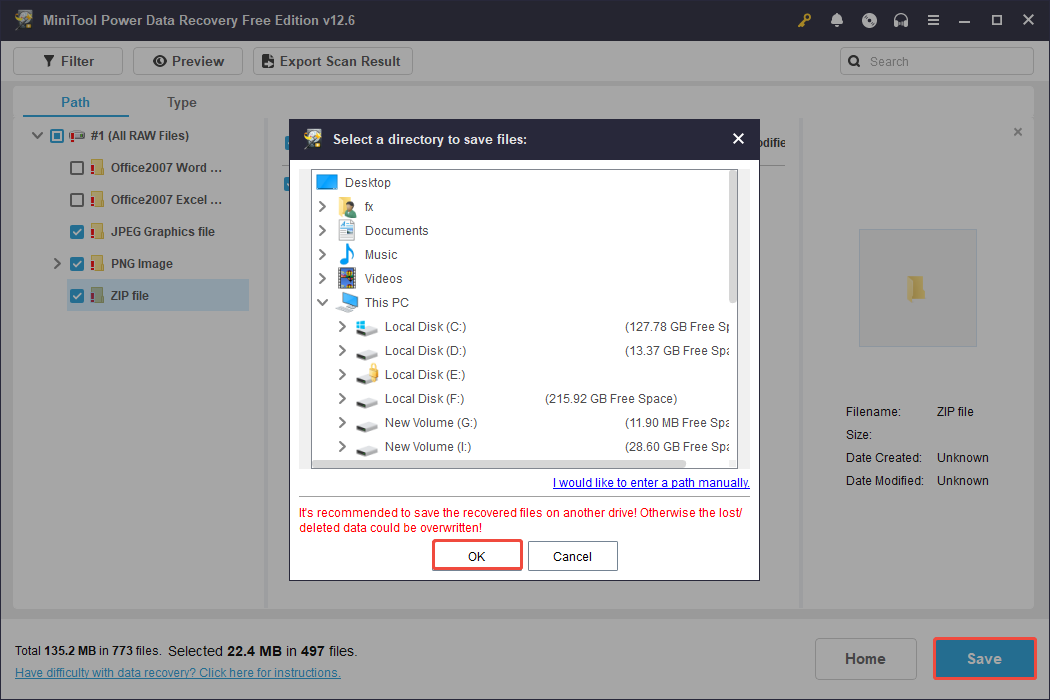
Step 3. After confirming the files you want to restore, choose all the desired files, and click Save.
In the new window, choose a safe location different from the original location and click OK.
You can recover up to 1 GB of data for free. If the total size exceeds this limit, the software will prompt you to upgrade to recover the remaining files.
Wrap Up
After reading this guide, you should know how to fix the “There is a problem with this drive” error on Windows by running Scan and fix, Hardware and Devices Troubleshooter, CHKDSK, updating or reinstalling the driver, or formatting the drive.
Moreover, if you want to recover data from such an inaccessible or formatted storage media, use MiniTool Power Data Recovery.
Should you have issues with MiniTool Power Data Recovery, contact us via [email protected].
About The Author

Position: Columnist
Sandy became an English editor after graduation. She is devoted to finding effective solutions for diverse IT problems and provides articles on data recovery, data backup, and computer partitions and drives. In her spare time, she likes listening to music and playing games.
User Comments :