An Introduction to Ext4 File System
Ext4, short for Fourth Extended Filesystem, is one of the most commonly used and mature file systems in Linux systems. It was officially released in 2008 to replace Ext3.
Main improvements of Ext4 over Ext3 include:
- A date range ending in 2446 (instead of 2038).
- Timestamp precision down to the nanosecond level (instead of the second level).
- A larger file size limit.
Its design goal is to balance performance, stability, and scalability. Compared to its predecessor, Ext4 supports larger file and partition sizes.
The Ext4 file system theoretically supports volumes up to 64 ZiB in size and individual files up to 16 TiB in size, as well as volumes up to 1 YiB in size. This makes it ideal for modern servers and large-scale storage environments.
It improves journaling to ensure data security. Data is written to the log before being written, preventing file corruption due to power outages or system crashes.
Ext4 also supports persistent pre-allocation, allowing space to be allocated for files in advance. This is typically used in scenarios such as databases or video recording.
Due to these features, Ext4 is widely used in Linux desktops, servers, and embedded devices.
However,Ext4 performs best on Linux but has limited support on Windows. By default, Windows systems cannot directly recognize and read disks with the Ext4 file system.
Given its poor cross-platform support, using Ext4 partitions on Windows typically results in a series of compatibility issues.
If you attempt to access Ext4 from Windows, it will prompt you to format it for normal use. However, if you choose to format, the existing data will be erased. Therefore, ensuring data security is very important.
How to Access Ext4 Data on Windows
The following section outlines methods for retrieving files from an Ext4 disk in various scenarios.
When your disk is in good condition, use DiskInternals Linux Reader to export files. On the contrary, use data recovery software to scan and recover files from your corrupted Ext4 disk.
Case 1: Extract Files from a Healthy Ext4 Partition on Windows
Windows does not natively support the Ext4 file system. To access it, third-party tools are required. These tools allow Windows to read or copy files from Ext4 partitions.
DiskInternals Linux Reader is recommended here, as it has the following advantages:
- It is free software and provides read-only access.
- It can help you browse Ext4 partitions and copy files to Windows.
Here is how to access and save files from Ext4 using this tool:
Step 1: Download and install DiskInternals Linux Reader on your computer.
Step 2: Launch the app, and then double-click your Ext4 disk.
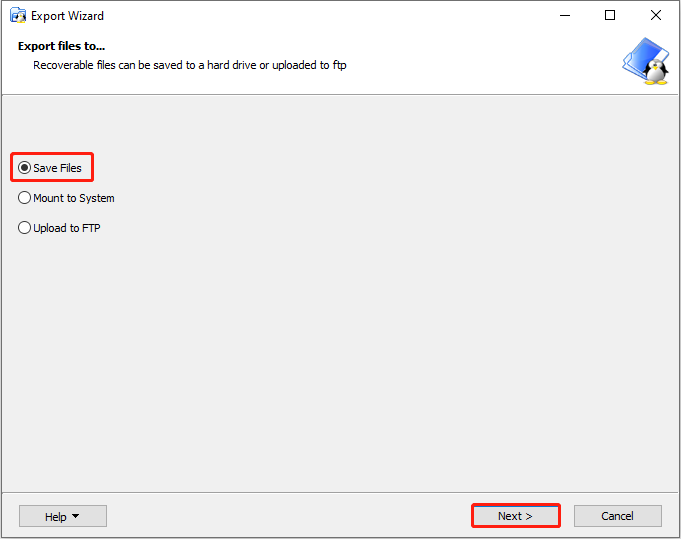
Step 3: In the new page, click Save in the top options to enter the Export Wizard window.
Step 4: Check the Save Files option and click Next.
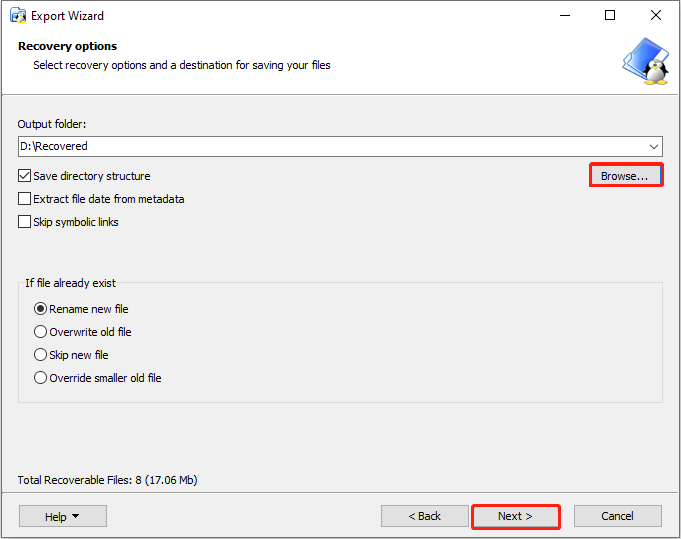
Step 5: Click Browse to choose an output folder and click Next.
Step 6: Choose the files you want to save and click Next to start the process.
Make sure all important files have been transferred. Then, you can start formatting the disk.
However, if your Ext4 disk is not properly read by the file system reader or has suffered data loss, refer to the following section.
Case 2: Recover Files from a Corrupted Ext4 Partition on Windows
If you encounter an Ext4 disk failure or Ext4 data loss, using data recovery software to recover data is necessary. MiniTool Power Data Recovery is worth a try.
MiniTool can recover Ext4 data lost due to file system corruption, partition table corruption, viruses or malware infection, or accidental formatting.
Besides Ext4, it also supports recovering files from other file systems, such as NTFS, exFAT, and FAT32. What’s more, it is capable of restoring almost all file types, such as documents, pictures, videos, audio, and so on.
Having a strong compatibility, it can be used on Windows 11/10/8.1/8. For storage devices, it can recover data from hard drives, USB flash drives, and SD cards.
This software has a clean and simple interface and is easy to use. It enables you to complete Ext4 data recovery in just a few steps.
The free edition allows you to recover up to 1 GB of data for free. And the paid edition supports unlimited recovery and advanced features (such as a WinPE boot disk).
After knowing about this software, it’s time to use it to recover data from Ext4 partitions.
Step 1: Download and install the Ext4 data recovery software
Click the following button to download and install MiniTool Power Data Recovery Free on your Windows PC.
MiniTool Power Data Recovery FreeClick to Download100%Clean & Safe
Step 2: Launch the software and scan the Ext4 drive
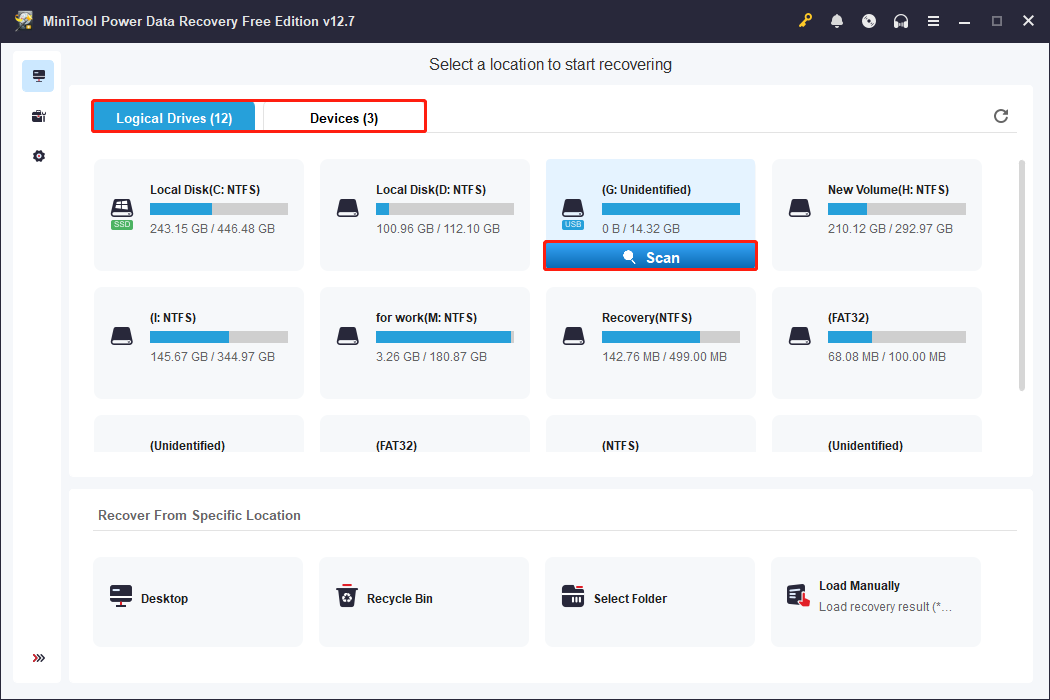
Open MiniTool Power Data Recovery. Locate the target drive under the Logical Drives tab, where the Ext4 drive should show as Unidentified. Then click the Scan icon on the Ext4 partition. The software will automatically scan all files on the disk.
Alternatively, you can switch to the Devices tab, which allows you to scan the entire disk. Find the target disk and click Scan.
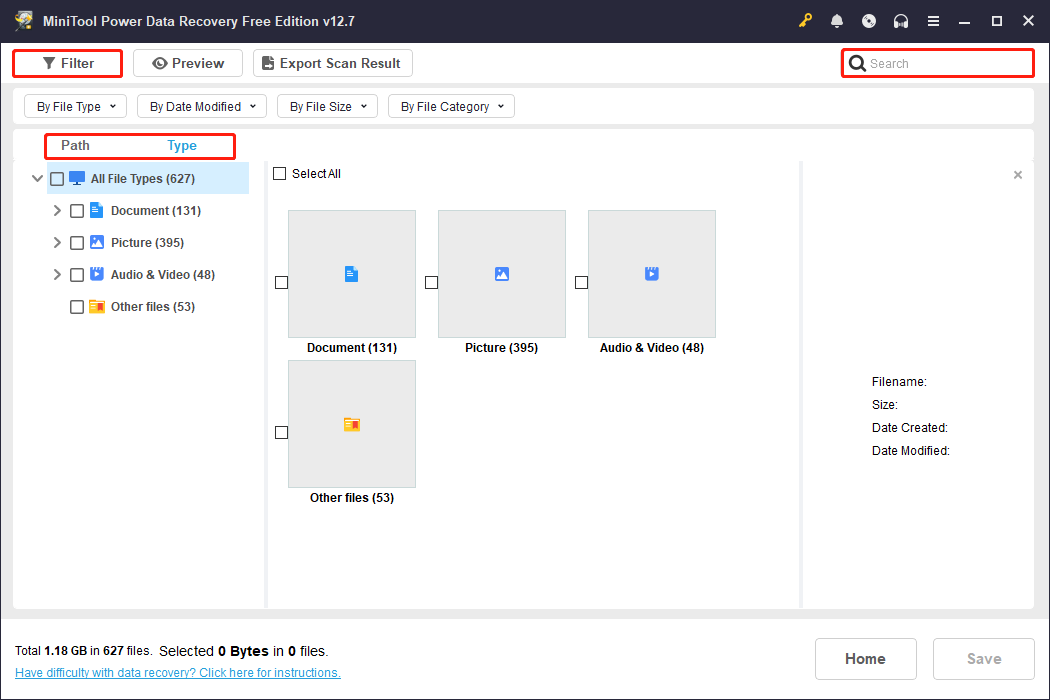
Step 3: Find and preview the target files
The scan process will take some time. When it ends, all the recoverable files will be displayed. Here are several features to help you find the files you need.
- The Path feature displays scan results as folder paths. It enables you to locate lost files based on their original storage location.
- The Type feature categorizes scan results based on file type, such as documents, pictures, videos, and audio. Knowing the file type allows you to quickly find the target file within the corresponding group.
- The Filter feature offers four filtering criteria, including file type, modification date, file size, and file category. This greatly narrows down the search scope.
- The Search feature allows you to directly enter a filename to search. The system will quickly match and display the specific file in the scan results.
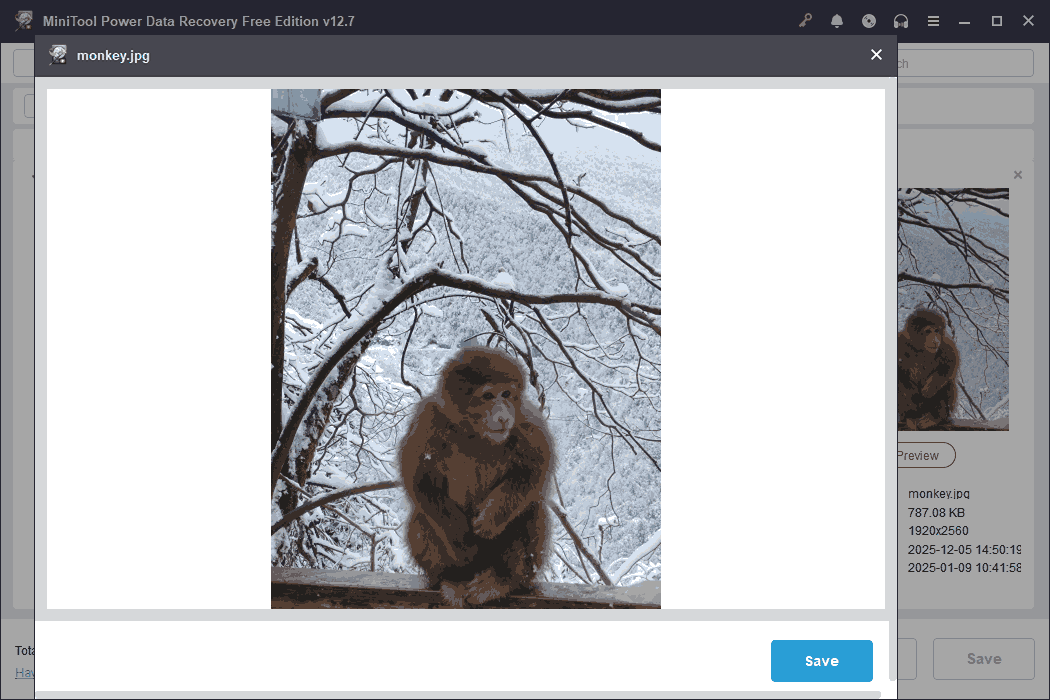
Once you have located the files you want to recover, preview their contents to ensure they are correct and complete.
MiniTool Power Data Recovery supports previewing various file types, such as pictures, documents, videos, audio, and text files.
To preview a file, double-click it in the scan results, and the preview window will pop up.
Step 4: Recover the required files to a safe location
After confirming the required files, check them and click the Save button. In the pop-up window, choose a new path to save the recovered files. Finally, click OK to start recovery.
When the files have been recovered successfully, the Recovery Completed window will show up. You will see the size of the recovered files and the remaining free recovery capacity.
Click the View Recovered button to access the selected path to view the recovered files.
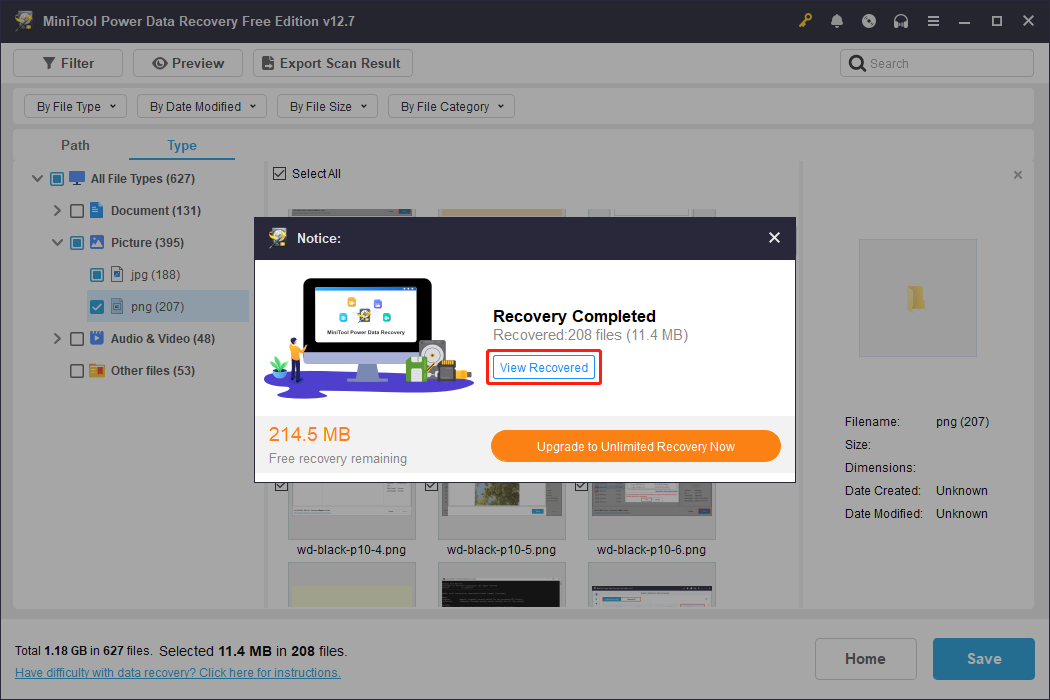
When you use up the 1 GB of free storage, upgrade to a full edition to continue recovering files.
When the files are in a safe place, it’s time to format the Ext4 drive.
Time to Format Ext4 Partition on Windows
As mentioned before, Windows does not support Ext4. To make the disk readable, you will need to format it to a supported file system, such as FAT32, NTFS, and more.
Here are several approaches to format your Ext4 drive on Windows.
Option 1: Format the Ext4 Partition in File Explorer
When accessing the Ext4 drive on File Explorer, you will be asked to format the disk before use. In the pop-up window, click Format disk.
In the format window, choose a file system, set a volume label, check the Quick Format option, and click Start. The format will start. Wait patiently for it to complete.
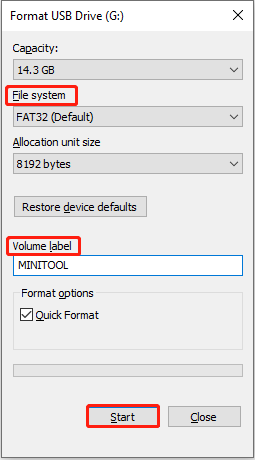
When the process ends, check if the drive can be accessed.
Option 2: Format the Partition with Disk Management
Disk Management is a built-in disk management tool on Windows. It can be used to format disks in any condition.
In Windows Disk Management, the Ext4 partition is not recognized as a usable file system. It is typically displayed as “RAW”.
Here is how to format the Ext4 disk in Disk Management:
Step 1: Press Win + X and choose Disk Management.
Step 2: Right-click the RAW Ext4 partition and choose Format.
Step 3: Type a volume label and choose a file system.
Step 4: Make sure the Perform a quick format option is checked and click OK.
Option 3: Format the Disk via MiniTool Partition Wizard
MiniTool Partition Wizard has powerful partition management capabilities. It can format the Ext4 partition to NTFS, FAT32, exFAT, or other file systems on Windows.
Its interface is clear, and the operation steps are simple, making it suitable for beginners. The free edition can fulfill the formatting requirement. Now, download and install it to start formatting your Ext4 disk.
MiniTool Partition Wizard FreeClick to Download100%Clean & Safe
Step 1: Launch the software, and then select the Ext4 drive, which is usually displayed as Unformatted.
Step 2: In the left pane, click Format Partition under Partition Management.
Step 3: In the format window, set a partition label, choose a file system, and click OK.
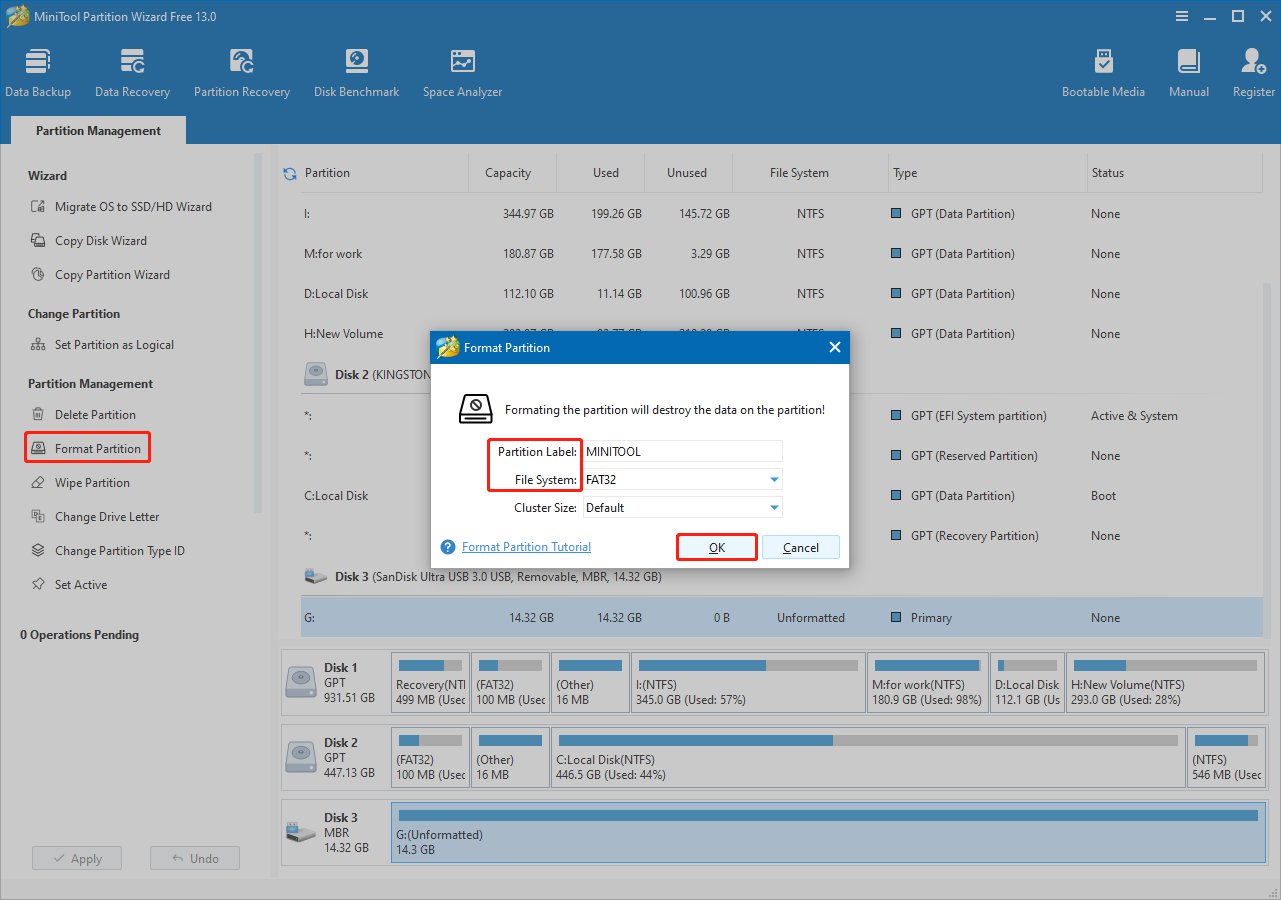
Step 4: Finally, click Apply in the lower left corner to make the change take effect.
Wait for the process to complete. When it finishes, check your Ext4 disk.
Now, continue reading the following section to understand the reasons for data loss and take appropriate measures.

Ext4 Data Loss: Common Causes & Prevention Tips
Ext4 data loss can occur for a variety of reasons. Here are some common ones.
- Human error. Accidental file deletion, incorrect partitioning, or disk formatting can cause data loss.
- System crash or power outage. Ext4 uses delayed allocation to improve performance, writing data to a cache first and then to disk. If the system crashes or experiences a sudden power outage, the data in the cache may be lost.
- Journal corruption. Ext4 relies on a log to ensure data consistency. However, if the cache is not flushed during a write operation, the log can become corrupted. This causes the file system to roll back to an inconsistent state.
- Hardware failure. Bad sectors on the hard drive, SSD controller failure, etc., can directly lead to data loss.
Lost data can usually be recovered, but it will take time and effort. To avoid or reduce the possibility of data loss, here are some feasible prevention measures.
- Back up data regularly. The most effective protection is to back up important data to external devices or the cloud.
- Use UPS or capacitor protection. Use uninterruptible power supplies (UPS) on servers or critical systems to prevent data loss due to sudden power outages.
- Properly configure journaling mode. Ext4 offers three journaling modes: journal (full recording), ordered (default, performance, and security balance), and writeback (performance priority but higher risk). Journal mode is recommended for critical data environments.
- Regularly run file system check tools. Use fsck or e2fsck on Linux to regularly check and repair file system errors.
Wrapping Things Up
Understanding the definition of Ext4 reveals its lack of robust cross-platform support; it’s only available on Linux.
When you want to access it on Windows, you need to format it first. However, before that, perform Ext4 data recovery based on the health status of the disk.
- For a healthy Ext4 partition, use DiskInternals Linux Reader to export files.
- For a corrupted Ext4 partition, use MiniTool Power Data Recovery to scan the drive and recover data.
When the data is secure, format the disk by using File Explorer, Disk Management, and MiniTool Partition Wizard.
If you have any confusion about our MiniTool products, send an email to [email protected].
About The Author

Position: Columnist
Chelsea graduated from university with a major in English. She has a strong interest in English writing. It is this passion for writing that led her to become an English editor. Her articles mainly foucus on data recovery and other computer industry news. As an energetic and outgoing girl, Chelsea enjoys listening to music, singing, riding bikes, and eating in her spare time.
User Comments :