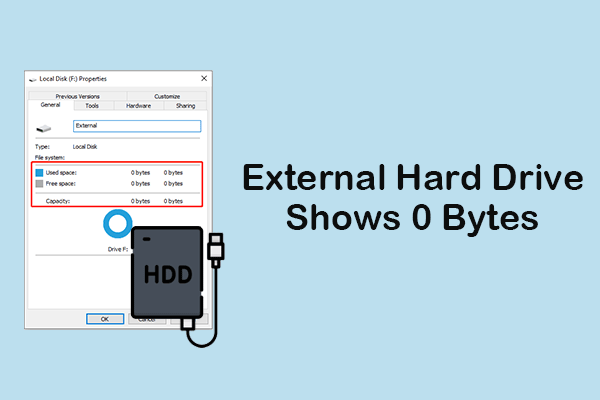
In daily computer use, you may encounter a problem: the external hard drive keeps disconnecting and reconnecting from your device.
“My external USB HDD drive keeps disconnecting mid-game. I thought it was the USB disconnect feature, so I have disabled it in both Device Manager and in the power management in control settings, but it unfortunately still does it. I’m pretty much lost at this point as to what’s causing it.”forums.lenovo.com
If you encounter the “external hard drive frequently disconnecting” issue, two concerns may arise:
- How to fix this vexing issue?
- How to recover data from the problematic external hard drive?
This step-by-step guide provides clear answers to both questions.
Before exploring the solutions, we’d like to explain the reasons behind this issue.
Why Does the External Hard Drive Keep Disconnecting
We have outlined some potential causes for the “external hard drive keeps disconnecting” issue below.
- Faulty USB Cable: The cable connecting the external hard drive to the computer may be damaged or loose. Electromagnetic interference from surrounding devices or cables could disrupt the connection.
- USB Port Problems: The USB port on your computer may be experiencing connectivity issues.
- Power Supply Issues: The external hard drive may not be getting sufficient power.
- Power Management Configurations: Windows power management settings could lead to the sudden disconnection of external drives. The operating system might automatically switch USB ports into a low-power state to save energy, which can cause the hard drive to disconnect when it is not actively being used.
- Driver Problems: Outdated or corrupted device drivers can lead to disconnection issues.
- Physical Damage: Check the external hard drive for any signs of physical harm.
- File System Problems: Corruption in the external hard drive’s file system and bad sectors can result in disconnections.
- Overheating: High temperatures may cause the external hard drive to malfunction.
- Firmware Problems: Verify whether there are any available firmware updates for your external hard drive.
- Software Conflicts: Certain applications, such as antivirus software or system utilities, may accidentally disrupt the functioning of external hard drives.
After recognizing the reasons why the external HDD is frequently disconnecting and reconnecting, start resolving this issue.
Quick Attempt: Perform a Hard Reset (For Lenovo Users)
As a user reported in the Reddit forum, Lenovo suggested performing a hard reset to resolve the issue.
To perform a hard reset, press and hold the Power button for 10 to 20 seconds or more than 60 seconds.
If it doesn’t work, consider using the following solutions to fix the connection issue.
Method 1. Use a Different USB Port and Cable
Before diving into advanced fixes, it is necessary to inspect issues with the USB cable, port, or computer.
Follow the steps to check the hardware connections.
Step 1. Verify the Physical Connection
Begin by checking the USB cable for any visible damage, such as fraying, bends, or deformed connectors. A defective cable can easily result in intermittent disconnections.
- Reconnect the cable securely: Ensure that the USB connector is fully inserted into both the external hard drive and the USB port on your computer.
- Replace the USB cable: If you see any signs of wear or damage, try using a different USB cable to check if the issue continues.
- Replace the port: If your computer has both USB 3.0 and 2.0 ports, consider using a USB 2.0 port. Although the transfer speeds might be slower, this should help prevent disconnections.
Step 2. Verify the External Hard Drive on a Different Computer
To identify whether the problem is with the external hard drive or your computer, try connecting the external drive to another computer.
- If the drive operates without disconnecting, the issue is likely with your PC.
- If the drive still disconnects, then the issue may lie with the drive itself.
Method 2. Turn off USB Selective Suspend
Windows has a power management feature known as “USB selective suspend,” which can lead to the disconnection issue of your external hard drive.
This feature will deactivate a USB device to conserve power when the system detects the device has been inactive for a long time.
To disable the USB selective suspend feature on your Windows PC, follow these instructions:
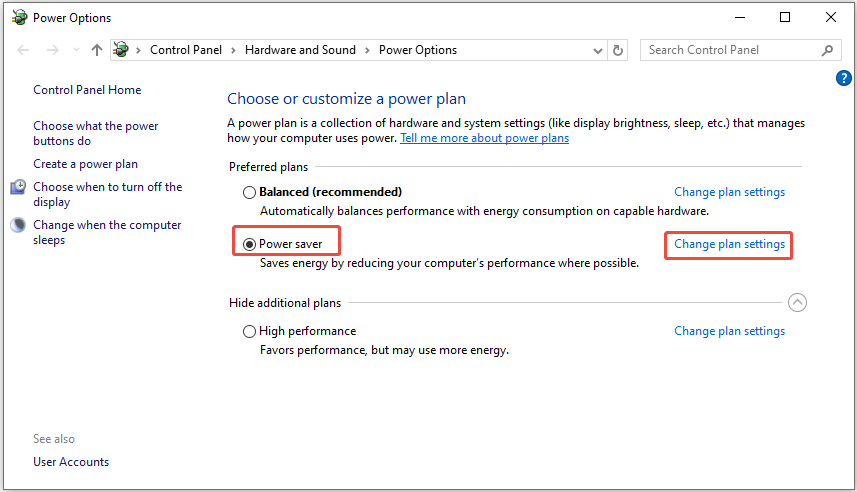
Step 1. Press Win + I to open Settings. Navigate to System > Power & sleep > Additional power settings.
Step 2. In the Preferred plans section, switch to Power saver and click Change plan settings.
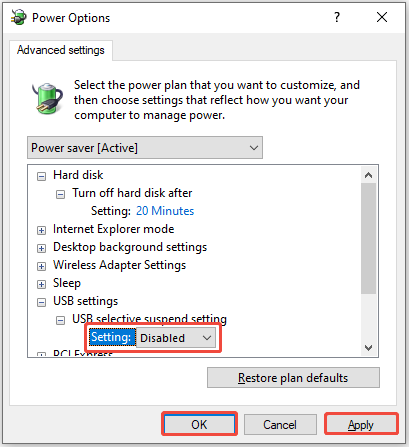
Step 3. In the Edit Plan Settings window, click Change advanced power settings.
Step 4. In the pop-up window, expand USB settings > USB selective suspend setting. Click on the Setting dropdown and choose Disabled.
Step 5. Click Apply > OK to confirm the change.
Reconnect your external hard drive. If the issue persists, try the next solution.
Method 3. Check Power Settings & Disable USB Power Saving
When your external hard drive is powered solely through a USB cable, it may struggle to receive adequate power, particularly if it is a larger model.
Basic Checks:
- Use a powered USB hub: If you are utilizing a USB hub, change to a powered one to ensure the external drive receives sufficient power.
- Use the dedicated power adapter: If your external drive comes with its own power adapter, ensure that it is securely connected to a power outlet.
- Directly connect to the desktop’s back/USB port: If your external drive is powered through the bus, connect it directly to a port located on the back of your desktop or your laptop’s USB port.
If the external hard drive still keeps disconnecting, consider disabling the USB Power Saving function.
For Windows devices, USB Power Saving is a built-in feature designed to automatically disable USB devices after a period of inactivity, even when they remain connected.
Turn off USB Power Saving:
Step 1. Press Win + X to open the Power User menu and click Device Manager.
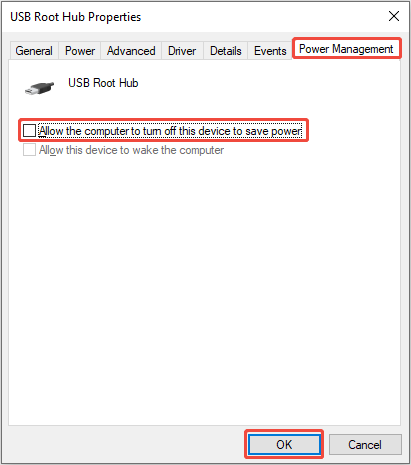
Step 2. In the new window, expand Universal Serial Bus controllers, right-click USB Root Hub, and select Properties.
Step 3. Switch to the Power Management tab and uncheck the box for Allow the computer to turn off this device to save power.
Step 4. Click the OK button to save the change.
If the external hard disk disconnection issue is not caused by an insufficient power supply, consider changing the disk power-off time.
Method 4. Change the Hard Disk Power-off Time
Modifying the power-off time settings for your hard disk ensures that the system does not automatically shut down the drive during periods of inactivity.
To set the timer to 0, follow these steps:
Step 1. Launch the Control Panel and navigate to System and Security > Power Options.
Step 2. Check the box for Power saver and then click on Change plan settings.
Step 3. Select Change advanced power settings.
Step 4. Select High performance from the drop-down menu.
Step 5. Expand the Hard disk section and look for Turn off hard disk after.
Step 6. Enter 0 in the provided box and click Apply > OK.

If the issue still exists, try running the disk checking tool to scan and fix any file system errors.
Method 5. Run the Error Checking Tool
This approach is focused on checking and fixing file system errors on the external hard drive. File system corruption or bad sectors can result in unreliable connectivity or even data loss.
Windows includes a built-in tool called error-checking that can repair file system errors and isolate bad sectors.
Here are the steps to run the disk checking tool:
Step 1. Press Win + E to launch File Explorer. Select This PC, right-click on the problematic drive, and choose Properties.
Step 2. Navigate to the Tools tab and click the Check button under the Error checking section.
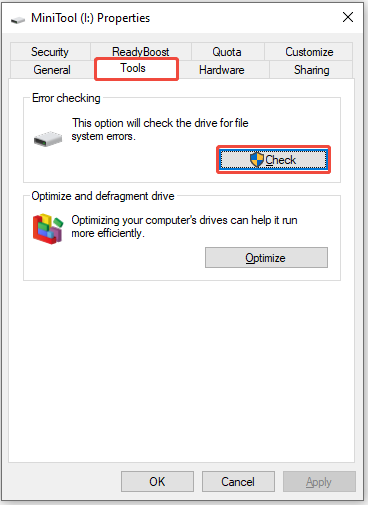
Step 3. In the dialog box that appears, select Scan and repair drive. Wait for the scanning process to finish.
If any errors are detected, the system will ask if you want to repair them. Follow the on-screen instructions to complete the entire procedure.
If this tool doesn’t find any errors, proceed with the next method.
Method 6. Update or Reinstall Device Driver
If the above-mentioned solutions do not resolve the issue of the “external hard drive keeps disconnecting,” consider updating or reinstalling your device drivers.
Outdated or corrupted drivers can lead to the system not consistently recognizing the hard drive, which may cause disconnections.
Here’s the breakdown to update or reinstall the disk driver.
#1. Update the Disk Driver
Step 1. Right-click the Windows icon and select Device Manager.
Step 2. Expand the Disk drives section, right-click on the target drive, and click on Update driver.
Step 3. In the pop-up window, choose Search automatically for drivers. This will identify and install the most up-to-date driver.
Wait for the installation process to finish and then restart your computer.
#2. Reinstall the Disk Driver
If there are no updates available, try reinstalling the device:
Step 1: In Device Manager, right-click on the drive and select Uninstall device.
Step 2: In the confirmation prompt, click Uninstall.
Once the uninstallation is complete, restart your computer, and Windows will automatically install the available driver.
If you find data loss on your external hard drive, read on to learn how to perform an external hard drive recovery.
How to Recover Files from a Frequently Disconnecting External Drive
One of the problems that comes alongside the “external hard drive keeps disconnecting” is data loss.
If you find yourself in this situation, you’ll need to use professional data recovery software to recover the data from your external hard drive.
MiniTool Power Data Recovery is a flexible and easy-to-use tool designed to recover lost data from malfunctioning external hard drives.
Key Highlights of MiniTool Power Data Recovery:
- Supports recovery of a wide range of file types, ensuring thorough external hard drive restoration.
- Allows you to preview recoverable files before recovery to enhance the accuracy and efficiency of recovery.
- Recover deleted, lost, formatted, or corrupted files from any storage device.
- Allows you to recover 1 GB of files for free and perform a secure data recovery.
Now, download and install this free data recovery tool to recover external hard drive data on Windows.
MiniTool Power Data Recovery FreeClick to Download100%Clean & Safe
Steps to Recover Data From an External Hard Drive
Step 1. Select the disk for scanning.
Once you enter the main interface of the recovery software, the initial step is to identify the partition or disk you wish to scan.
You can view partitions under the Logical Drives section and entire disks under Devices.
Hover your cursor over the desired partition or disk and click on Scan.

Step 2. Find and select the files you wish to recover.
After the scanning process is finished, it’s time to identify the files you want to restore from the scan results.
Under Path, navigate through the folder structure by expanding each level to explore and locate the files you need.
Alternatively, you can shift to the Type tab to view files based on their type and format.
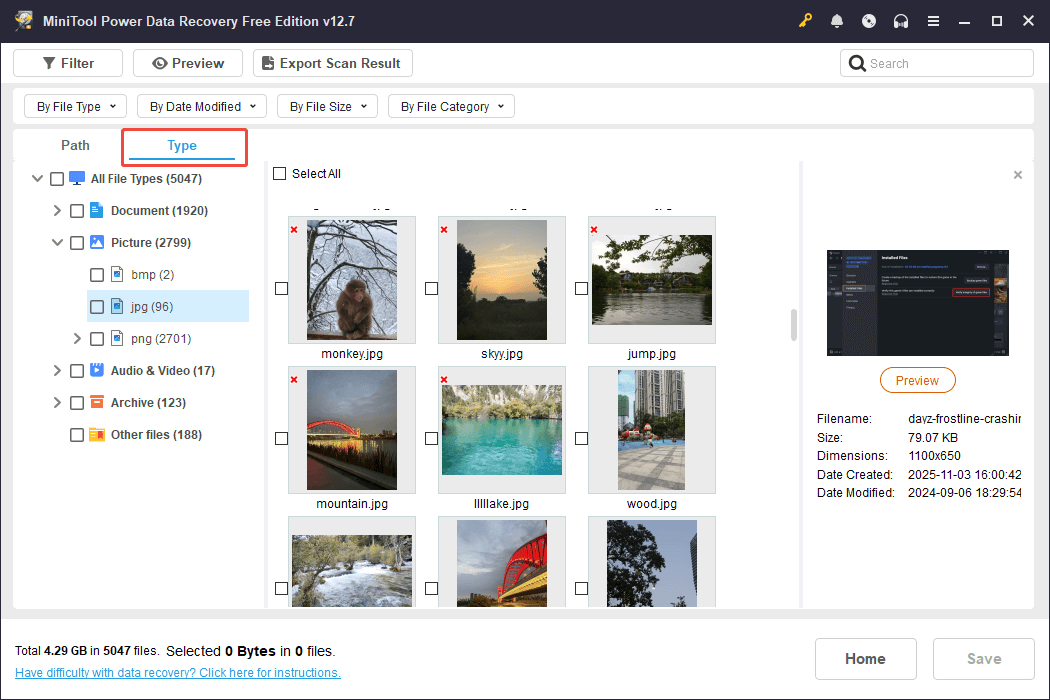
If you want to refine the results further, click on the Filter button in the top left corner. You will then be able to filter files by their type, size, modification date, and category.
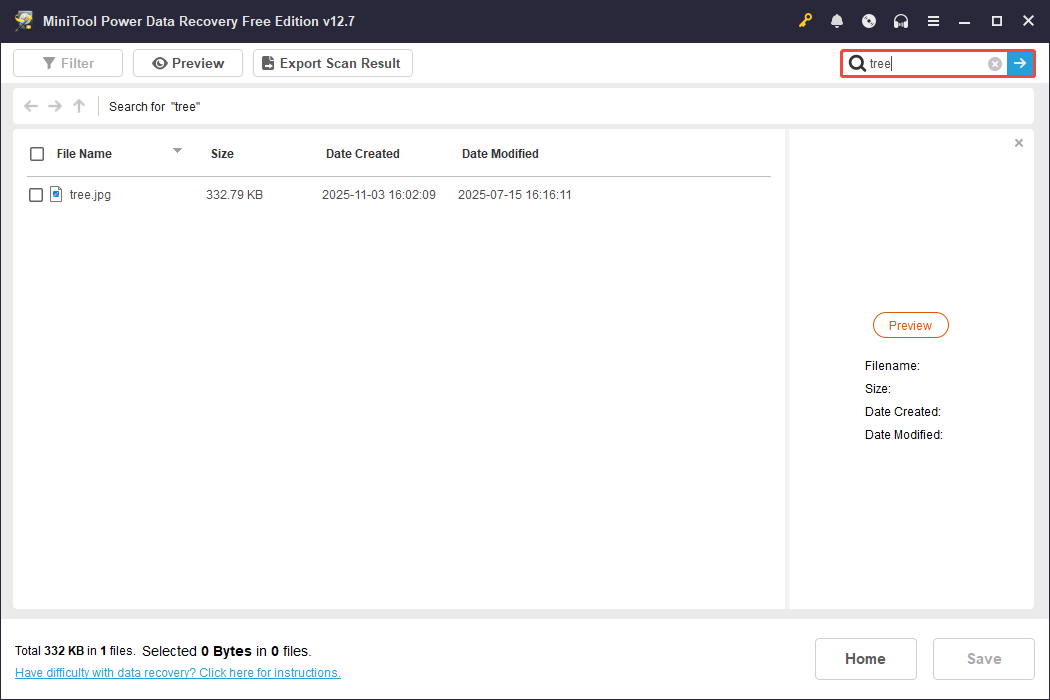
If you remember the name of the file or folder you want to retrieve, simply type it into the search box at the top right corner and press Enter to locate it directly.
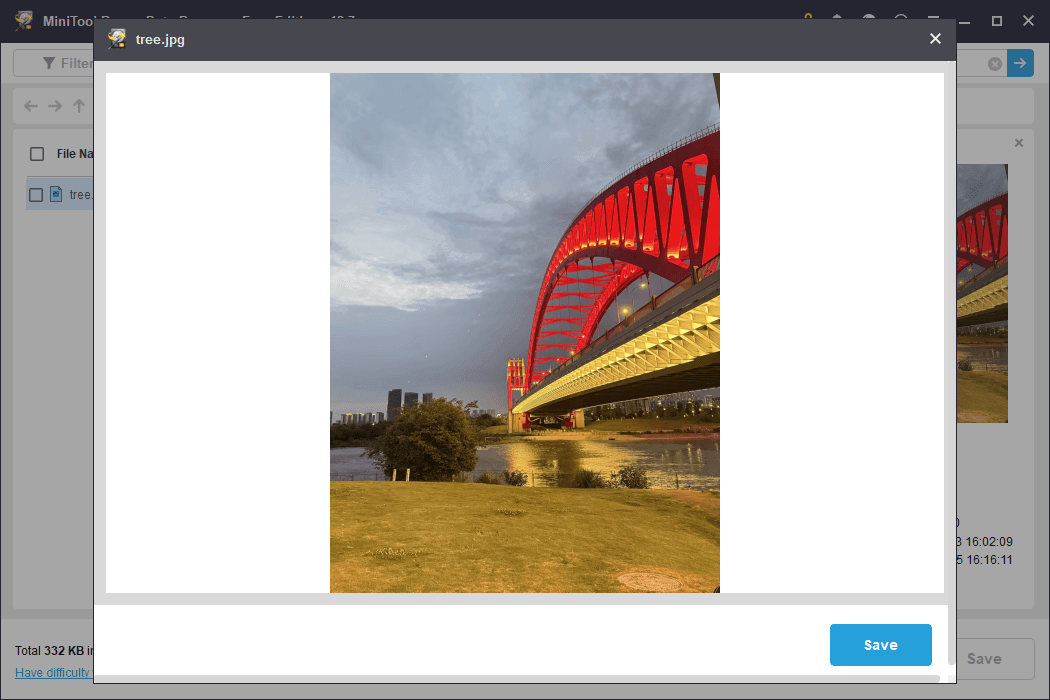
Step 3. Preview and save the chosen files.
To utilize the 1 GB of free data recovery effectively, double-click on each file to preview it before recovery.
Finally, ensure that all the files you wish to recover are checked to prevent the need for another scan, and then click on the Save button.
In the pop-up window, select a location on a different disk to store the recovered files.
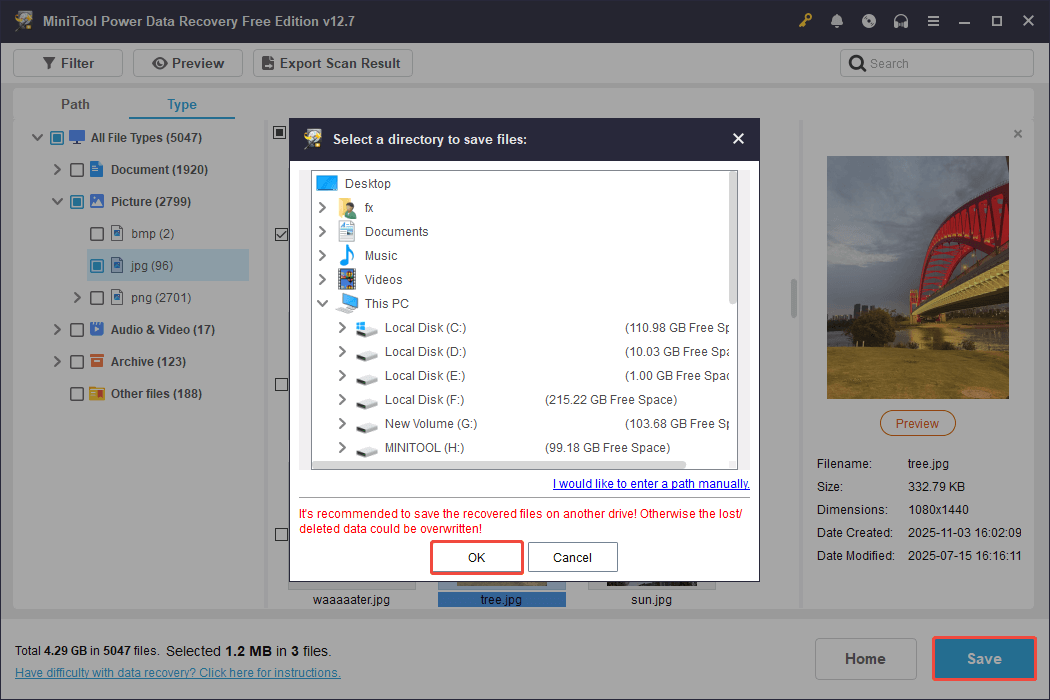
Be aware that any files exceeding the 1 GB free limit will require an upgrade to a full edition of the software to be recovered.
Bottom Line
The “external hard drive keeps disconnecting” problem can be caused by faulty cables, partition table issues, or hardware failures, etc.
Basic troubleshooting should include changing a cable, port, or computer. If the drive is still not recognized, advanced solutions like firmware updates, disabling USB Selective Suspend, or using disk checking, can help you fix it.
If you find you have lost data from the external hard drive, try using MiniTool Power Data Recovery to rescue it.
Should you encounter any issues or have any questions about the MiniTool data restoration tool, please send an email to the support team via [email protected].
About The Author

Position: Columnist
Sandy became an English editor after graduation. She is devoted to finding effective solutions for diverse IT problems and provides articles on data recovery, data backup, and computer partitions and drives. In her spare time, she likes listening to music and playing games.
User Comments :