When faced with video files occupying a large amount of disk space, you may choose to delete some of them. In addition, sometimes your videos may get lost due to computer failure. When deleted or lost videos are useful to you, how can you recover them? Read this post to learn how to do hard drive video recovery with MiniTool Power Data Recovery.
Common Reasons for Hard Drive Video Loss
“Videos from my recent trip were located at the end of all my photos in the photo gallery. I was trying to burn the videos to a DVD which didn’t work.... However, I was trying to view the videos again and they have disappeared. I cannot find them anywhere!!! Can anyone help me, any suggestions??????”answers.microsoft.com
The hard drive is an internal or external computer component used to store data including the operating system, application, and user’s files. It is a non-volatile storage device, which means although there is no electricity, it also can preserve the stored data. However, files on the hard drive may be lost unexpectedly.
Why could data be lost? Here are some reasons for hard drive video loss.
- The most common one is the human factor. The video may have been accidentally deleted while cleaning your disk.
- Power surges and outages can suddenly shut down the operating system without following the correct procedures. This can damage the computer, affecting the hard drive.
- The hard drive has removable parts. It can fail mechanically due to wear, overheating, static discharge, or being dropped.
- The virus and malware on your computer can be dangerous for hard drives. They will attack your hard drive and cause data loss.
Can I Recover Deleted Video From Hard Drive and Why
There is a common misunderstanding that when we delete a file, it will be deleted completely from the hard drive. The space vacated by the deleted file will be marked as a space for storing files, but the original data will remain in the original location. When new data is stored in the location where the deleted file is, the original data is overwritten and cannot be scanned out.
Therefore, only if when other files do not overwrite the deleted files on the hard drive, the deleted files have the opportunity to be recovered. That’s why you can recover the deleted files, formatted data, and lost files.
Generally, if you use the Delete key to delete videos, they will be put in the Recycle Bin. Therefore, you can recover them from the Recycle Bin. If the video is not here, you can check if there is a backup. However, if you need to recover permanently deleted videos from hard drive without backup, you should use secure file recovery software like MiniTool Power Data Recovery.
How to Recover Deleted Video From Recycle Bin
The video can be easily recovered if you delete the video by right-clicking it and choosing Delete. You can find the deleted files in your Recycle Bin and then you can restore the video you want. Here are some steps to make hard drive video recovery from the Recycle Bin:
- Find the Recycle Bin icon. It is usually on your desktop.
- Right-click on Recycle Bin and choose Open. After opening, you will see all the data you have deleted.
- Double-click on the video, and then click on the Restore button in the lower right corner.
Once you complete these operations, you can find the recovered video in the original location in your File Explorer.
How to Recover Video From Hard Drive Using MiniTool Data Recovery Software
In the next part, we will introduce two software released by MiniTool to help you recover videos.
Method 1: With MiniTool Power Data Recovery
If you don’t find the video you want to recover in the Recycle Bin, then you can use MiniTool Power Data Recovery. It plays an important role in restoring data, which can help you retrieve lost videos, photos, and so on. It supports various hard drive video loss scenarios, such as virus attack, incorrect disk formatting, accidental deletion, etc. Whether you are running Windows 11/10/8.1/8, this free software can satisfy your need for recovering data. Now you can download MiniTool Power Data Recovery Free on your computer to recover data.
MiniTool Power Data Recovery FreeClick to Download100%Clean & Safe
Step 1: Launch MiniTool Power Data Recovery
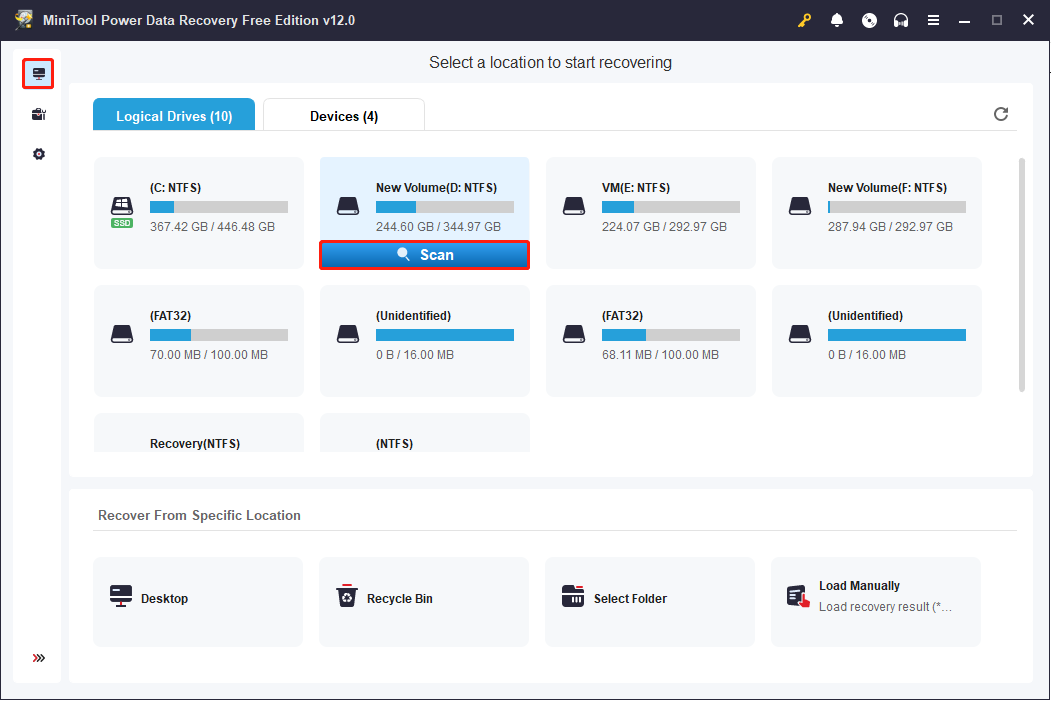
After installing the software, it will show up on your desktop. You should double-click on its icon to open it. Then you will see the main interface of this software with a column of icons on the left and drives on the right.
Step 2: Find the hard drive to scan
When you enter the software home page, you are in the This PC section by default. Now you can find the drive where the original drive of the videos you want to recover is located in the right pane. When you put your cursor in the drive, the Scan icon will show up. Click on it to start scanning.
Step 3: Choose the videos to save
The scanning process will take some time. For the best scan result, please wait until the full scan finishes. After scanning, switch to the Type bar and expand All File Types and Audio & Video. You can check all the video files which are classified by specific formats.
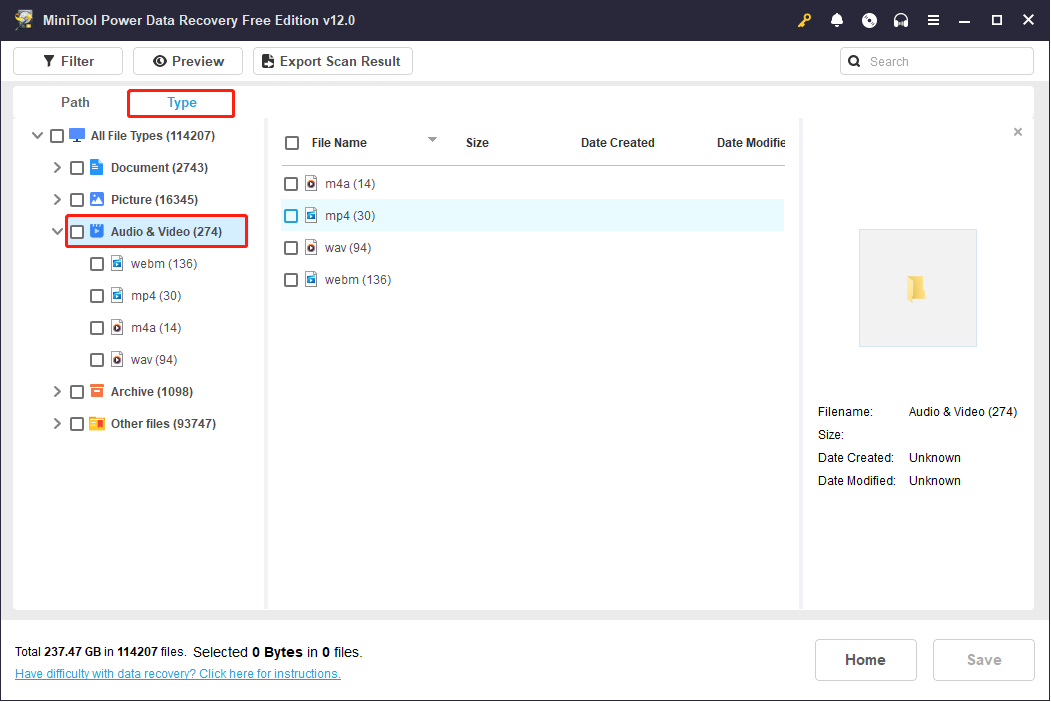
The Filter feature in the upper left corner also has the function of classifying files by file type, which can help you filter all videos. Compared with Type, it has more filtering functions, allowing you to filter listed files by file modification date, file size, and file category.
In addition, you will see the search box on the top right corner. It is suitable when you want to recover a specific video file. After typing the keyword of the file name of the desired file and pressing Enter, the video will be displayed.
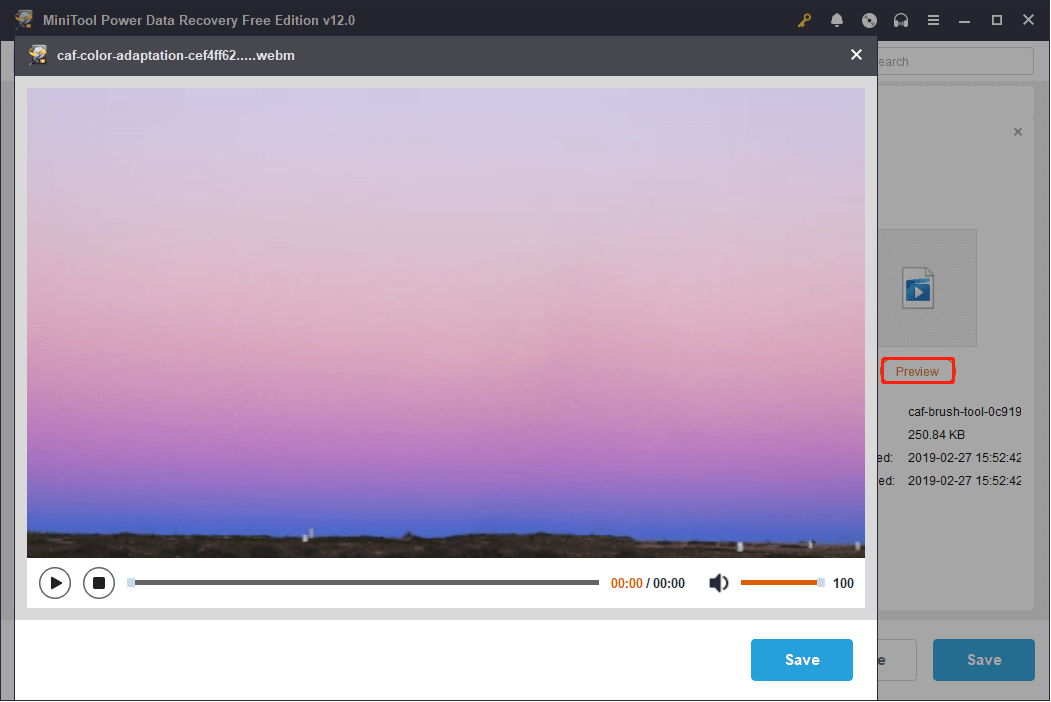
When you find the video files, you can click the Preview button to check if the file is what you want or whether it is corrupted.
Step 4: Select the location to store the recovered videos
Finally, select all required videos and click on Save, and then the Select a directory to save files window will pop up. Now you should select a location to store the videos you want to recover. In the end, click on OK.
After doing so, you can go to File Explorer and check if the videos are recovered.
The free edition of this file recovery software can only recover 1 GB of files. If you have more files to recover, you can upgrade the free edition to a full edition.
Method 2: Via MiniTool Photo Recovery
MiniTool Photo Recovery is dedicated to recovering photos, videos, and audio files, and is more targeted at recovering videos. If you want free hard disk video recovery software, do not miss it. Now download and install MiniTool Photo Recovery Free on your computer.
MiniTool Windows Photo RecoveryClick to Download100%Clean & Safe
Here you can see how to utilize this software to recover videos from hard drive:
Step 1: Launch MiniTool Photo Recovery
Once you complete the installation, the software will be displayed on your desktop. You should double-click on its shortcut icon to open it. After doing so, the main interface will come into view.
Step 2: Select the hard disk volume to scan
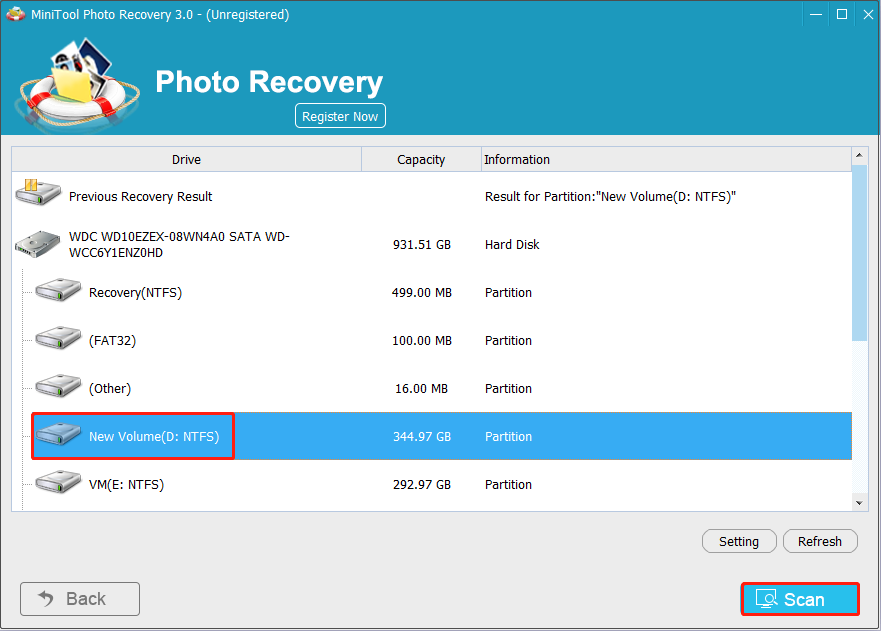
Click on the Start button to open the following interface. Click the Setting button in the lower right corner, tick the Audio/Video option only in the new window, and hit OK. Now you should choose the target drive where your videos are before losing them. Then click on Scan to find the deleted or lost videos. It will take several time for this process.
Step 3: Select the videos to recover
When the scan is compeleted, find all the needed videos according to file type in the left panel, and click on Save.
Step 4: Choose a location to store the recovered videos
When the Save Files window appears, click on Browse… to select a directory. The final step is to click on OK.
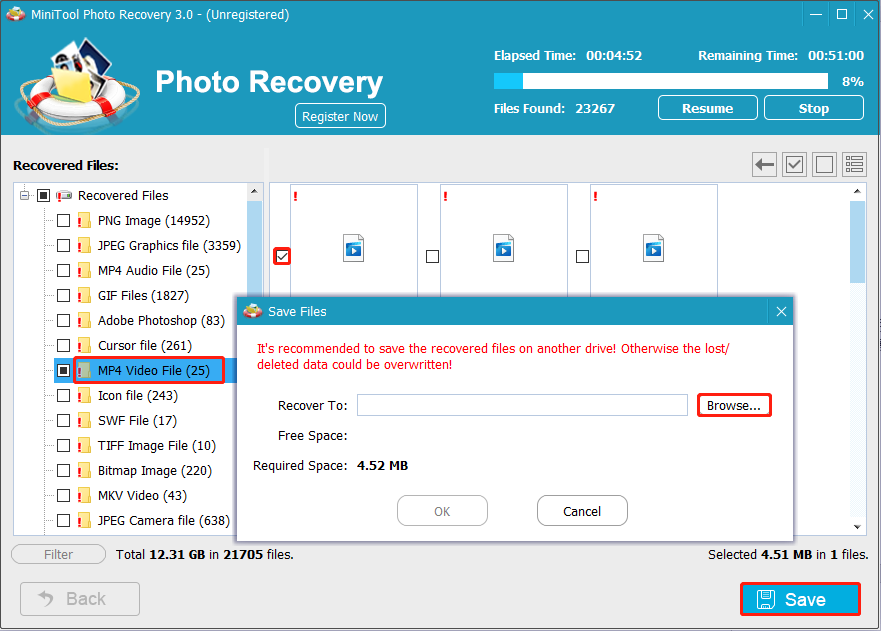
As long as you follow these steps, you have recovered the videos successfully.
How to Recover Deleted Video Through File History
File History It is a built-in function that can back up files in the Users folder in the C drive, such as music, pictures, and videos, to an external disk or network location. If you enabled this function before data loss, you can restore files with File History. Here is how you can use it to recover deleted video:
Step 1: Press the Win + S keys, input Control Panel in the search box, and press Enter.
Step 2: After opening the Control Panel, switch the view into Large icons.
Step 3: Click on File History > Restore personal files.
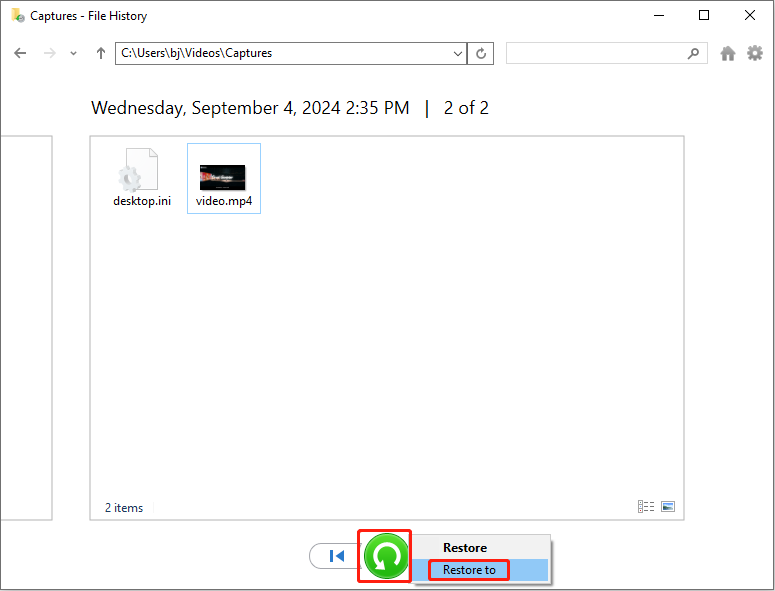
Step 4: Choose the videos you want to restore, and click on the green Restore button to restore them to their original locations. If you want to restore videos to another location, you should right-click on the green Restore button, and then select Restore to… to save them to another location.
How to Back up Videos on Windows
If you are worried about video loss, it is recommended that you make backups regularly so that even if your original videos are lost, you still have the backup videos to use. For example, you might back up personal files from a desktop computer to an external hard drive and the cloud. Storing data in three places that face different risks can minimize the risk of complete data loss.
Here are some methods to help you back up videos:
Back up files using MiniTool ShadowMaker:
MiniTool ShadowMaker is a Windows backup tool used to make regular backups effectively. It also provides data protection services and disaster recovery solutions for your computer. You can download this tool to your computer and use it for free within 30 days. See this tutorial: How to back up files using MiniTool ShadowMaker.
MiniTool ShadowMaker TrialClick to Download100%Clean & Safe
Back up videos with Backup and Restore:
- Open your Control Panel and change the View by to Large icons.
- Choose Backup and Restore (Windows 7), and connect an external disk to your computer.
- Under Backup, click on Change settings.
- In the Set up backup interface, select the external disk to store your videos and click on Next to continue.
- Select the files you want to back up and click Next.
- Hit Save settings and run backup.
Once this process is complete, you have completed the backup.
Back up video via File History:
- Right-click on the Start button and choose Settings to enter it.
- In Settings, select the Update & Security option.
- In the left pane, choose Files backup, turn on the Automatically back up my files and click on More options under Back up using File History.
- Click on Add a folder under Back up these folders to select the folder you want to back up and then click on Choose this folder. If this folder appears under the Add a folder option, it can automatically be backed up.
- After choosing folders, click on Back up now under Overview.
Read More: A Comprehensive Guide on How to Back up Files (Windows 10/11)
Final Words
Now you should have a clearer understanding of hard drive video recovery. This article lists several methods to teach you how to recover video from hard drive. If you cannot find the video in Recycle Bin or your Recycle Bin is corrupted, or didn’t back up with File History, you can use MiniTool Power Data Recovery to recover it. Of course, making a regular backup is important for you to protect your data. You can use MiniTool ShadowMaker to make a backup.
If you have any questions when you use MiniTool Power Data Recovery or MiniTool ShadowMaker, you can contact us via [email protected].


User Comments :