Unfortunately, your hard drive came up as “Unknown Device” in Device Manager and you cannot read or access all the data. Here on this page, you’ll learn four effective ways to fix the hard drive shown as Unknown Device, and powerful hard drive data recovery software to recover inaccessible data.
HDD Shown as Unknown Device in Device Manager
Encountering your HDD shown as Unknown Device can be quite frustrating, as it puts you at risk of losing your data. Actually, an unknown HDD is a common issue encountered by many users. In addition to external HDDs, users also report that their USB flash drives become “Unknown Devices” as well.
What is an “Unknown Device”? An unknown device refers to a device that is unable to be identified or recognized by the Windows system. In Device Manager, such a device is labeled Unknown Device and marked with a yellow alert icon.
Help: I’ve got an unknown drive showing up on My Computer. I can explore it and even open many files on the drive, but I don’t know where it comes from. It’s not a mapped network drive and I have no USB drives or other HDDs mounted. I’ve supplied pics of My Computer and Device Manager. Device Manager doesn’t even list the drive. What am I missing? Where is this unknown drive coming from? Any help?community.spiceworks.com
Reasons Why HDD Shows as Unknown
Identifying the causes of the Disk Unknown error on your computer before delving into the effective steps can help determine appropriate troubleshooting solutions to fix the unknown hard drive.
- Incorrectly connecting the drive to your system.
- Data corruption in the hard drive may cause it shown as Unknown.
- The currently loaded driver for the external drive has become unstable or corrupted.
- Your external drive may be entering selective suspend.
- Your PC motherboard may need updated drivers.
These causes may trigger the Disk Unknown error. You need to check your external hard drive and computer to ensure that the following methods are suitable for you. Read the following content to learn how to recover data from an unknown device.
How to Recover Data from Unknown HDD
MiniTool Power Data Recovery is a piece of free data recovery software. It is dependable, powerful, and easy-to-use data recovery software that is worth a try. It is not only an Unknown HDD Recovery tool but also performs well with external hard drive recovery, HDD data recovery, SD card data recovery, and more. MiniTool Power Data Recovery software is popular for the following features:
- This MiniTool free data recovery software can deep scan hard drives, memory cards, SSDs, etc. on Windows-compatible devices.
- MiniTool free data recovery software supports types of files including photos, videos, audio, documents, and more.
- MiniTool free data recovery software can recover data from kinds of storage devices under different data loss situations like file deletion, virus invasion, disk failure, file system error, etc.
- The MiniTool Power Data Recovery free version allows you to preview files before restoring them. This makes file restoration easier as you can determine whether these files are the ones you want.
When you lose access to the Unknown HDD, do not hesitate to run the software to scan and display all the external hard drive data for you. If needed, download and install the Free MiniTool Power Data Recovery Edition NOW on your PC by clicking the button below to try to recover your lost data from the hard drive.
MiniTool Power Data Recovery FreeClick to Download100%Clean & Safe
6 Steps to Recover Data from An Unknown Device
Suppose you have downloaded and installed MiniTool Power Data Recovery successfully, follow the next instructions to recover data from the Unknown device.
Step 1: Connect your external hard drive that includes lost data to your computer. Then, click the MiniTool Power Data Recovery software icon to open it, and click the Yes button in the UAC prompt.
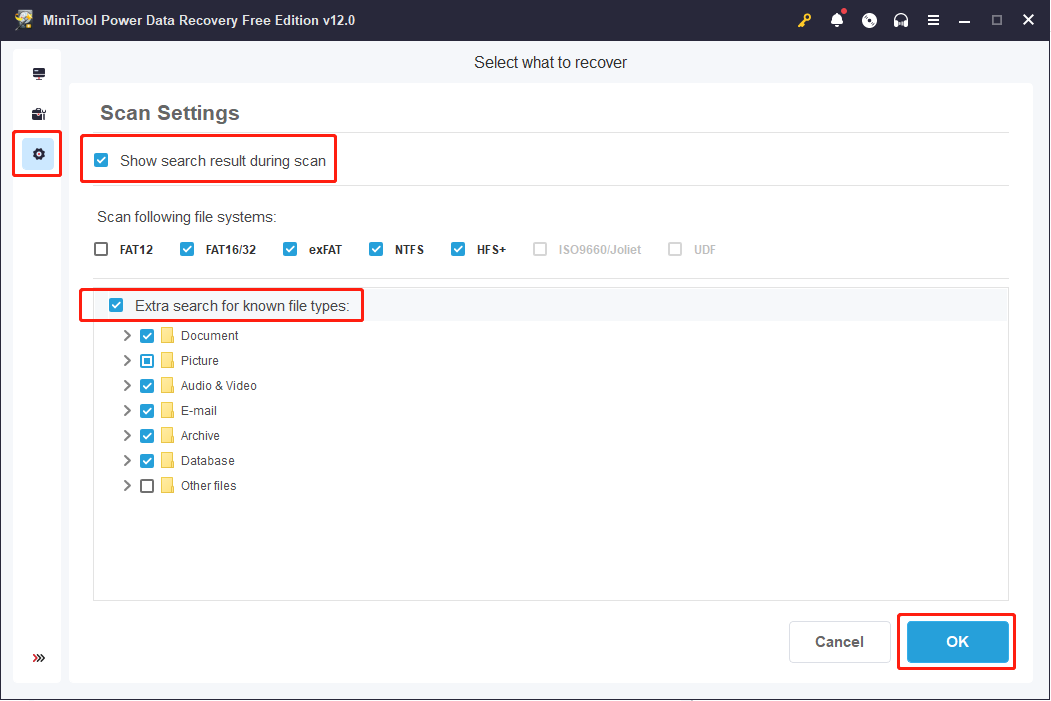
Step 2: This is an optional action. Before starting to scan devices, you can select the desired file types in the Scan Settings section. In the same section, you can also choose the file system. After changing the settings, click the OK button to save the change.
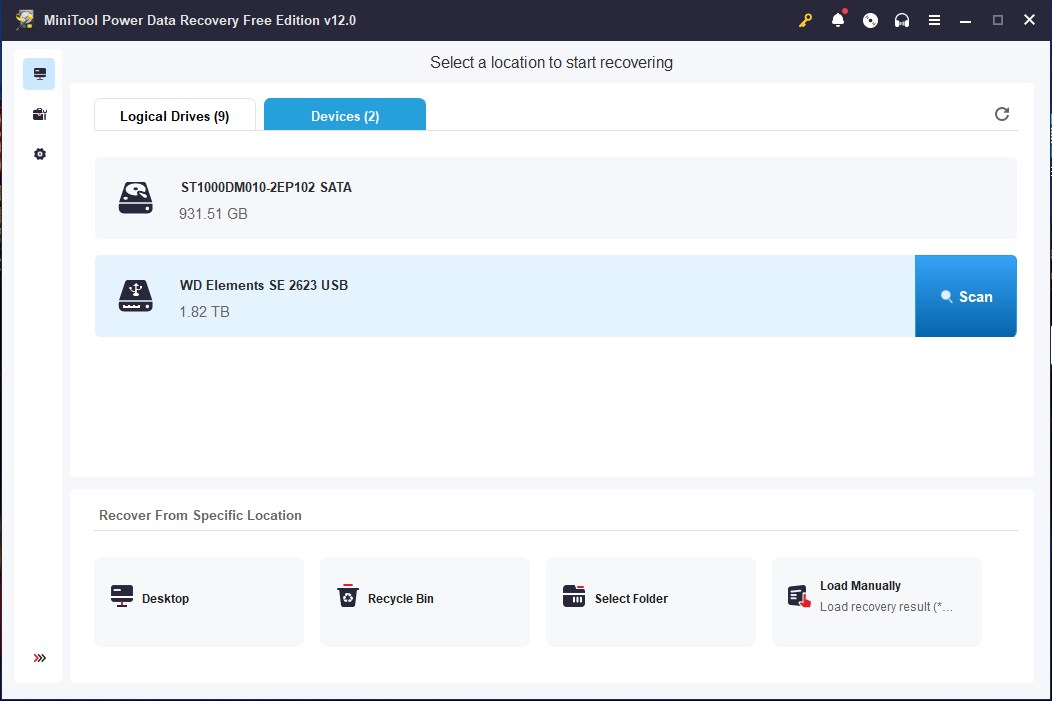
Step 3: Back to the This PC interface, you will see the external hard drives under the Devices tab. Then, in the right panel, select the hard drive you want to recover, and click Scan to scan the whole disk directly. The scan duration depends mainly on the amount of data. It may take some time to complete the entire scanning process, so please be patient and wait until the scan is finished to get the best results.
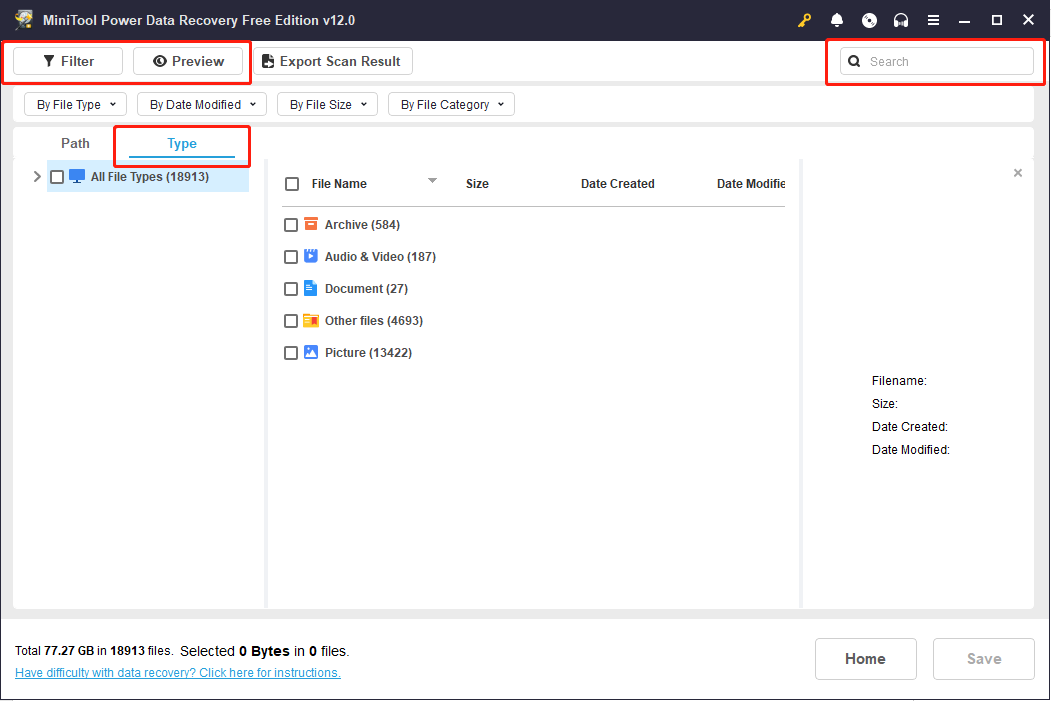
Step 4: You can filter files by using the Type, Filter, and Search features to find the files you need easily.
Four useful features:
Type: Typically, a large number of files appear in the scan results window. You can click the Type button to show the file types of the scan result, including Document, Picture, and so on.
Filter: Specify the file type, date modified, file size, and file category to view only the desired files from the scanning result.
Search: You can find files by inputting continuous keywords of the file name in the search box.
Preview: Check the chosen file is what you want. You can preview files, photos, videos, and audio. Please note that the previewed videos and audio should not be larger than 2GB.
Step 5: Add checkmarks before the files you want to recover, then click on the Save button.
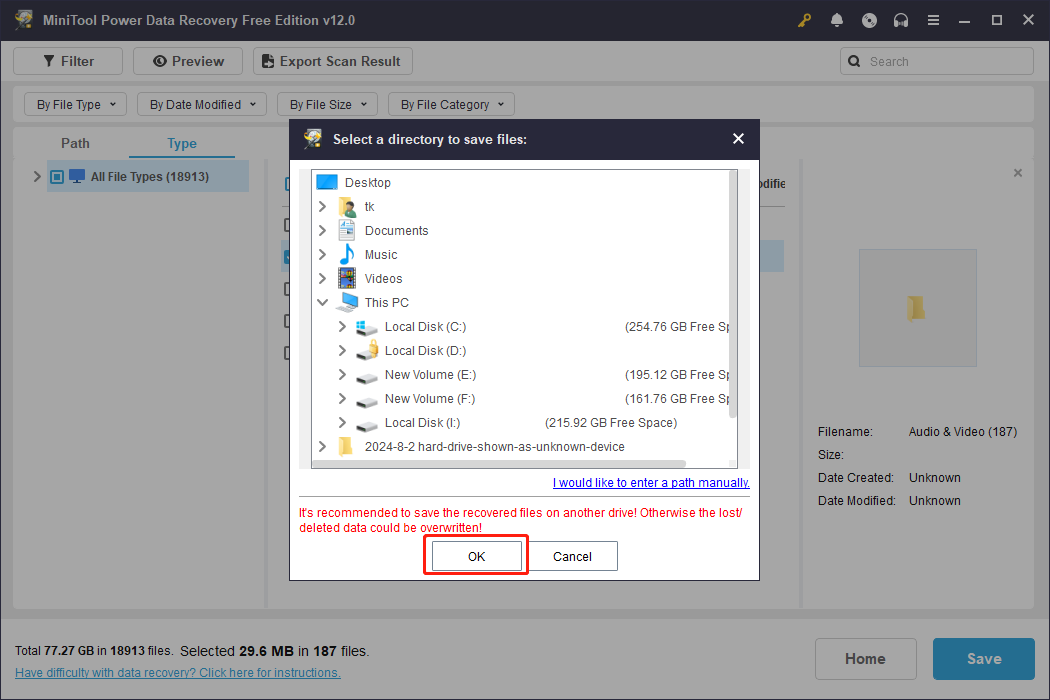
Step 6: Choose the correct storage path to save files and click OK to confirm.
Once you have recovered the lost data, it’s better to back them up to prevent data loss. You can choose Windows-embedded utilities to back up files, such as File History. Alternatively, to perform a comprehensive and precise backup task, you can select one professional backup service, like MiniTool ShadowMaker. In addition to the basic backup function, this software enables you to back up files in a period automatically. You can get this software to experience backup features for free within 30 days.
MiniTool ShadowMaker TrialClick to Download100%Clean & Safe
4 Fixes to Resolve an Unknown Device
Regardless of how the error appears, there are solutions available to resolve this problem. Check for possible connection issues between the hard drive and your computer before investigating any other solutions.
First, unplug and re-plug the hard drive into your PC to eliminate any temporary connection problems. Additionally, please make sure that the hard drive’s connection cable has no visible damage to any part of it. What’s more, clean both ends of the cable with a cloth to ensure that no dust or debris is stuck inside, which could prevent the disk from being recognized.
If none of the above temporary issues seem to be the culprit, try the methods below to resolve the Unknown Device issue.
Fix 1: Disable Selective Suspend Settings to Fix Unknown Device
Selective suspend allows an idle USB device to power down and later resume while the computer remains working. When USB Selective Suspend is enabled, the hub driver will suspend a single port, which may cause the USB to be recognized as an Unknown Device. Therefore, disabling the USB selective suspend setting may fix the error with the HDD shown as Unknown Device. Follow the steps below:
Step 1: Press the Win + R key combination to launch the Run dialog box, type control in the box and press Enter to continue.

Step 2: In the Control Panel window, type Power Options in the search box and click the relevant result.
Step 3: In your own power plan, choose Change plan settings after the Balanced (recommended) option.
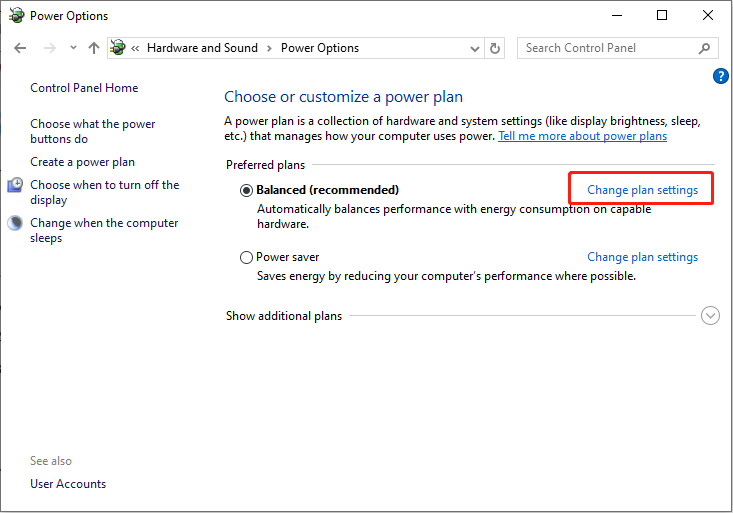
Step 4: Next, click the Change advanced power settings option to continue.
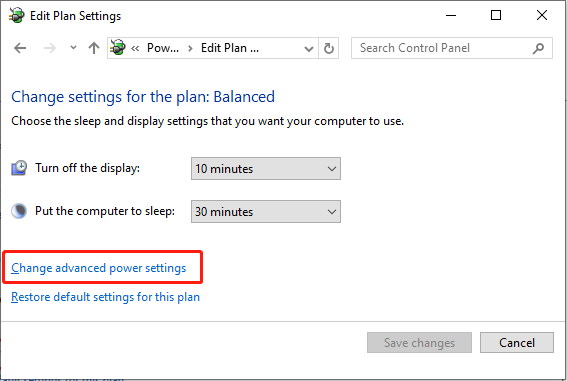
Step 5: In the pop-up interface, expand USB settings and then choose the USB selective suspend setting option. Next, click Setting, and turn the default Enable to Disable.
Step 6: Click the Apply button to save the change.

Fix 2: Uninstall and Reconnect the External Hard Drive
To fix an unknown device, you can also choose to uninstall the external hard drive and reconnect it to check whether it is still shown as an Unknown Device.
Step 1: Click the Search button on the taskbar, type Device Manager in the search box, and select the relevant result to continue.
Step 2: In the following window, navigate to the hard drive showing Unknown Device (Usually it’s under the Other devices option).
Step 3: Right-click on it and select Uninstall.
Step 4: After the hard drive is uninstalled, eject the external hard drive.
Step 5: Wait a while, and reconnect the external drive to the computer.
Windows will automatically install and load the drive this time. Go to check if the drive shows in Windows Explorer.
Fix 3: Reinstall the USB Controller
USB controller enables hardware like flash drives, mice, and keyboards to communicate with your PC. It features input and output ports for data transmission through cables or direct connections.
Step 1: Open Device Manager as in Fix 2. Expand Universal Serial Bus Controllers and find the Unknown USB Device option.

Step 2: Right-click on it and select Uninstall.
Step 3: Wait until it completes, eject your USB drive, and restart your computer. The USB controllers will automatically install. Go to check if the USB drive shows up in Windows Explorer.
Fix 4: Update Your Motherboard Chipset Drivers
Chipset drivers allow your operating system to communicate with your motherboard, an essential component that manages communication between the CPU and memory. The outdated chipset drivers will slow down your system performance. Therefore, you can follow the steps below to update your motherboard chipset drivers.
Step 1: Review your computer’s documentation which includes the name of the motherboard manufacturer. It’s important for you to search for a matched driver.
Step 2: Visit your computer manufacturer’s official website. Navigate their website to find the appropriate driver for your motherboard. For assistance, you can also reach support for further help.
After updating your motherboard chipset drivers, if your external HDD is still showing up as “Unknown Device, the last resort is to initialize the external drive. In most cases, you don’t want to format the external hard drive directly because there are some important files on it. Fortunately, you can initialize the disk without losing data by using MiniTool Partition Wizard.
MiniTool Partition Wizard FreeClick to Download100%Clean & Safe
However, if the initializing operation causes a total data loss, you can recover data after initializing the disk with professional data recovery software by following the above data recovery steps.
Bottom Line
This post provides four solutions with detailed steps to help you solve a HDD shown as Unknown Device error in Windows. If you unexpectedly lose your data while fixing the error, you can use data recovery software to recover it instantly.
If you have any puzzles in using MiniTool software, don’t hesitate to get in touch with us via [email protected].


User Comments :