Is Kingston SSD not detected on your computer? In fact, you are not the only one suffering from this annoying problem. This post puts forward several practical methods and introduces one powerful data recovery software to rescue your data. If you are searching for solutions, delve into this post for more information.
Kingston SSD not Detected on Windows
With splendid stability, speed, and durability, Solid State Drives (SSD) have gradually become the main data storage device for the majority of people. Kingston SSD is one of the popular ones. However, some people report the Kingston SSD not detected on their computers. Why does this issue occur and how to resolve it without losing data? Continue reading to figure out the answers.
Possible Causes for the Kingston SSD not Showing up
Coming to the main causes, we can generally discuss them in terms of the following 4 aspects:
- Loose connection: If your computer does not recognize the Kingston SSD, you should check the connection cable and port of the SSD as well as your computer. Sometimes, a damaged or broken port or cable results in a poor connection between the two devices, causing the external device not to show up.
- Outdated firmware and software: An outdated device component or device driver can cause incompatible issues between the Kingston SSD and the computer, possibly, making the Kingston SSD not detected.
- Not initialized for use: If you are using a new Kingston SSD and find it doesn’t appear in File Explorer, the most probable reason is that the SSD is not initialized for proper use.
- Improper BIOS settings: As an essential component, BIOS ensures the computer’s proper performance. Hence, the misconfiguration on BIOS could result in the Kingston SSD not detected error.
- Etc.
Knowing those common triggers assists you in discerning the actual reason for your case. Solutions in the following content shows you several solutions to resolve the Kingston SSD not showing up issue.

Do Some Preliminary Checks
Instead of carrying out complex solutions immediately, you can first do some simple checks to see if those easy operations help resolve the issue.
- Check whether the Kingston SSD has physical damage, including the cable, port, and device. If the cable or the port is damaged, change to a new one and reconnect it to your computer.
- Detect if the USB port on your computer is distorted or corrupted. You can connect the Kingston SSD via another USB port. Additionally, if you connect the Kingston SSD to the computer via a USB hub, remove the hub and directly connect it to the PC. This is because USB hubs are not always able to provide sufficient power to detect devices.
You can directly connect the Kingston SSD to another device. If the Kingston SSD is detected properly on another device, the SSD not showing up issue is triggered by your computer; otherwise, it is caused by the SSD itself. Afterward, choose the appropriate solutions to troubleshoot the issue.
Fix 1. Add a Drive Letter to the Kingston SSD
A drive letter is used to identify and access volumes on a computer. Typically, the computer gives a drive letter to volumes automatically to distinguish them. When a volume or disk doesn’t have a drive letter, it will not show up in File Explorer. In this case, people may think the disk has disappeared or not been detected. In fact, assigning a drive letter to the disk can resolve the issue handily.
Step 1. Press Win + X and choose Disk Management from the WinX menu.
Step 2. Locate the Kingston SSD in the disk list and right-click on the partition. Choose Change Drive Letter and Paths from the context menu.
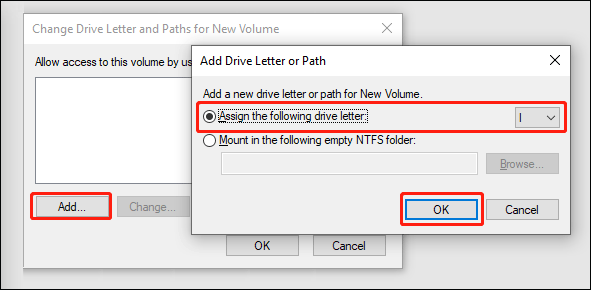
Step 3. Click Add and choose a proper drive letter from the dropdown menu of Assign the following drive letter.
Step 4. Choose OK to save your change.
Go to File Explorer to see if the Kingston SSD shows up here.
Fix 2. Initialize Kingston SSD
In addition to initializing a Kingston SSD when it is brand new, you should also initialize the disk when Kingston SSD is not recognized, reports an initialization error, or gets some system errors. After initializing, you can create a new volume of the SSD for future use. If the Kingston SSD is not a new one, you should first get your data out of it and then start the initialization process.
Step 1. Recover Data from Kingston SSD
This video tells you how to recover data from an SSD using MiniTool Power Data Recovery:
An uninitialized Kingston SSD is recognized as an unknown disk on the computer, but MiniTool Power Data Recovery happens to be one of the best options for recovering data from an unknown device. This secure data recovery service enables you to recover types of files from Windows and diverse data storage devices that can be recognized by Windows.
As long as the data stored on the Kingston SSD is not overwritten, MiniTool Power Data Recovery provides chances to recover them. You can download and install the free edition of this software to deep scan the Kingston SSD and recover 1GB of files for free.
MiniTool Power Data Recovery FreeClick to Download100%Clean & Safe
Now, use this tool under the guidance below to rescue files from the SSD.
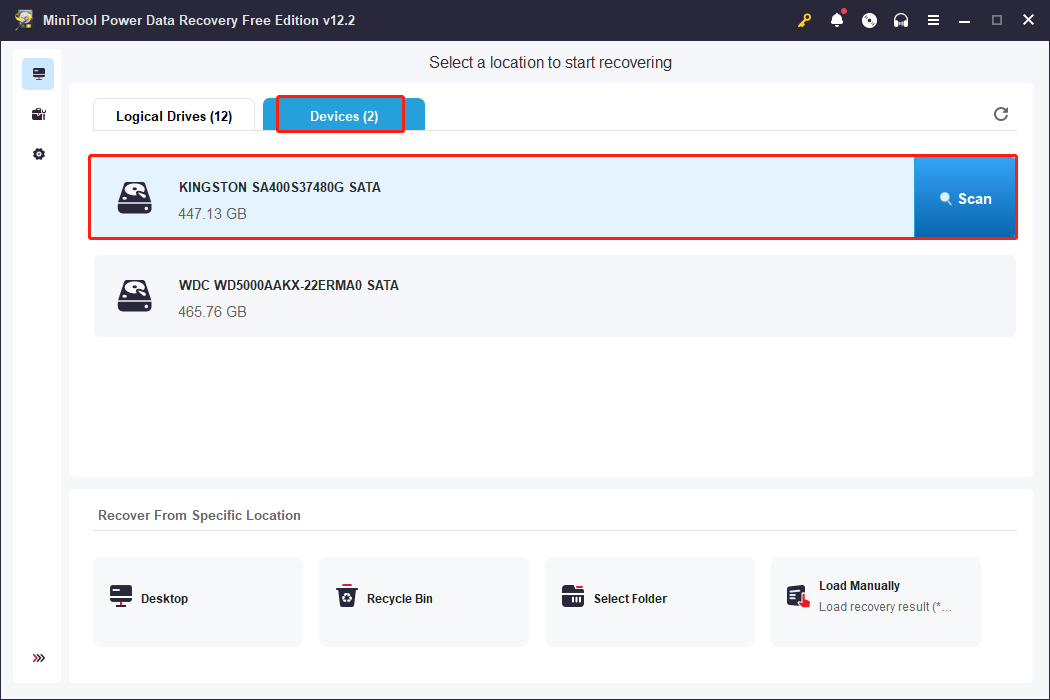
1. Connect the Kingston SSD to your computer and launch the software to enter its main interface. By default, you are loaded to the Logical Drives section, which displays all the detected partitions. If you cannot figure out the partition of the Kingston SSD or want to recover all the files on the Kingston SSD at once, switch to the Devices tab to choose the device and click Scan.
2. Wait for the scan duration to complete itself in order to find all the lost files on the SSD. The Path and Type features classify your files according to their original structures or file formats. To find specific files, use the Filter and Search features, which can set filter conditions or search with keywords of file names.
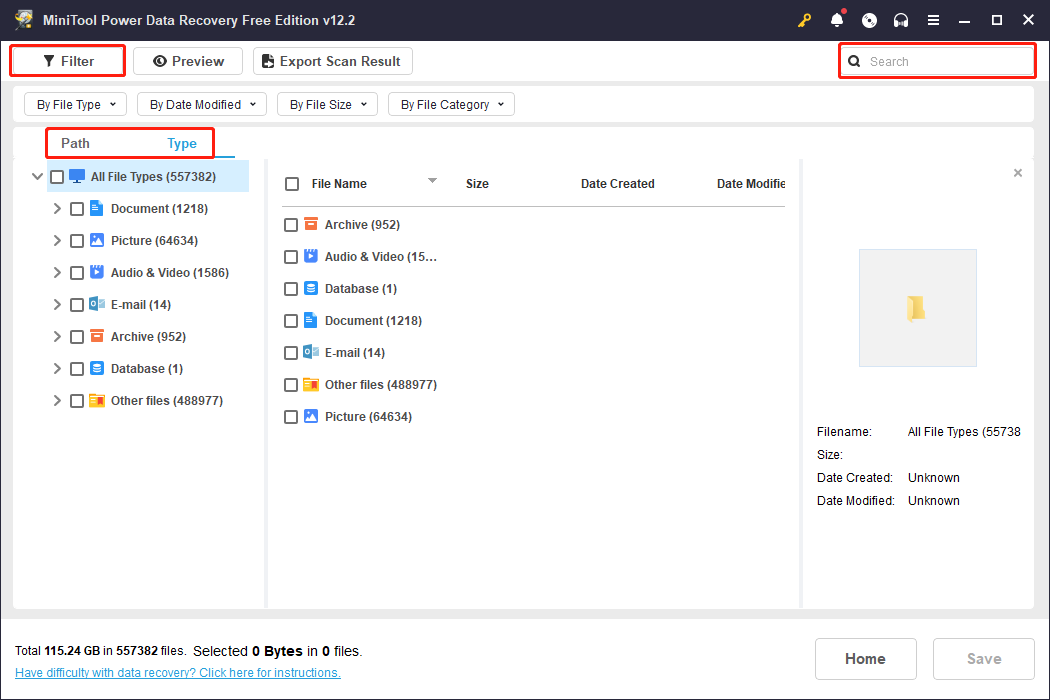
3. Since the free edition only has 1GB of free file recovery capacity, the Preview feature is significant to increase the data recovery accuracy. Double-click on the file to preview its content before saving. Once confirmed, select them and click Save.

In the prompt window, choose a proper save file location. When the data recovery process is complete, you can head to the chosen destination to check your files.
MiniTool Power Data Recovery FreeClick to Download100%Clean & Safe
Step 2. Initialize and Create a Partition on Kingston SSD
After retrieving files, you can initialize the Kingston SSD.
1. Right-click on the Windows icon and choose Disk Management.
2. Right-click on the disk and choose Initialize Disk. Set MBR or GPT according to your requirements.
When the initialize process is finished, you can create a new volume for further use of this disk.
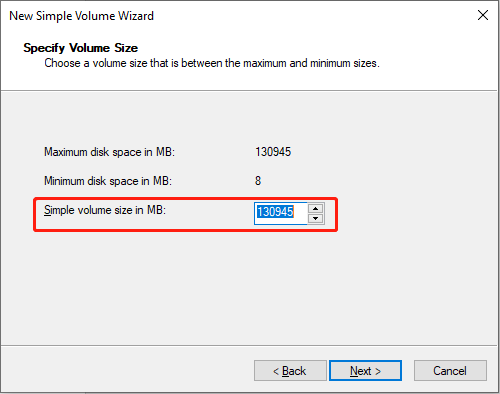
1. Right-click on the partition and choose New Simple Volume from the context menu. Click Next. If you need to separate several volumes, change the drive volume to a certain size.
2. In the following window, select an appropriate driver letter for the partition and click Next.
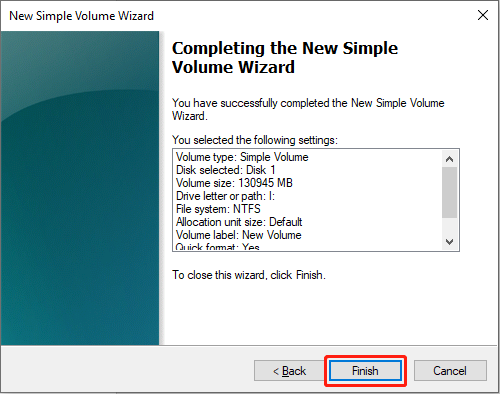
3. Choose a file system from the dropdown menu and set the Volume label as you like. Click Next and Finish to complete the process.
You can repeat the above three steps to create other partitions. Afterward, the Kingston SSD can be used normally.
Additionally, utilizing MiniTool Partition Wizard helps you handle the initialization and partition creation tasks easily. Different from Disk Management, this partition manager allows you to revoke improper disk operations instead of instant application. You can complete the two tasks with the free edition of this software.
MiniTool Partition Wizard FreeClick to Download100%Clean & Safe
Fix 3. Manage Related Device Driver
An outdated or improper device driver can result in the PC not recognizing Kingston SSD. You can check the device driver status in Device Manager and configure the driver properly.
#1. Update the Kingston Disk Driver
Step 1. Right-click on the Windows icon at the left corner and choose Device Manager from the context menu.
Step 2. Expand the Disk driver option to find the Kingston SSD driver. There should be a symbol that indicates the driver requiring an update. Then, right-click on the driver and choose Update driver.

Step 3. Select Search automatically for drivers in the following window.
The computer will automatically install the latest compatible driver on your computer. However, sometimes, you need to uninstall and reinstall the driver to fix the driver issue. In this case, choose Uninstall device from the same context menu in Step 2 and click Uninstall again to confirm. Afterward, restart your computer to let it reinstall the driver automatically.
#2. Uninstall the Improper Storage Controller
According to some users, they find using the Microsoft default storage controller instead of other controllers can resolve the incompatible issue.
Step 1. Open the Device Manager by pressing Win + X and choosing Device Manager.
Step 2. Expand the Storage controllers option to check if there are other drivers. You can right-click on the driver and choose Uninstall device.
After that, restart your computer to run with the default Microsoft driver. You can then check if your Kingston SSD appears.
Fix 4. Use the Kingston SSD Manager for Further Check
Kingston SSD Manager is a tool to monitor and manage SSD status. This tool can check the SSD’s health, verify the device specification information, update the device firmware, erase stored data, etc. Hence, you can download the Kingston SSD Manager from the official website to do a further check.
When your Kingston SSD firmware demands an update, you can find the update information via this tool. Sometimes, people encounter the Kingston SSD not showing up issue when using Kingston SSD Manager. In this case, downloading and installing the latest version of this utility can help resolve the problem.
Bonus Tip. Back up Data Stored in Kingston SSD
As digital devices are prone to diverse errors that may cause data loss unexpectedly, the best way to safeguard data is to back them up regularly. File backups are always the optimal choice to recover lost data in every circumstance, including SSD not showing, device crashing, partition loss, and more.
MiniTool ShadowMaker is capable of backing up files, folders, partitions, and disks. It provides three backup types to avoid creating any duplicate files. Furthermore, modifying the backup schedules individually realizes automatic file backups. You can get the trial edition to utilize this robust tool.
MiniTool ShadowMaker TrialClick to Download100%Clean & Safe
Step 1. After installing MiniTool ShadowMaker, connect your Kingston SSD to your computer and launch the software.
Step 2. Change to the Backup tab.
- Click SOURCE. You can select Folders and Files or Disk and Partitions in the following interface. After selection, click OK to return to the Backup page.
- Click DESTINATION to choose a storage path to save those backups and click OK.

Step 3. Choose Options at the bottom right, then configure the backup types, backup schedules, and other backup settings based on your requirements. Click OK to save your changes.

Step 4. Click Back Up Now to start the backup process.
Final Words
Whenever experiencing the Kingston SSD not detected is frustrating, but, luckily, this is a fixable issue in most situations. You should check both the Kingston SSD and your computer carefully to discover the culprit. This post delivers four feasible solutions and hope one of them makes sense for you.
Apart from resolving the issue, you should take good care of your data to avoid data loss or any secondary damage to it. MiniTool Power Data Recovery is always ready to rescue your data lost under various situations. Should you have any problems using this tool, please feel free to let us know via [email protected].
User Comments :