USB drives are one of the most common portable devices, and they are used to save and transfer files between different devices. However, you may suddenly encounter the USB drive not showing files and folders after connecting it to your computer. Where do your files go? Can you recover them if they are lost? The following content answers you.
Why Is My USB Drive Full but No Files Visible
USB drives, also known as pen drives, are widely used storage devices to save, back up, and transfer files. Hence, when the USB drive not showing files and folders on your computer, you may first consider file loss unexpectedly. In this case, running trustworthy data recovery software to recover lost files can resolve the issue easily. However, in addition to file loss, there are several other causes of pen drive data not showing:
- USB drive not properly connected: If the USB drive is not properly connected, the computer cannot read the USB drive and fails to display USB data on Windows. Loose connection and broken or disabled USB ports are responsible for the USB files not showing issue.
- Hidden files and folders: The USB files may be hidden by your unintentional click or virus attacks. In this situation, you can find the USB files not showing but space used. Showing hidden files and folders can get files back quickly.
- Logical errors on USB drive: If the USB drive contains an unrecognized or corrupted file system, it probably leads to the USB drive not showing files on Windows. Other issues may manifest as sluggish performance, automatic deletion of files, or other symptoms on the USB drive. You need to run some utilities to repair the problematic USB drive immediately.
If your USB files disappear due to the above reasons, several solutions are available to get them back. However, if your USB drive is physically damaged because of exposure to extreme environments for a long time, like humidity, high temperature, dust, etc., you should seek help from the specialized data recovery center to see if the USB files can be found.
Keep reading and try those solutions if the USB file recovery task can be done on your own.
How to Fix USB Drive not Showing Files and Folders
Owning to the different causes of a USB drive not showing files and folders on Windows, you should carry out different solutions to resolve your case. Here are some suggestions.
Do Preliminary Checks Before Restoring Files
Before delving into more complex solutions, you can do some basic checks to rule out physical problems on the computer and your USB drive.
If your USB drive isn’t detected by the computer, you should reconnect it to another computer or via a new USB port. This will help you to ascertain whether the issue lies with the USB drive or the USB port. When you connect the USB drive via a USB hub, remove the USB hub and directly connect the USB to your computer as some USB hubs do not provide enough power for the USB identification process.
On the other hand, some viruses may affect your USB drive and hide the USB files without your acknowledgment. If the pen drive data not showing occurs following a connection to an untrusted or public device, you should run a virus scan to determine whether the USB drive is virus-affected. Remove the viruses and recover USB files with secure data recovery services as soon as possible.
When you ensure that the USB drive runs properly on your computer, work with the following methods to get files back.

Option 1. Show Hidden Files on USB Drive
It is possible that your files are not actually lost but hidden due to mistaken clicks. In this case, you can show those hidden files using the steps below.
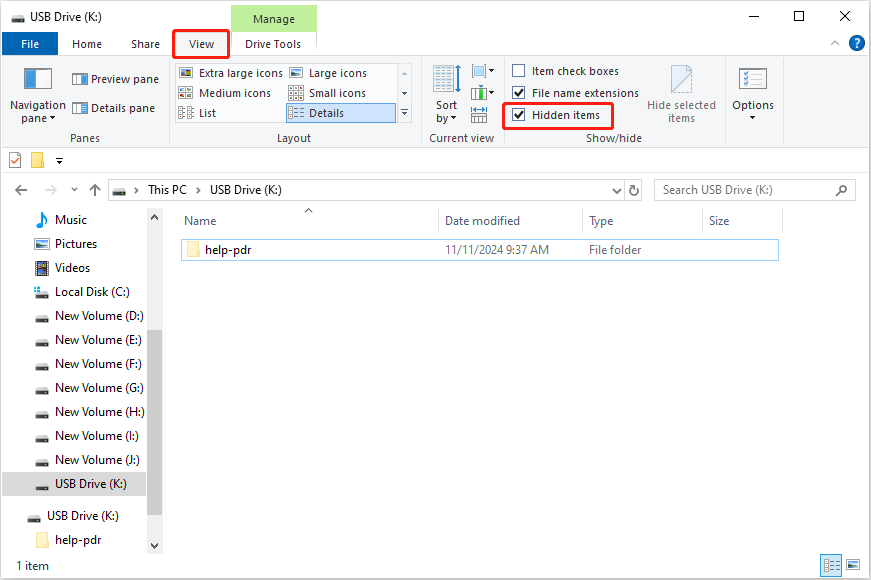
Step 1. Connect the USB drive to your computer and press Win + E to open the Windows Explorer.
Step 2. After switching to the View tab at the top toolkit, you can tick the Hidden items option to show files.
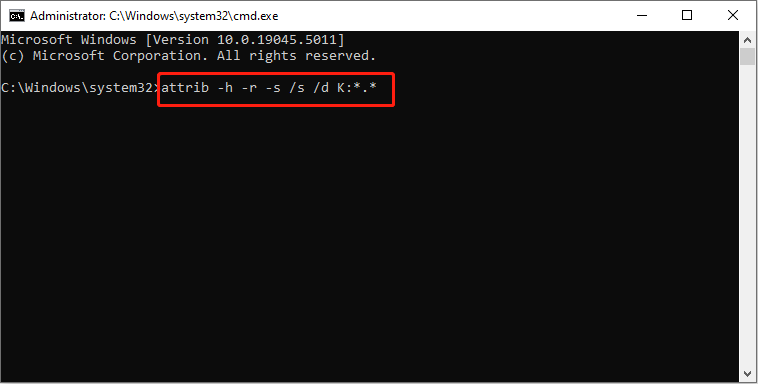
Alternatively, if you are familiar with command lines, executing the proper command line via the Command Prompt enables you to remove the hidden attribute of files handily.
Step 1. Connect the USB drive to your computer.
Step 2. Press Win + R to open the Run window. You can type cmd into the dialog and press Shift + Ctrl + Enter to run Command Prompt as administrator.
Step 3. Type attrib -h -r -s /s /d X:\*.* and hit Enter. Remember to replace X with the actual drive letter of the USB drive.
After changing those settings, you can check whether the USB files show up. If not, try the next approach.
Option 2. Check USB Errors
Bad sectors can be the cause of the USB drive full but no files visible error. You can check and repair the USB drive errors with Windows built-in tools. Here I’d like to show you how to use the error checking tool in File Explorer.
Step 1. Connect the USB drive to your computer and press Win + E to open Windows Explorer.
Step 2. Choose your pen drive at the left sidebar and right-click on it to choose Properties.
Step 3. Select the Tools tab and click Check in the Error checking section.

Please wait for the checking disk process to complete. Afterward, open your USB drive to see if the hidden files appear. If USB data is still invisible, it is most likely to be permanently lost. Please move on to the next solution.
Option 3. Recover Lost USB Files Using MiniTool Power Data Recovery
For permanent data loss due to shift deletion, virus attack, device formatting, or other causes, the most effective solution is to employ advanced data recovery tools, such as MiniTool Power Data Recovery.
MiniTool Power Data Recovery, a well-known Windows data recovery utility, stands out with its reliable and robust data recovery algorithm, wide compatibility with data storage devices and file types, concise and user-friendly interfaces, and multiple and feasible functions.
No matter what reason leads to your USB drive not showing files and folders, as long as those lost files are not overwritten, MiniTool Power Data Recovery has the ability to recover them. You can get the MiniTool Power Data Recovery Free to scan your USB drive to ascertain if this utility works on your case.
MiniTool Power Data Recovery FreeClick to Download100%Clean & Safe
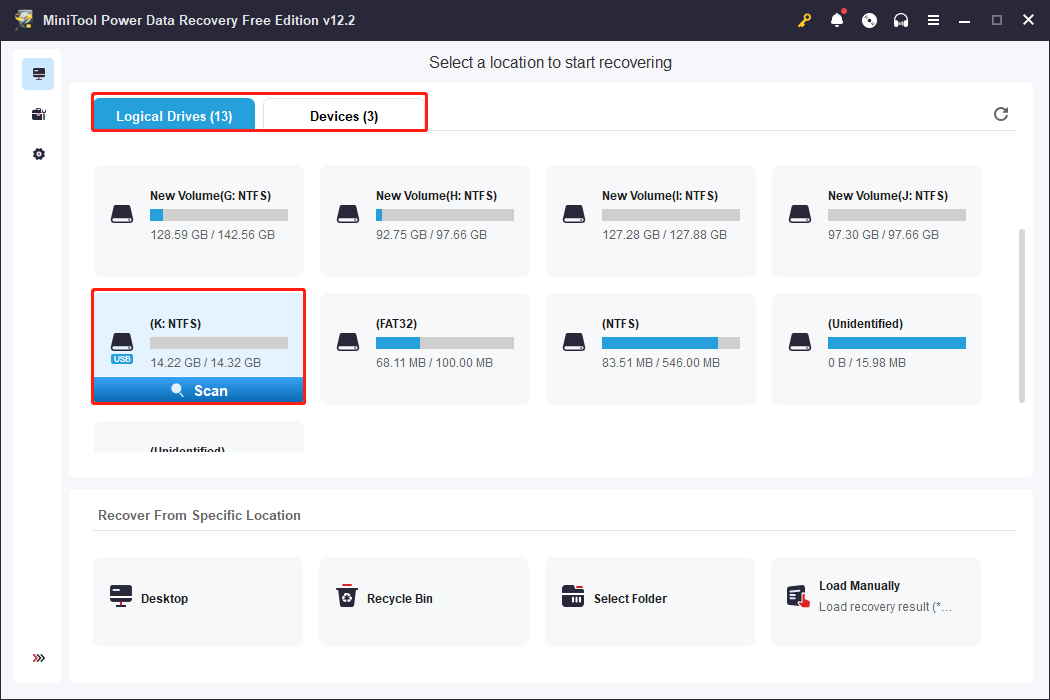
Step 1. After downloading and installing MiniTool Power Data Recovery on your computer, you need to connect the USB drive to your computer and launch the software to enter its main interface.
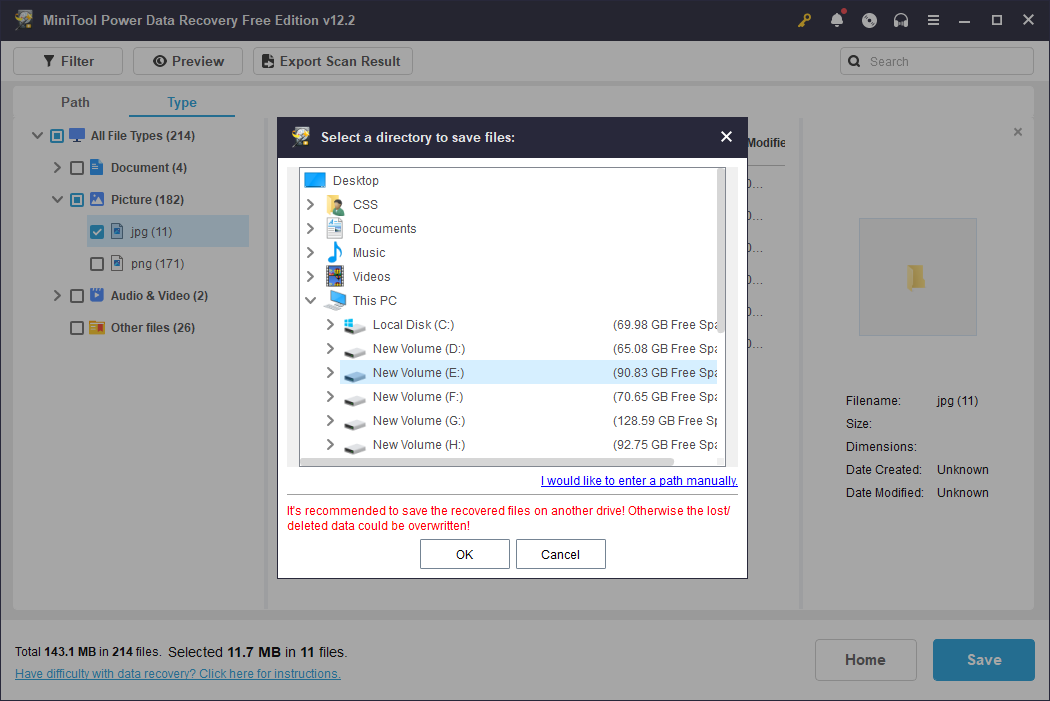
If the USB drive has several partitions, choose one that contains the lost files under the Logical Drives section and click Scan. Optionally, scan the entire USB drive under the Devices section, which may take a longer time to complete the scan process.
Step 2. In order to find all the files, do not stop the scan process in the midway. You can browse the file list to locate target files. Confronting with numerous files, you have an option to utilize several auxiliary functions. For instance, set screening conditions with the Filter function, search a specific file using the Search feature, sort files following the file types and formats under the Type tab, and verify the file content with the Preview feature.
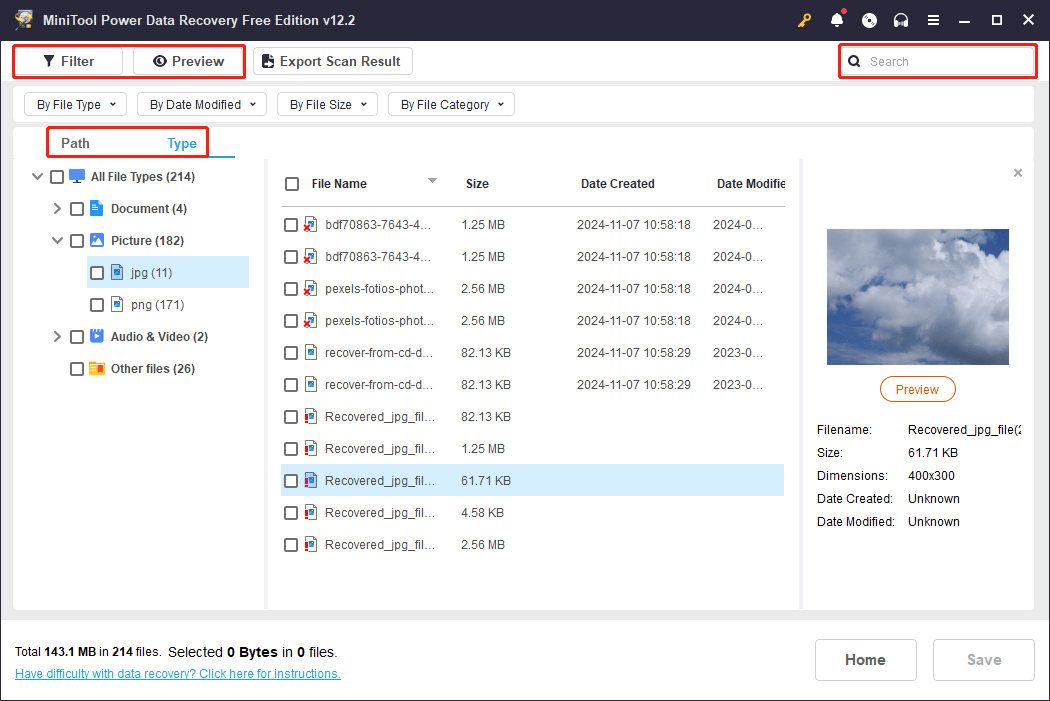
Step 3. Once finding the wanted files, add check marks in front of them and click the Save button. You need to choose a destination different from the original one to avoid data overwriting, which may cause data recovery to fail.
MiniTool Power Data Recovery Free allows you to recover 1GB of files for free. If you need a larger data recovery capacity, you need to upgrade to an advanced edition. The License Comparison page shares you with detailed information about different editions. You can visit the page to choose one edition you preferred.
Option 4. Format the USB Drive
A USB drive not showing files and folders can also be caused by file system errors, such as unrecognized or corrupted file systems. Generally, you will receive an error message that informs you to format the USB drive once the USB drive is connected to your computer. If you refuse to format the device, the USB drive will turn inaccessible as well as the data on it.
To avoid any secondary damage to the original data on the USB drive, you are highly advised to recover data from it before formatting with the help of MiniTool Power Data Recovery. This software can restore files from a RAW drive easily.
MiniTool Power Data Recovery FreeClick to Download100%Clean & Safe
After successfully rescuing data out of the USB drive, you can format it for normal use. You can format the USB drive via File Explorer directly or using third-party software when Windows built-in utilities fail to complete formatting.
>> Format the USB drive in File Explorer
Step 1. Click on the folder icon at the taskbar on your computer to open File Explorer.
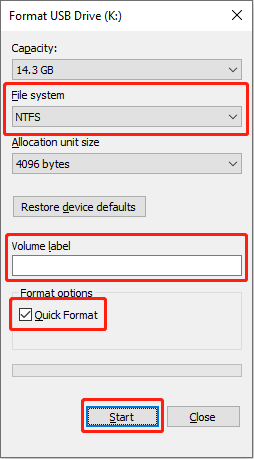
Step 2. Find and right-click on the USB drive at the left sidebar and choose Format.
Step 3. Choose a compatible file system and set the volume label for the USB drive.
Step 4. Ensure the Quick Format option is enabled and click Start to format the USB drive.
>> Format the USB drive using MiniTool Partition Wizard
However, sometimes, the computer fails to format the USB device due to insufficient privileges. In this case, you can format the USB drive with a professional partition manager, like MiniTool Partition Wizard. This software can resize, merge, format, and wipe partitions and disks within a few clicks. You can complete the partition format task with the free edition.
MiniTool Partition Wizard FreeClick to Download100%Clean & Safe
Step 1. Connect the USB drive to your computer and launch the software.
Step 2. Select the USB drive partition on the main interface and click Format Partition at the left sidebar under the Partition Management section.
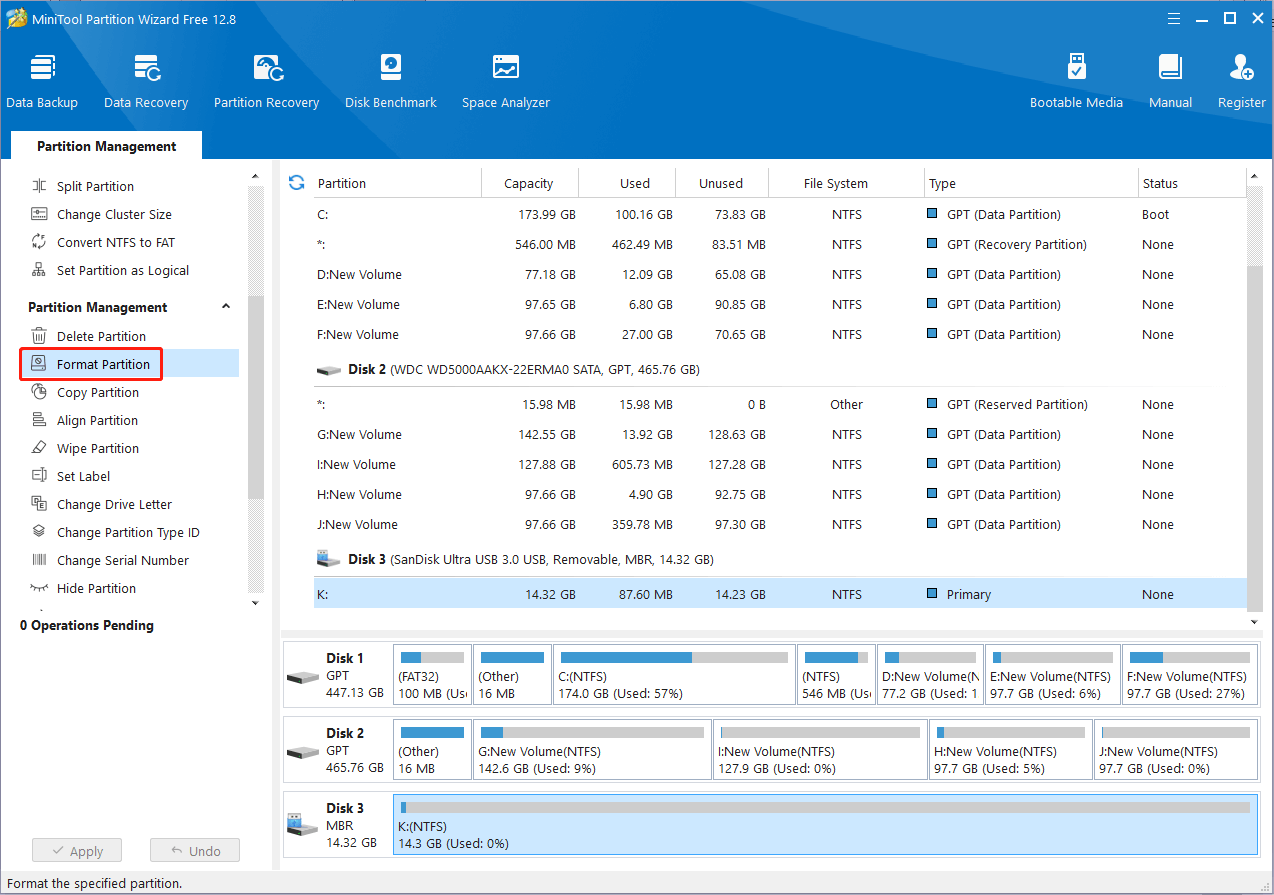
Step 3. In the small prompt window, you need to set the file system and volume label and click OK.
Step 4. The software will display the disk status after formatting. After ensuring that there is no mistaken operation, click the Apply button to finish the suspend process.
If your USB drive loses files frequently, you’d better replace it with a new drive to avoid data loss and for better use.
Bonus Tip: Back up USB Files Regularly
USB drives, similar to other portable devices like SD cards, memory sticks, and others, are small in size but have large data storage capacity. However, advanced digital technology doesn’t help those devices immune to data loss, such as a USB drive not showing files and folders. To effectively safeguard your files, you are heartily advised to back up the USB drive on a regular basis.
MiniTool ShadowMaker is a comprehensive data backup software that allows you to back up files, folders, partitions, and disks on different devices, including USB drives, SD cards, external hard drives, memory sticks, and more. Furthermore, this software supports three backup types – full backup, incremental backup, and differential backup, and automatic backup on a settled period. You can get the free edition to experience those powerful backup features for free within 30 days.
MiniTool ShadowMaker TrialClick to Download100%Clean & Safe
Step 1. Connect the USB drive and launch the software.
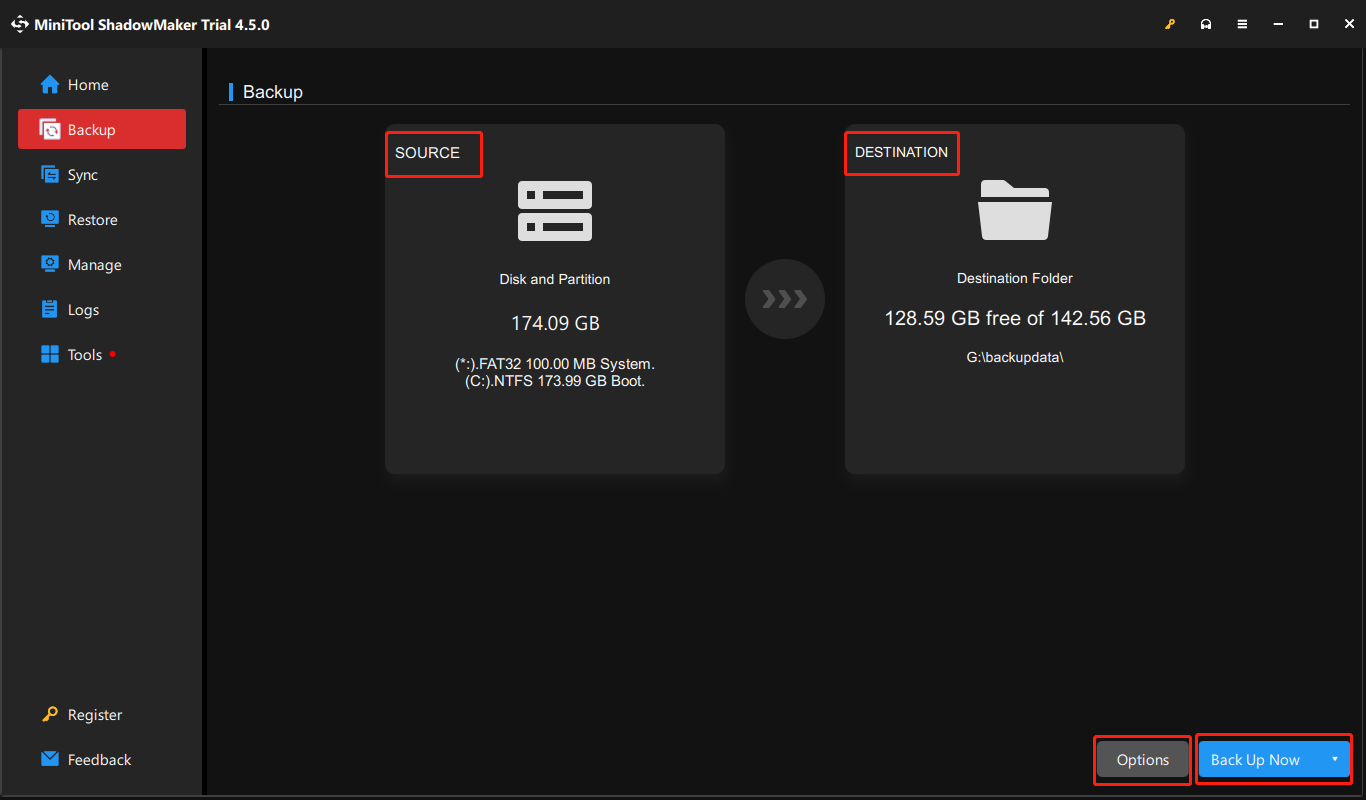
Step 2. Choose the Backup tab on the left sidebar.
- Click on the SOURCE section and choose Folders and Files to select the files you want to back up from the USB drive. Click OK.
- Click on the DESTINATION section to choose another path for the backup and click OK.
Step 3. Optionally, choose the Options button next to the Back Up Now button. You can set the backup type and backup scheme in the following window.
Step 4. Click Back Up Now to start the backup task.
Final Words
Experiencing a USB drive not showing files and folders could not be a good thing as your files may be hidden or permanently lost. This post shows you how to get files back in different situations while the most effective way is to retrieve USB files with MiniTool Power Data Recovery.
If you have any puzzles using MiniTool software, please feel free to let us know via [email protected].
User Comments :