CHKDSK is a useful command line tool used to check disk status and repair disk problems. However, sometimes you may encounter the problem of “files missing after CHKDSK”. Here this tutorial will walk you through the steps to recover CHKDSK deleted files by using MiniTool Power Data Recovery.
Chapter 1 – CHKDSK Deleted My Data
As a free Windows command, CHKDSK is used for disk scanning and checking. Whenever unknown errors appear on your storage device (such as a hard drive, USB flash drive, SD card, or memory stick), you can try to use this command to fix the error. Usually, it does a great job of checking and fixing the error, but deleting important files that you need also happens now and then.
Here are two cases:
Case 1:
"I booted up my Win 7 computer today and CHKDSK said my Ex HDD may have been corrupted and proceeded to delete some files. Those were some very important files - how can I get them back? (Video and Adobe Premiere Pro CS4 files)– posted by Ruester on Seven Forums
Case 2:
"Every time I opened a file or folder on my computer it told me it wasn't there although I could see the icon. It also kept telling me to run chkdsk. I tried to change file extensions on the Excel files so I could open them but it didn't work. So chkdsk ran the next time I rebooted and now the files are gone. Does anyone know how to get a list of the files that chkdsk removed or is there a way to recover CHKDSK deleted files? Thanks in advance."– asked by Pumpkin Ridge in Microsoft Community
At this critical moment, you must take measures immediately to recover CHKDSK deleted files. Is there a free or cheap method for data recovery after CHKDSK? Keep reading.
Chapter 2 – How to Recover Files Deleted by CHKDSK
MiniTool Power Data Recovery has become a wonderful choice at this time. Why? Here are three leading reasons:
- It provides a free edition with a data recovery limit of 1 GB: You can download and use MiniTool Power Data Recovery Free to see if it works for your situation, and then decide if you need to upgrade to a full edition. If the files you want to recover do not exceed 1 GB, you can complete file recovery at no cost.
- It has excellent compatibility: This file recovery software is compatible with almost all the common Windows operating systems (like Windows 11/10/8.1/8) and storage devices (like hard drives, USB flash drives, SD cards, etc.).
- It supports recovering all kinds of files: This date restore tool is capable of restoring diverse files, including documents, photos, videos, audio, emails, and so on.
- It is equipped with high security: This software is totally clean, has no spyware and it will not damage your drive/data during the recovery process. This ensures that you can perform secure data recovery.
Now, you can follow the steps below to recover CHKDSK deleted files.
Step 1. Click the button below to download MiniTool Power Data Recovery Free and then install it on your computer. Do not install this software on the disk where data loss happens so as to avoid data overwriting.
MiniTool Power Data Recovery FreeClick to Download100%Clean & Safe
Step 2. Insert the removable disk into your computer via a USB cable and USB port (if you are trying to recover files from your computer’s internal disks, skip to Step 3).
Step 3. Launch MiniTool Power Data Recovery Free to enter its home page. Now, you need to select the disk partition where CHKDSK deleted files and click the Scan button. Subsequently, the software will start to scan the selected partition for deleted/lost files.

A thorough and uninterrupted scan ensures the best data scanning results. Therefore, you should wait patiently for the full scan to finish rather than stopping it midway.
Step 4. After scanning, all files the software detects will be listed by file path under Path, and you can expand each folder to find the items you need to recover. However, this is a little bit time-consuming. To save time, you can go to the Type category to browse files by file type.
Alternatively, you can make use of the Filter and Search features to simplify the file discovery process. The former feature allows you to filter listed files by file type, file size, file modification date, and file category. The latter feature is used to search for a certain file by using its file name.
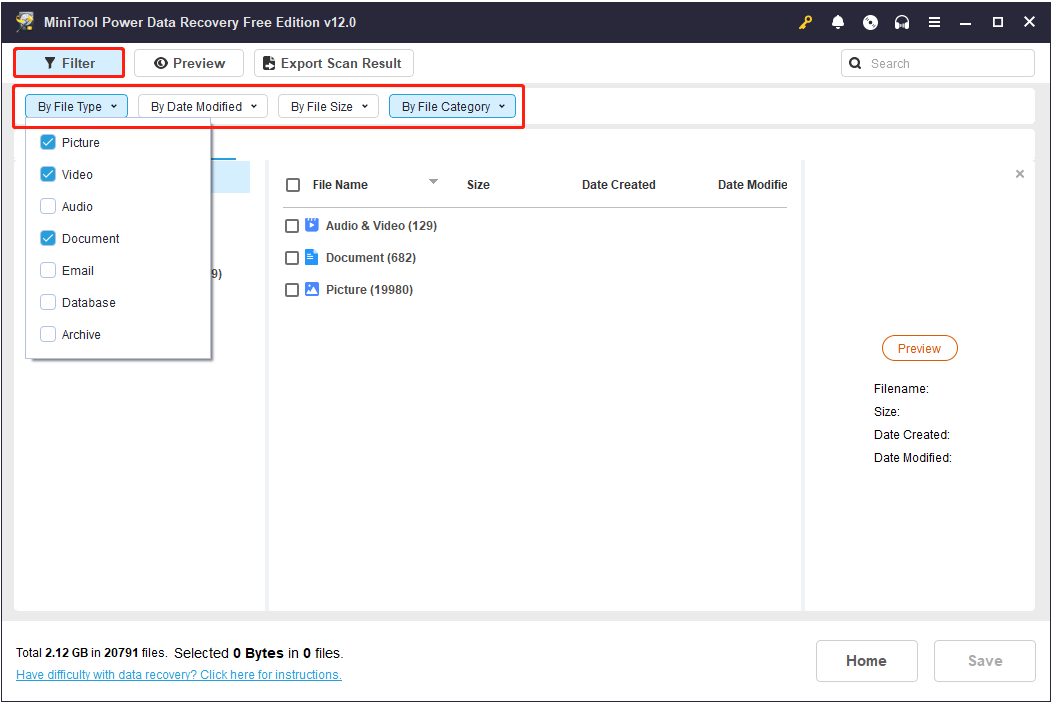

Moreover, you can double-click on a file to preview it. Supported file types to preview include documents, photos, videos, audio, archives, and more. Note that the file you are trying to preview should not exceed 2 GB in size.

Step 5. Tick the checkbox next to each of the required files, and then click the Save button. When a prompt window pops up asking you to select a file directory, select one and click OK. After that, you can go to the selected location to view the recovered files.
As you can see, with the user-friendly wizard and the powerful features, MiniTool Power Data Recovery is able to help you get back files missing after CHKDSK with ease.
Chapter 3 – CHKDSK Command Tips & Tricks
The full name of CHKDSK is check disk, as we said before, and it is designed for disk inspection after your system was shut down improperly or illegally. Of course, you can also manually call the command to check a specific disk partition, which is based on the file system used by the partition being detected. CHKDSK will create & display disk/partition status reports and list & correct errors on the disk/partition.
Three Stages of CHKDSK
The activities of CHKDSK can be divided into three main stages.
Stage one: examine the basic file system structure
During this phase, CHKDSK scans the integrity of the file system and file system metadata on the disk volume and repairs logical file system errors. In this stage, CHKDSK will also check each file record segment in the master file table (MFT) of the checked drive.
Stage two: examine file name linkage
In this step, CHKDSK will check the links between file names to ensure consistency between the file name and the file data in the file system. If incorrect links are found, CHKDSK will try to repair them.
Stage three: examine the security descriptor
During this step, CHKDSK checks the security descriptor of each file and folder on the disk to ensure its integrity and consistency.

Things to Notice When Running CHKDSK
- CHKDSK can only be applied to check logical disk errors in the file system. To check the physical disk errors, you should use the SCANDISK program.
- CHKDSK can’t be used to allocate drives and networks. CHKDSK can neither be used for the working of drives created by the SUBST command nor be used for disk checks on network drives.
- CHKDSK will mark the bad sectors it found as “bad”. Meanwhile, the SCANDISK and other physical disk error correction procedures will also mark the bad sectors as “bad”, so they will not cause any damage.
- CHKDSK will report cross-linked files if there are two files or directories that share the same disk space. However, it will not fix the cross-linked file even if the item “/F” is specified. To repair a cross-linked file, you need to run the SCANDISK program or repair it manually, and then copy it to the specified file & delete the original file.
- Please don’t run CHKDSK when there is an opening file. The CHKDSK command is designed by assuming that all the disk files are off. So if you run this command when a file is opening, the corresponding MS-DOS will modify the file allocation table and directory structure. Those changes do not necessarily take place immediately; instead, changes in the file allocation table and directory structure occur at different times, so the error may occur, resulting in data loss or file system damage.

Chapter 4 – To Sum up
Whenever you run CHKDSK and then find it deletes your data during the scan and fixes process, you should put an end to the command immediately. The next thing to do is start the recovery tool in order to recover files missing after CHKDSK in time. The sooner you take action, the more likely you will recover all the deleted data.
Then, you should read the working stages of CHKDSK and the precautions for use to know better about this command and to avoid unnecessary troubles as much as possible.
In addition, we advise you to back up the important data (if not all) on a regular basis. In this way, no matter what kind of disaster occurs and leads to serious data loss, you can deal with the situation directly and easily, without worrying too much about data security.
About The Author

Position: Columnist
Shirley graduated from English major and is currently an editor of MiniTool Team. She likes browsing and writing IT-related articles, and is committed to becoming a professional IT problem solver. The topic of her articles are generally about data recovery, data backup, and computer disk management, as well as other IT issues. In spare time, she likes watching movies, hiking and fishing.
User Comments :