Facing the “Your PC did not start correctly” error can be a frustrating interruption to your workflow, but it is usually not a fatal problem for your computer.
Real User Situation:
“Need help on how to fix ‘Your PC did not start correctly’. Does anyone know how to fix? I was trying to play a game, and then it went to a black screen, so I turned off my PC and turned it back on, and now it’s on this screen, and I’ve tried things to fix it still won’t work properly. Please help me out.”www.reddit.com
Before proceeding to the specific solutions, check the possible causes for this problem first.
Reasons Why the “Your PC Did Not Start Correctly” Issue Appears
The common triggers of the Automatic Repair error are as follows:
- Temporary system issues: Sometimes, incomplete shutdowns or system glitches can interfere with the boot process.
- Corrupted files: Windows files may become corrupted due to sudden power failures, software clashes, or hard drive errors, leading to the Your PC did not start correctly BSOD error.
- Boot configuration problems: A corrupted Boot Configuration Data (BCD) or Master Boot Record (MBR) can stop the computer from finding the operating system partition.
- Driver or software problems: Recently installed drivers, antivirus apps, or Windows updates may cause compatibility issues, leading to a failure in the boot process.
- Hardware interference: External devices that are connected may disrupt the boot sequence.
- System restore failures: If the computer was recently restored to a previous state, incomplete restoration processes may leave the system unable to boot.
Before proceeding with any repairs, perform a data recovery to prevent the permanent loss of important files.
Action 1. Recover Files From the PC that Won’t Start Correctly
To recover files from the PC that fails to start properly due to the Automatic Repair BSOD error, consider using MiniTool Power Data Recovery.
MiniTool Power Data Recovery FreeClick to Download100%Clean & Safe
This professional, user-friendly, and read-only data recovery tool features MiniTool Bootable Media Builder. This tool can help you effectively retrieve lost data when Windows cannot boot.
It does not depend on the original system operating properly. Instead, it boots the computer directly using bootable media.
This indicates that even if the system fails or the boot files are corrupted, this tool can still access the hard drive in a self-sufficient, pre-installed setting.
Key features for this data recovery tool:
- It supports common Windows file systems, including NTFS, FAT32, and exFAT.
- It is compatible with Windows versions 11/10/8/8.1.
- It supports various file formats, such as documents, images, videos, and more.
The free version of this software does not allow for the creation of bootable disks. To use this feature, download MiniTool Power Data Recovery Bootable on a functioning PC.
Here’s how to use it:
#1. Create a Bootable MiniTool Disk
Step 1. Plug a blank USB drive into the working computer.
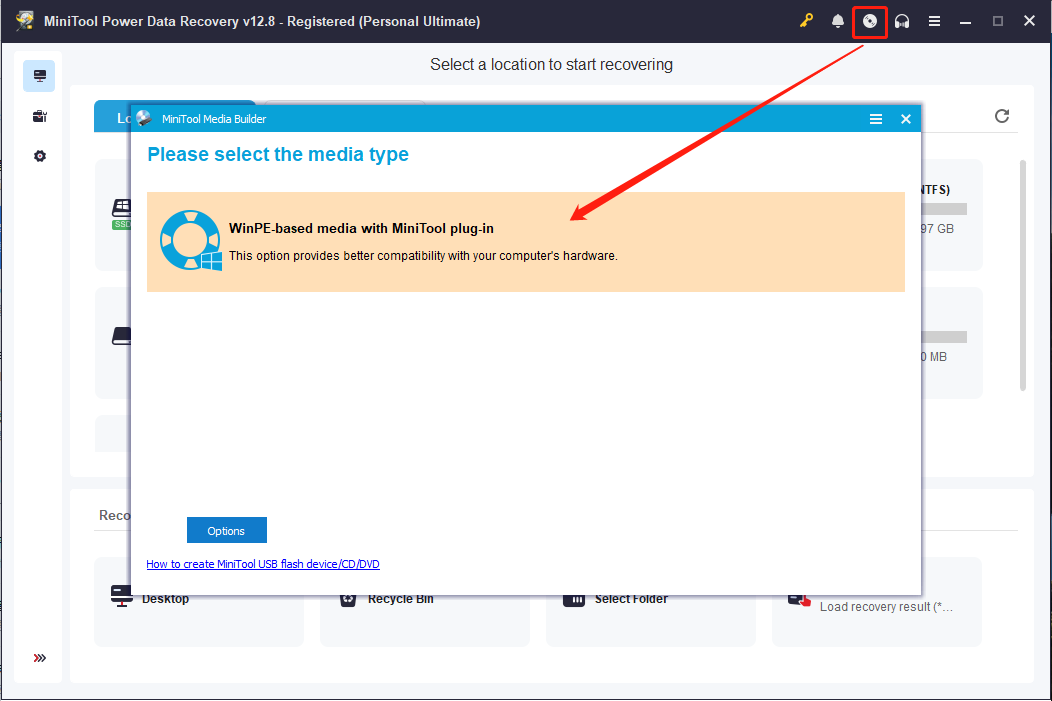
Step 2. Open the recovery software and click the disc icon at the top to access MiniTool Bootable Media Builder.
Step 3. Select WinPE-based media with MiniTool plug-in and follow the prompts on the screen to create a bootable disk.
Step 4. Once the process is finished, click Finish and take out the disk.
#2. Boot Your PC From the Bootable Disk
Step 1. Connect the bootable USB drive to the computer that is malfunctioning.
Step 2. Restart the computer and press F2, F12, Esc, or Delete during the startup process to enter the BIOS settings.
Step 3. Navigate to the Boot tab and modify the boot order to boot from the burned USB disk.
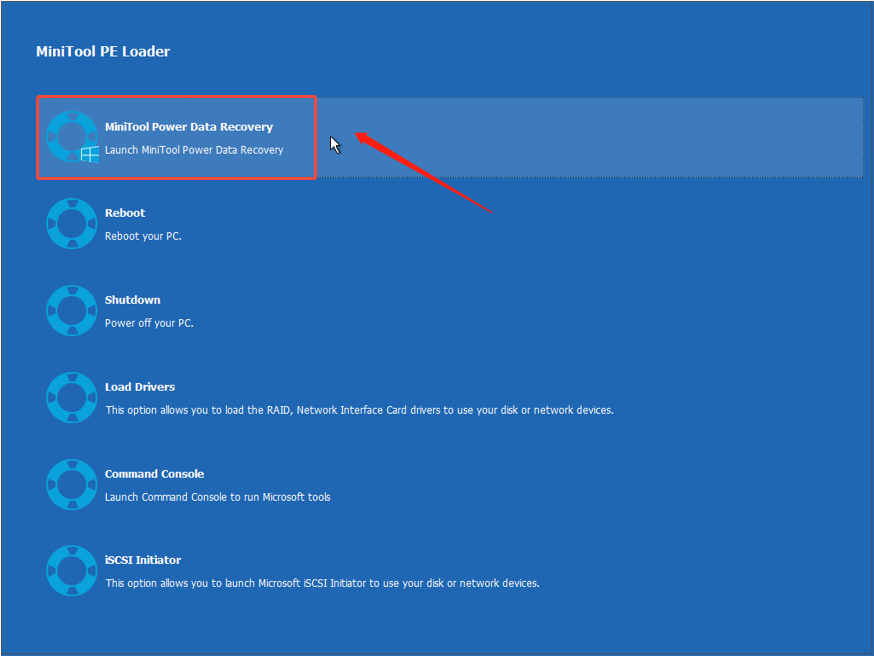
Step 4. Once it has started, you will enter the MiniTool WinPE environment. Click MiniTool Power Data Recovery to launch it.
#3. Scan the PC and Recover Lost Files
Step 1. Under the Logical Drives section, select the specific drive from which you wish to recover lost data and click on Scan.
Alternatively, navigate to the Devices section next to Logical Drives, choose the entire disk, and click Scan.

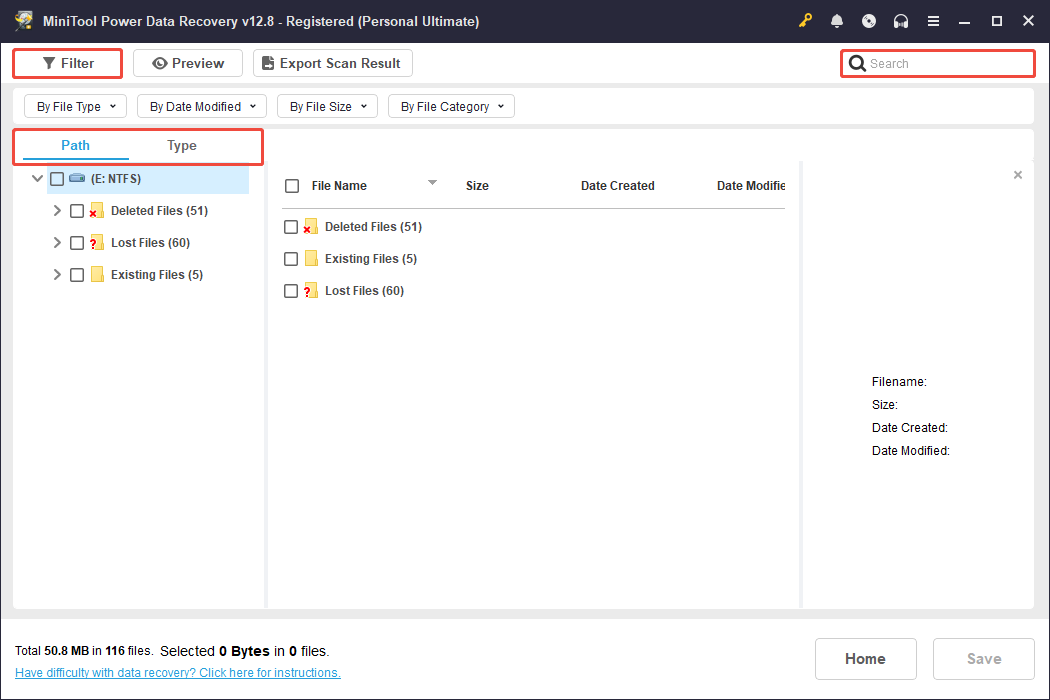
Step 2. Once the scanning process is completed, find the target files. Below are some features designed to help you locate them quickly:
- The Path feature displays the scan results sorted by folder path, which is helpful if you remember the original location of the files.
- The Type feature organizes scan results by file type, such as documents, pictures, videos, and audio files.
- The Filter feature provides various filtering options, including file type, modification date, file size, and file category.
- The Search feature allows you to type the filename or keywords to locate a specific file. It’s ideal for quickly searching for files if you remember the filename.
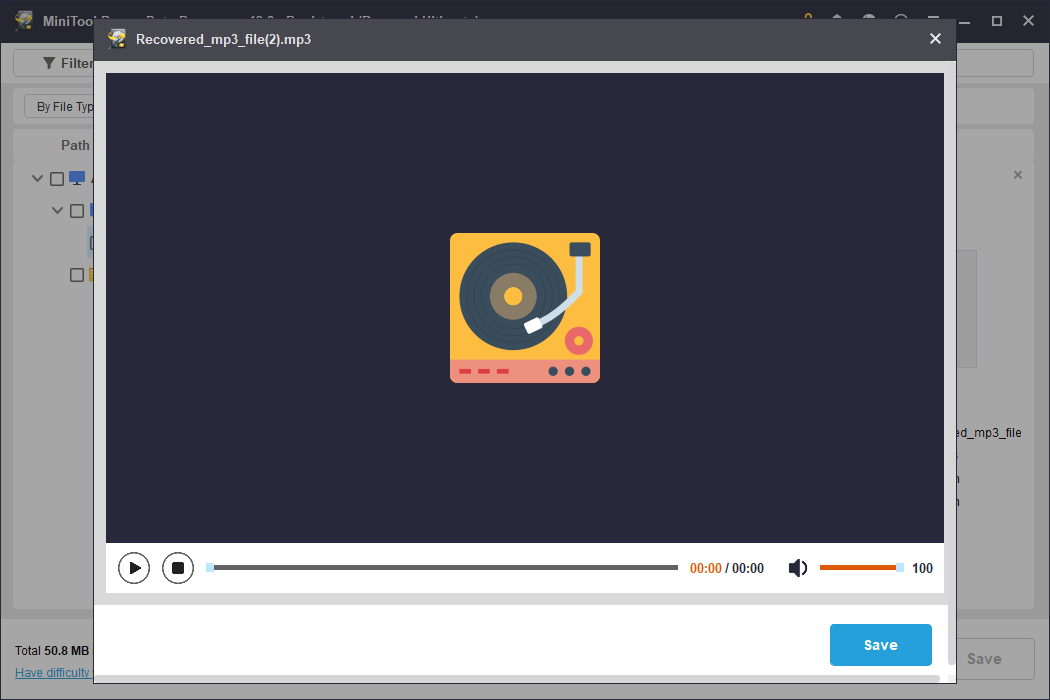
The Preview feature enables you to check images, videos, audio files, and documents before recovery, preventing unnecessary recovery actions.
Double-click the file to preview.
Step 3. After confirming the files you need, select them and click Save. Select an external hard drive to save the recovered files, and then click OK.
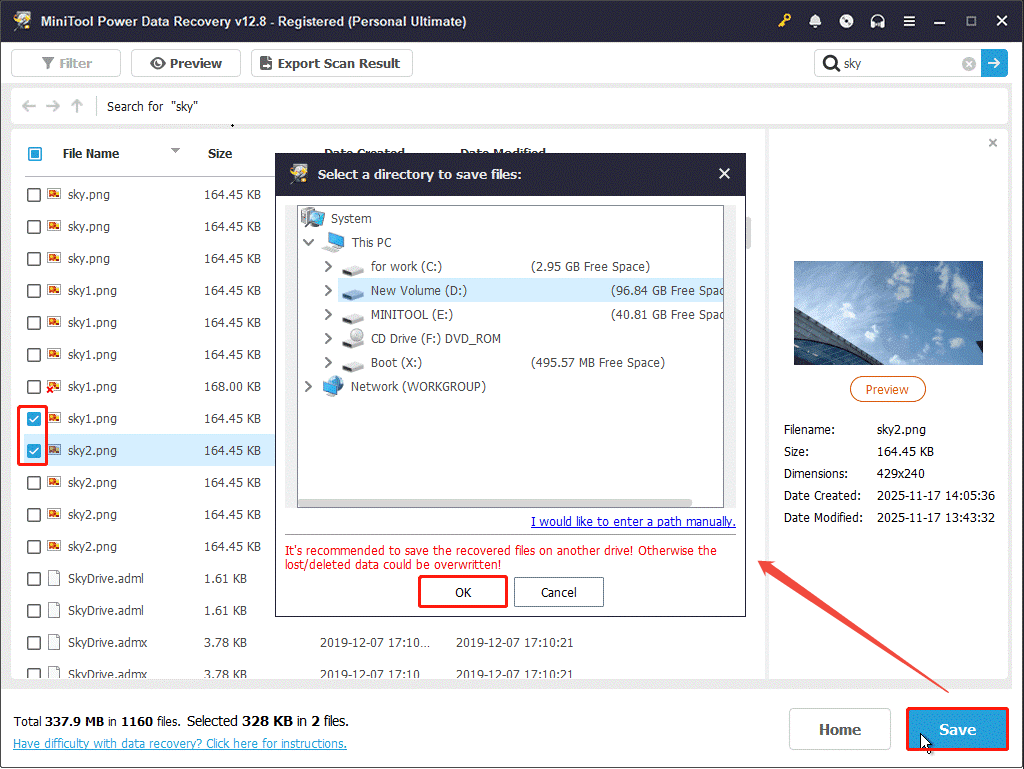
Once the file recovery is finished, connect the external drive to the working computer and verify the recovered files.
After recovering important data, read on to learn how to fix Your PC did not start correctly.
Action 2. Fix Your PC Did Not Start Correctly BSOD
Follow these sequential fixes to resolve the Automatic Repair error, starting with the simplest solutions.
Method 1. Restart Your Computer
When the “Your PC did not start correctly” issue happens, your PC will boot into a BSOD. The first method to resolve it is to click the Restart button as Windows advises.
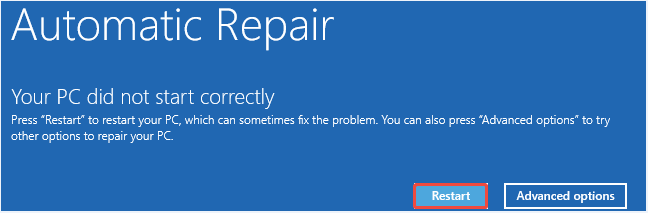
If the issue persists after rebooting, try the next solution.
Method 2. Run the Startup Repair Tool
Windows has a built-in automated repair tool that scans and fixes typical boot problems, such as corrupted BCD or missing boot files.
Follow these steps to run the Startup Repair tool:
Step 1. On the error screen, choose Advanced options, then go to Troubleshoot > Advanced options > Startup Repair.
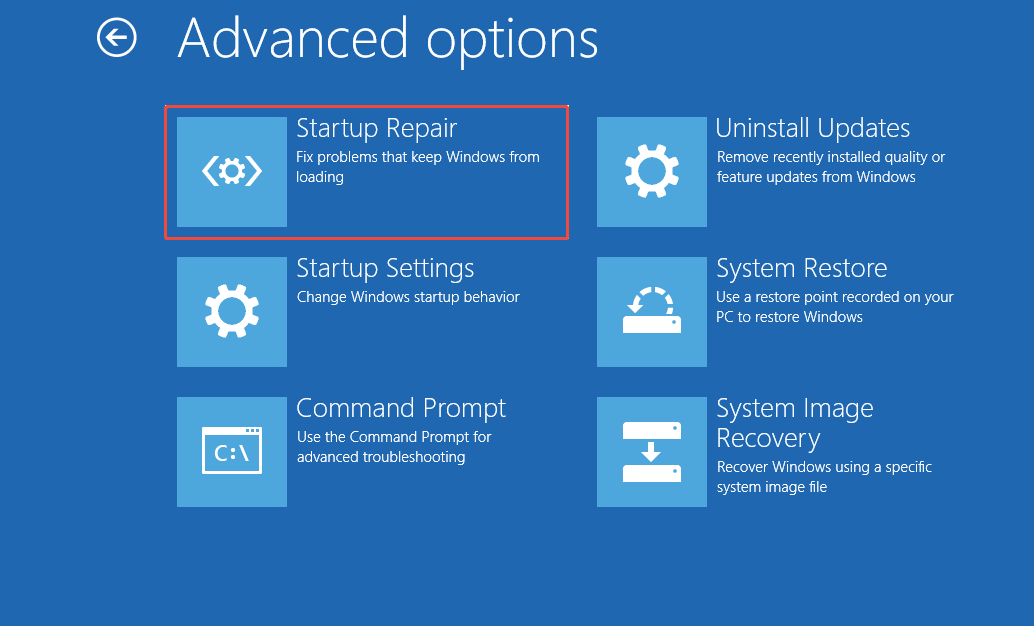
Step 2. Follow the prompts displayed on your screen. Windows will search for issues, try to make automatic repairs, and restart the computer.
Step 3. If necessary, log in to your user account to finish the repair process.
Once it is completed, restart the computer and verify if the problem is fixed.
Method 3. Run SFC
As mentioned above, corrupted system files may cause the “Your PC did not start correctly” issue.
SFC is a command-line tool that scans protected system files and repairs or replaces corrupted files.
Here’s how to run SFC:
Step 1. On the error screen, select Advanced options > Troubleshoot > Advanced options > Command Prompt.
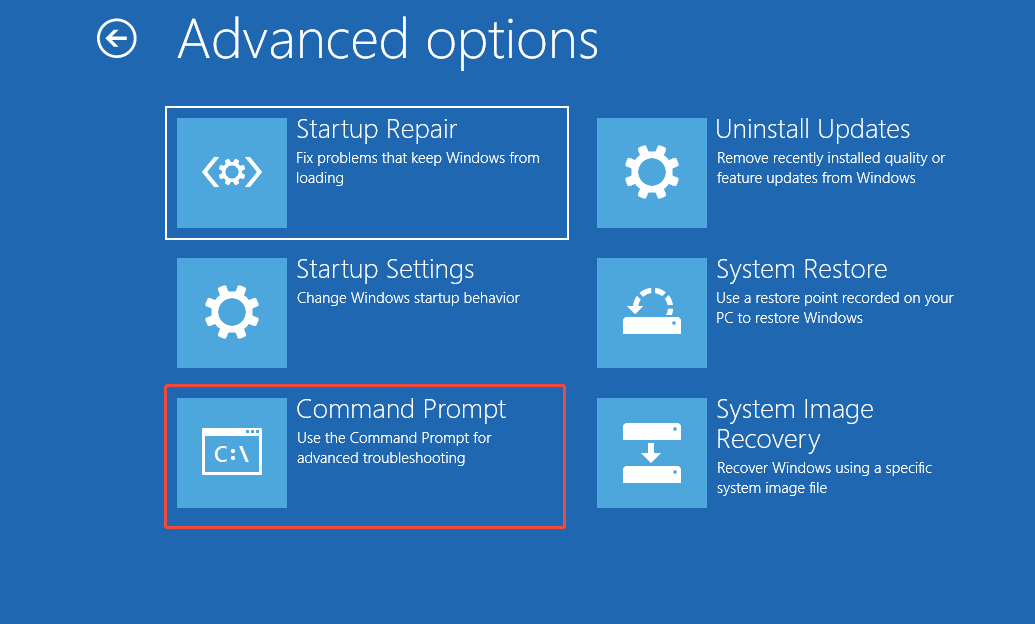
Step 2. Type sfc /scannow and press Enter to scan and repair system files
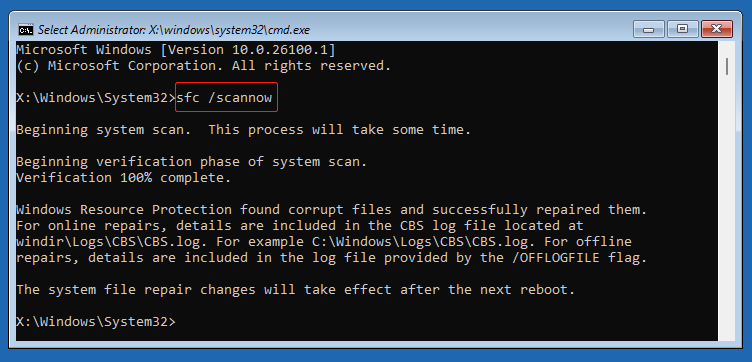
Step 3. Wait for the process to complete, then type exit and press Enter to close the Command Prompt. Finally, restart your PC and check if it boots normally.
Method 4. Boot into Safe Mode
Safe Mode loads Windows with only the necessary drivers and services, helping identify problems caused by third-party applications or malfunctioning drivers.
Here’s the breakdown to do it:
Step 1. While you are on the error screen, navigate to Advanced options > Troubleshoot > Advanced options > Startup Settings > Restart.
Step 2. Press F4 to enter Safe Mode.
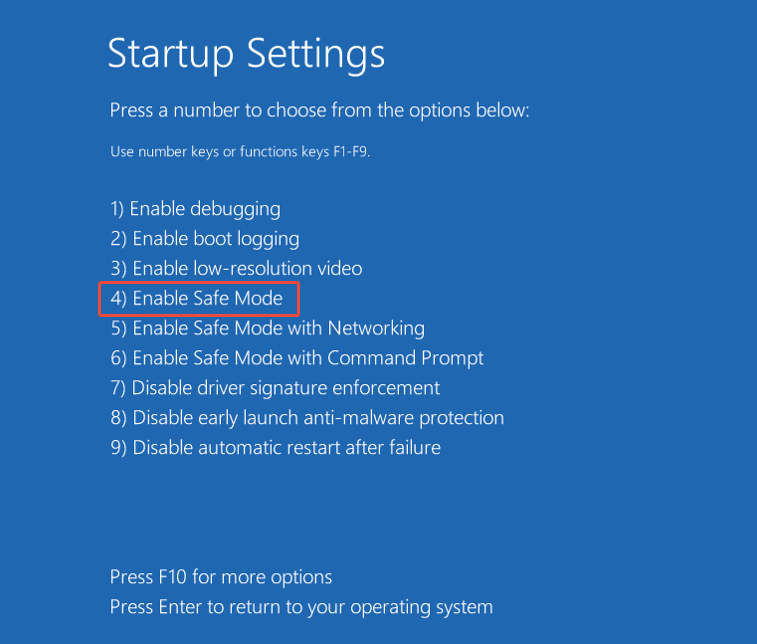
Step 3. If the issue does not occur in Safe Mode, basic device drivers or system services are not the cause. In this case, proceed with the following steps:
- Uninstall any recently added drivers, applications, or Windows updates.
- Turn off non-essential startup applications by launching Task Manager > Startup tab, right-clicking on undesired apps, and choosing Disable.
Step 4. Restart the computer to exit Safe Mode and check if the problem is resolved.
Method 5. Disable Antivirus
Conflicting antivirus programs may obstruct essential boot files, leading to a startup issue.
Therefore, follow these steps to turn off the early launch anti-malware protection feature:
Step 1. On the error display, select Advanced options > Troubleshoot > Advanced options > Startup Settings > Restart.
Step 2. Press 8 or F8 on your keyboard to disable the early launch anti-malware protection.
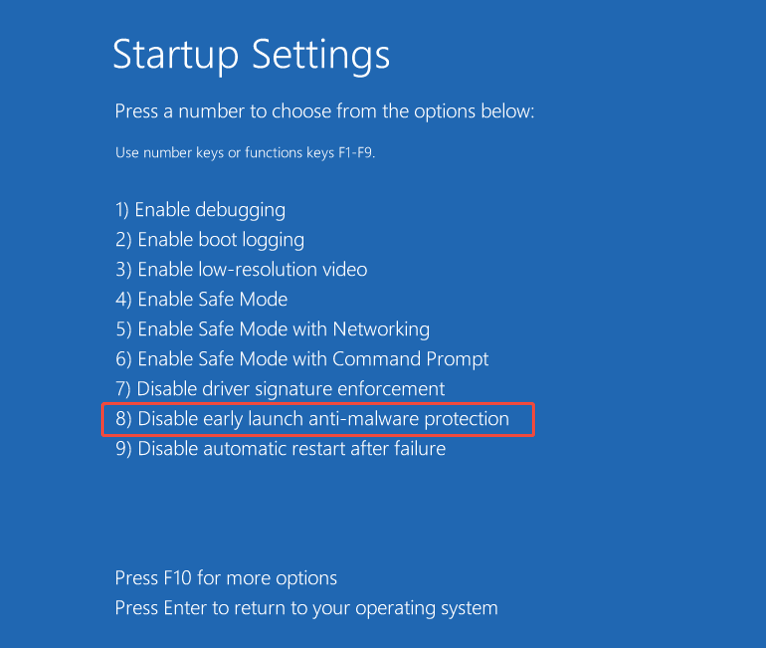
Next, restart your PC and check if the issue is resolved.
Method 6. Rebuild BCD & MBR
The Master Boot Record (MBR) is a specific boot sector that stores the bootloader code and the partition table.
A corrupted MBR or BCD (Boot Configuration Data) is a common reason for the “Automatic Repair, your PC did not start correctly” error.
These steps will fix the boot records to restore the boot process:
Step 1. On the error screen, navigate to Advanced options > Troubleshoot > Advanced options > Command Prompt.
Step 2. To fix boot codes, type the bootrec command and press Enter: BOOTREC /FIXMBR.
Step 3. To fix the boot sector, execute this command: BOOTREC /FIXBOOT.
Step 4. To scan for all installed systems, type Bootrec /ScanOS and press Enter.
Step 5. After it is completed, reboot the computer to verify if the problem has been resolved. If not, type the following commands and press Enter after each:
- bcdedit /export c:\bcdbackup
- attrib c:\boot\bcd -r -s -h
- rename c:\boot\bcd bcd.old
- bootrec /rebuildbcd
Step 6. Restart the computer.
Method 7. Perform System Restore
If you have previously activated the System Restore feature on your computer, this method can be helpful.
System Restore rolls back your PC to a previous “restore point,” resolving problems caused by recent software installations, updates, or configuration changes.
Here’s how to do it:
Step 1. On the error screen, choose Advanced options > Troubleshoot > Advanced options > System Restore.
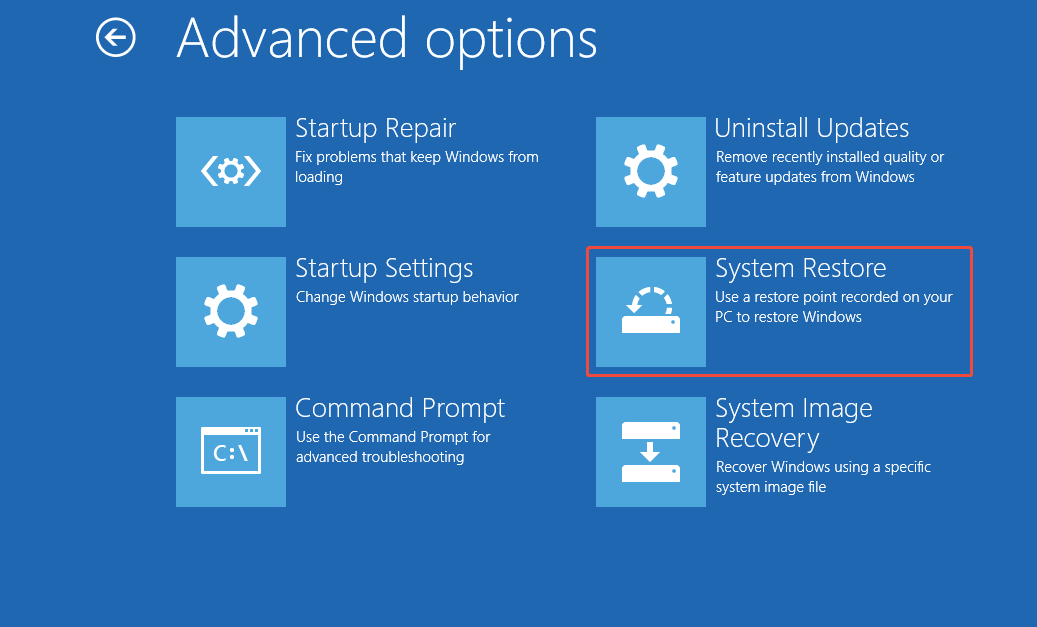
Step 2. Follow the wizard to select a restore point that was created before the error occurred.
Step 3. Confirm your selection of the restore point and wait for the process to finish.
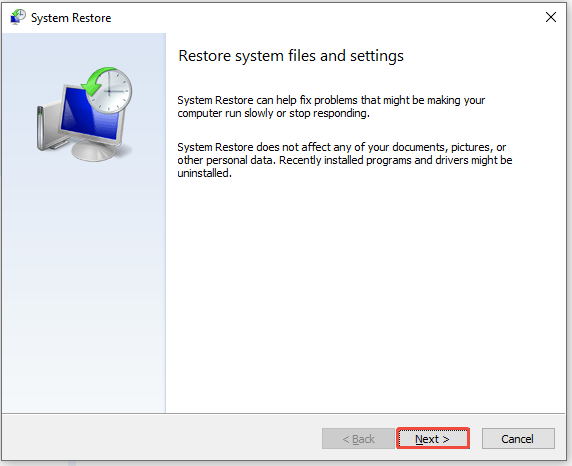
Restart your PC. If the restoration is successful, your system will return to the chosen state.
If this method doesn’t work, move to the next method to reset your PC.
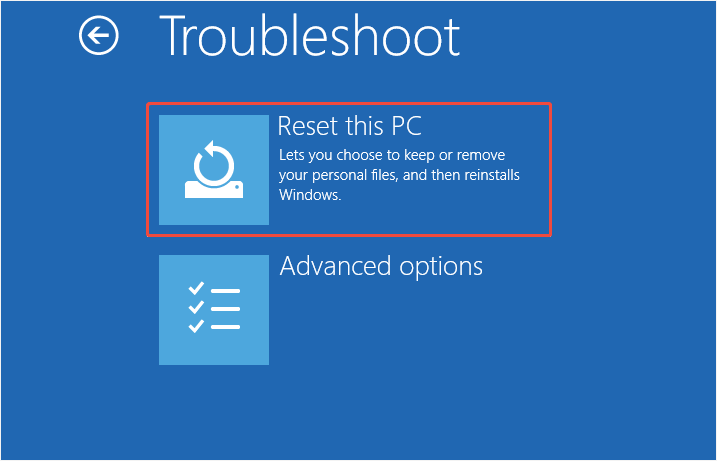
Method 8. Reset the PC
When all the above methods can’t help you fix the “Your PC did not start correctly” error, try resetting the PC.
Carefully follow the steps mentioned here:
Step 1. From the error screen, select Advanced options > Troubleshoot > Reset this PC.
Step 2. In the pop-up window, opt for Keep my files to retain documents and photos.
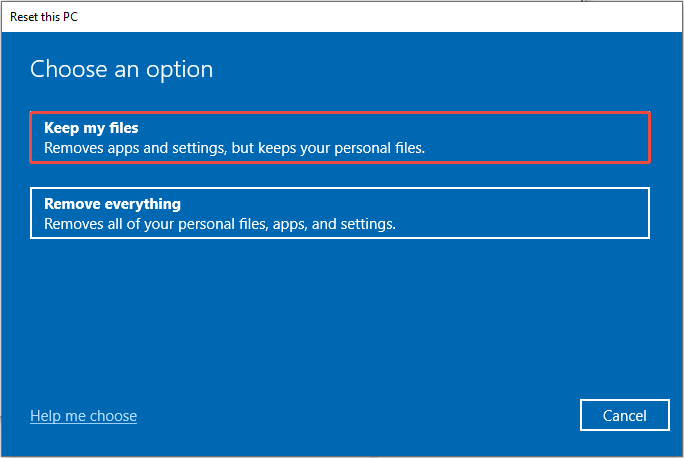
Step 3. Choose the installation method:
- Local reinstall: Uses current Windows files.
- Cloud reinstall: Downloads new files from Microsoft servers.
Step 4. Follow the instructions on your screen to finalize the reset.
After the reset, reinstall essential drivers and software.
If you find your data is lost after reinstalling the PC, try using the free data recovery tool to restore it immediately and safely.
Final Words
To fix the “Your PC did not start correctly” error, this post provides 8 effective and practical solutions. You can try them one by one until the problem is resolved.
If you have problems using MiniTool data recovery software to recover files, please contact [email protected].
About The Author

Position: Columnist
Sandy became an English editor after graduation. She is devoted to finding effective solutions for diverse IT problems and provides articles on data recovery, data backup, and computer partitions and drives. In her spare time, she likes listening to music and playing games.
User Comments :