Shift + Delete is a common method to delete files permanently, bypassing the Recycle Bin. Users often use this method when they want to prevent easy recovery or avoid manually emptying the Recycle Bin later.
However, accidental use of Shift + Delete can lead to unintended data loss, making deleted file recovery more challenging.
Is Shift-Deleted File Recovery Possible?
Yes, it is possible.
When you delete files using Shift + Delete, they are permanently removed from your computer’s storage, bypassing the Recycle Bin. The Recycle Bin normally allows easy data restoration, but Shift deletion skips this step.
The system marks the space previously occupied by those files as available for new data. However, the actual file content remains on the hard drive until it is overwritten by new files.
Most data recovery software can still retrieve these files as long as they have not been overwritten.
Therefore, once you realize you have accidentally deleted files using Shift + Delete, stop using the affected disk immediately to avoid writing new data to the drive. The sooner you act, the better your chances of recovery.
Now, start exploring how to recover permanently deleted files on Windows in detail.
How to Recover Shift Deleted Files on Windows?
In this part, you will learn how to restore Shift deleted files for free by using backup files and data recovery software.
Method 1. Restore From a Backup
Backing up files is essential for protecting against data loss in unexpected situations. It ensures you can quickly restore your files, regardless of which backup solution you have chosen.
If you use third-party backup software, open the program and follow its restore process. If your files are stored in the cloud, log in to your account and download the files back to your computer.
If you use built-in Windows tools, follow the instructions below.
Use File History:
File History is a handy Windows backup feature that automatically backs up your library files to an external hard drive or network location.
If you had File History configured before your files were deleted, use it to restore your data.
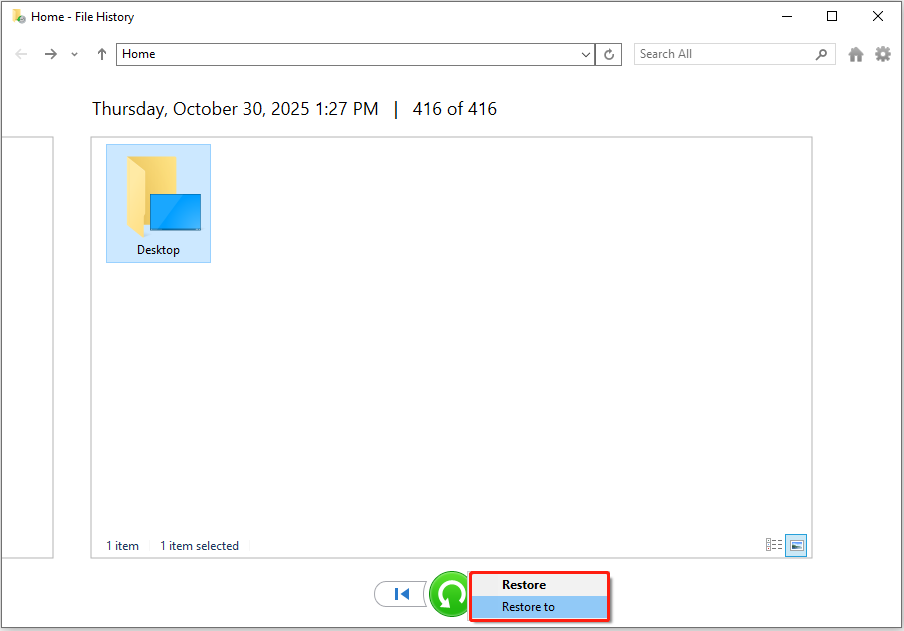
Step 1. Type Control Panel in the Windows search box and press Enter to open it.
Step 2. Click System and Security > File History > Restore personal files.
Step 3. Browse the listed files and select the ones you want to recover. Then, right-click the green Restore button and choose whether to restore them to their original location or a different destination.
Use Windows Backup and Restore:
Windows Backup and Restore is another backup feature that allows you to back up individual files or create a full system image.
Here is how to restore backup files by using Backup and Restore.
Step 1. Open the Control Panel and navigate to System and Security > Backup and Restore (Windows 7) > Restore my files.
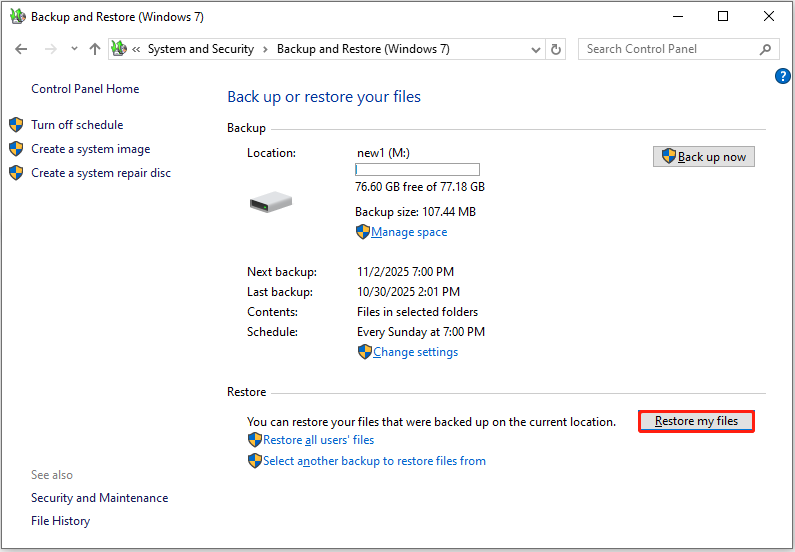
Step 2. Click Browse for files.
Step 3. Add the files you want to recover, and click Next.
Step 4. Choose a preferred location and click Restore.
If your files were permanently deleted without a backup, you will need data recovery software to retrieve them.

Method 2. Use MiniTool Power Data Recovery
If you do not have a trusted and free data recovery software, consider using MiniTool Power Data Recovery.
This professional file recovery tool is designed for Windows 11/10/8/8.1 and supports a wide range of storage media, including HDDs, SSDs, USB flash drives, SD cards, and more.
As long as your deleted photos, videos, documents, or other files have not been overwritten by new data, MiniTool can help you retrieve them.
In addition to recovering files deleted via Shift + Delete, it can also recover files from data loss scenarios such as virus infections, disk formatting, partition loss, and file system corruption.
Get the free edition of this MiniTool recovery tool and use it to recover up to 1 GB of files for free.
MiniTool Power Data Recovery FreeClick to Download100%Clean & Safe
Follow the steps below to recover Shift deleted files with MiniTool Power Data Recovery.
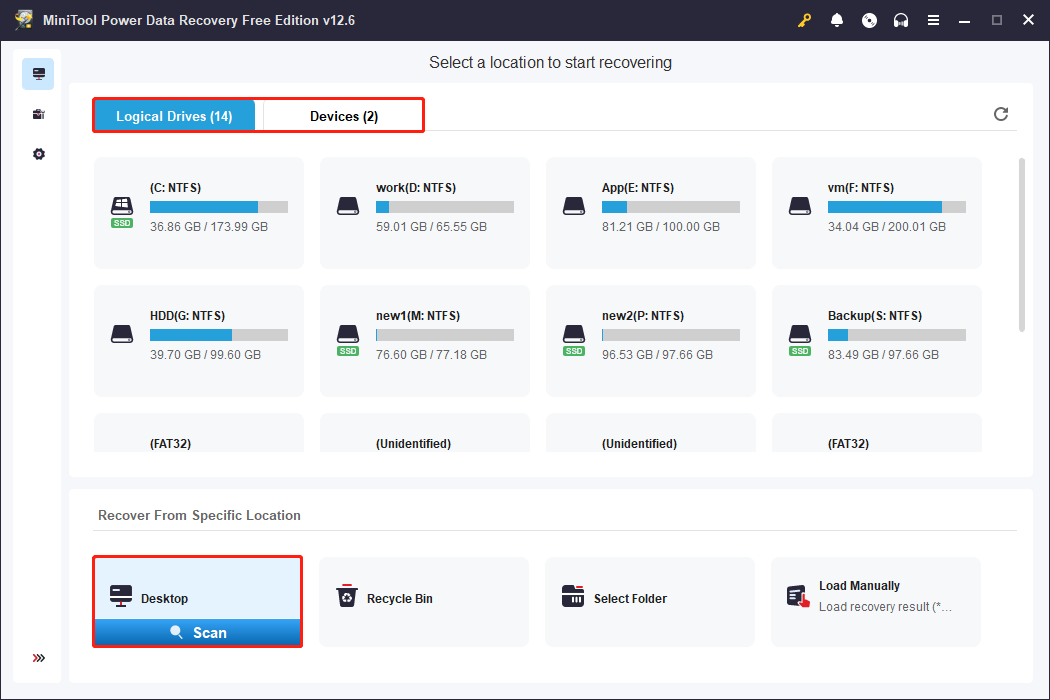
Step 1. Scan the drive, disk, or location.
On the software’s home page, under Logical Drives, select the partition where the deleted files should exist and click Scan. If you are unsure which partition is correct, switch to Devices and scan the entire disk instead.
Additionally, this software allows you to scan specific locations, such as the Desktop or any specified folder. Here, we choose the Desktop to scan.
Step 2. Locate and preview desired files.
After the scan is complete, start locating and selecting the files you want to recover.
Under Path, browse through the file paths to find the directory where the deleted files were originally located.
If you are looking for specific types of files, such as documents, pictures, or videos, switch to the Type tab. Next, expand All File Types, and your files are categorized by file type and data format.
Moreover, you can use the Filter function to narrow results by file type, date modified, file size, and file category. This helps you quickly find the files you want.
If you remember the name of the file you are looking for, use the Search bar. Input the file name or keywords and press Enter, and the software will immediately display only the files that match your search query.
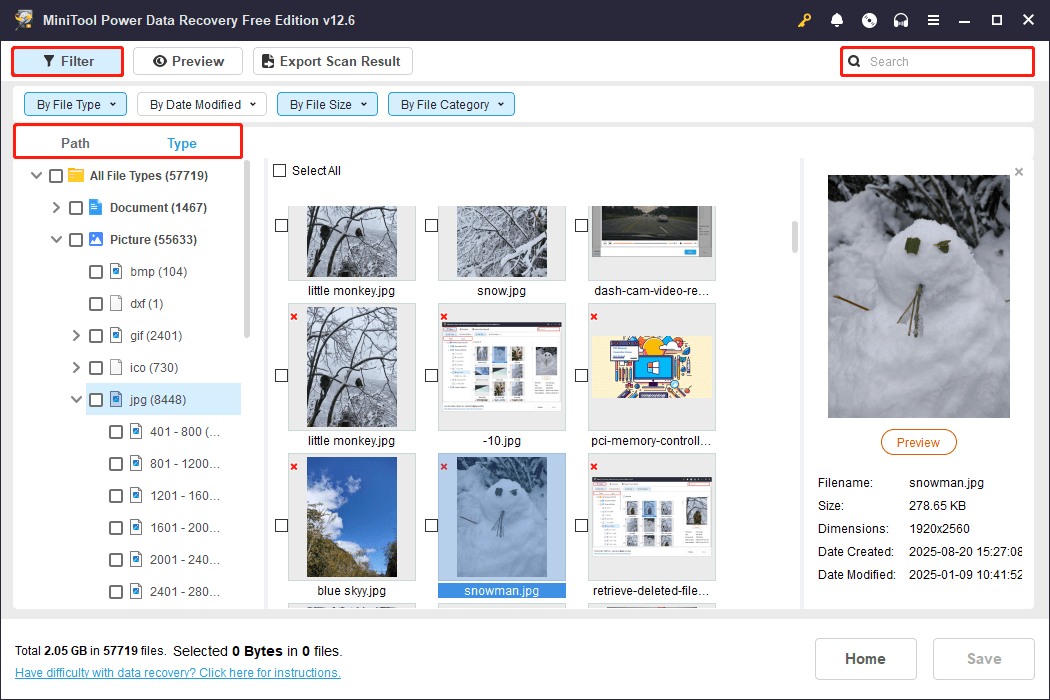
After locating the files, preview them. To preview a file, double-click it, or select it and then click the Preview button.
Step 3. Save files.
Make sure all the files you want to recover are selected. Then, click Save and choose a safe location to store the recovered files.
Do not save the files back to the same partition where they were deleted to avoid overwriting the deleted files.
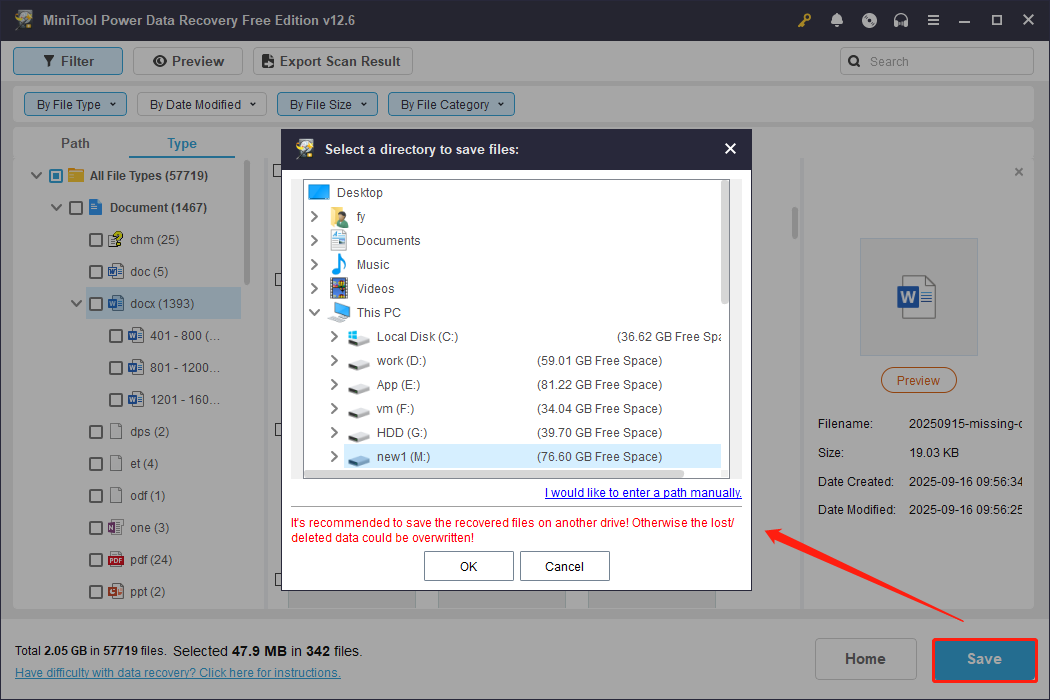
After recovery, you can go to the selected location to view the recovered items.
Method 3. Use Windows File Recovery
If you prefer using a built-in file recovery solution from Microsoft instead of third-party software, use Windows File Recovery.
It is a totally free command-line tool that can help recover files that have been deleted from your local storage devices. Supported devices include internal drives, external drives, and USB devices.
First, open the Microsoft Store and download Windows File Recovery. Second, follow the instructions below to recover Shift deleted files for free.
For a more intuitive guide, watch this short video guide:
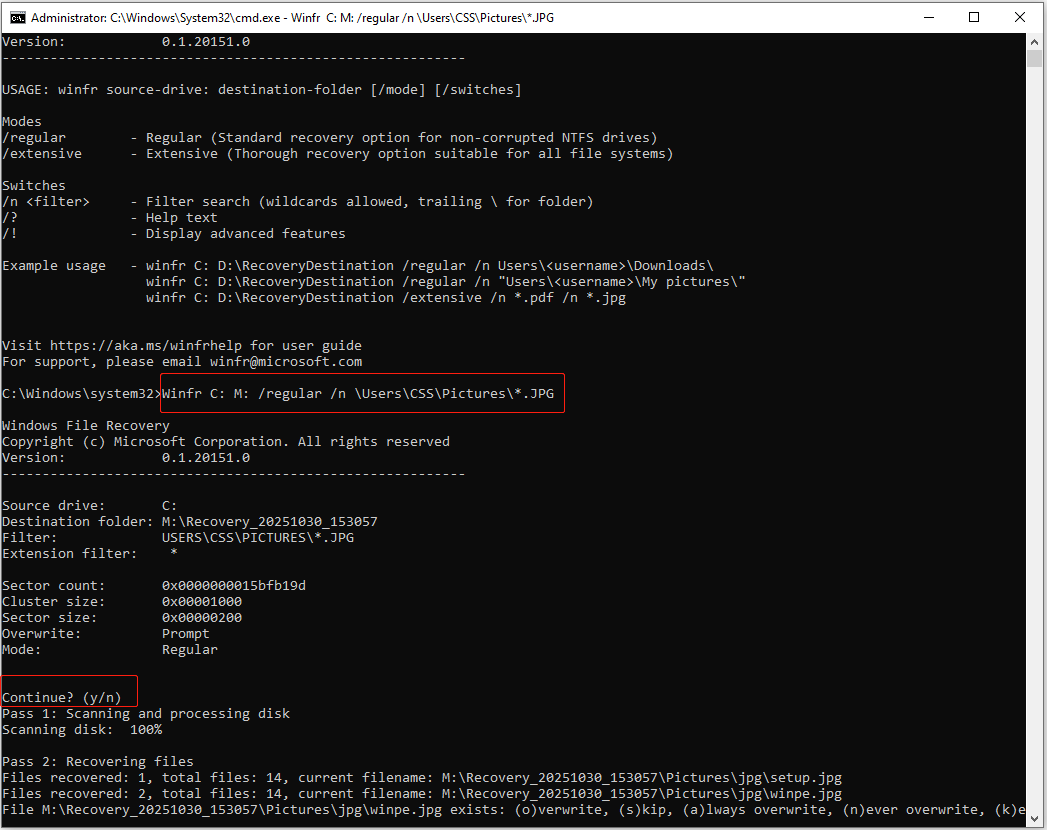
Step 1. Run Windows File Recovery to enter the command line window.
Step 2. Input the command in the following format:
winfr source-drive: destination-drive: [/mode] [/switches]
- source-drive: The drive from which you want to recover files.
- destination-drive: The drive where the recovered files will be saved.
- [/mode]: Specifies the recovery mode. The regular mode is used for standard recovery on non-corrupted NTFS drives, while the extensive mode provides a more thorough recovery suitable for all file systems.
- [/switches]: Optional switches that offer additional control over the recovery process, such as specifying a particular file name, type, or path.
For example, to recover JPG photos from the Pictures folder to the M drive with the regular mode, type this command and press Enter:
Winfr C: M: /regular /n \Users\username\Pictures\*.JPG
Step 3. When the Continue? (y/n) message appears, press Y on your keyboard, and the recovery tool will start scanning the disk and recovering detected files.
To explore more command-line options and recovery scenarios, visit Microsoft’s official Windows File Recovery documentation.
Useful Tip: Avoid Shift + Delete for Safer File Recovery
While Shift + Delete permanently removes files and frees you from manually emptying the Recycle Bin, it also eliminates your chance to recover those files.
For this reason, it is safer to use the regular Delete key instead of Shift + Delete.
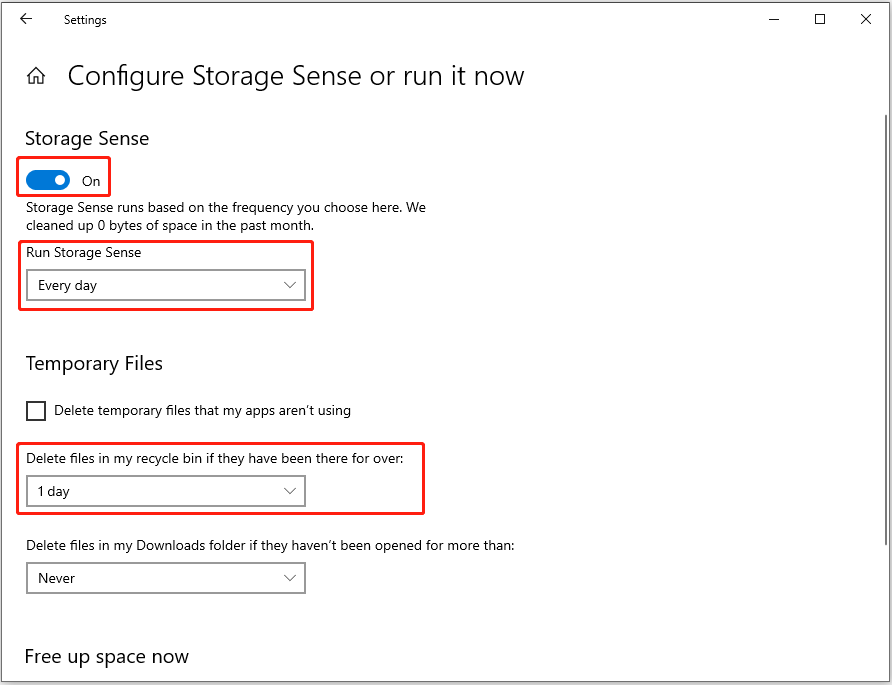
If you are concerned about the Recycle Bin taking up too much space or do not want to manually empty it, consider enabling Storage Sense. This built-in Windows feature automatically clears files from the Recycle Bin after a set period.
Configure Storage Sense as follows:
Step 1. Press Windows + I to open Settings.
Step 2. Navigate to System > Storage.
Step 3. Click Configure Storage Sense or run it now.
Step 4. In the new window, switch the Storage Sense button to On. Then, adjust the frequency of when Storage Sense runs (every day, week, month, or when disk space is low).
Step 5. Expand the drop-down menu under Delete files in my Recycle Bin if they have been there for over: to configure the time (1 day, 14 days, 30 days, or 60 days).
After configuration, files can be deleted normally without manually emptying the Recycle Bin.
Final Thoughts
To summarize, although files deleted using Shift + Delete are not stored in the Recycle Bin, you can easily restore them if you have backups. Even if no backup is available, data recovery software can assist in retrieving the files.
If you encounter any issues or have any questions while using MiniTool Power Data Recovery, contact the support team at [email protected].
About The Author

Position: Columnist
Shirley holds a bachelor’s degree in English and has been an editor at the MiniTool Team for many years. She specializes in IT-related content, with a focus on data recovery, file backup, disk management, and other technical topics. She is committed to delivering clear, accurate, and practical solutions to help users resolve common computer issues.
User Comments :