

Windows Scan and Fix deleted files? If your files are lost after performing the Windows-recommended operation, how can you recover deleted files from Scan and Fix? This post introduces you to robust data recovery software and the proper operation when receiving such a window.
If your files disappeared after clicking “Scan and Fix” on a USB drive, external hard drive, or SD card, stop using the device immediately.
To recover deleted files after Scan and Fix, check the Found.000 folder or use professional data recovery software to scan the affected storage device and restore recoverable files. Avoid saving new files to the device before recovery because overwritten data may become unrecoverable.
Does Windows Scan and Fix Delete Files
Windows Scan and Fix is a built-in repair feature that appears when Windows detects possible errors on a removable storage device, such as a USB flash drive, external hard drive, or SD card.
Windows Scan and Fix does not delete files directly, but it can make files disappear in certain situations.
Windows Scan and Fix attempts to repair file system problems. If the drive contains corrupted file records, damaged directories, or inconsistent file information, Windows may modify the file system structure during repair.
As a result:
- Files may no longer appear in File Explorer.
- File names and folder structures may become unavailable.
- Some recovered fragments may appear in a Found.000 folder.
The actual data may still exist on the storage device and can be recovered from the Found.000 folder or with data recovery software.

How to Recover Deleted Files After Windows Scan and Fix
Before starting recovery, do not write new files to the drive and avoid running Scan and Fix again. To recover files, the first step is to check whether Windows saved any recovered file fragments. If the original file structure is damaged, you can also use data recovery software to restore lost files.
Method 1. Check the Found.000 Folder
After Windows repairs a drive, it may create a hidden folder named Found.000 in the root directory of the drive.
This folder may contain recovered file fragments with the .CHK extension, such as File0000.CHK or File0001.CHK. They may contain parts of your lost documents, photos, videos, or other data.
Change the extensions of these .CHK files back to their original formats and check if they can be opened.
Method 2. Use Data Recovery Software
When Scan and Fix makes files disappear, the original file data may remain on the disk even though Windows cannot display it.
Professional data recovery software can scan the drive directly and locate recoverable files.
MiniTool Power Data Recovery supports file recovery from USB flash drives, SD cards, external hard drives, and other Windows-detected devices.
Use the free edition to recover 1 GB of files for free:
MiniTool Power Data Recovery FreeClick to Download100%Clean & Safe
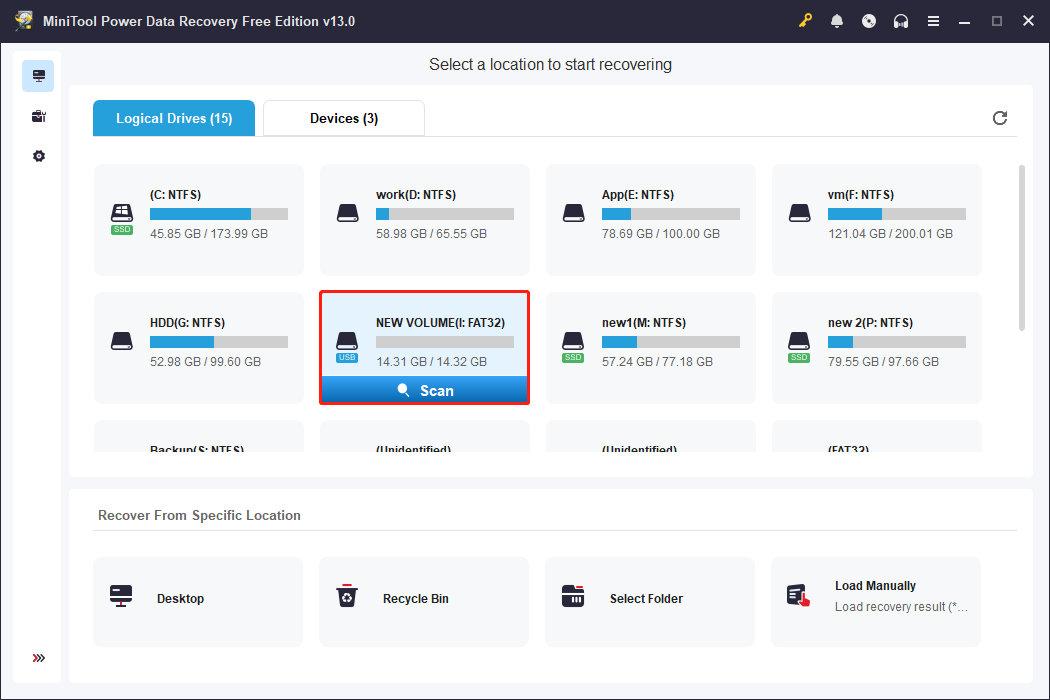
Step 1. Scan the drive
On the main interface of the recovery tool, choose the target partition under Logical Drives and click Scan.
Step 2. Find and select wanted files
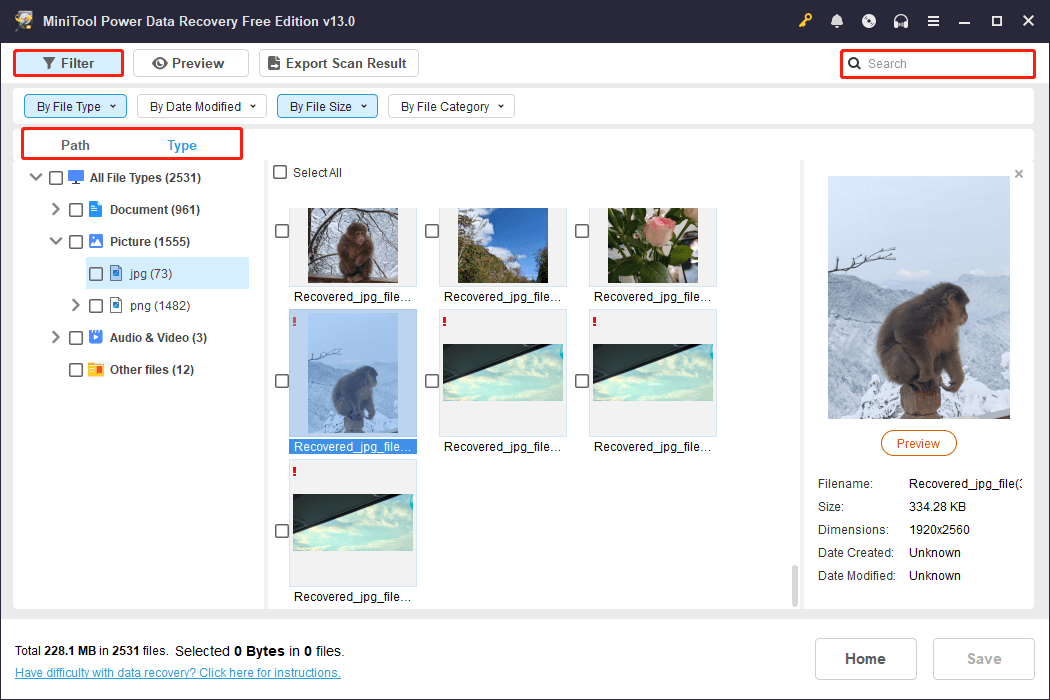
When the scan process is completed, you can start to find your required files. If there are numerous files, you can utilize features such as Filter, Type, and Search to filter out unnecessary files.
- Filter: You can set filter conditions according to your requirements, such as file size, file type, file category, and file modified date.
- Type: This function will sort files by their types, including Document, Picture, Audio & Video, Archive, etc.
- Search: To find a specific file, you can input its file name (both complete and partial names are OK) into the search box and hit Enter.
Step 3. Recover files to a safe location
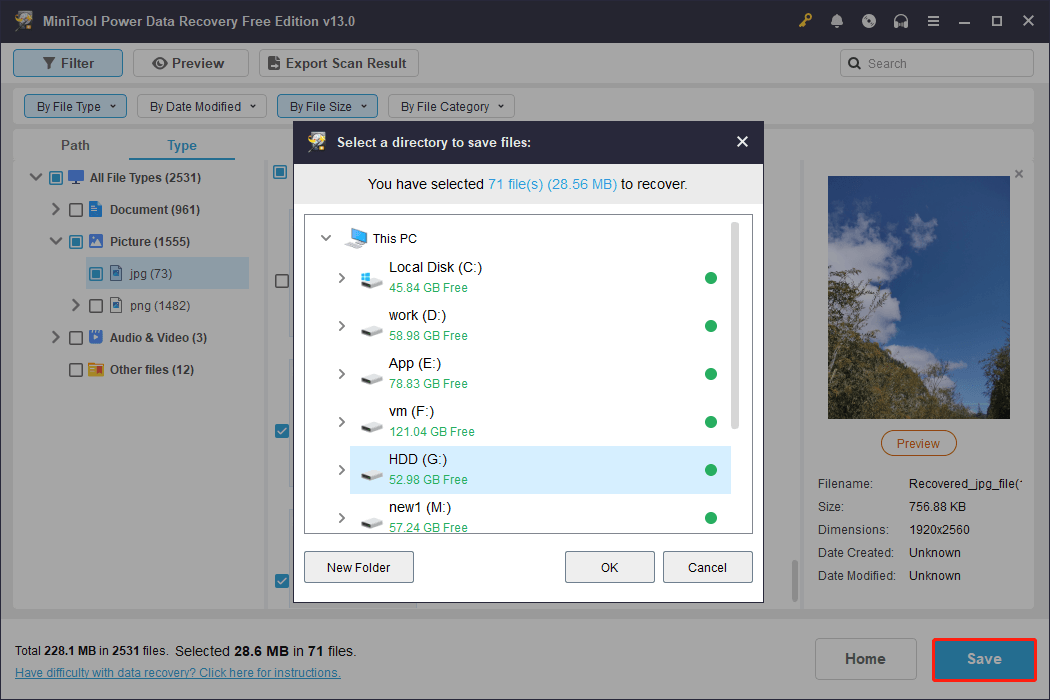
Make sure all wanted files are selected, and then click the Save button. In the prompt window, you need to choose a proper restoration path for those files. The chosen file path should be different from the original one to avoid data overwriting.
MiniTool Power Data Recovery Free only supports 1GB of file recovery for free. When you choose files more than 1GB, you should get an updated version to recover the excess part of the files.

How to Avoid File Loss After Windows Scan and Fix
Windows Scan and Fix can help repair minor file system problems, but running it without checking the condition of the drive may put important files at risk.
Follow these practices to reduce the chance of data loss.
1. Choose “Continue Without Scanning” When Important Files Are Stored on the Drive
When you receive a prompt window that says “Do you want to scan and fix Removable Disk (*:)?”, choose the Continue without scanning button instead of the recommended one.
Sometimes, you may be prompted into other informational windows, such as “We found errors on this drive. To prevent data loss, repair the drive now.” Click Cancel to disable the operation.
Next, copy important data to another location. After that, right-click the drive, click Properties, go to the Tools tab, and run the error-checking tool.

2. Back Up Important Files Regularly
A backup is the safest method to prevent data loss caused by file system corruption, formatting errors, or physical damage.
Keep at least one additional copy of important files on another storage device or a backup service.
For automatic backups, you can use backup software such as MiniTool ShadowMaker to create scheduled backups. The trial edition allows you to experience those backup features for free within 30 days.
MiniTool ShadowMaker TrialClick to Download100%Clean & Safe
3. Safely Eject USB Drives
Removing a USB drive while files are being transferred can damage the file system.
Before disconnecting a removable drive, click the USB icon in the Windows taskbar, select Eject, and remove the device after Windows confirms it is safe.
Sum Up
Windows will offer you a solution to repair your device when it thinks your device is encountering some problems. For instance, it will suggest that you Scan and Fix your removable disk when it detects errors there. On one hand, this is convenient for you to solve the problem; but on the other hand, it may delete your valuable files by mistake.
Considering that so many people are seeking help to get Windows Scan and Fix deleted files back, I feel honored to provide practical solutions to it. When you are really in face of such a situation, please follow the steps we described in this post to know how to recover deleted files from Scan and Fix and how to fix the problem easily and quickly.
If you do have other questions or doubts, please feel free to leave a short message below; I’ll reply very soon.
FAQ About Windows Scan and Fix Deleted Files
Immediately back up your data and repair or replace the drive.
About The Author

Position: Columnist
Shirley holds a bachelor’s degree in English and has been an editor at the MiniTool Team for many years. She specializes in IT-related content, with a focus on data recovery, file backup, disk management, and other technical topics. She is committed to delivering clear, accurate, and practical solutions to help users resolve common computer issues.
User Comments :