About Error Checking
What Is Error Checking
In Windows, error checking is a tool used to detect and fix problems on USB drives, SD cards, external hard drives, and other storage devices.
It can help you repair file system errors, bad sectors, or other disk-related problems to ensure the health of the disk and the integrity of the file system.
It is a graphical interface version of the CHKDSK command, suitable for ordinary users.
How to Use Error Checking
This part tells you how to run error checking to scan and repair your disk.
Step 1: Open File Explorer
Press the Win + E keys to open the File Explorer, or right-click the Windows icon and choose File Explorer.
Step 2: Enter the drive’s properties page
Click This PC. Find and right-click the drive you want to check and choose Properties.
Step 3: Run the error checking
Switch to the Tools tab and click Check under the Error Checking section. In the pop-up window, click Scan and repair drive.
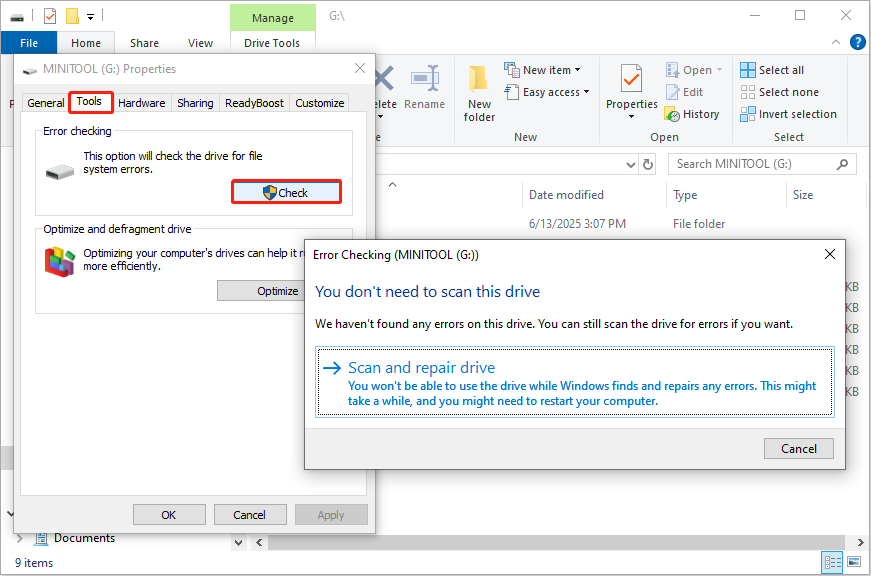
This USB error checking process will detect and repair errors on your drive.
What if Error Checking USB Is Stuck at 0%, 10% or 100%
However, sometimes, error checking does not go as planned. Your USB drive may get stuck at scanning and repairing for minutes or even hours.
Why does this happen? Here are the most common reasons:
- The USB drive has serious errors or bad sectors. If the drive has damaged areas, the system may not complete the repair and get stuck at 0%, 10%, or even 100%.
- The drive’s file system is damaged or incompatible. A damaged file system (such as FAT32, NTFS) can prevent the scan from continuing.
- The USB drive is infected with viruses or malware. Malicious programs may interfere with disk access, causing the scan to get stuck.
- The driver is outdated or misconfigured. Old or damaged USB drivers may prevent the system from correctly identifying the device.
- There is a sudden power outage or forced USB unplugging. Interrupting the scanning process may cause the system to hang or be unable to continue.
- There is a USB drive hardware failure. Hardware failure of the USB drive can also cause the scanning process to fail.
When this issue occurs, how should you deal with it? Try these two actions first.
- Wait for a while: Sometimes, if the USB is large or has damaged areas, the system check will be slow. You need to wait a few minutes to see if it recovers.
- Cancel and re-plug: If there is no response for a long time, you can cancel the check window. Then, safely remove the USB and re-plug it.
Still cannot fix it? Here are two cases you need to check next.
Case 1: The USB Drive Is Accessible
If your USB is accessible but gets stuck at error checking, it means the device is still readable, but some parts may be slightly damaged or the system may be processing it abnormally.
At this time, for the sake of data security, you need to transfer or back up the data first, and then solve the problem.
Back up USB Drive Data in Advance
If you are worried about data errors or loss during the transfer process, you can choose to back up your USB drive. This operation will greatly improve the security and recoverability of your data.
Option 1: Direct copy and paste
Step 1: Insert the problematic USB drive into your computer’s USB port.
Step 2: Press Win + E to open File Explorer. Click This PC and locate your USB drive.
Step 3: Open the folder or file you want to back up, right-click it, and select Copy.
Step 4: Find the backup location on your computer, right-click on a blank area, and select Paste.
Now, wait for the file to finish copying.
Option 2: Use MiniTool ShadowMaker
MiniTool ShadowMaker is a professional backup tool. It can create an image file of the entire USB. Here is how to use MiniTool ShadowMaker to back up your USB drive.
Step 1: Download and install MiniTool ShadowMaker and open it.
MiniTool ShadowMaker TrialClick to Download100%Clean & Safe
Step 2: Switch to the Backup section. Click SOURCE and DESTINATION to choose the files you want to back up and where to save the backup.
Step 3: When it’s done, click Back Up Now to start the backup process.

How to restore the USB drive?
Open the software and go to the Restore tab.
Find the backup image you want to restore and click the Restore button next to it.
Case 2: The USB Drive Cannot Be Accessed
When the error check is stuck and the USB shows inaccessible, it means that the device may have serious file system errors or bad blocks.
At this time, the data in it is likely to be lost, so you need to recover files first. There are a few things you need to note:
- Do not format: Formatting will clear data and reduce the success rate of recovery.
- Do not repeatedly plug and unplug or run CHKDSK: It may cause data to be overwritten or damaged.
- Do not write data on the drive: Continuing to write data will overwrite the original file, making recovery difficult.
Recover Data From an Inaccessible USB Drive First
From my experience, MiniTool Power Data Recovery is the best tool for recovering data from inaccessible USB drives. It offers powerful features for handling unreadable or unrecognized devices.
This tool can identify USB flash drives in abnormal states such as unallocated, RAW, and uninitialized. And it supports data recovery from lost partitions, formatted partitions, and damaged partitions.
Running in read-only mode, it will not write to the original USB drive, avoid data overwriting, and ensure the success rate of recovery. It is not limited to USB drives only, but also to hard drives, SD cards, etc.
This free data recovery software allows you to restore 1 GB of files for free. Download and install it to have a try.
MiniTool Power Data Recovery FreeClick to Download100%Clean & Safe
Step 1: Scan the inaccessible USB drive
Launch MiniTool Power Data Recovery. In the main interface, go to the Devices tab and click Scan on your USB drive.

Step 2: Locate the target files
The scan process will take a while. When it is done, all files are listed by path under the Path tab. You can find files according to the file structure under this tab.
Besides this, there are some other features to help you locate files quickly.
- Type: Display files based on file type, such as documents, pictures, videos, audio, etc. Double-click All File Types to expand the list and focus on the type of files you want to recover.
- Filter: Quickly narrow down the scope based on file attributes, such as file type, size, modified date, and category.
- Search: Used to directly search for a specific file. Type a full or partial file name in the box and press Enter to quickly and accurately locate the target file.

Step 3: Check the file content
Before recovering all the files, you need to confirm the file content to ensure the accuracy of the recovery.
The Preview function can help you confirm which files are worth recovering and which ones may be damaged or unnecessary. How to use it?
After the target files are found, select the files one by one and click Preview. If the file supports preview, a preview window will pop up to display the content. After confirming that everything is correct, check the boxes next to the files you want to recover.

Step 4: Save files to a safe place
Tick all the target files and click the Save button. A window will pop up prompting you to choose a destination to store the recovered files. After selecting, click OK to start the recovery process.

When the Recovery completed window shows, go and check your recovered files.
Final Step: Fix Error Checking USB Drive Stuck
After finishing the above operations, it’s time to fix “error checking USB drive scanning and repairing stuck”. Here are three ways you can try.
Fix 1: Run CHKDSK
The CHKDSK (Check Disk) command is a built-in disk checking tool in Windows. It is used to scan and repair file system errors and bad sectors on the disk. So, use it to repair your USB drive.
Step 1: Open an administrative Command Prompt
Type Command Prompt in the Windows search bar, right-click the best match, and choose Run as administrator. When prompted by UAC, click Yes to continue.
Step 2: Run the command
Type chkdsk G: /f /r in the window and press Enter to execute the command. Replace G with the drive letter of your USB drive.
The following are common parameter descriptions:
- G: Specifies the drive letter of the disk partition you want to check
- /f: Fixes errors on the disk
- /r: Identifies bad sectors and recovers readable data (implies /f)


Fix 2: Update or Reinstall Disk Driver
If the disk driver is outdated, corrupted, or misconfigured, the system may not be able to complete the scan and repair process. Therefore, updating or reinstalling the disk driver is a critical step.
Step 1: Open Device Manager
Press the Win + X keys or right-click the Start button and choose Device Manager.
Step 2: Update the disk driver
Click the small arrow in front of the Disk drives to expand it. Find and right-click your USB drive and choose Update driver. In the new window, select Search automatically for drivers to update your driver.
If this step doesn’t work, try reinstalling it.
Step 3: Reinstall the device
Right-click your USB drive and choose Uninstall device. In the prompt window, click Uninstall to confirm. Then, restart your computer, and Windows will install the driver automatically.

Fix 3: Format the USB Drive
Still stuck with the problem and unable to restore your drive to normal? Your USB file system (FAT32, NTFS, etc.) may be too corrupted to fix.
At this point, formatting the drive is your best option. This will rebuild the file system and get your drive working again.
Since you have already recovered your files, there is no need to worry about data loss. So, go ahead and format your USB drive.
Option 1: Via File Explorer
Step 1: Open File Explorer
Right-click the Windows icon and choose File Explorer or just press the Win + E keys.
Step 2: Access format settings
Click This PC in the left pane, right-click your USB drive, and choose Format.
Step 3: Format the USB drive
Set the file system and allocation unit size. Tick the box for Quick format and click Start. In the pop-up reminder box, click OK.
Option 2: Via Disk Management
Step 1: Open Disk Management
Right-click the Windows button and choose Disk Management.
Step 2: Start the format process
Find and right-click your drive and choose Format. Set the volume label, file system, and allocation unit size. Check the box for Perform a quick format and click OK. In the warning window, click OK.
MiniTool Partition Wizard FreeClick to Download100%Clean & Safe
Bottom Line
Now you know how to fix the problem: error checking USB drive stuck. Try running CHKDSK, updating/uninstalling the disk driver, or formatting the drive. However, before that, remember to back up or recover data in advance.
Have any confusion about MiniTool products? Contact us immediately without hesitation via [email protected]
About The Author

Position: Columnist
Chelsea graduated from university with a major in English. She has a strong interest in English writing. It is this passion for writing that led her to become an English editor. Her articles mainly foucus on data recovery and other computer industry news. As an energetic and outgoing girl, Chelsea enjoys listening to music, singing, riding bikes, and eating in her spare time.
User Comments :