An encrypted USB drive is a USB device that uses encryption technology to protect the stored data. For the security of data, choosing an encrypted flash drive to store data is a good way, which ensures that only authorized users can access the data on the drive. After encryption, the USB drive will automatically lock, making the data inaccessible. To recover files from a password protected USB drive, you need the password or the recovery key to unlock it first.
Is It Possible to Recover Data From Password Protected Drive
My wife’s computer died (Lenovo G80-50, Windows 10), likely the motherboard. Unfortunately, despite my continual warnings, she didn’t do regular backups and needs data from the user password protected drive (I don’t see how the data would be encrypted). Is there a fix for this?answers.microsoft.com
It is possible to recover files from a password protected USB drive, but only if the drive is unlocked. This is because an encrypted USB drive blocks access to its contents until it is successfully unlocked, and neither you nor any data recovery software can read the data before that. Therefore, in order to recover files from an encrypted USB drive, you need to unlock the drive to gain access first.
Step 1: Unlock an Encrypted USB Drive
Encryption is a security measure, while unlocking is a key step in gaining authorized access to data. Follow the methods below to unlock the drive.
Way 1: Turn off the Physical Protection Switch
Some USB drives have a physical protection switch, which is usually located on the side or bottom of the drive and controls write access to the drive. Its main function is to protect the stored data from being modified or deleted.
If the switch is toggled to the lock position, your USB drive will show locked. This way, even when you insert the drive into a virus-infected computer, the data stored in the drive will not be affected. However, this mode will prevent you from accessing the drive. To unlock this kind of USB drive, you can just turn off the physical protection switch.

Way 2: Unlock the USB Drive With a Password
If you remember the password, you can unlock the password protected USB drive with the password easily. This is usually the most common way because the password is a security key set by the user to protect the data stored in the USB drive. Choose one of the following two methods to proceed.
Option 1: Via File Explorer
Step 1: Right-click on the Windows icon and choose File Explorer.
Step 2: In the left pane, expand This PC to find your encrypted USB drive.
Step 3: Right-click on it and choose Unlock Drive.
Step 4: A new window will pop up. Enter the password and click on Unlock to unlock the drive.
Option 2: Via Control Panel
Step 1: Type Control Panel in the Windows search box and press Enter.
Step 2: Click on the View by box to change the view to Large icons and select BitLocker Drive Encryption.
Step 3: Scroll down the list to locate your encrypted USB drive and expand it.
Step 4: Click on Unlock drive in the locked removable drive section.

Step 5: Enter the password and click on Unlock to apply the change.
Way 3: Unlock the USB Drive With Recovery Key
If you forget your password, the recovery key can be used as a second verification method to help you unlock the USB drive. This serves as a secure backup unlocking option. The recovery key has been saved when you set up encryption. If you cannot find it, it’s necessary to recover the lost BitLocker recovery key. After finding it, start unlocking the drive.
Step 1: Press the Win + E keys to open File Explorer.
Step 2: Under This PC, right-click on your USB drive and choose Unlock Drive.
Step 3: In the new window, click on More options > Enter recovery key to enter the recovery key.
Step 4: Finally, click on Unlock to make the change take effect.

Way 4: Use the Command Line to Unlock the Drive
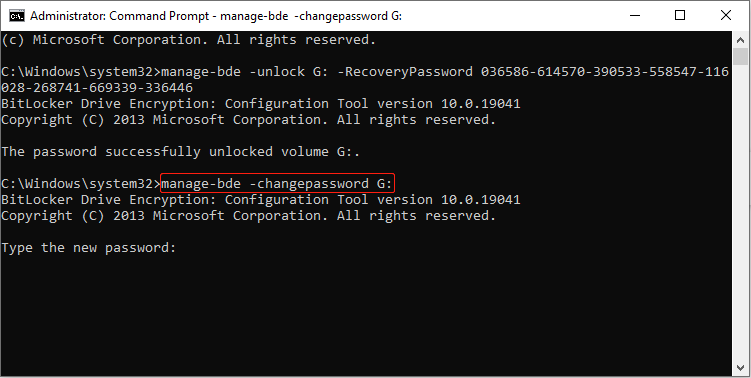
Besides these, you can also use the command line to unlock the drive. It is noted that this command line must specify an unlock mechanism (password, SID, certificate, recovery password, or recovery key). Here, I take the recovery key as an example.
Step 1: Type Command Prompt in the Windows search box, right-click on the best match, and choose Run as administrator.
Step 2: When prompted by the UAC window, click on Yes to continue.
Step 3: Type manage-bde -unlock G: -RecoveryPassword YOUR-RECOVERY-KEY in the window and press Enter. The letter G should be replaced by the drive letter of your USB drive. YOUR-RECOVERY-KEY is your BitLocker recovery key.

After the drive is unlocked, if you still cannot remember your password, you can reset the password for future use through the next step.
Step 4: Type manage-bde -changepassword G: in the same window and press Enter to enter the new password. Replace G with the drive letter of your USB drive.
Step 2: Recover Files From a Password Protected USB Drive
MiniTool Power Data Recovery is professional file restore software designed to recover files from various file storage devices. It cannot scan encrypted USB drives, but once the drive is unlocked, it is ideal for recovering files from it.
Whether it is file deletion, virus attack, disk failure, or file system error, this robust software can scan and recover lost data from diverse storage devices such as hard drives, SD cards, USB flash drives, etc. In addition, it supports the recovery of multiple file types such as pictures, videos, audio, documents, etc.
This free file recovery software is easy to operate and can be used even by users without technical backgrounds. It allows you to restore 1 GB of files without spending a cent. After knowing about the software, download and install it to recover files from a password protected USB drive.
MiniTool Power Data Recovery FreeClick to Download100%Clean & Safe
Step 1: When the installation is completed, double-click on the MiniTool Power Data Recovery icon to launch it. After loading all the disk information, you will enter the main interface.
Under Logical Drives, all the partitions, including existing, lost, or deleted ones, are displayed in this section. The unlocked BitLocker-encrypted drive will appear with a green unlocked icon. Hover your cursor over it and click on the Scan button to scan for data.

Step 2: The scanning time varies depending on factors such as the size of the stored data, drive condition, file system structure, and so on. Larger or damaged drives may take longer to scan. For a more complete scanning result, you need to wait patiently for the process to be completed.
When it ends, all the files will be listed under the Path tab by default. This classification method is based on the original folder structure, generally including Deleted Files, Existing Files, and Lost Files. As a comprehensive recovery tool, it provides other classification methods to help you find the target files. Let me introduce them one by one to you.
- Firstly, the Type feature next to the Path classifies files according to the type, including documents, pictures, audio, videos, and more. You can click on the small arrow in front of All File Types, and expand the list to locate the target files.
- Secondly, the Filter feature not only supports classification by file type, but also by file size, modification date, and file category. Click on the Filter button and set the criteria at once. The files that meet the criteria will be displayed.
- Thirdly, the Search feature, in the upper-right corner, allows you to search for the target files by the file name. Type the partial or full file name in the box and press Enter. All the unnecessary files will be filtered out.

Step 3: After finding the target file, do not rush to recover it. It is recommended that you preview it first to confirm whether it is the file you want. After all, the free recovery capacity is only 1 GB. Select the file and click on the Preview button or just double-click on the file to view the contents.
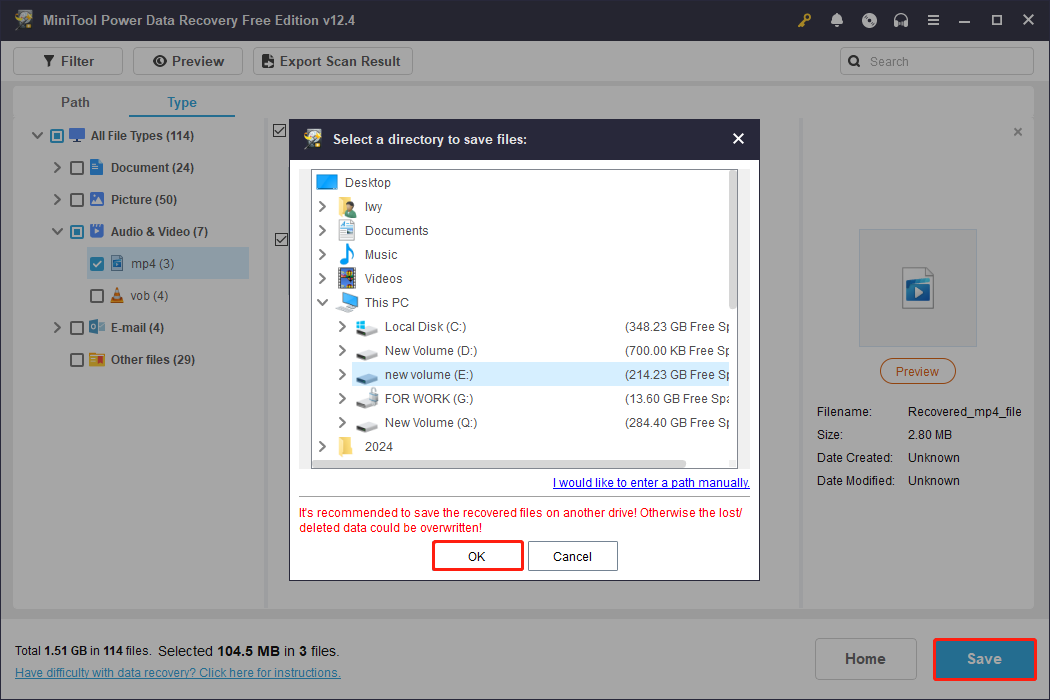
Step 4: Once you have determined all the files you want to recover, you can tick them all and click on the Save button. There is a new window prompting you to choose a directory to store the recovered files. It is best to select a new location to prevent files from being overwritten. Finally, click on OK to get started.
When the recovery completes, close the window and go check your recovered files.

Perform a Backup to Prevent Encrypted USB Drive Data Loss
As you can see, although disk encryption offers strong data and disk protection, forgetting the password or encountering access issues can still put your files at risk of complete loss. Therefore, after setting a password for the USB drive, make sure to store your password and recovery key in a secure place.
When it comes to data protection, encryption alone is not enough. Regular data backups are equally important. Backups ensure that your important files can be recovered in case of any logical errors or physical damage.
You can regularly transfer significant files from your USB drive to an external hard drive or a cloud storage service like Dropbox, Google Drive, etc. Alternatively, consider using a professional data backup tool like MiniTool ShadowMaker. It provides secure and reliable backups, and your original data remains untouched during the process.
This user-friendly software comes with a 30-day free trial. Now, download and install it on your computer to create a backup.
MiniTool ShadowMaker TrialClick to Download100%Clean & Safe
Step 1: Launch the MiniTool ShadowMaker software and go to the Backup section. In the right pane, you will see two sections: SOURCE and DESTINATION.
Step 2: Click on the SOURCE section to choose what you want to back up. You can choose between Disk and Partitions or Folders and Files, depending on what you need. After confirming the data to be backed up, click on OK to return to the main interface.
Step 3: Click on the DESTINATION section to select a location to store the backup, and then click on OK.
Step 4: In the main interface, you can click on Options to set the backup scheme and schedule, and then click on OK.
Step 5: When everything gets ready, click on Back Up Now to start the process.

After backing up the files, it is recommended to store the backups on multiple devices, which can effectively avoid file loss caused by physical damage to the device.
Conclusion
To recover files from a password protected USB drive is a process that requires skill and patience. Taking the right approach based on the specific problem and using a professional tool like MiniTool Data Recovery can increase the success rate of data recovery. At the same time, paying attention to backup and password management is the key to protecting data security.
MiniTool Power Data Recovery FreeClick to Download100%Clean & Safe
When you have any questions about MiniTool products, please contact us via [email protected].
About The Author

Position: Columnist
Chelsea graduated from university with a major in English. She has a strong interest in English writing. It is this passion for writing that led her to become an English editor. Her articles mainly foucus on data recovery and other computer industry news. As an energetic and outgoing girl, Chelsea enjoys listening to music, singing, riding bikes, and eating in her spare time.
User Comments :