

Phenomenon: Hard Drive Is Full but No Files in It
You may be confused about why such a contradictory situation appears on your computer — hard drive full but no files found. Fret not; you are not alone. After reading many forum discussions, we found that many users have experienced this frustrating issue. Some users did not find any large files in the problematic hard drive, and some even found that there were no files at all.
“Local Disk (C:) is full, but I can’t find any files to delete. I kept getting notifications that I needed to clear Disk (C :), so I checked. I only had 3GB free out of the 476 GB. I looked through every file that got in my head, deleted screenshots and clips I no longer needed, and even did scans with the antivirus, but I still can’ find anything. Is there something else taking space that I’m not aware of?”www.reddit.com
This is where this post comes in. As things stand, you should verify whether these files are hidden on the troublesome hard drive. Navigate to the hard drive in the File Explorer, in the top toolbar, click View, and then check the box of Hidden items.
If you still receive the error message saying your hard drive is full, you may wonder, “Why is my hard drive full for no reason?” Keep reading to get more details.
Main Reasons for Hard Drive Full but No Files
Here are the common factors that cause your computer to restart randomly:
- Hidden Files and Folders: Certain files and folders, like system and temporary files, may be hidden from view by default but still occupy valuable storage space.
- Corrupted File System: A corrupted file system can lead to inaccurate reports of available storage, causing the external hard drive to misrepresent its capacity.
- Formatting or Deletion Leftovers: Data remnants from incomplete formatting or deletion can linger on the external hard drive, taking up space even if not visible.
- Index Files and Thumbnails: Thumbnail caches and index files created for quick access may occupy storage space even if the original content has been deleted.
- Virus or Malware: The utilized disk space does not match the real size of the current files and folders, indicating that something is consuming the disk space. Viruses and malware can generate files that occupy your system drive. Additionally, malware might lead to files becoming hidden or corrupted.
- Large Files Saved Unintentionally: You may have accidentally stored large files or folders on the drive, which take up storage capacity.
- …
What Happens When a Hard Drive Is Full?
When facing the “hard drive full but no files” error, you may see a warning about low disk space. When the system drive is running low on space, some applications may not function correctly. Even worse, it could lead to a system crash.
If your hard drive is full, you may wonder what files can be deleted without causing serious issues. Listed below are some safe files:
- Windows upgrade log files: You can remove them if you haven’t had any issues when upgrading to a new version of Windows.
- Windows Update Cleanup files: Generally, you can delete these files, but if you’re experiencing problems related to updates, it’s best to keep them for troubleshooting purposes.
- Recycle Bin: You can empty the Recycle Bin from within Windows. Just ensure it doesn’t contain anything you still need.
- Language resource files: If you’ve downloaded a language or keyboard layout that you no longer require, you can delete it.
- Temporary files: As the name indicates, temporary files are not necessary in the long term. Thus, you can safely remove them.
Advanced Step: Recover Deleted Files from the Problematic Hard Drive
Before looking for any potential methods, you may try deleting some files to resolve the hard drive full but no files error, but find it didn’t work. Now, if you want to recover some deleted files that you don’t know are important, one reliable option is MiniTool Power Data Recovery.
This free data recovery software is designed to recover lost or deleted files for various reasons, including intentional deletion, virus infections, hard drive issues, file system corruption, etc. It supports various file storage devices such as hard drives, solid-state drives, USB flash drives, memory cards, and others.
Featuring a user-friendly interface and robust recovery algorithms, MiniTool Power Data Recovery can efficiently scan your storage device and recover files that may appear to be permanently lost, providing a strong likelihood of retrieving your important data. Furthermore, you can rest assured that it will not cause any harm to your files or drives, as it only reads the data without modifying file attributes or content, ensuring 100% secure data recovery.
Now, you can download the free edition of this recovery tool and use it to recover up to 1 GB of files for free.
MiniTool Power Data Recovery FreeClick to Download100%Clean & Safe
Step 1. Scan Your Hard Drive/Target Partition
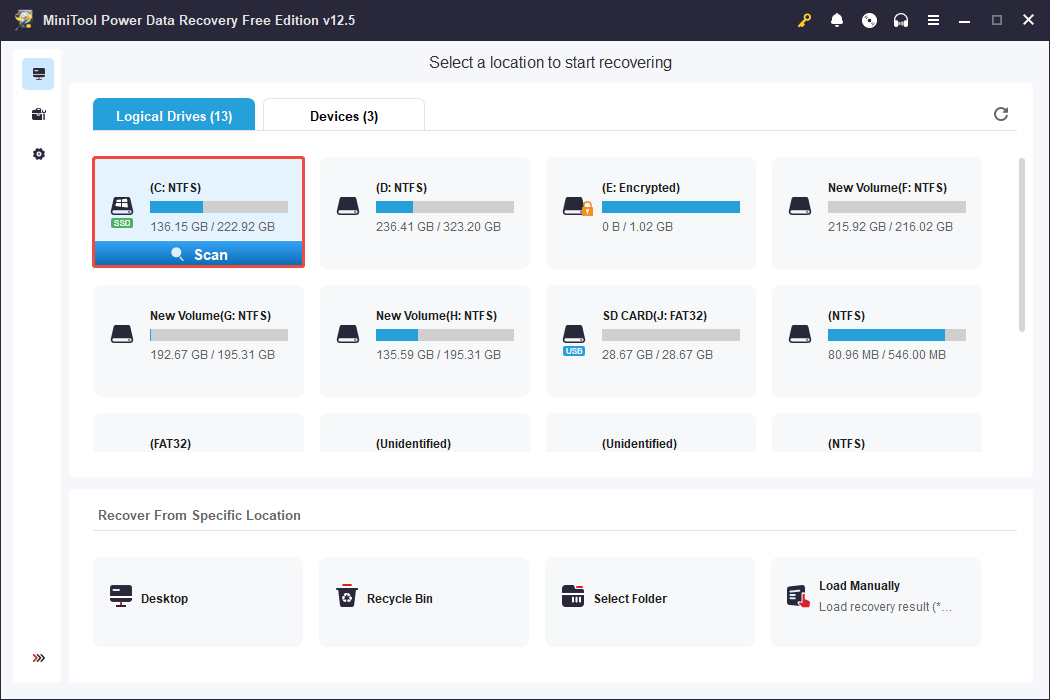
After installing the app, launch MiniTool Power Data Recovery to get its main interface. Now, you can select the drive from which you need to recover files and click Scan under the Logical Drives tab. Besides, you can choose to scan the whole hard drive in the Devices tab.
Here, I select the C: Drive to scan:
Step 2. Locate Desired Files Using Path, Type, Filter, and Search
Once the scan is complete, you will typically see a large number of files listed in the results window. You can use the following features to locate the needed files faster.
By default, all files are shown under the Path tab, sorted by their file locations. Some files will keep their original names and structure, while others may have lost their original organization and can be found in the RAW Files folder.
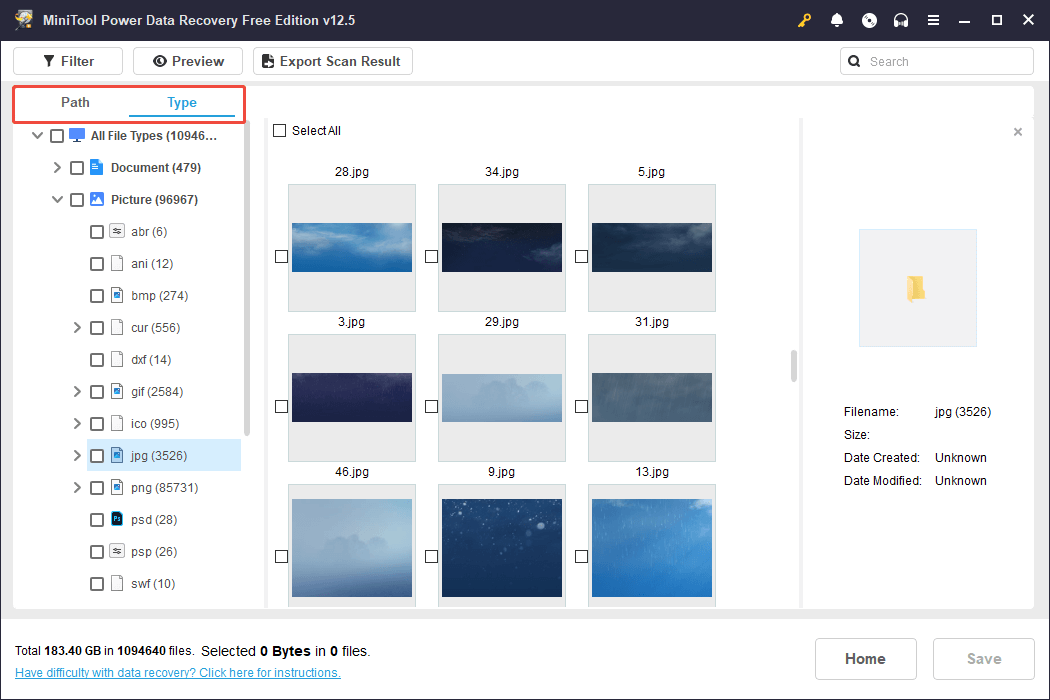
Alternatively, you can go to the Type section, where files are organized according to their type, such as photos, videos, documents, and more. This option is perfect if you’re trying to recover a particular kind of file.
To make the deleted file recovery process faster and more efficient, this software includes integrated the Filter and Search functionalities.
- The Filter option enables you to organize the displayed files based on criteria such as file type, modification date, file size, and file category, making it easier to locate the most pertinent files quickly.
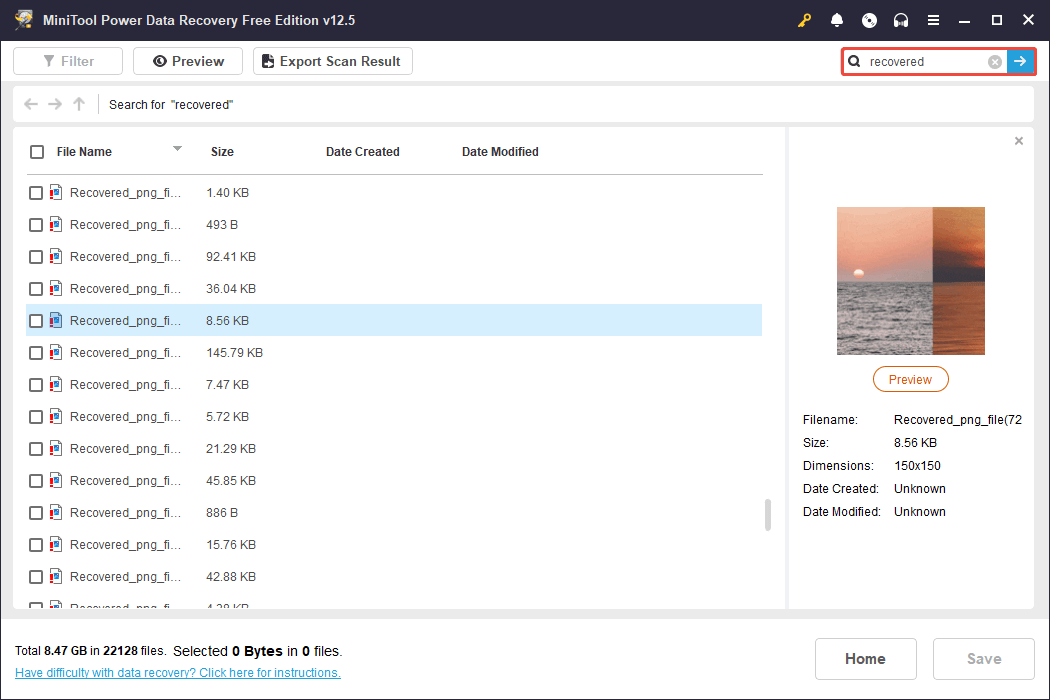
- The Search feature allows you to look for specific filenames in the scan results, which can save you time if you know exactly what you need.
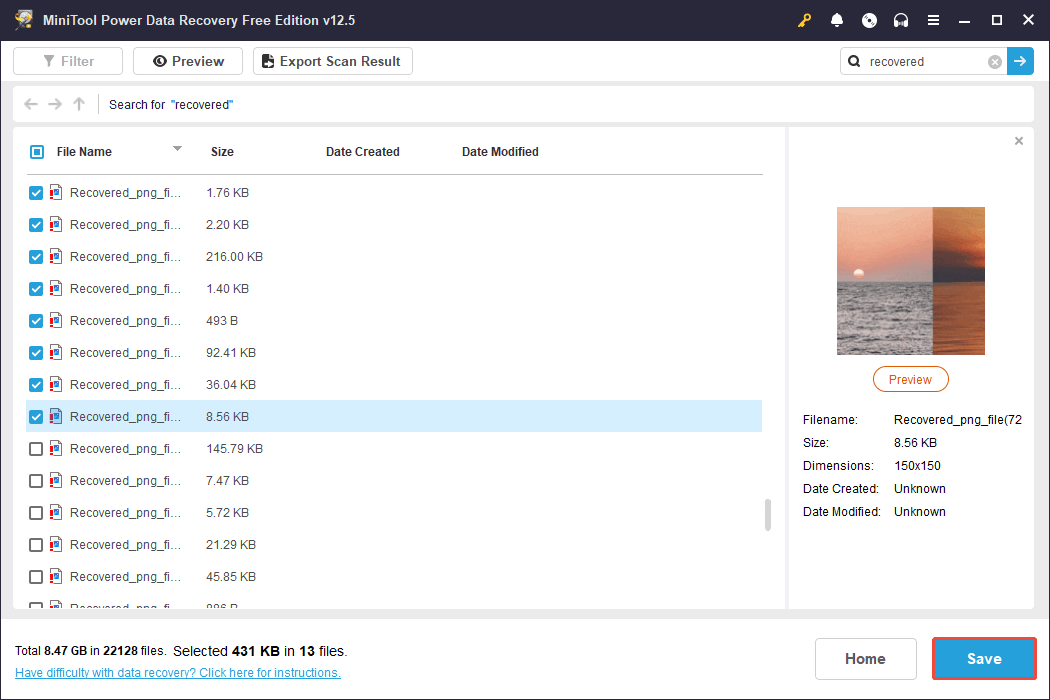
Step 3. Preview the Located Files and Save Them
To guarantee accurate data recovery and minimize the consumed recovery capacity, it is advisable to view the found files before saving them. Most file types can be viewed freely, while certain types must not exceed 100 MB. You can easily view a file by simply double-clicking on it.
Lastly, make sure all the files you wish to recover are selected, and then click the Save button. Following that, you will need to choose a directory to save the recovered files, and you should follow these instructions to initiate the recovery process.
How to Fix Hard Drive Full but No Files
Solution 1. Empty Windows Recycle Bin
Don’t overlook the recycle bin, as it contains many discarded files. A full recycle bin is said to consume some disk space until it is cleared out.
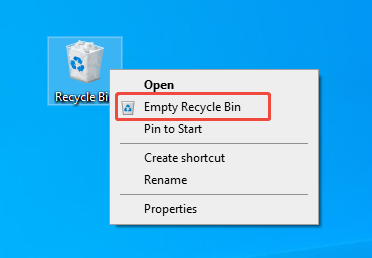
Step 1. Locate the Recycle Bin icon on your desktop.
Step 2. Right-click on it and choose Empty Recycle Bin from the menu that appears.
Solution 2. Run CHKDSK
As we mentioned above, system problems can lead to the improper functioning of the hard drive or display incorrect disk space. Therefore, consider using the CHKDSK utility to identify and resolve the issue.
Step 1. Type cmd in the Windows search box, right-click on the appropriate result, and select Run as administrator.
Step 2. Type the command chkdsk X: /f /r /x and ensure to replace X with the letter corresponding to your hard drive, then press Enter.
Wait for the process to complete, then check if the “hard drive full but no files” problem has been fixed.
Solution 3. Check the Virus or Malware
One main culprit for the “hard drive full but no files” error is a virus or malware. If you have accidentally installed a virus or harmful software on your Windows computer, it could cause the hard drive to be full while showing no files.
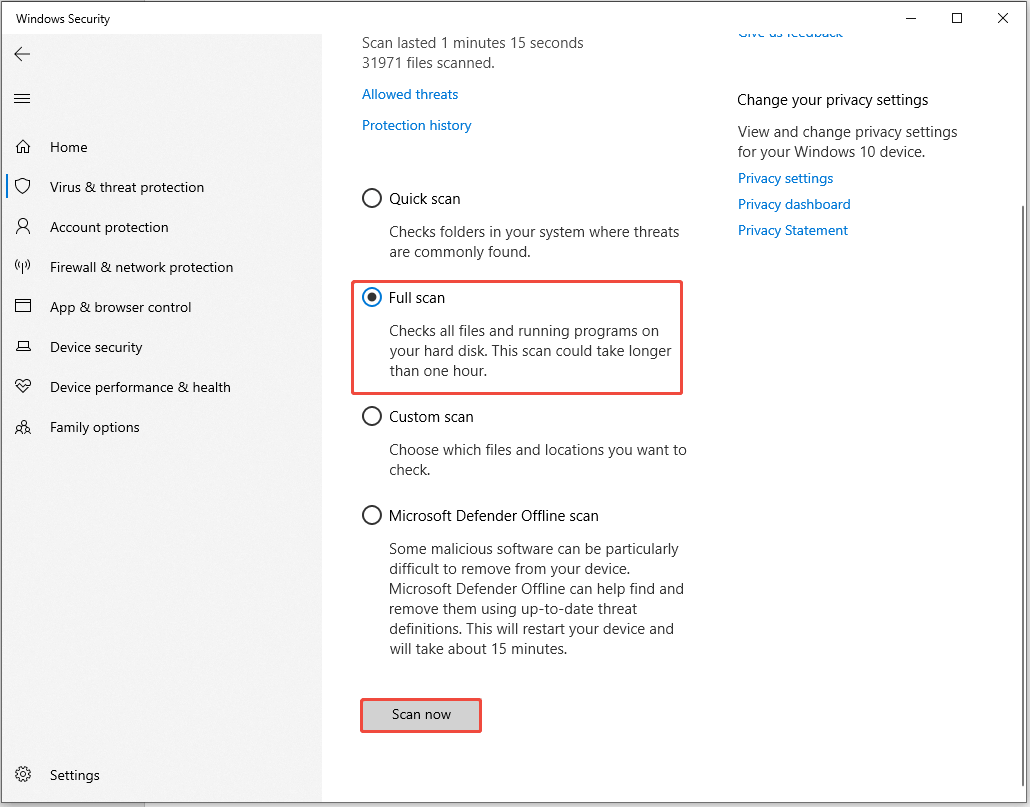
In such a case, you can manually perform a full scan for any viruses, spyware, and other types of malware and hackers to ensure that the data has not been corrupted. To do so, follow the breakdown below:
Step 1. Press Win + I to open Windows Settings, and then navigate to Update & Security > Windows Security > Virus & threat protection.
Step 2. Once in the Virus & threat protection section, click on the Scan options button under the Current threats section.
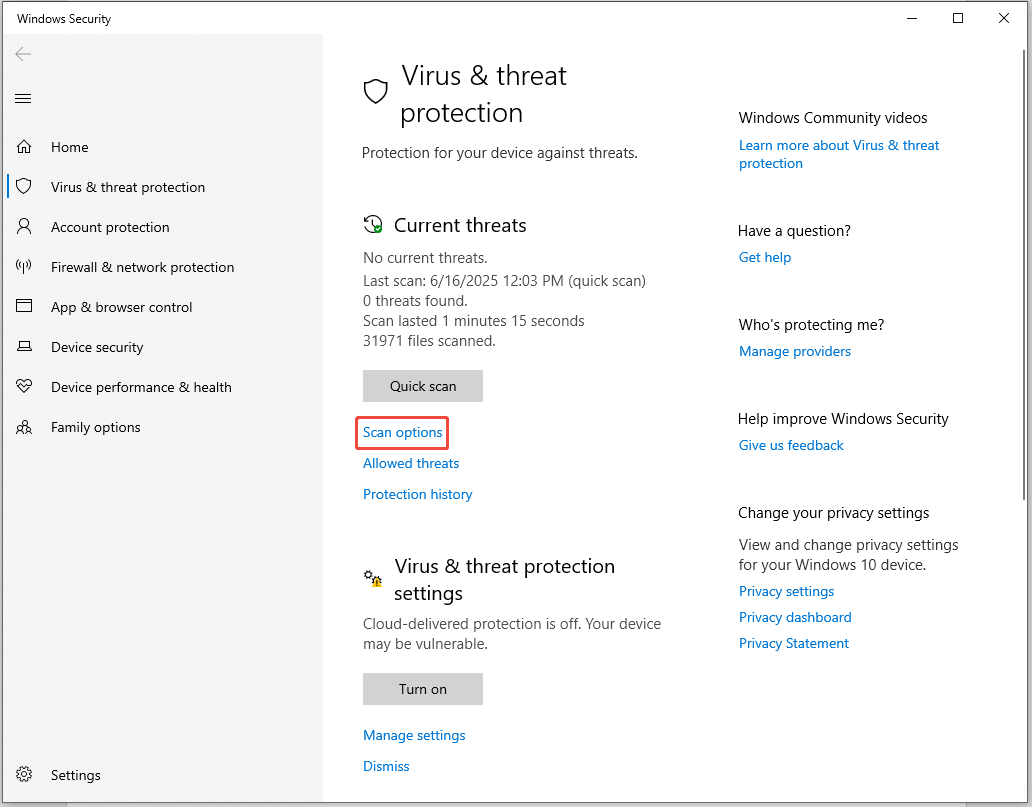
Step 3. Choose the Full scan option to thoroughly scan the entire system for viruses and other types of malware. After that, click the Scan now button.
Solution 4. Delete Temporary Files
The presence of temporary files, including browsing caches, upgrade logs, and Windows installation files, could be the root cause of the problem. To resolve the problem of a seemingly full hard drive, follow these steps to clear temporary files.
Step 1. Press Win + R at the same time, type %temp%, and then click OK.
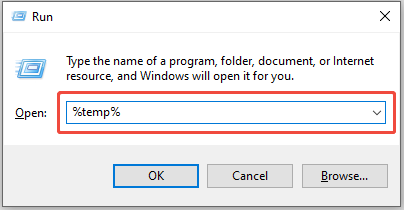
Step 2. Press Ctrl + A to select all and press Delete. If a message pops up, skip the one that is currently being used.
Solution 5. Delete the Hibernate File
Windows OS can set aside the hibernation file to approximately half of the RAM. For instance, if your computer has 8GB of RAM, the hibernation file (hiberfil.sys) will be around 4GB in size. The steps below show how to delete hiberfil.sys files:
Step 1. Run Command Prompt as administrator.
Step 2. Next, in the command line window, type powercfg.exe -h off and execute it by pressing the Enter key.
Step 3. This will turn off hibernation on Windows and automatically delete the hiberfil.sys file, removing the Hibernate option from Power Options. By doing this, you will reclaim some free space on your C drive.
Solution 6. Delete System Restore Points & Enable System Protection
If you frequently restore your system, you may have created numerous backups that take up huge space on your hard drive. For instance, consider the C drive. Follow these steps to remove system restore points.
Step 1. Press Win + S to open the Windows Search bar, type Create a restore point in the box, and press Enter.
Step 2. In the pop-up window, click the Configure button.
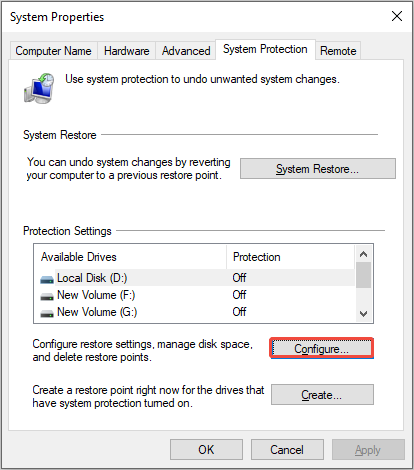
Step 3. Enable the Turn on system protection option.
Step 4. In the Disk space usage section, you can modify the amount of disk space allocated for daily backups. Adjust the slider accordingly. A suggested percentage is between 3-6%.
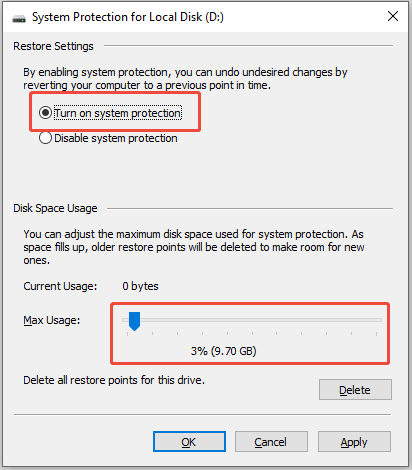
Step 5. Next, click the Delete button to remove the restore points for the drive. Press OK to proceed.
Solution 7. Run Disk Cleanup
Windows Disk Cleanup is a built-in utility commonly utilized by advanced users to clean up unnecessary files, such as system files, system restore points, and shadow copies, which can help free up space. To do it, follow these steps:
Step 1. In the search box, type disk cleanup and press Enter.
Step 2. A pop-up window will appear with the system drive chosen by default. Choose the problematic hard drive. Click OK to proceed.
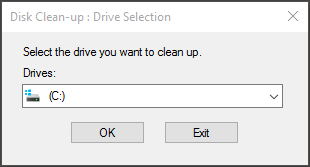
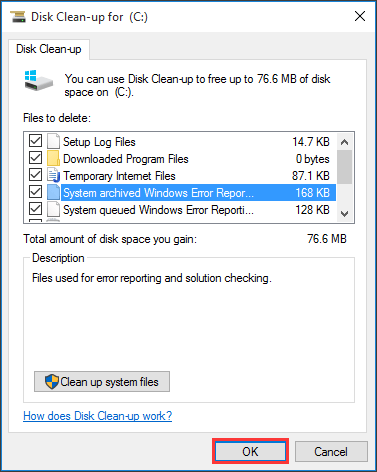
Step 3. After a few minutes of calculation, you will see the total amount of disk space you can recover by deleting all files listed in the window, which includes:
- Windows Upgrade Log Files
- Setup Log File
- Downloaded Program Files
- Temporary Internet Files
- System archived/queued Windows Error Reporting
- Delivery Optimization Files
- Recycle Bin
- Temporary Files
- Thumbnails
- Temporary Windows Installation Files
- Previous Windows installation(s)
Choose the types of files you wish to delete and click OK.
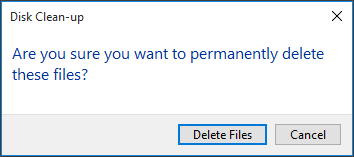
Step 4. Select Delete Files to confirm that you want to permanently erase these files.
Solution 8. Extend the System Partition Without Data Loss
If the above-mentioned solutions don’t resolve the “hard drive full but no files” issue, consider extending the system partition. This can be accomplished easily using MiniTool Partition Wizard, which allows you to extend the Windows system partition. Its Extend Partition, Move/Resize Partition, and Migrate OS to SSD/HD features can extend the partition.
MiniTool Partition Wizard FreeClick to Download100%Clean & Safe
Key Indicators: What Are the Signs Your Hard Drive Is Full?
It is often said that everything happens for a reason. If you want to avoid such situations and safeguard your computer, it’s essential to recognize the key signs of a full hard drive.
- Your device might freeze or run slowly while performing tasks or programs.
- You may see frequent notifications about a lack of available storage space on your drive.
- Installing or upgrading software on your computer may become unfeasible.
Wrap-up
How to fix the “hard drive full but no files” issue on Windows? Simply follow this step-by-step guide, and then you can easily recover deleted files and resolve the annoying problem.
If you encounter any problems or have any feedback about MiniTool Power Data Recovery, please do not hesitate to send an email to the support team via [email protected].
About The Author

Position: Columnist
Sandy became an English editor after graduation. She is devoted to finding effective solutions for diverse IT problems and provides articles on data recovery, data backup, and computer partitions and drives. In her spare time, she likes listening to music and playing games.
User Comments :