The problem of “hard drive spinning but not detected” often indicates a complex issue that may involve the drive’s connection interface, physical damage, or logical corruption. This post covers effective fixes for this problem and shows how to rescue your files using MiniTool Power Data Recovery.
What Does It Mean When Your Hard Drive Spins but Not Detected
“For the past six months, I used a SATA to USB to connect my previous laptop hard drive to my new laptop. Everything was fine till yesterday when it suddenly disappeared from Disk Management. I uninstalled it from Device Manager in the hopes that after a restart it would be picked up again, but alas it is just spinning and not detected.”elevenforum.com
When a hard disk is spinning, it means that the drive is physically powered. However, if your computer does not detect it, the problem could be related to connection issues, physical damage, or logical errors. Typically, there are three common cases, and I will explain the possible causes for each one in detail below.
Hard Drive Is Not Detected in BIOS/Device Manager
If the disk is not detected even in BIOS or Device Manager, it means the system fails to recognize it at the hardware level. In this case, a faulty SATA or power cable could be the cause, allowing the disk to spin but preventing the motherboard from recognizing it. It is also possible that the hard drive’s controller chip is malfunctioning. Additionally, physical damage such as a failed read/write head or damaged platters can also lead to this issue.
Hard Drive Is Not Detected in Disk Management
Typically, it is rare for a disk to appear in Device Manager but not in Disk Management. However, if this does happen, it usually indicates that the disk list is not refreshed properly or that the drive has physical damage, preventing the system from recognizing it correctly.
Hard Drive Is Not Detected in File Explorer
This is the most common situation, and it can be caused by several factors. Below are some typical cases and their corresponding reasons:
- The disk is not initialized: If a hard drive is not initialized, the system won’t treat it as a usable storage device, and it won’t appear in File Explorer.
- The hard drive is not partitioned: When a disk has no partition, or its existing partitions have been deleted or lost, it will not show up in File Explorer.
- The disk has no drive letter assigned: A disk must have a drive letter to be listed in File Explorer. Even if it has been formatted and contains data, it won’t be visible without a drive letter.
- The drive lacks a valid file system or shows as RAW: Partition table corruption, improper formatting, or virus infection may lead to a missing or damaged file system. In such cases, the drive may appear as RAW and Windows Explorer will not be able to recognize it properly.
Try These Basic Troubleshooting Steps
When faced with the internal/external hard drive spinning but not detected issue, there is no need to rush into hard drive data recovery right away. It is a good idea to start with some basic troubleshooting steps to see if the drive can be recognized again. These simple methods are generally safe and won’t result in data loss. However, if you have extremely important files on the drive, you can skip to the next section to recover your data first.
Basic methods:
- Switch a USB port or cable: As mentioned earlier, the spinning of the drive indicates that it is receiving power, but this could be at a minimal voltage. The power supply to the drive may not be stable or sufficient. To eliminate power-related issues, you can switch to a different USB port or use another SATA power cable. In addition, if possible, you can use a USB Y cable to draw power from two USB ports simultaneously.
- Change the computer/system: Switching to a different computer or even system can help rule out issues with the port, power, BIOS settings, and other factors at once. Sometimes, the hard drive may not be detected by Windows but could be recognized by another operating system, such as Linux.
- Scan for hardware changes: In Device Manager, you can scan for hardware changes to let the system reload the undetected drive, which may resolve issues caused by driver conflicts or interface problems.
If the computer still fails to recognize the drive after following the troubleshooting steps above, the issue likely lies with the hard drive itself.
Check if the Hard Drive Can Be Recognized by the Data Recovery Tool
If the hard drive contains important data, before proceeding with advanced methods, it is essential to check if the best free data recovery software – MiniTool Power Data Recovery can recognize it. If it does, it is recommended to transfer your files immediately to prevent further drive damage and potential data loss.
What Is MiniTool Power Data Recovery?
MiniTool Power Data Recovery is a professional file recovery tool developed by MiniTool, designed to restore files on Windows 11, 10, 8.1, and 8. It is fully compatible with all brands of internal/external hard drives, USB flash drives, SD cards, and even CDs/DVDs. Whether you are trying to recover files from a Seagate external hard drive that’s spinning but not detected, or from any other brand, this software is highly effective.
As long as the disk can be detected by the software, it can find all lost or existing files that have not been overwritten. Even if the partition is lost, the tool can scan unallocated space to find lost files.
Download the data recovery software for free now and use it to check if your hard drive can be detected. If it does, you can follow the steps below to recover up to 1 GB of files for free.
MiniTool Power Data Recovery FreeClick to Download100%Clean & Safe
How to Rescue Files With MiniTool Power Data Recovery?
Step 1. Choose the disk to scan.
Once you access the main interface of the recovery tool, the first step is to locate the partition or disk you want to scan. You can find partitions under the Logical Drives tab and the entire disks under Devices. Hover over the target partition or disk and click Scan.

Step 2. Locate and tick the files you want to recover.
After the scan is complete, it is time to find the files you want to recover from the scan results. You can browse the files by expanding each folder and subfolder under Path to locate the targeted files. Alternatively, you can switch to the Type tab to browse files by file type and format.
If you want to narrow down the results further, stay in the Type tab and click the Filter button in the top left corner. Then you will be able to filter files by file size, modification date, and file category.
If you remember the name of the file or folder you want to recover, simply enter it in the search box at the top right corner and press Enter to locate it directly.

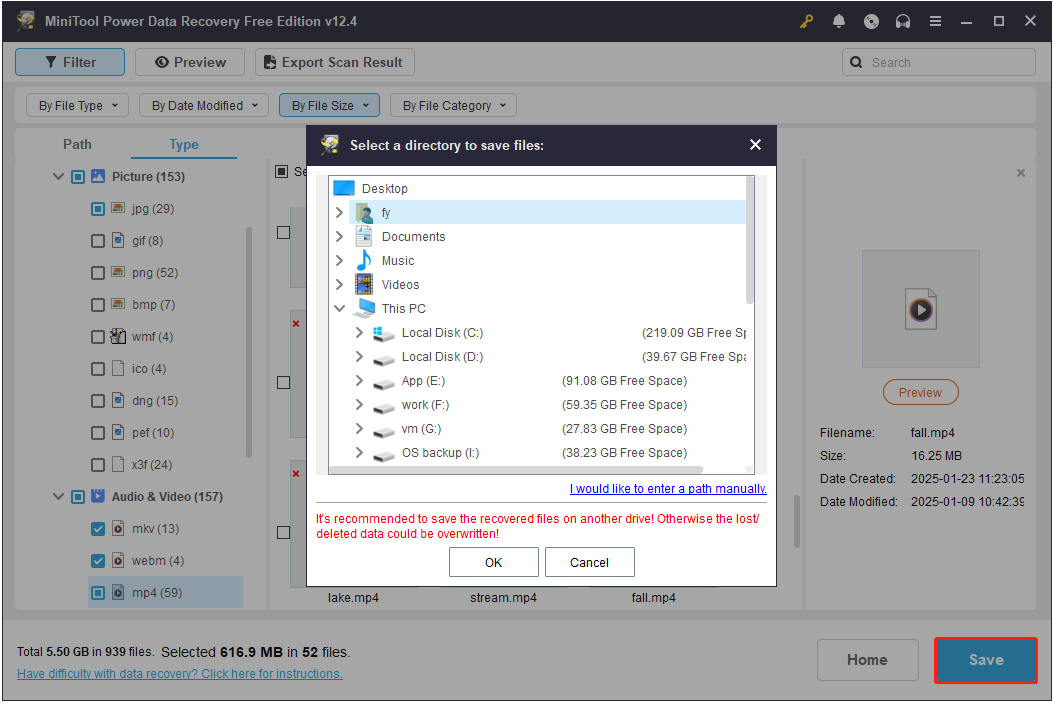
Step 3. Preview and save the selected files.
To make the most of the 1 GB of free data recovery, double-click on each of the files to preview them before recovering. Please note that not all files can be previewed. Some file types may not be supported, some files may have been corrupted, and some types of files larger than 100 MB may not be previewed.
Finally, make sure all the files you want are checked to avoid the need for a second scan and then click the Save button. In the pop-up window, choose a location on a different disk to store the recovered files. Be aware that any files exceeding the 1 GB free limit will require an upgrade to a full edition of the software to be recovered.
Advanced Methods to Fix Hard Drive Spinning but Not Detected
The following fixes mainly apply to the case where the disk is not showing up in File Explorer or Disk Management.
Way 1. Update the Disk Firmware
Sometimes, updating the disk firmware can help fix controller startup errors or other errors that cause the hard drive to spin but not be detected.
Step 1. Check the disk firmware version.
- Right-click the Start button and choose Device Manager.
- Expand Disk drives, right-click your disk, and choose Properties.
- In the new window, go to the Details tab. Select Hardware Ids in the drop-down menu to view the firmware version.
Step 2. Update the firmware.
After knowing the firmware version, you can visit the disk manufacturer’s official website to search for firmware updates for this model. Then you can use the corresponding firmware update tool to complete the update according to its firmware documentation.
Way 2. Assign a Drive Letter
If the disk is not detected in File Explorer due to a missing drive letter, you can assign one through Disk Management. In some cases, even if a drive letter is already assigned, the system may still fail to recognize the drive properly. In such a situation, it is recommended to change a drive letter.
Step 1. Open Disk Management.
Step 2. Right-click the disk partition and choose Change Drive Letter and Paths.
Step 3. Click Add or Change, and then choose an available drive letter from the drop-down list and click OK to save the change.
Way 3. Create a New Partition
If the disk appears as unallocated in Disk Management, it indicates that the disk is not partitioned or the original partitions have been deleted. In this case, you need to create a new partition and format it to a proper file system so that it can be displayed in File Explorer and can be used to store files.
Step 1. In Disk Management, right-click the unallocated region on your hard disk, and then select New Simple Volume.
Step 2. In the New Simple Volume Wizard, select Next. Then specify the partition size and click Next.
Step 3. Accept the default drive letter and click Next.
Step 4. Choose a file system, type a volume label, and hit Next.
Step 5. Click Finish. Then go to File Explorer and check if the disk shows up.

Way 4. Initialize the Disk
Sometimes your drive shows up in Disk Management but with a Not Initialized and Unknown status. This usually means the system has not set it up for use yet. At this time, you need to initialize the disk for further use.
Step 1. In Disk Management, right-click the disk and choose Initialize Disk.
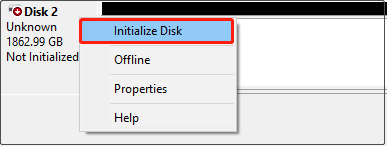
Step 2. In the pop-up window, choose MBR or GPT for the disk and click OK to confirm the operation.
Step 3. After the disk is initialized successfully, the partition is usually not created yet. So, you need to partition the hard drive.
Way 5. Format the Hard Drive
If your hard drive appears in the RAW format in Disk Management, it cannot be accessed from File Explorer since the file system is either missing or corrupted. Formatting will make it usable again. Right-click the disk partition and choose Format. Next, set up the disk information and complete the format.
If you have trouble formatting the hard drive in Disk Management, MiniTool Partition Wizard can help you. It is the best free partition management software designed for Windows operating systems to manage disk partitions.
Step 1. Download, install, and start MiniTool Partition Wizard.
MiniTool Partition Wizard FreeClick to Download100%Clean & Safe
Step 2. Select the RAW disk partition and click Format Partition from the left menu.
Step 3. Set the partition label, file system, and cluster size for the hard drive and click OK.
Step 4. Preview the formatted partition and click Apply in the lower left corner.
Way 6. Seek Help From Professional Disk Repair Center
If the disk is still not showing up on your computer, you may need to take it to a professional repair center to check whether there is severe physical damage.
Bottom Line
The hard drive spinning but not detected problem typically indicates that the disk is receiving power but cannot establish a successful or stable connection with your computer. This can be caused by faulty cables, ports, damaged disk firmware, partition table issues, file system errors, or hardware failures.
Basic troubleshooting should include changing a cable, port, or computer. If the drive still is not recognized, advanced solutions like firmware updates, disk formatting, or consulting a data recovery professional may be required.
By the way, to prevent data loss due to such a situation in the future, it is recommended to back up your hard drives regularly with the Windows backup tool, MiniTool ShadowMaker, which can be used for free within 30 days.
MiniTool ShadowMaker TrialClick to Download100%Clean & Safe
Should you encounter any issues or have any questions about MiniTool products, please send an email to the support team via [email protected].
About The Author

Position: Columnist
Shirley holds a bachelor’s degree in English and has been an editor at the MiniTool Team for many years. She specializes in IT-related content, with a focus on data recovery, file backup, disk management, and other technical topics. She is committed to delivering clear, accurate, and practical solutions to help users resolve common computer issues.
User Comments :