When you want to clear your disk using the DiskPart clean command, you may mistakenly select the wrong disk, like the following case:
“Can I recover data after using the DiskPart clean command? I accidentally selected the wrong disk and deleted it. Is there a way to recover it?”www.reddit.com
If you are facing the same issue, this post will guide you through the comprehensive recovery procedure.
Before trying the recovery method, we will focus on what DiskPart clean is and how the DiskPart clean command deletes data.
Overview of DiskPart Clean Command
The DiskPart clean command is a low-level operation that removes all partitions and volume formatting from a specified disk by overwriting the MBR or GPT.
After cleaning, the disk will become unallocated.
Typical file deletion vs. DiskPart clean command:
- Typical file deletion: It simply deletes the file system pointers while leaving raw data intact.
- DiskPart clean command: It deletes the disk’s partition table, rendering all existing partitions, volumes, and stored files invisible to Windows. Additionally, the OS will mark the disk as “unallocated” or “unknown”.
DiskPart clean vs. DiskPart clean all:
It is important to differentiate between DiskPart clean and clean all, as these commands vary significantly in data erasure intensity and recoverability.
| DiskPart Clean | DiskPart Clean All | |
| Working Principle | For MBR disks, it overwrites MBR partitioning information and hidden sector information. For GPT disks, it overwrites the primary and backup GPT headers. | Performs a complete zero-fill process throughout the whole disk, overwriting every sector with binary zeros. |
| Required Time | Completes quickly since it only marks the data on the disk as removed. | Takes a long time to wipe the target disk. |
| Data Recoverability | The majority of data remains intact in the physical storage sectors. Therefore, data is recoverable with professional data recovery software. | Data is impossible to recover. |
Common Scenarios of Accidental DiskPart Clean Execution
Here are two common cases of accidental DiskPart clean execution:
- Situation 1. You may mistakenly select the wrong disk or confuse internal disks and external drives when running the command.
- Situation 2. When you are trying to fix disk errors like RAW partitions or corrupted file systems, you may unintentionally run the clean command.
Many tutorials suggest using DiskPart to reset disks, but you may skip verification steps and execute the command without confirming the target device.
How to Recover Data After Using DiskPart Clean
As mentioned, the DiskPart clean command only deletes data, but doesn’t really zero out the target disk. Thus, it is still possible to recover data after using DiskPart clean.
However, if you used the clean all command, recovering data is impossible.
It is worth noting that it is not feasible to undo DiskPart clean. After executing the command, DiskPart will clear the chosen disk.
Pre-recovery Preparation:
- Stop using the selected drive after executing the DiskPart clean command. Saving new files can overwrite your deleted data, as it still exists in the allocated area.
- Do not reformat the drive, change the partition table, or perform any other commands. If you do so, the possibilities of recovering your data will significantly decrease.
- Choose a reliable data recovery tool to rescue your data immediately.
Keep your disk unchanged and consider the following method to recover data after DiskPart clean.
As explained, there is no simple method to undo the DiskPart clean. The only method to restore your files after executing DiskPart clean is using a data recovery tool.
MiniTool Power Data Recovery is particularly well-suited for this purpose due to its high compatibility, powerful scanning capabilities, and specialized recovery module.
The software is compatible with various storage devices impacted by the DiskPart clean command, including internal HDDs/SSDs, USB drives, and SD cards.
It supports various file systems such as NTFS, FAT32, exFAT, and EXT2/3/4. In addition to having a high success rate, it supports 2000+ file formats.
Additionally, this free data recovery tool allows you to recover 1GB of files for free.
It offers an effective solution for all scenarios of data loss, including DiskPart clean, accidental deletion, formatting, virus infection, and more.
Now, download and install this powerful data recovery software on your PC.
MiniTool Power Data Recovery FreeClick to Download100%Clean & Safe
Follow the detailed instructions below to recover data lost by DiskPart clean with MiniTool Power Data Recovery:
Step 1. Scan the Target Partition/Disk
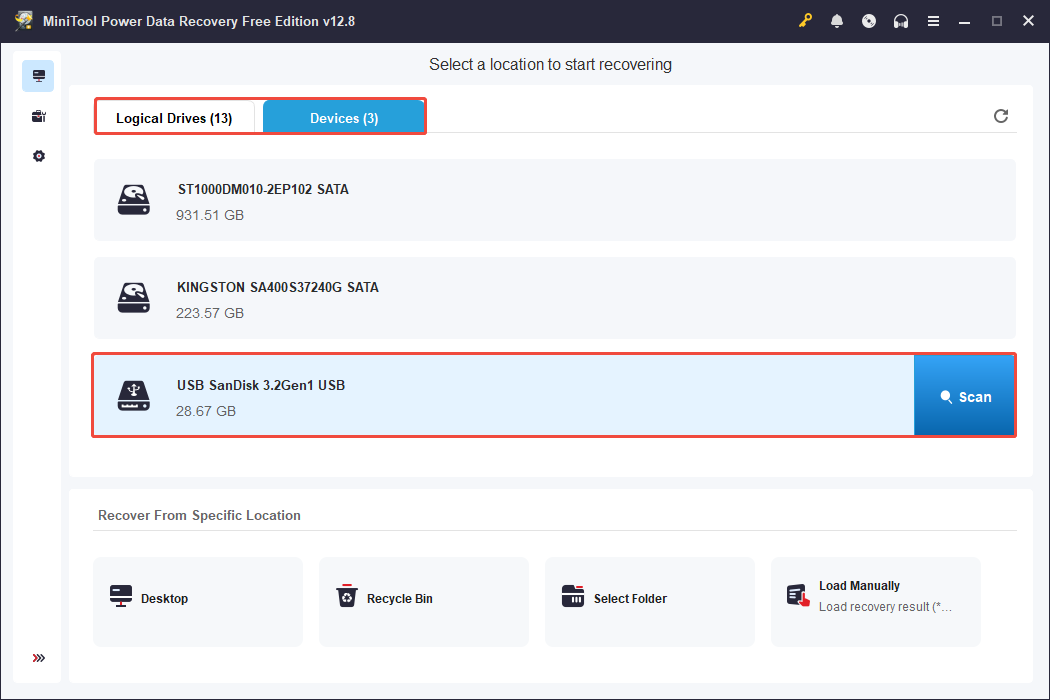
Launch MiniTool Power Data Recovery to enter its main interface. Here are two scanning options:
- Logical Drives: Shows all detected partitions, which include existing partitions, lost partitions, and unallocated areas.
- Devices: Displays all connected physical storage devices, such as internal hard disks, external hard drives, USB flash drives, SD cards, and more.
Choose the target drive or device where your DiskPart-cleaned files are stored and click Scan to start the scanning process.
This scanning process may take some time. To get the optimal scan results, wait until the entire procedure is complete.
Step 2. Locate and Preview the Needed Files
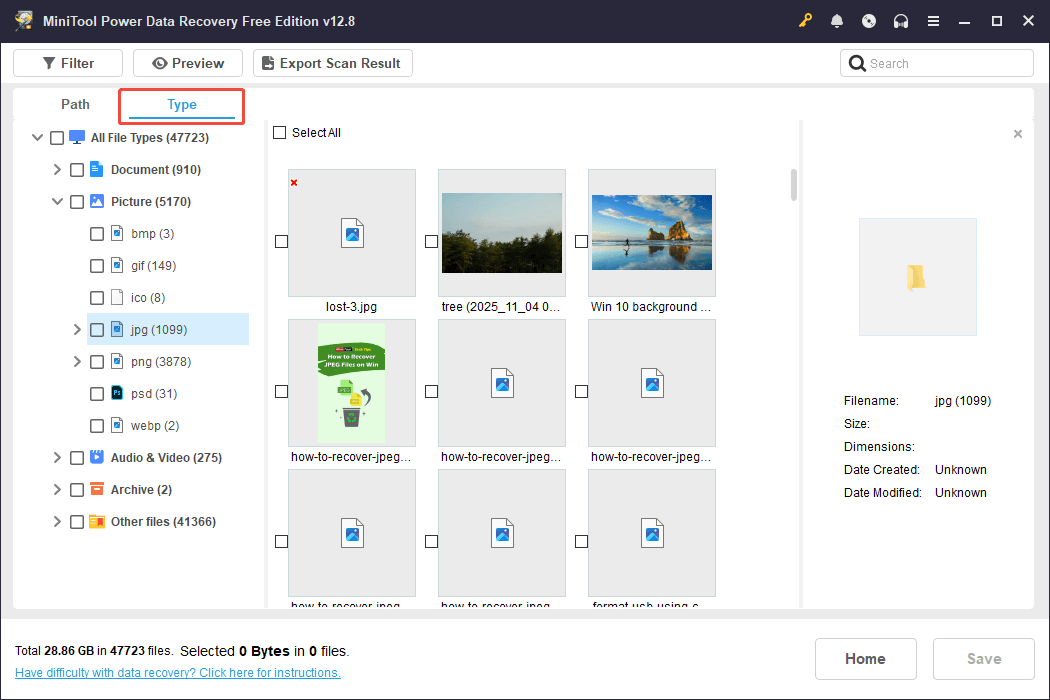
Once the scan completes, the software displays files according to their paths under the Path tab. Expand each folder to locate the files you need.
Additionally, change to the Type view to see the files organized by type, like videos, pictures, audio, documents, and so on.
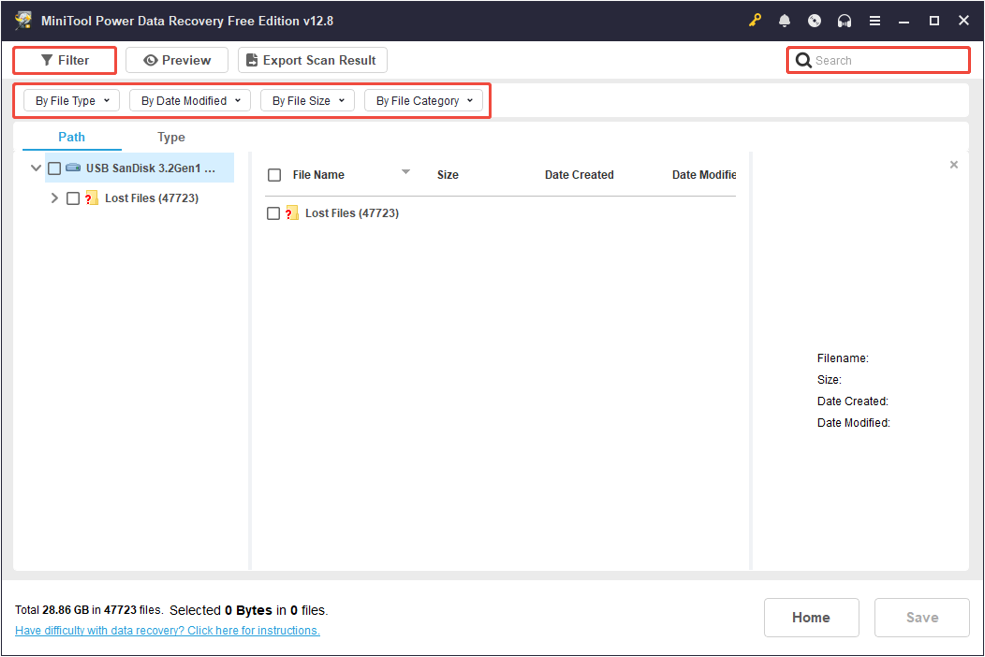
The Filter option can help you narrow down the scanning results based on file type, file size, modification date, and file category.
Just click the Filter button and adjust the settings to find the files you want more effectively.
If you still remember the name of the file you are looking for, use the Search function to find it by name.
Previewing files is a crucial step before proceeding with recovery. It allows you to confirm if they are correct and complete.
On the scanning results page, double-click the file you want to view, and MiniTool will launch a built-in player window.

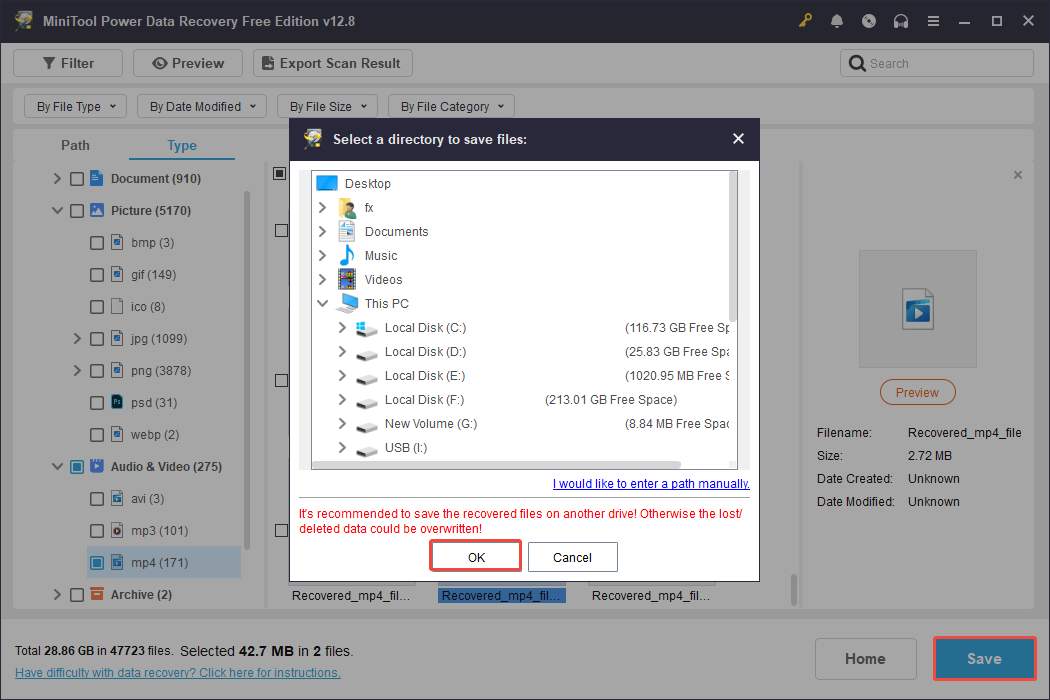
Step 3. Recover the Files to a New and Safe Location
Once you’ve verified all the desired files, check them and click on the Save button. A window will appear asking you to select a storage location.
Finally, click OK. The software will commence the file recovery process.
Recover Data Lost by DiskPart Clean if PC Won’t Boot
Recovering data after running the DiskPart clean command on a non-bootable computer requires MiniTool Power Data Recovery Bootable.
Use the software to create a bootable USB drive and recover your lost data. It is crucial to avoid reinstalling Windows before data recovery, as doing so will overwrite the lost data.
Follow the steps to recover lost data when the PC can’t boot:
Step 1. Download and install MiniTool Power Data Recovery on a functioning computer.
MiniTool Power Data Recovery FreeClick to Download100%Clean & Safe
Step 2. Launch the tool, click the Bootable Media button in the top right corner. Then follow the prompts to obtain a full edition that includes MiniTool Bootable Media Builder.
Step 3. Create a bootable USB flash drive or CD/DVD.
Step 4. Connect the bootable media to the non-functional PC, then power on the computer.
Step 5. Enter BIOS settings to set the bootable disk as the primary device and save changes.
Step 6. Launch MiniTool Power Data Recovery from the MiniTool PE Loader interface.
Step 7. Select the target drive in MiniTool Power Data Recovery and click Scan.
Step 8. Preview files before recovery if desired. Select the files to recover and save them in a secure location.
Bottom Line
To sum up, this post explores how to recover data lost by DiskPart clean with MiniTool Power Data Recovery.
In addition, you should know what DiskPart clean is and the differences between DiskPart clean and DiskPart clean all.
If you have any questions about the MiniTool data recovery software, feel free to contact us at [email protected].
FAQs: Recover Data Lost by DiskPart Clean
There are numerous DiskPart commands available that assist you in managing your drives effectively, including creating, deleting, and changing disk partitions.
Both actions delete data, but the deleted files can still be recovered.
However, the actual data remains on the drive until it is overwritten by new files.
The only solution to stop it is to reboot your computer for internal drives or disconnect the external disk.
This may result in the disk’s file system becoming RAW and needing formatting, and it could lead to data loss. In this situation, try using data recovery software to recover lost data.
About The Author

Position: Columnist
Sandy became an English editor after graduation. She is devoted to finding effective solutions for diverse IT problems and provides articles on data recovery, data backup, and computer partitions and drives. In her spare time, she likes listening to music and playing games.
User Comments :