Why I Can View Pictures on My SD Card but Not on My Computer
SD cards are universally equipped to store data on mobile phones, digital cameras, doorbells, and other devices. Some people try to transfer their photos, videos, or other data from the SD card to the computer but only find photos on SD card not showing on computer. Indeed, this is not an uncommon occurrence, as evidenced by the following real case example:
SD card shows up in the camera but not in the laptop
Basically the title. Used an SD card to record something on my camera and when I went to transfer the footage to my computer the SD wasn’t showing up. Tried with a different laptop and it still had the same issue. - DrRetr0_76reddit.com
What causes this problem to arise? Are your pictures not identified or really lost? How do you get those disappeared pictures back? You may be puzzled by those questions, so try to figure them out. The content below provides answers.
Do Basic Checks on the SD Card and the Computer
Several reasons result in the issue that pictures won’t load from the SD card, including poor connection, missing drive letters, virus infection, incompatible file system, and so on. Obviously, you should manipulate corresponding solutions to handle this issue. When you cannot discern the root cause of your case, try all the solutions explained here.
At the very beginning, you can do some preliminary checks to troubleshoot the photos on SD card not showing on computer issue caused by some obvious reasons.
- Check the USB port and the card reader. Detect if the connected USB port is distorted or corrupted as the poor connection can be caused by the problematic USB port. Additionally, if you connect the SD card to your computer via a card reader, examine whether the SD card reader works properly. When the SD card reader not working, the computer fails to recognize this SD card.
- Reinsert the SD card to the computer. The computer may fail to recognize the SD card properly by chance due to some temporary problems. Reinserting the SD card refreshes the settings and may allow the card to be recognized correctly.
- Physically unlock the SD card. Your SD may be physically locked, preventing it from writing and reading. You can unlock the SD card by toggling the switch to off on the side of your SD card. Reconnect the SD card to your computer again to check if those pictures are accessible.
- Check the drive letter of the SD card. If the SD card is well connected but does not appear in File Explorer, photos are not available. In this case, you should go to Disk Management to see if the SD card is assigned with a drive letter properly. If not, right-click on the SD card partition and choose Change Drive Letter and Paths. Then, choose Add to select a drive letter for your SD card. Open File Explorer to find pictures on your SD card.
- Search files in File Explorer. Your SD card pictures may be allocated into different folders and paths. You can simply open File Explorer and type the picture name into the search bar to search them throughout the File Explorer.
When the above simple fixes don’t work for you, work with the step-by-step guide below to do further repairs.

Way 1. Show Hidden Files
After inserting an SD card but finding the SD card pictures not showing on Windows, possibly the pictures are not lost but hidden due to your unconsciousness operations or virus infections. Showing hidden files in File Explorer helps discover the missing pictures on your SD card.
Step 1. Press Win + E to open File Explorer.
Step 2. Choose View at the top toolkit and tick Hidden items. This will show all the hidden files, folders, and drives in File Explorer, making your SD card pictures visible.

Way 2. Open SD Card Pictures with Other Multimedia Viewers
Due to somewhat incompatible issues, your SD card pictures are still invisible even after enabling the show hidden files setting. According to some people, they successfully find their missing SD card pictures by using other picture viewers, such as VLC.
Step 1. Launch VLC on your computer and select Media > Open File.
Step 2. In the following window, you can navigate to your connected SD card to see if there are any pictures listed on the window.
If the photos are available, you can save them to another path. However, if those files still can’t be found, please move on to the next method.
Way 3. Do a Virus Scan
As we mentioned beforehand, viruses or malware can not only hide pictures but also delete files and even hold them for ransom. You’d better perform a virus scan to check the computer’s health. Over-detecting your computer removes underlying threats and quarantines suspicious files. You can utilize reliable third-party antivirus software or Windows Security.
Step 1. Type Virus & threat protection into the Windows search bar and hit Enter to quickly access the Windows Security.
Step 2. Click Scan options. Choose Full scan among those options and click Scan now to start the scan process. Making a full scan requires a longer time; thus, please wait patiently until the scan process is completed.

Should the computer detect any threats, please follow the on-screen instructions to remove or block them. If the computer informs you that the computer is secure, go on to another solution.
Way 4. Run the CHKDSK Command Line
Photos on SD card not showing on computer can also be actuated by the not integrated file system or other logical system issues. Fortunately, those problems can be repaired with the CHKDSK utility. This command line executes via the Command Prompt to repair disk errors and isolate bad sectors on the disk. Here is how to run it on the computer.
Step 1. Type Command Prompt into the Windows Search bar. Right-click on the best-matched option and choose Run as administrator.
Step 2. Type CHKDSK X: /f /r /x and press Enter to execute it. You should replace the X parameter with the actual drive letter of your SD card.

Way 5. Update or Reinstall the Device Driver
Apart from the SD card errors, you should also consider whether the problems happen on your computer’s components, such as the device driver. When the device driver turns corrupted or outdated, even if the SD card is well connected, your computer cannot recognize the SD card and read its data properly. In this case, you should update or reinstall the driver.
Step 1. Right-click on the Windows icon and choose Device Manager.
Step 2. Click Disk drives to find your SD card. If there is a yellow exclamation beside the SD card driver, you should right-click on it and choose Update driver from the context menu.
Step 3. Select Search automatically for drivers in the prompt window.
Occasionally, you need to reinstall the device driver to make it work. Right-click on the SD card driver and choose Uninstall device to uninstall the driver, and then restart your computer to reinstall the driver automatically.
Way 6. Format the SD Card Without Losing Data
Pictures won’t load from the SD card on your computer possibly because the SD card is corrupted. A corrupted SD card is inaccessible and similar to the stored pictures or other data. In another situation, when the file system of the SD card is not compatible with the computer, your data cannot be read as well. To make your SD card available again, you can only format it with a proper file system whereas formatting will remove all the stored data.
#1. Recover Pictures from the Problematic SD Card
Therefore, before formatting, you can recover data from the SD card first. MiniTool Power Data Recovery is a practical tool that supports recovering data from corrupted, unrecognized, or formatted devices. This free file recovery software can detect partitions with various file systems, including Windows-compatible file systems, such as exFAT, NTFS, FAT32, etc., and other file systems, like Ext2, Ext3, Ext4, HFS+, etc.
You can get the free edition of this software on your computer to deep scan the SD card to see if any pictures can be found and recover no more than 1GB of files for free.
MiniTool Power Data Recovery FreeClick to Download100%Clean & Safe
Step 1. After getting this software on your device, you can connect the SD card to your computer and launch the software.
On the main interface, choose the partition of your SD card and click Scan. When your SD card contains more than one partition, you can change to the Devices tab to scan the whole SD card.

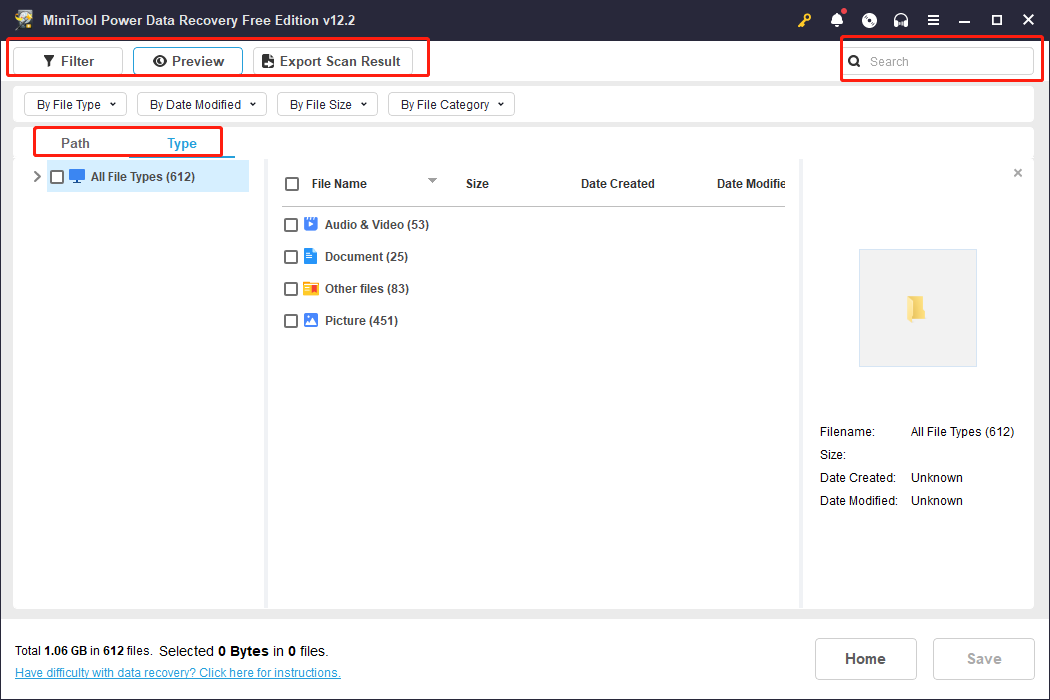
Step 2. Wait for the scan process to complete. In order to get all the files, you should wait until the scan process completes itself. Afterward, look for the target pictures on the result page.
- By default, files under the Path tab are classified by the file structure. You can expand folders layer by layer to locate the wanted files.
- Changing to the Type tab, you can search for files according to their file types and file formats. For instance, when you need to recover PNG pictures, you can expand the Picture classification and choose the PNG subfolder to check PNG photos only.
- The Filter feature is designed to filter out unnecessary files by several filter criteria. You can set the file size, file type, file category, and file last modified date to narrow down the file list effectively.
- If you remember the file name, using the Search feature can enhance the efficiency largely. Input the keyword of the file name and press Enter to pinpoint a specific file.
Step 3. Once locating the wanted photos, double-click on them to verify the file content to avoid recovering the wrong files. Add checkmarks in front of them and click Save.

When selecting the destination for those recovered pictures, you should choose a new path instead of the original one. Saving files to the original path raises the risk of data overwriting, making the data recovery process fail.
Remember that the free edition has only 1GB of free data recovery capacity. If you need to recover more than 1GB of files, upgrading to a premium edition should be a good option. Head to the License Comparison page to obtain information about different editions and choose one that suits you best.
#2. Format the SD Card for Future Use
After recovering data successfully, you can format the SD card for use. Go to Disk Management to complete the rest steps.
Step 1. Press Win + X and select Disk Management from the WinX menu.
Step 2. Locate the SD card on the disk list and right-click on it to choose Format.
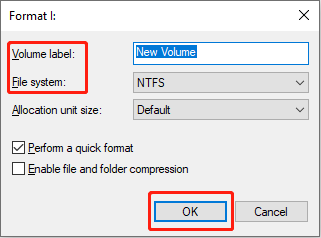
Step 3. Set the Volume label and choose an appropriate File system for the SD card. Click OK to apply your changes.
Data recovery isn’t a 100% useful method to get your data back. The best way to avoid data loss and corruption is to back them up regularly; thus, even if your data are lost unfortunately, you can recover them from the previous backups easily. MiniTool ShadowMaker is a versatile backup utility that is capable of backing up files, folders, partitions, and disks. You can also set the backup schedules to back up files on a daily, weekly, monthly, or event basis. Get this software to start your file backup tasks right now!
MiniTool ShadowMaker TrialClick to Download100%Clean & Safe
Final Words
Photos on SD card not showing on computer troubles many people, especially for some digital camera users. The trigger can either be your SD card errors or the computer issues. Follow the guidance in this post to repair this problem in your case. If you have any issues using MiniTool Power Data Recovery, please contact us via [email protected].
User Comments :