

The problem of “Nintendo Switch not reading microSD card” can occur due to physical issues, software problems, or hardware failures. This guide shows you how to fix it, including cleaning the card, checking compatibility, updating the Switch system, and formatting the card. To avoid data loss, use MiniTool Power Data Recovery to recover files.
Quick Answer
When your Nintendo Switch cannot read a microSD card, first restart the console and reinsert the card to fix temporary recognition issues. If the problem continues, check whether the card is compatible, clean the microSD card slot, update the Switch system, or format the card.
Before formatting the card, recover important screenshots, videos, or other files first because formatting will erase all stored data. You can use MiniTool Power Data Recovery to scan the microSD card and recover accessible files before formatting.
Why Is My Nintendo Switch Not Reading My microSD Card
Nintendo Switch may fail to read a microSD card due to connection issues, compatibility problems, software errors, file system corruption, or physical damage. When this happens, games, screenshots, and videos stored on the card may become inaccessible.
The common reasons why your Nintendo Switch is not reading a microSD card include:
| Possible Causes | Description |
| Temporary software glitches | System errors may prevent Nintendo Switch from detecting the microSD card properly. |
| Improper card installation | A loosely inserted card or incorrect placement may cause connection problems. |
| Dirty microSD card slot | Dust or debris on the card slot or contacts can interfere with card recognition. |
| Incompatible microSD card | Nintendo Switch only supports certain microSD card types and capacities. |
| Outdated system software | An outdated Switch system may cause compatibility issues with some microSD cards. |
| Corrupted file system | Improper removal or interrupted data transfer may damage the card file system. |
| Physical damage | A damaged microSD card may not be detected by Nintendo Switch. |
Once you understand what may cause the issue, follow the solutions below to troubleshoot the Nintendo Switch not reading microSD card problem.

How to Fix Nintendo Switch Not Reading microSD Card
The following methods cover common solutions, from simple checks like restarting your console and cleaning the card slot to advanced fixes such as formatting or replacing the microSD card. Try them one by one until your Nintendo Switch detects the card again.
Fix 1. Restart Nintendo Switch
A temporary system error may prevent your Nintendo Switch from recognizing a microSD card. Restarting the console can clear the error and restore microSD card detection.
How to restart Nintendo Switch?
Step 1. Hold down the Power button on the top of the console for three seconds.
Step 2. Select Power Options from the Power menu.
Step 3. Select Restart to reboot the Switch.
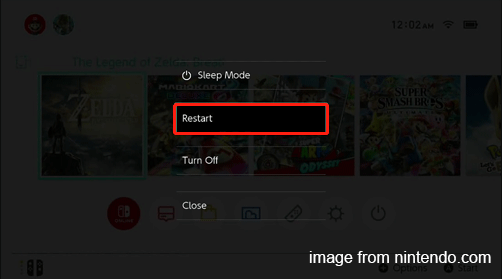
If holding the Power button for 3 seconds does not open the Power menu, keep holding it for 12 seconds or more to force the Switch to shut down.
If after restarting the console, the card is still not detected, try the next solution.
Fix 2. Clean the microSD card Slot
If there is any dust and debris in the card slot or contacts, the console may not detect the microSD card. So, it is necessary to check for any dirt and clean it.
How to clean the Nintendo Switch microSD card slot or contacts?
Step 1. Completely power off the Switch.
Step 2. Remove the card from the console and check for any dust or debris.
Step 3. Use a can of compressed air to gently blow out any dust or debris from the slot. Clean the card’s metal contacts with a soft and dry cloth.
Step 4. Reinsert the card into the console properly. Then, restart the Switch and check whether it detects the card.
If the card and the card slot are clean, but the Switch still cannot read the card, there may be compatibility issues.
Fix 3. Check microSD Card Compatibility
Not all microSD cards are supported by the Nintendo Switch. Using an incompatible card can prevent the console from recognizing it.
Which microSD cards are supported on Switch?
The following types of microSD cards are supported:
- microSD (up to 2 GB)
- microSDHC (4 GB – 32 GB)
- microSDXC (64 GB and above)
If the current card is not compatible with Nintendo Switch, replace it with a compatible one.
Fix 4. Update Nintendo Switch System
Keeping your console up to date ensures compatibility with your microSD card. Make sure to install the latest system update.
How to perform a system update on Nintendo Switch?
Step 1. Turn on your Switch and go to the System Settings menu.
Step 2. Scroll down the menu and select System.
Step 3. Select the System Update option to start the system update process.
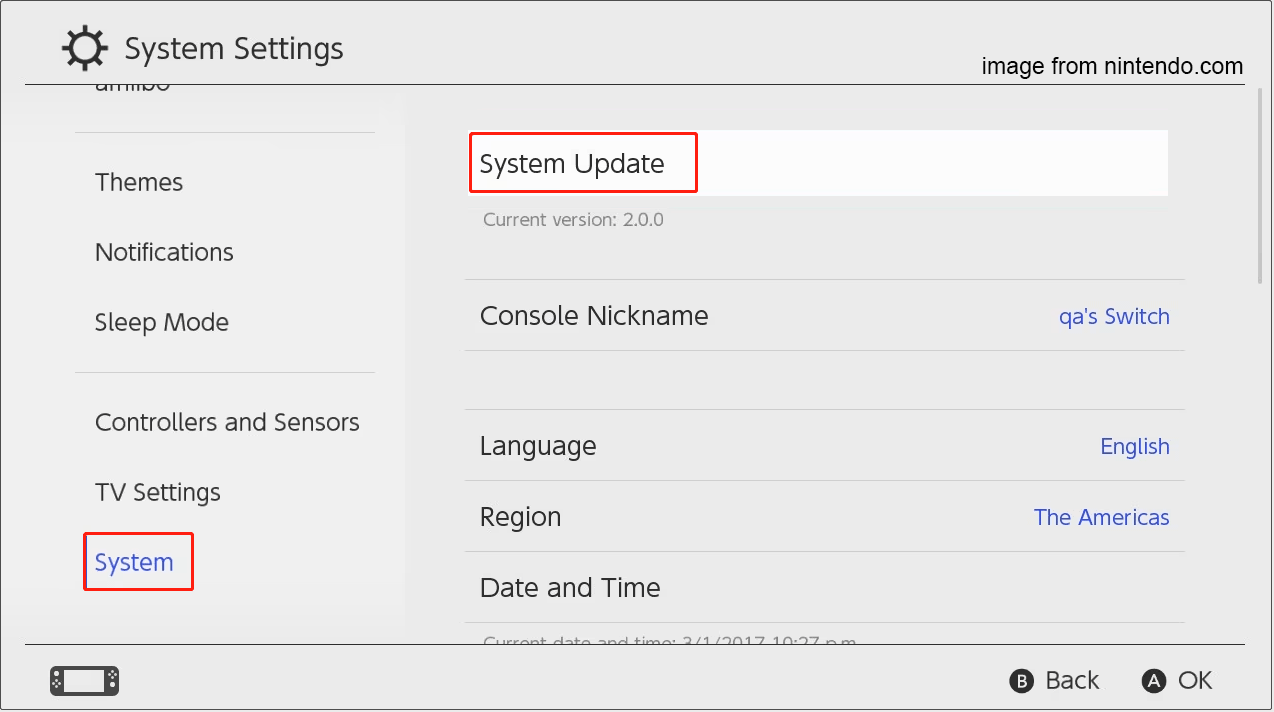
If the console is already running the latest system version but your microSD card is still not being read, the card may be faulty or have a corrupted file system. In this case, try formatting the card.
Fix 5. Recover Data and Format microSD Card
Formatting can fix file system errors and make the microSD card usable again on Nintendo Switch, but it will permanently erase all files stored on the card.
If your microSD card contains important screenshots, videos, or game data, do not format it immediately. Use MiniTool Power Data Recovery to scan and recover your files first, then format the card after your data is safe.
Process 1. Recover Files on the microSD Card
MiniTool Power Data Recovery is a Windows-based recovery tool that can help recover photos, videos, screenshots, and other files from Nintendo Switch microSD cards.
It supports common file systems such as FAT32 and exFAT and uses a read-only recovery process, which helps avoid overwriting existing data on the card.
This free data recovery software allows you to recover up to 1 GB of files for free. Get it and follow the steps below to recover your files.
MiniTool Power Data Recovery FreeClick to Download100%Clean & Safe
Step 1. Scan the microSD Card.
Make sure the microSD card is well connected to your computer. Then launch the MiniTool data recovery software.
On the main interface, find your microSD card under Logical Drives and click the Scan button on it to start scanning.
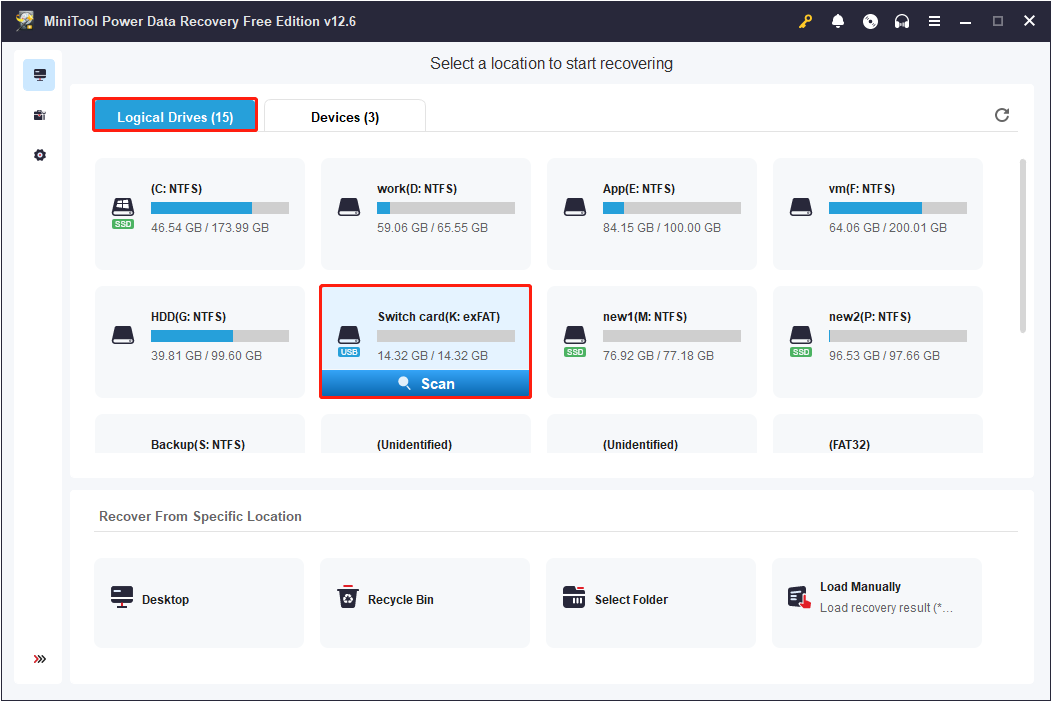
Wait for the scanning process to finish, and you will get the best and most complete scan results.
Step 2. Find and Preview Found Files.
Once the scan is complete, you can start locating the files you want to recover.
You can browse the recovered files in two ways: by Path or Type. Path organizes files according to their original folder structure, while Type groups files by file type and format.
If there are many files, you can use Filter or Search to find your files more quickly. Filter allows you to filter files by type, size, modification date, or category. Search lets you look for a specific file by entering its full or partial name.
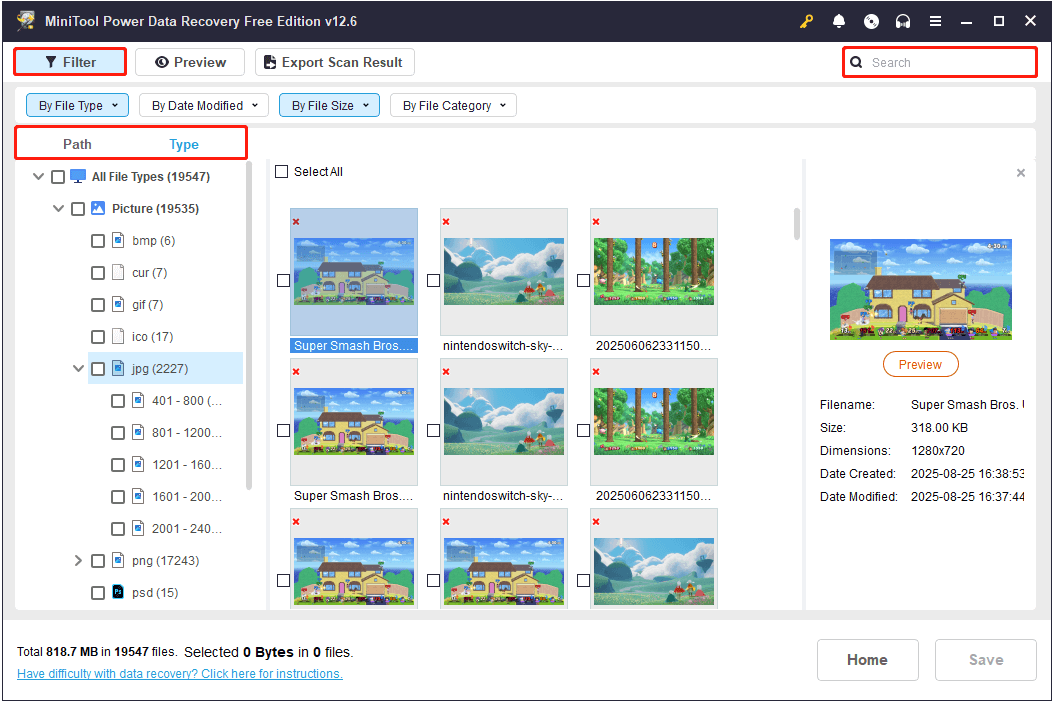
In addition, you can preview a file by double-clicking it.
Step 3. Save Needed Files.
Tick all required files and click the Save button. When the new small window appears, select a new location and click OK to store the ticked files.
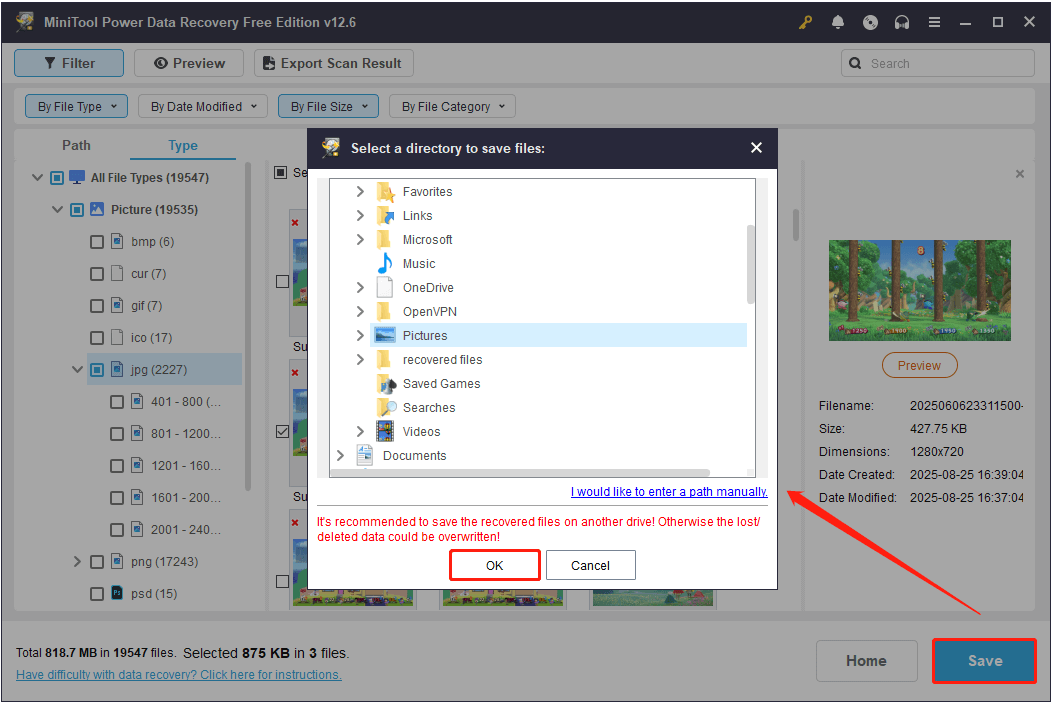
Since the free edition of this recovery tool only supports recovering 1 GB of files for free, if you want to recover more, you need to upgrade to a Professional edition.
After recovering your files, it is time to format the microSD card.
Process 2. Format the microSD Card
The Nintendo Switch microSD card format should be either FAT32 or exFAT. I will share 4 options with you for formatting the card to one of these file systems.
Option 1. From File Explorer.
You can format your microSD card directly from File Explorer.
Step 1. Open File Explorer and go to the This PC section.
Step 2. Right-click your microSD card and choose Format.
Step 3. Expand the File system option and choose FAT32 or exFAT. Then type a volume label, and click the Start button.
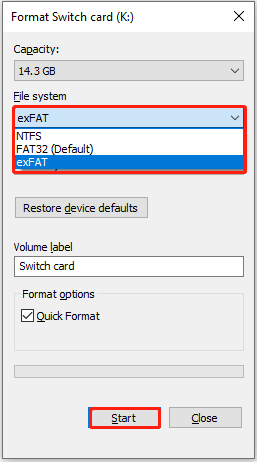
Step 4. Click OK, and wait for the process to complete.
Option 2. Via Disk Management.
Using Disk Management, you can format your microSD card similarly to File Explorer.
Step 1. Right-click the Start button and choose Disk Management.
Step 2. Right-click the microSD card partition and choose Format.
Step 3. Type a volume label, choose a proper file system, and click OK.
Step 4. Hit OK again to confirm.
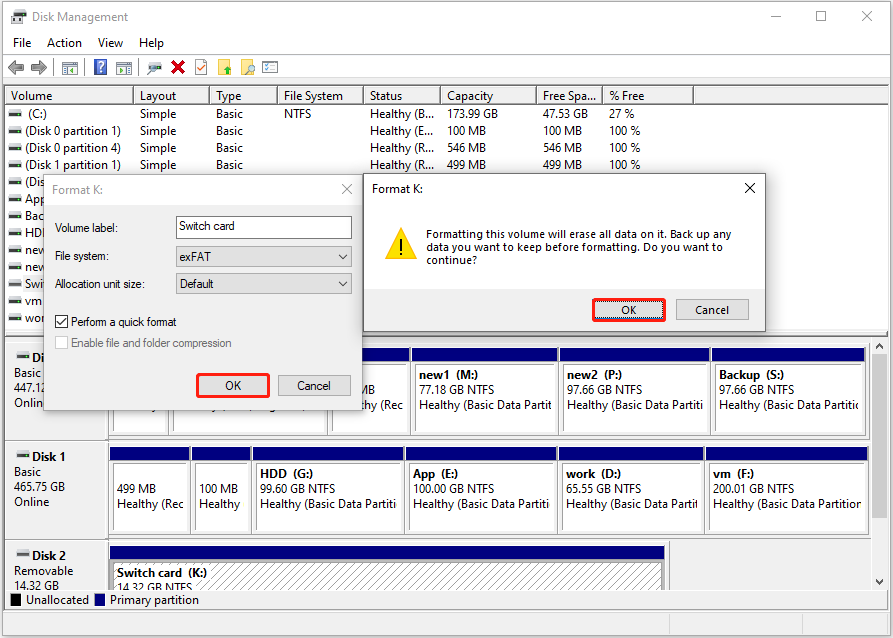
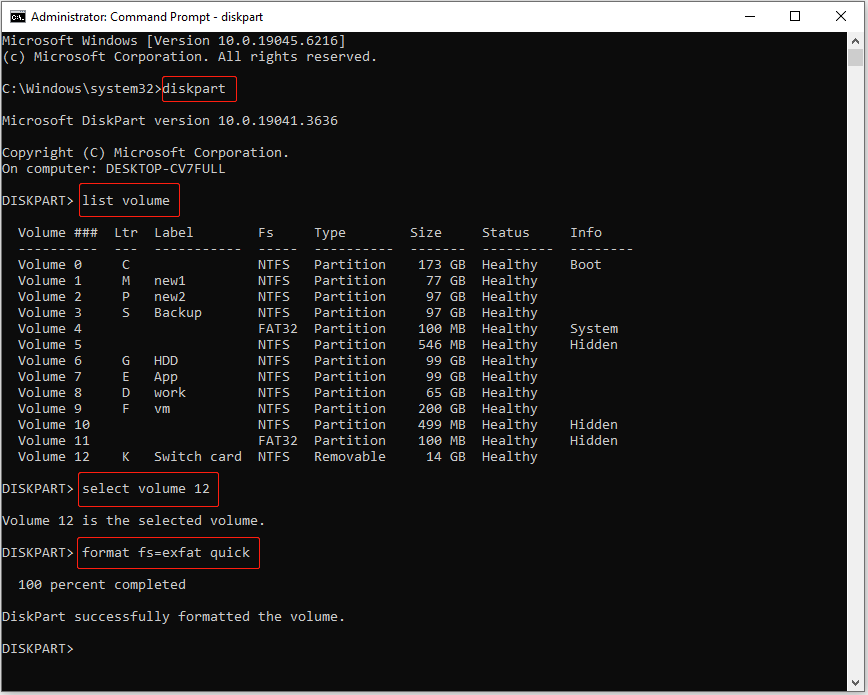
Option 3. Use CMD.
If you prefer command-line tools, you can format the microSD card using CMD.
Step 1. Type cmd in the Windows search box. Then, right-click Command Prompt and choose Run as administrator.
Step 2. Input the following command lines one by one and press Enter after each:
- diskpart
- list volume
- select volume # (replace # with the volume number of your microSD card)
- format fs=exfat quick (if needed, you can replace exfat with fat32)
Option 4. Run MiniTool Partition Wizard.
If you encounter errors while formatting the microSD card, run MiniTool Partition Wizard. It is a free partition manager that supports formatting a drive to FAT32, exFAT, NTFS, and other file systems without any cost.
Click the button below to get MiniTool Partition Wizard and give it a try.
MiniTool Partition Wizard FreeClick to Download100%Clean & Safe
Step 1. Run this partition manager. On its home page, select the microSD card partition, and choose Format Partition from the left menu.
Step 2. Set the partition label, file system, and click OK.
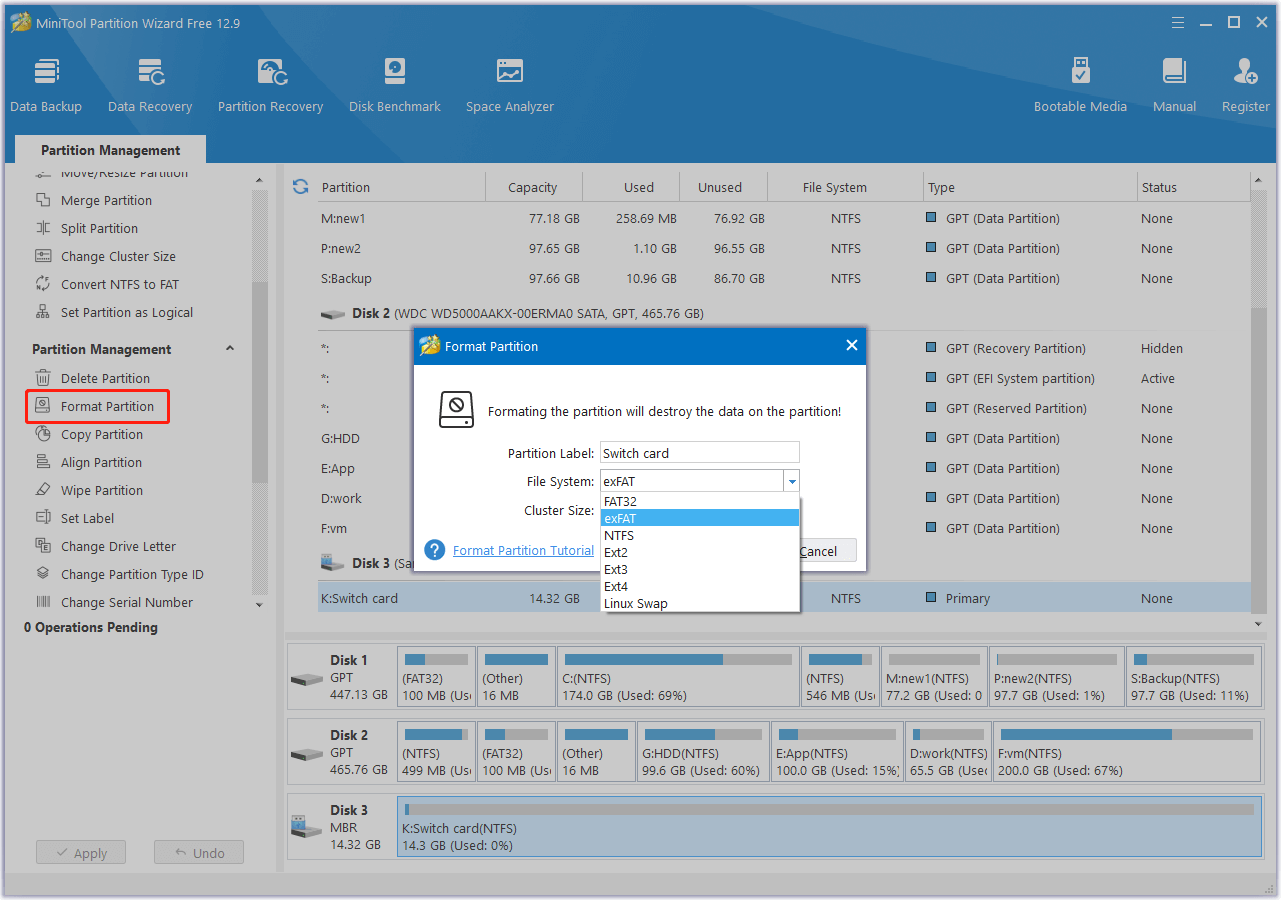
Step 3. Click Apply in the lower left corner to confirm the formatting.

Fix 6. Replace the microSD Card
If your Nintendo Switch still cannot read the SD card after formatting, the card may be damaged or the console’s SD card slot may have a hardware problem. Try another compatible SD card to determine whether the issue comes from the card or the Switch.
If the new card works, the old one is likely faulty and needs to be replaced. If the problem persists, contact Nintendo Switch support for repair assistance.
After learning several solutions to fix microSD card recognition issues on your Nintendo Switch, let’s take some preventive measures to avoid similar problems in the future.
How to Prevent Switch microSD Card Recognition Issues
To avoid issues with your Nintendo Switch not reading a microSD card, follow these tips:
- Use compatible high-quality microSD cards. Switch supports microSD (up to 2 GB), microSDHC (4 GB – 32 GB), and microSDXC (64 GB – 2 TB), while Switch 2 supports microSD Express (up to 2TB). Brands like SanDisk or Samsung reduce recognition issues.
- Insert the card correctly. Shut off the console before removing or inserting your microSD card. Also, insert the card fully until you hear a click.
- Keep console software up to date. Switch system updates sometimes fix microSD card compatibility issues.
- Avoid physical damage. Keep the card away from bending, moisture, dust, and debris.
Nintendo Switch Not Reading microSD Card FAQ
Check whether the card meets Switch requirements and try formatting it for the console if necessary.
It can also happen if the card is not inserted properly or the console software is outdated. Checking the card compatibility, updating the system, or formatting the card may help fix the issue.
You can try testing the card on another device or checking its condition with a disk diagnostic tool. If the card is still accessible, recover important data before replacing it.
Conclusion
A Nintendo Switch that cannot read a microSD card can often be fixed by restarting the console, checking the card, updating the system, or formatting the card. If the issue persists, the card or card slot may be damaged.
Before formatting or replacing the card, recover any important files stored on it. For any questions about MiniTool’s software, please feel free to contact the support team at [email protected].
User Comments :