Are your downloads not showing up in the Downloads folder on Windows? Why does this problem occur and how to get your downloaded files back? Now read this post to learn how to show downloads and how to recover deleted downloaded files with the best data recovery software.
Downloads Not Showing up in the Downloads Folder
Downloading files, such as applications, documents, and media files, is a very common and frequent operation when using a computer. In the Windows operating system, the Downloads folder is the default directory for storing downloaded files. Whether you download files from Chrome, Edge, or other browsers, or email clients and file transfer applications, they will be stored here by default.
However, many users reported that they could not find the downloaded files in the Downloads folder. This is a real user’s feedback:
Downloaded files are not appearing in Downloads folder. Recently, my Downloads folder now acts as a regular folder. I can save images to the folder, but my downloaded files won’t appear there or anywhere. How do I make my Downloads folder a Downloads folder again?reddit.com
If you are stuck in such a situation, you should verify whether the downloaded file is really not in the Downloads folder. It is recommended that you click Date modified in the Downloads folder to rearrange all files in this folder in chronological order from newest to oldest.
If you still cannot see the downloaded files, you may wonder “Why aren’t my downloads showing up”. Possible reasons usually involve the downloaded files being hidden, the default location of the downloaded files being changed, the files being accidentally deleted, etc. With the methods listed below and the corresponding specific steps, you will most likely successfully retrieve your downloaded items.

How to Restore Downloaded Files on Windows 10/11
Way 1. Check if the Downloads Are Hidden
In the Windows operating system, there is a file attribute setting — hidden attribute. Files assigned with this attribute will be not visible in File Explorer. This is mainly used to protect system files and other important files from unauthorized changes or deletion. However, some malware may change the file attributes and set your downloaded files to hidden, making them invisible in the Downloads folder. Or, you may accidentally turn on the hidden attribute for your downloaded files.
To rule out this cause, you can enable the Show Hidden Items feature in File Explorer.
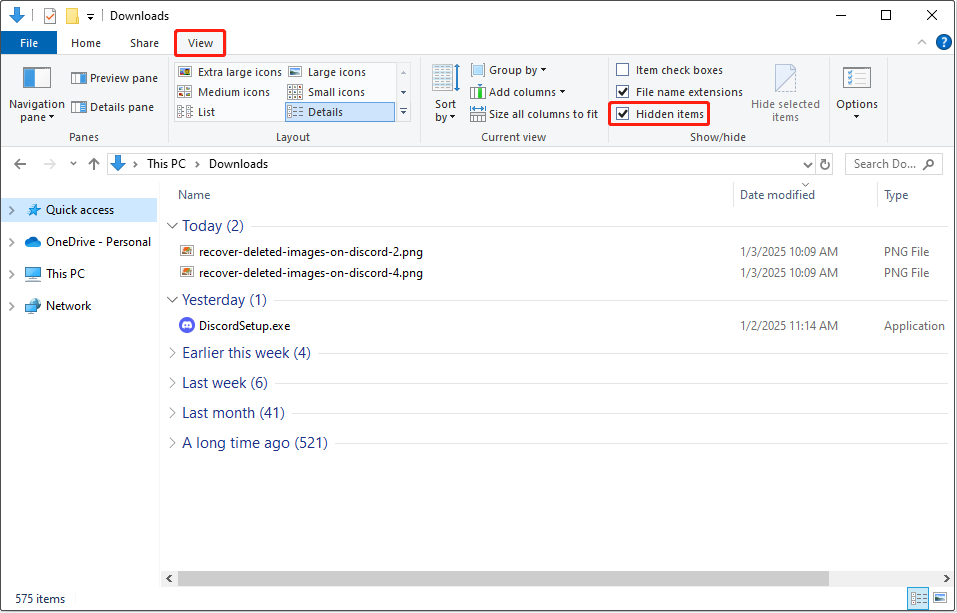
Step 1. In File Explorer, go to the Downloads folder.
Step 2. Click the View option from the top menu bar, and then tick the Hidden items option.
Step 3 (optional). If the downloaded files show up, it indicates that they are hidden. If you prefer to unhide them, you can right-click on them and choose Properties. In the new window, untick the Hidden option, and then click Apply > OK to save this change.

Way 2. Check the Browser Settings
Although Chrome and other major browsers provide a default file download location, they all allow you to change this location as needed. Therefore, when facing the downloads not showing up in the Downloads folder issue, you can check the browser settings to confirm the actual file storage path. If necessary, you can change the location to the default one. Here we take Google Chrome to show you the operation steps.
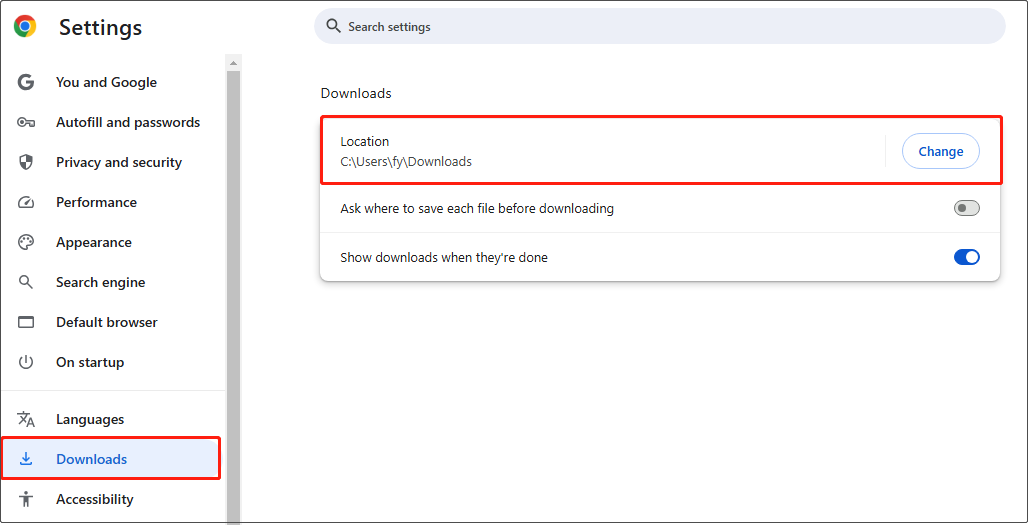
Step 1. Open Chrome, and then click the three-dot icon in the upper right corner and click Settings.
Step 2. Go to the Downloads tab, and then you can see the location where your downloaded files are stored in the right panel. Of course, you can click the Change button to change this location if necessary.
Way 3. Restore the Default Location of Downloads
If you have changed the location where your downloaded files are stored, you may not be able to find the downloads from the Downloads folder. To resolve this problem, you can choose to restore the default location of the Downloads folder.
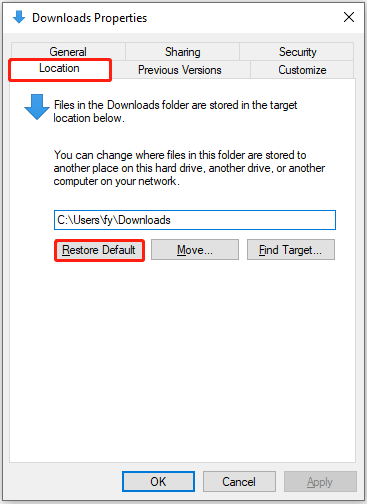
Step 1. In File Explorer, right-click the Downloads folder and choose Properties.
Step 2. In the new window, go to the Location tab, and then click on Restore Default.
Step 3. When you receive the prompt asking you whether you need to move all of the files from the old location to the new location, it is recommended to select Yes. This is a good option to ensure that the programs needing to access the folder’s content can do so.
Way 4. Restore Deleted Downloaded Files
If you have tried all the above methods and the “downloaded files not showing up Windows 11/10” issue still exists, it is very likely that the files were not downloaded successfully or have been deleted for various reasons. In this scenario, going to the original download site to re-download the files is the best option.
If there are too many missing files or you can no longer find the original download location, there is still a way out. MiniTool Power Data Recovery, the best free data recovery software for Windows 11/10/8.1/8, can help you recover your files as long as they are not fully overwritten by new data.
This software supports the deleted file recovery of various types of data, ranging from common pictures, videos, or document formats to niche file formats. Moreover, in addition to the complete scan of the entire disk or partition, it also provides the option to scan the Downloads folder separately, helping you achieve more targeted scanning and saving scanning time. It is also worth mentioning that with this software in hand, you don’t need to worry about ineffective financial expenditures. This is because the free edition of this tool supports free file preview and 1 GB of free file recovery, which greatly reduces the probability of recovering useless files.
Now, click the button below to download and install MiniTool Power Data Recovery Free, and then start it to recover your files.
MiniTool Power Data Recovery FreeClick to Download100%Clean & Safe
Step 1. Select the Downloads folder to scan.
On the main interface of MiniTool Power Data Recovery, there are many options available, including all hard disk partitions on your computer and some specific locations like the Desktop, the Recycle Bin, and the option of Select Folder.
Since you need to recover deleted downloaded files from the Downloads folder, you should hover your mouse cursor over the Select Folder option, and then click the Browse button. In the pop-up window, choose the Downloads folder and hit Select Folder.

After that, this recovery tool will start to scan the selected folder automatically. What you should do is wait patiently until the scan finishes automatically so as to ensure the best scan results.
Step 2. Find and preview the needed files.
Once the full scan is done, it is time to find and tick the files you want to recover. Since the software finds all deleted, lost, as well as existing files in the Downloads folder, there could be a large number of files listed by path by default. To find the files you need as quickly as possible, you can follow the suggestions below or use the following features.
If the files were deleted, you should focus on the Deleted Files category under Path. Expand it and its subfolders if necessary to find the files you want to recover. Besides, this tool provides you with a Type category list, which allows you to browse files by file type and file format. If you need to recover a certain type of file like photos, this feature is more suitable for you.
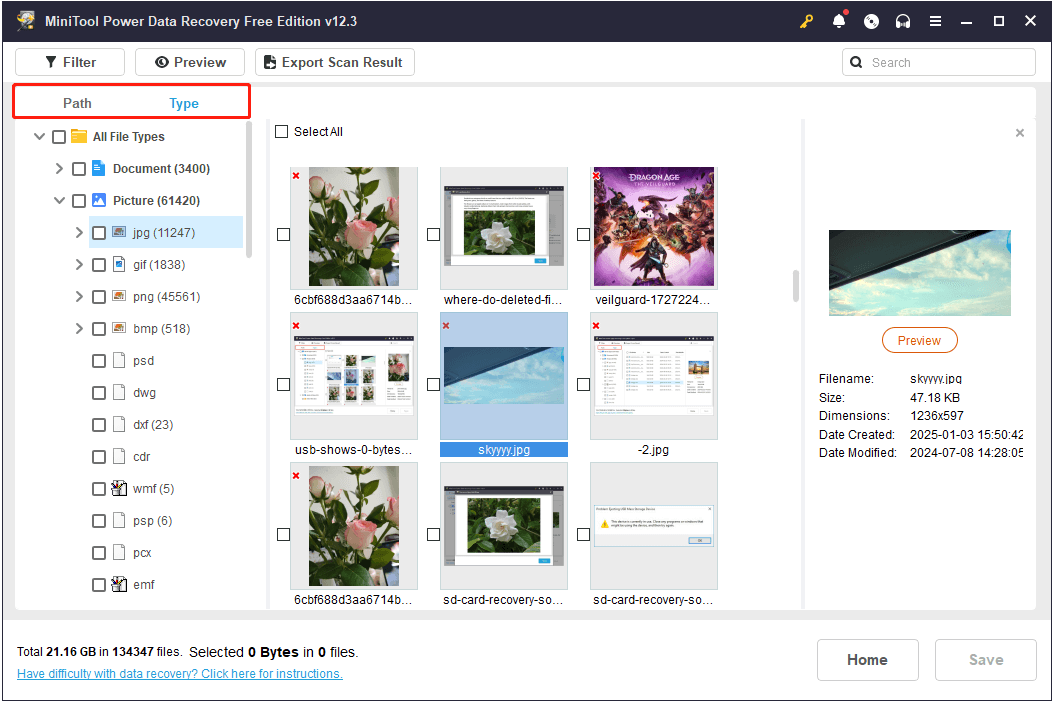
The files are listed by file thumbnail by default under the Type category for a more intuitive file preview. If you prefer to view files by file path, you can right-click on any file in the right panel and choose Change to List View.
Here are two more features to help you narrow down the file list and find the needed files faster. The first one is Filter, which allows you to filter out unwanted files by file type, file modification date, file size, and file category.

The second one is Search, which can help you search for a certain file with a specific file name. Besides, it allows you to search for a series of files based on file suffixes. It should be noted that the search function does not currently support keeping the selected files checked after returning to the scan results page. So, after finding the files you want to recover, double-click it to preview it as soon as possible, then click Save to restore it to avoid having to search for it again.

Step 3. Select a location to save the recovered files.
Ensure that you have selected all the items you want to recover. Finally, click on the Save button in the lower right corner, choose a safe location in the pop-up window, and click OK to store the recovered files. To avoid data overwriting causing the lost files to become unrecoverable, it is necessary to choose another location separate from the original Downloads folder.
Useful Tips to Prevent Mistaken File Deletion on Windows
While MiniTool Power Data Recovery is indeed robust enough to retrieve various types of files, it is crucial to prevent data loss from the outset. This is important not only because files deleted a long time ago might have been overwritten and thus become unrecoverable, but also to save your time or even money. Here are two common tips to help you avoid accidentally deleting files on Windows.
Tip 1. Enable File Delete Confirmation Dialog
Deleting downloaded files or other files without any prompts can lead to accidental deletions. To prevent this from happening, you can enable the File Delete Confirmation Dialog. When you attempt to delete a file, a dialog box will appear, asking you to confirm whether you truly want to delete that file. To enable it, follow the steps below.
Step 1. On your desktop, right-click on the Recycle Bin shortcut icon and choose Properties.
Step 2. When you see the following window, tick the Display delete confirmation dialog option.
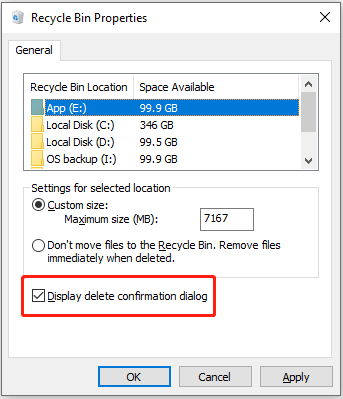
Step 3. Click Apply and OK sequentially to save this change.
Tip 2. Disable Storage Sense
Storage Sense is a built-in tool in Windows that is used to automatically clean up your files on the computer. It can automatically delete files in your Downloads folder that have not been modified for a long time and delete the Recycle Bin files older than a certain number of days based on the time interval you set. Although this is a good feature to free up disk space, it also creates some obstacles for easy and secure data recovery. If you often delete files by mistake, you may consider turning off this feature.
How to disable Storage Sense? Follow the instructions below.
Step 1. Press the Windows + I key combination to open Settings.
Step 2. Select System > Storage. In the right panel, click Configure Storage Sense or run it now.
Step 3. In the new window, switch the button under Storage Sense to Off. Also, you can select Never under both Delete files in my recycle bin if they have been there for over and Delete files in my Downloads folder if they haven’t been opened for more than.

I believe that with the above two precautions, you will not face the trouble of accidental data deletion.
Bottom Line
This article introduces how to fix the problem of downloads not showing up in the Downloads folder on Windows, as well as how to prevent accidental file deletion in the future. I sincerely hope that the steps mentioned above are effective for you and detailed enough for you to understand how to do it effortlessly.
Should you need any help with MiniTool Power Data Recovery, please feel free to reach out to the technique support team via [email protected].
About The Author

Position: Columnist
Shirley holds a bachelor’s degree in English and has been an editor at the MiniTool Team for many years. She specializes in IT-related content, with a focus on data recovery, file backup, disk management, and other technical topics. She is committed to delivering clear, accurate, and practical solutions to help users resolve common computer issues.
User Comments :