File Explorer is the built-in file management tool in Windows that allows you to view and organize files and folders.
It has a navigation pane with sections like Quick access and This PC for easy access to frequently used and library folders.
However, sometimes when you open File Explorer, you may find that certain files or folders are missing. This can cause confusion over whether the items were deleted.
First, understand why your files or folders are not visible in Windows Explorer.
Why Files or Folders Are Not Showing in File Explorer
Missing files do not always indicate that they have been deleted. In many cases, they are only hidden or not displayed due to system glitches.
Here are the main causes why you can’t see files in File Explorer:
- The files are set as hidden, and the system is set not to display hidden files.
- The files may have been moved to another folder or drive.
- There are temporary glitches in Windows Explorer or the operating system.
- Corrupted icon cache files affect how your files are displayed.
- The system has changed certain settings that prevent library files from appearing in This PC.
- The files were deleted due to human error, virus infection, disk failures, or software bugs.
Now that you know why your files are not showing in Windows Explorer, try the following methods to make them visible and resolve the issue.
How to Fix File Explorer Not Showing Files on Windows 11/10
To fix File Explorer not displaying files, restart the Explorer, adjust hidden file settings, repair system files, and clear thumbnail cache files.
Solution 1. Restart Windows Explorer
Before proceeding with advanced solutions, consider restarting your computer or Windows Explorer to rule out temporary glitches.
Here is how to restart Windows Explorer:
Step 1. Right-click the Start button and choose Task Manager.
Step 2. Select Windows Explorer, and click Restart.
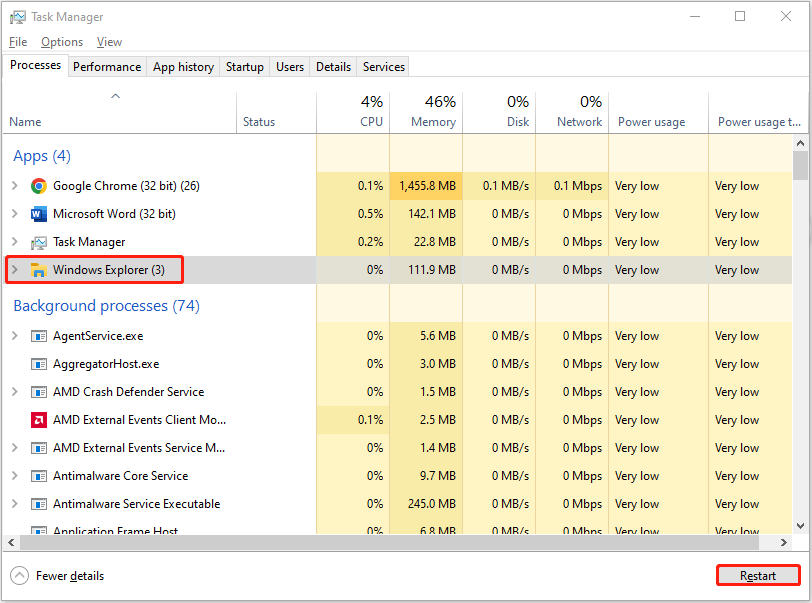
Your taskbar will refresh automatically. After that, open File Explorer and check if the target files or folders appear now. If not, continue with the following solution.
Solution 2. Show Hidden Files
Files on Windows may be assigned a hidden attribute due to manual operations, virus infections, or software conflicts. In such cases, files will only be visible if the system is configured to show hidden items.
In Windows 10, to enable the “Show hidden items” feature in File Explorer, go to the View tab and check the Hidden items box.
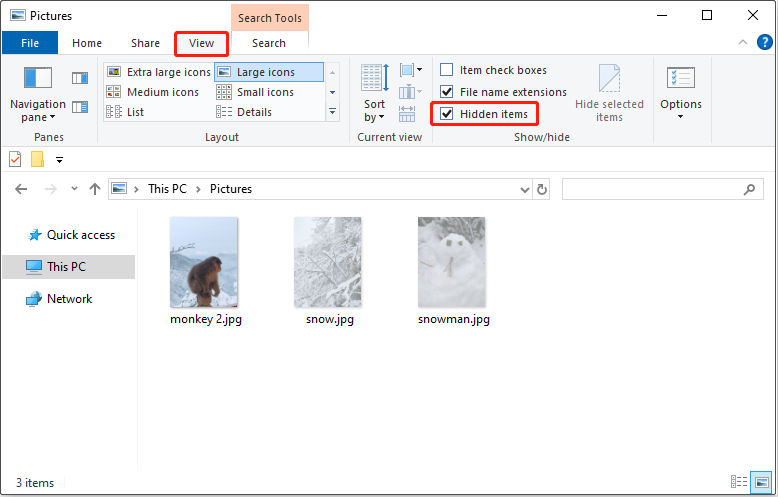
In Windows 11, click the View menu on the toolbar (or the icon with four horizontal lines), then choose Show and select Hidden items.
After enabling this option, all hidden files will be visible in File Explorer.
If you want to unhide all these files, use the attrib command to remove the hidden attribute:
Step 1. Type cmd in the Windows search box. Then, right-click Command Prompt from the best results and click Run as administrator.
Step 2. Input attrib -h -r -s /s /d drive letter:\*.* and press Enter. Replace the drive letter with the correct one that contains the files you want to unhide.
For example, to unhide files on the M: drive, type attrib -h -r -s /s /d M:\*.* and press Enter.
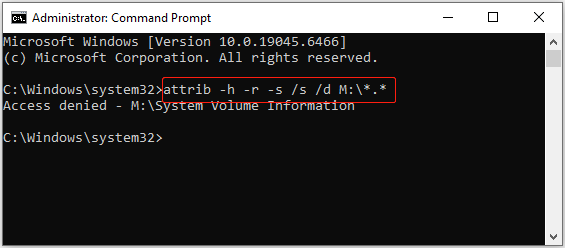
Once the attrib command is executed, all files on the M: drive will be unhidden.
If the problem is not related to the hidden attribute, try the following solutions.

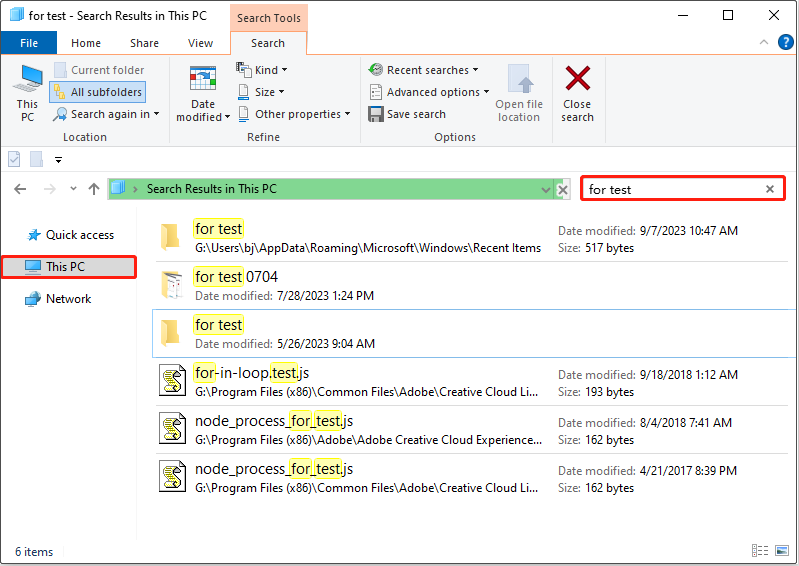
Solution 3. Search for Files in This PC
If the previous methods have not displayed the files, they may be stored elsewhere on your hard drive. Using the Search function in This PC allows you to search across indexed and non-indexed locations.
Solution 4. Run SFC Scan
Occasionally, corrupted or missing system files can cause File Explorer to malfunction or fail to display files. Under these circumstances, running the SFC (System File Checker) tool to scan and repair system files may resolve the issue.
Follow the steps below to execute the SFC command:
Step 1. Open Command Prompt as an administrator.
Step 2. Input sfc /scannow and press Enter.
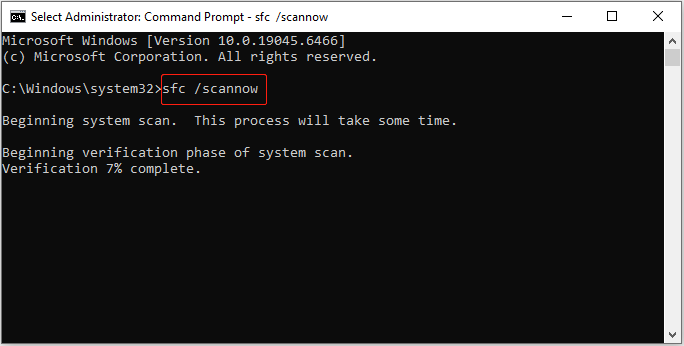
The SFC tool will start to scan all system files and replace corrupted files with a cached copy. Wait for the process to complete to get the scan result.
Solution 5. Clear Thumbnail and Icon Cache
Corrupted thumbnail or icon cache files can sometimes prevent files from displaying correctly in File Explorer. Clearing the cache may help restore missing file icons or thumbnails.
Here is how to delete thumbnail and icon cache files:
Step 1. In File Explorer, navigate to the following location:
C:\Users\Your Username\AppData\Local\Microsoft\Windows\Explorer
Step 2. Find and select all files starting with thumbcache and iconcache. Right-click them and click Delete.
Step 3. Restart Windows Explorer and check whether thumbnails or icons display correctly now.

Solution 6. Add Folders to This PC (for Windows 11)
Some reports indicate that library folders such as Documents and Pictures no longer appear under This PC in File Explorer.
This is not a bug, but rather the result of a Windows update that redesigned the navigation pane to simplify file navigation.
To restore the previous layout where the library folders are visible under This PC, you need to modify the registry. Refer to the guide on adding or removing folders under This PC to complete this task.
By following the methods outlined above, hidden or misplaced files should become visible. If the files still do not appear, they may have been deleted rather than hidden.
In such cases, refer to the following section to recover deleted files.
How to Recover Files Not Showing in File Explorer
For deleted file recovery, first check the Recycle Bin or any available backup files. If the files are not restored, consider using free data recovery software like MiniTool Power Data Recovery.
Method 1. Check the Recycle Bin
When files are deleted from internal hard drives, they are often moved to the Recycle Bin rather than being permanently removed.
Checking the Recycle Bin is the quickest approach to recover recently deleted files without using additional tools.
Double-click the Recycle Bin icon on your desktop to open it. Select and right-click the files you want to restore, and then click Restore. The selected items will be restored to their original locations.

Alternatively, you can drag and drop the target files to any preferred location manually.
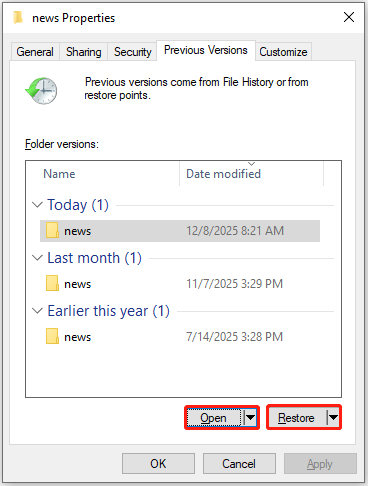
Method 2. Restore Previous Versions of Folders
If File History is enabled and the missing files were included in the backup source, Windows will automatically create backups of them.
In this case, restoring a previous version may help restore the missing files.
Here is how to restore a previous version of a folder or drive:
Step 1. In File Explorer, right-click the folder or drive containing the lost files and click Restore previous versions.
Step 2. All available versions of the folder or drive will be listed. Select each one and click Open to preview its content.
Step 3. Select the version you want to recover and click Restore to replace the current version of the folder or drive.

Method 3. Use MiniTool Power Data Recovery
If data recovery software is needed to recover deleted files, MiniTool Power Data Recovery is a reliable option.
As one of the leading data recovery tools, it supports the recovery of all types of files from HDDs, SSDs, USB flash drives, SD cards, and other storage media.
As long as the deleted files have not been overwritten by new data, regardless of the reason for deletion, the software can help recover them.
It operates in read-only mode during data recovery, ensuring that no data is written to the original drive, thereby preventing data overwriting.
With its clear interface, files can be recovered quickly and easily on Windows 11/10/8/8.1.
Get the free edition of this software and use it to recover 1 GB of files for free.
MiniTool Power Data Recovery FreeClick to Download100%Clean & Safe
Step 1. On the main interface of this recovery software, select the target partition, location, or disk and click Scan. The available options are organized into the following categories:
- Logical Drives: Displays all detected partitions on the computer, including system drives and data volumes.
- Devices: Lists physical storage devices such as HDDs, SSDs, USB flash drives, and SD cards. Use this option if you are unsure which partition your files should be in.
- Recover From Specific Location: Provides quick scanning of the Desktop, Recycle Bin, and a specific folder. These options significantly reduce scanning time.
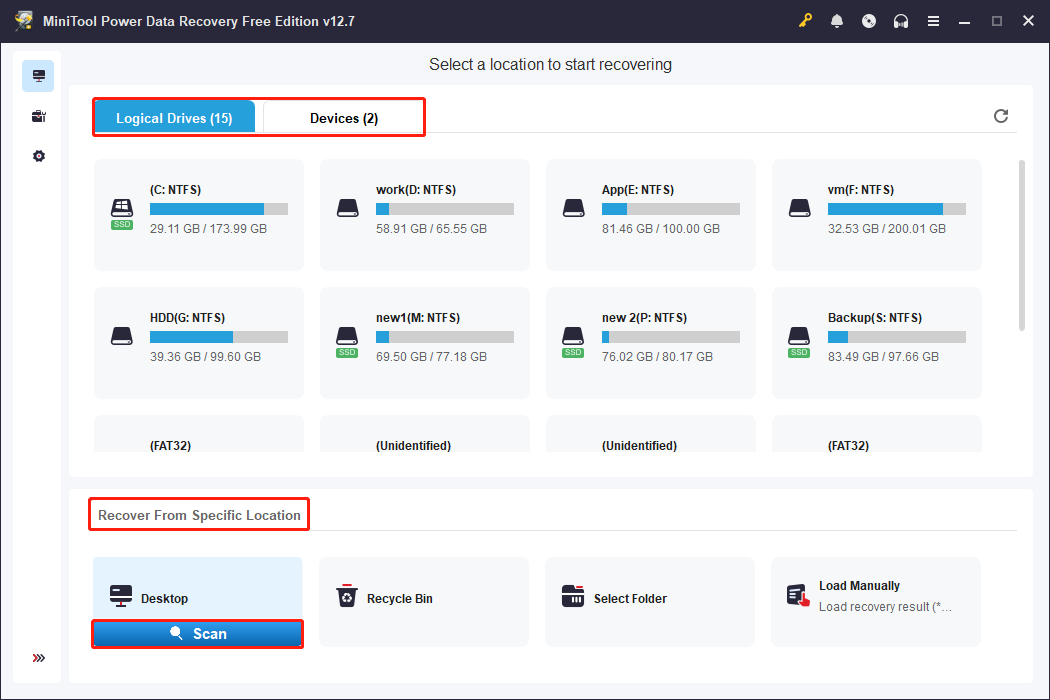
The duration of the scanning process varies depending on the size of the drive and the amount of data. For optimal results, wait for the scan to complete fully.
Step 2. Once the scan is finished, all recoverable files will be listed. To help locate the desired items efficiently, this tool offers useful viewing and filtering options:
- Path: Displays files according to their original directory structure.
- Type: Groups files based on their file types, such as documents, videos, pictures, and more.
- Filter: Enables advanced filtering based on file type, modification date, file size, and file category.
- Search: Supports searching for specific files by entering a file name or keyword into the search box.
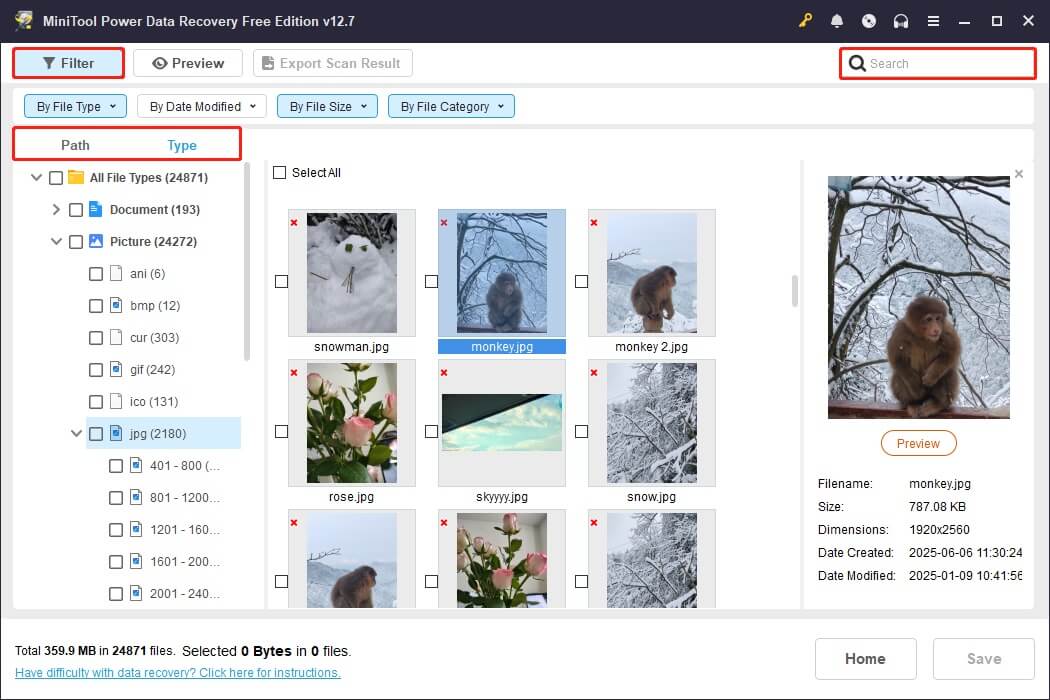
Step 3. Before recovering a file, double-click it to view its contents. Supported file types for preview include documents, images, videos, and more.
Make sure all files you want to recover are checked, and click Save. In the pop-up window, select a safe directory separate from the original location and click OK.
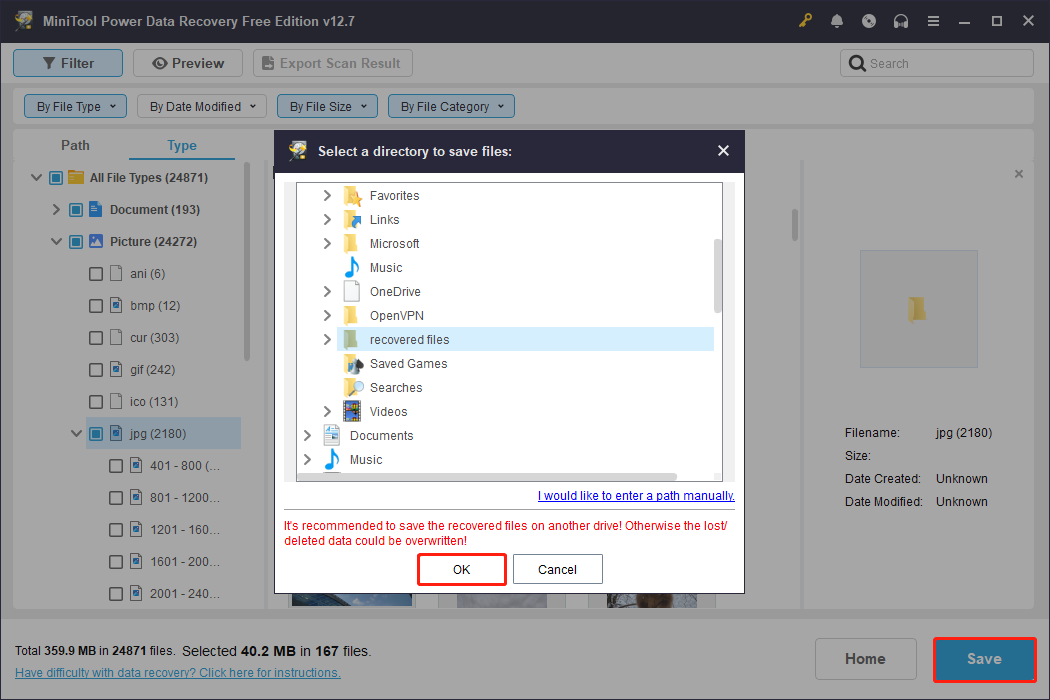
After the recovery process is completed, navigate to the specified location to view the recovered files.
Recommended: Back Up Important Files
After recovering your files, it is recommended to back up files to prevent future data loss. Regular backups help ensure that your important data remains safe even if data loss happens.
File History and professional data backup software are two effective and reliable backup options.
Method 1. Enable File History
File History is a built-in Windows feature that automatically backs up your files at regular intervals. Follow the steps below to set it up:
Step 1. Connect an external drive to your computer or set up a network location to save your backup files.
Step 2. Open the Control Panel and navigate to System and Security > Save backup copies of your files with File History.
Step 3. Click Turn on to enable File History.

Method 2. Use MiniTool ShadowMaker
MiniTool ShadowMaker is a professional backup solution that provides greater flexibility and control over data backup. It offers full, incremental, and differential backup schemes and flexible schedule settings.
Get the trial edition of this tool to back up files or partitions for free for 30 days.
MiniTool ShadowMaker TrialClick to Download100%Clean & Safe
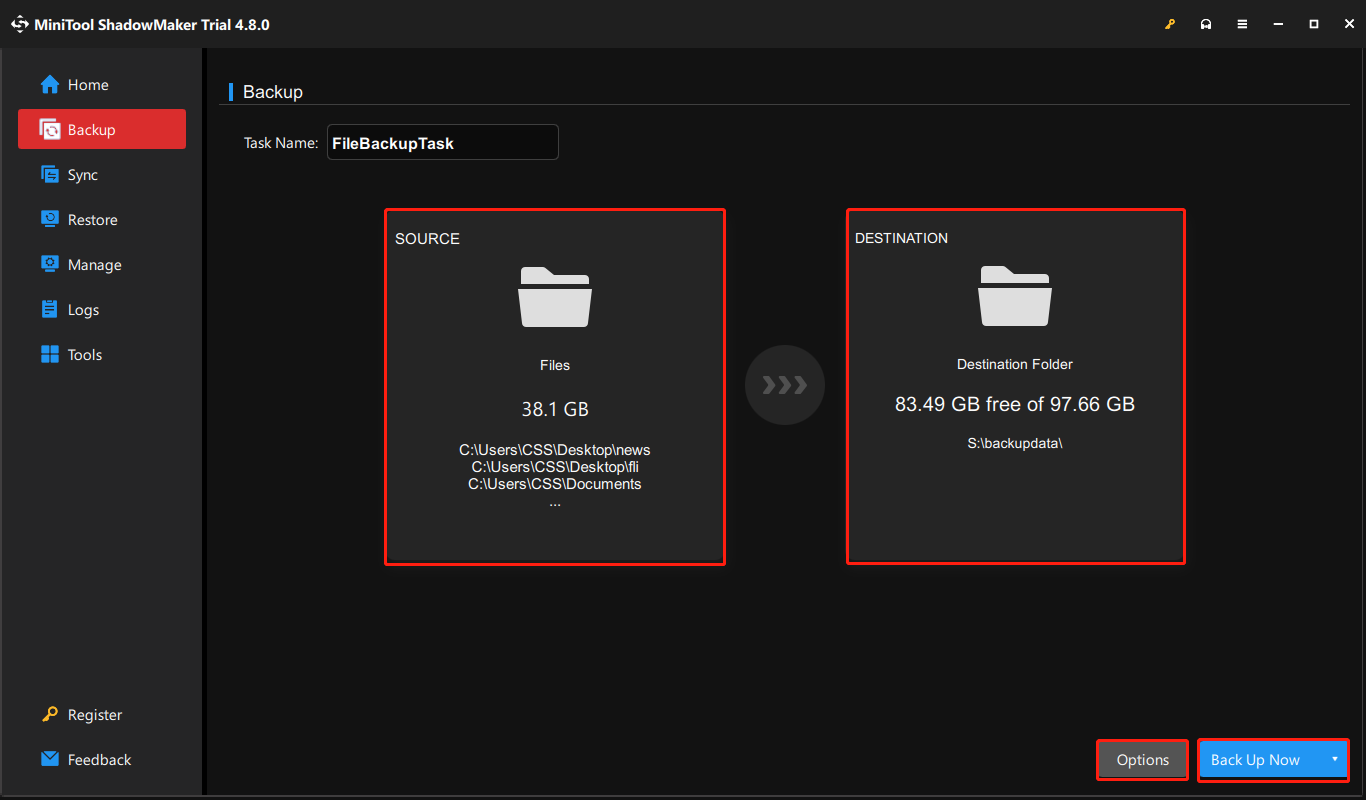
Step 1. Run the backup tool and click Keep Trial to enter its main interface.
Step 2. Switch to the Backup tab.
Step 3. Click SOURCE to select the files, folders, partitions, or disks to back up. Next, click DESTINATION to choose a location to store the backup file.
Step 4 (optional). Click Options to enable and configure backup settings, including backup schemes and schedule settings.
Step 5. Click Back Up Now to start backing up the selected data.
Wait for the backup process to complete. If data loss occurs in the future, you can open the software and go to the Restore tab to efficiently retrieve your files from the backup.
Final Thoughts
To sum up, the problem of File Explorer not showing files can be divided into two situations. One is that files are hidden or affected by system glitches; the other is that files have been deleted.
For hidden files or glitches, try restarting your device or Explorer, changing folder settings to show hidden files, or checking for system file corruption.
For deleted files, restore them from the Recycle Bin, from backup copies, or by using data recovery software.
Once your files are recovered, make sure to back them up to prevent future loss.
If you encounter any issues while using MiniTool software, please contact the support team at [email protected].
About The Author

Position: Columnist
Shirley holds a bachelor’s degree in English and has been an editor at the MiniTool Team for many years. She specializes in IT-related content, with a focus on data recovery, file backup, disk management, and other technical topics. She is committed to delivering clear, accurate, and practical solutions to help users resolve common computer issues.
User Comments :