The Pictures folder is the default storage location on a computer for images and screenshots. This folder makes it easier to access and manage your photos.
Where exactly is the Pictures folder, and how can you access it? Keep reading to find out.
Where Is My Pictures Folder in Windows
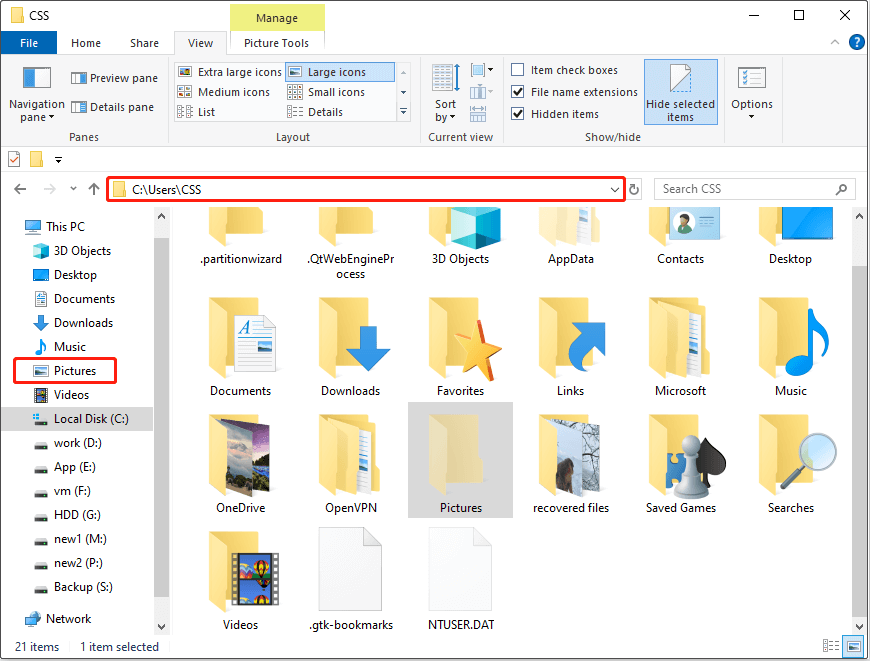
The Pictures folder is usually located in your user profile folder. You can access it by navigating to:
C:\Users\Your User Name\Pictures
Alternatively, you can find it under the This PC section in File Explorer, or search for it using the Windows search bar.
However, some users reported that the Windows Pictures folder cannot be found using any of these methods.
Are you experiencing the same issue? This may be caused by accidental deletion, incorrect folder options, registry errors, or other reasons.
In the following section, you will learn how to restore the Pictures folder on Windows 10 and 11.
How to Restore the Missing Pictures Folder in Windows 10/11
If the Pictures folder is not showing up on your computer, start with some basic checks: restart your computer, create a new Pictures folder, or adjust the folder options to show hidden files.
If these steps do not work, check for incorrect registry values or restore the Pictures folder to its default settings.
Follow the methods below step by step.
Method 1. Restart the Computer
The Pictures folder is a default system folder in Windows. If it is missing, restarting the computer will automatically recreate it as an empty folder.
So, restart your computer and check if the Pictures folder is back.
If not, try the next solution.
Method 2. Create a New Pictures Folder
If restarting does not work, you can manually create a new Pictures folder in your profile. This ensures that Windows has a folder to recognize as the default storage location of images.
To do this, navigate to C:\Users\Your User Name. Right-click the blank space and choose New > Folder, and then name it Pictures.
If this does not resolve the issue, proceed to the next method.
Method 3. Show Hidden Files
If the Pictures folder is hidden, it won’t appear on your computer. In this case, you need to enable the option to show hidden files to make it visible.
Here is how to do it:
Step 1. Press Windows + E to open File Explorer.
Step 2. Go to the View tab.
Step 3. Make sure the Hidden items box is ticked. Then the Pictures folder should appear.

Step 4 (optional). To unhide the Pictures folder, select it, and then uncheck the Hide selected items option under the View tab.
If you prefer a quick video guide to show hidden files, watch this short video:
Method 4. Modify the Registry Value
The ThisPCPolicy registry value controls whether the Pictures folder appears under This PC in File Explorer. If your Windows Pictures folder is missing, it may be because this registry value is set to Hide.
In this case, you need to change the value to Show to make the folder visible again.
Here is how to do it:
Step 1. Press Windows + R to open Run, then type regedit in the box, and press Enter.
Step 2. If the User Account Control window appears, select Yes to open the Registry Editor.
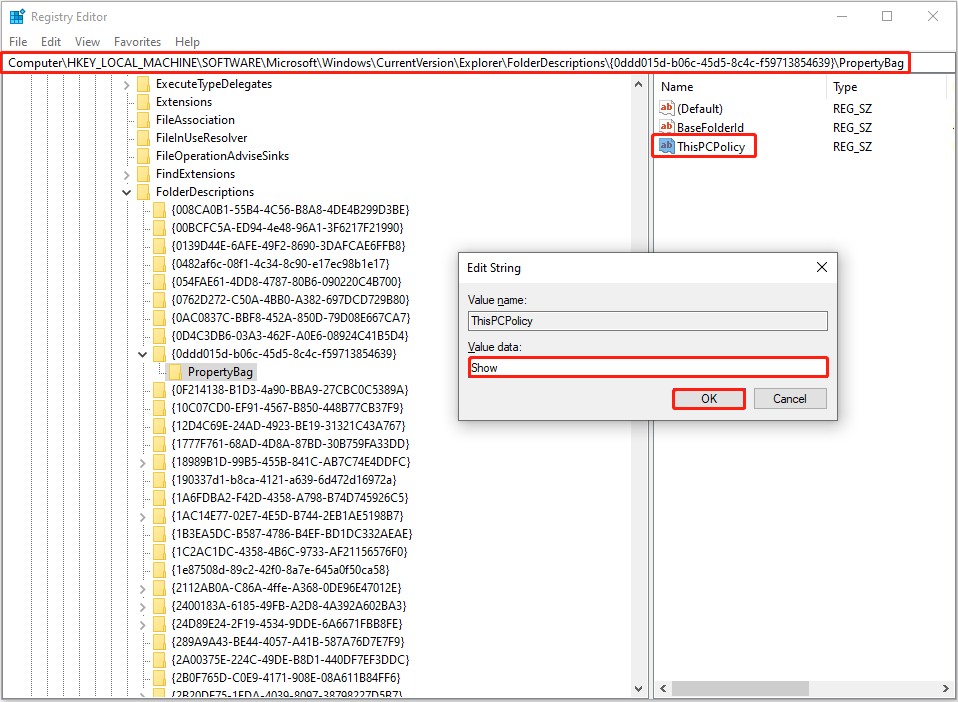
Step 3. Navigate to the following location:
Computer\HKEY_LOCAL_MACHINE\SOFTWARE\Microsoft\Windows\CurrentVersion\Explorer\FolderDescriptions\{0ddd015d-b06c-45d5-8c4c-f59713854639}\PropertyBag
Step 4. In the right panel, double-click ThisPCPolicy. Then change its value data to Show and click OK.
What if the Pictures folder still does not appear? Try the last resort.
Method 5. Restore Default User Folder Location
If the Pictures folder path has been changed, Windows may not be able to recognize it correctly. In this case, restoring the folder to its default location can often fix the problem.
Follow the steps below to restore the default Pictures location:
Step 1. Open the Registry Editor by using the search box.
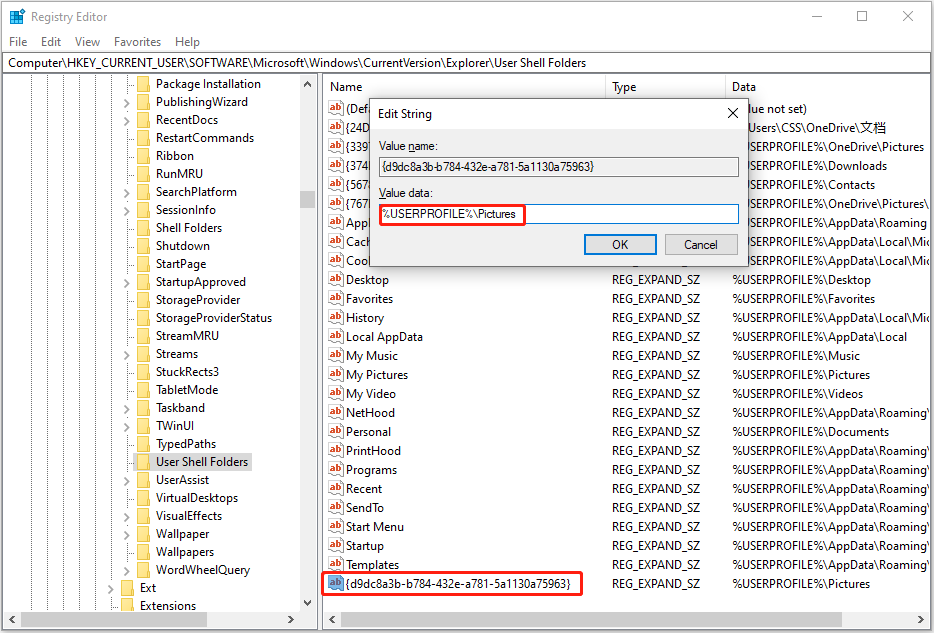
Step 2. Go to the following location:
Computer\HKEY_CURRENT_USER\SOFTWARE\Microsoft\Windows\CurrentVersion\Explorer\User Shell Folders
Step 3. In the right panel, make sure the My Pictures entry exists and its value data is set to %USERPROFILE%\Pictures.
If the entry is missing, right-click the blank area and choose New > Expandable String Value, and name it {d9dc8a3b-b784-432e-a781-5a1130a75963}.
Step 4. Double-click the newly created value and set its value data to %USERPROFILE%\Pictures.
Now you can restart your computer and check whether the Pictures folder appears.

How to Restore Disappeared Pictures From the Pictures Folder
As you can see, the Pictures folder can usually be restored in various solutions. However, sometimes the files inside may remain missing even if the folder has been recovered.
Is it possible to recover deleted or lost pictures from the Pictures folder? Absolutely yes.
First, check the Recycle Bin or any available backups for your deleted pictures. If they are not there, use reliable free data recovery software to recover your pictures.
Method 1. Check the Recycle Bin
When you delete a file from your computer’s internal drive, it is not permanently removed right away. Instead, Windows moves it to the Recycle Bin for temporary storage.
Before the Recycle Bin is emptied, you can easily restore your deleted files from there.
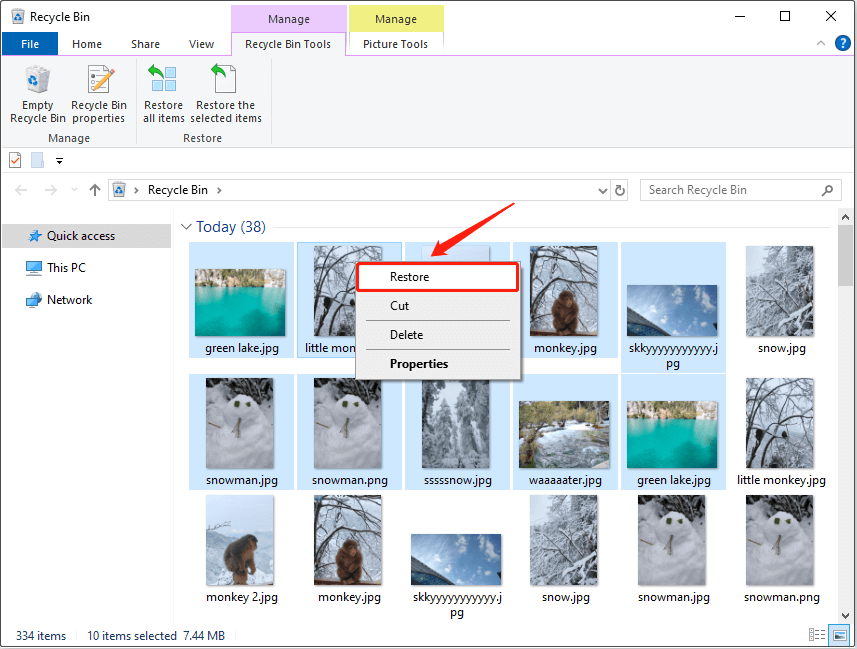
Double-click the Recycle Bin icon to open it. Then, select and right-click your pictures and choose Restore to restore them to their original location.
If you cannot find the pictures you want in the Recycle Bin, use the next solution.
Method 2. Restore From Backups
If you have previously backed up your pictures using File History, professional backup software, or cloud backup services, you can now restore your missing pictures from those backups.
The recovery method depends on the backup solution you used.
>> File History backup:
Go to Settings > Update & Security > Files backup. Click More options under Back up using File History, then select Restore files from a current backup.
Choose the images you want to restore and click the green Restore button.
>> Professional backup software:
Open the backup program and follow its on-screen wizard to restore your files.
>> Cloud backup services:
Log in to your cloud account and download the uploaded files to your computer.
If you do not have a backup, do not worry. You still have another option – use data recovery software.
Method 3. Use MiniTool Power Data Recovery
When files are deleted from local storage devices, they are usually not permanently erased. Instead, Windows removes only the pointer to the file and marks the space as available for new data.
The actual file data remains on the disk until it is overwritten by new information. This is why professional data recovery software can scan the storage media for files that have not been overwritten and restore them.
If you do not have a trusted file restore tool, MiniTool Power Data Recovery is worth a try.
It supports recovering photos, documents, videos, audio, emails, archives, and other types of files from HDDs, SSDs, USB drives, SD cards, and other file storage media.
It supports free disk scanning, free file preview, and 1 GB of free data recovery.
Now, download, install, and launch this tool to recover your pictures.
MiniTool Power Data Recovery FreeClick to Download100%Clean & Safe
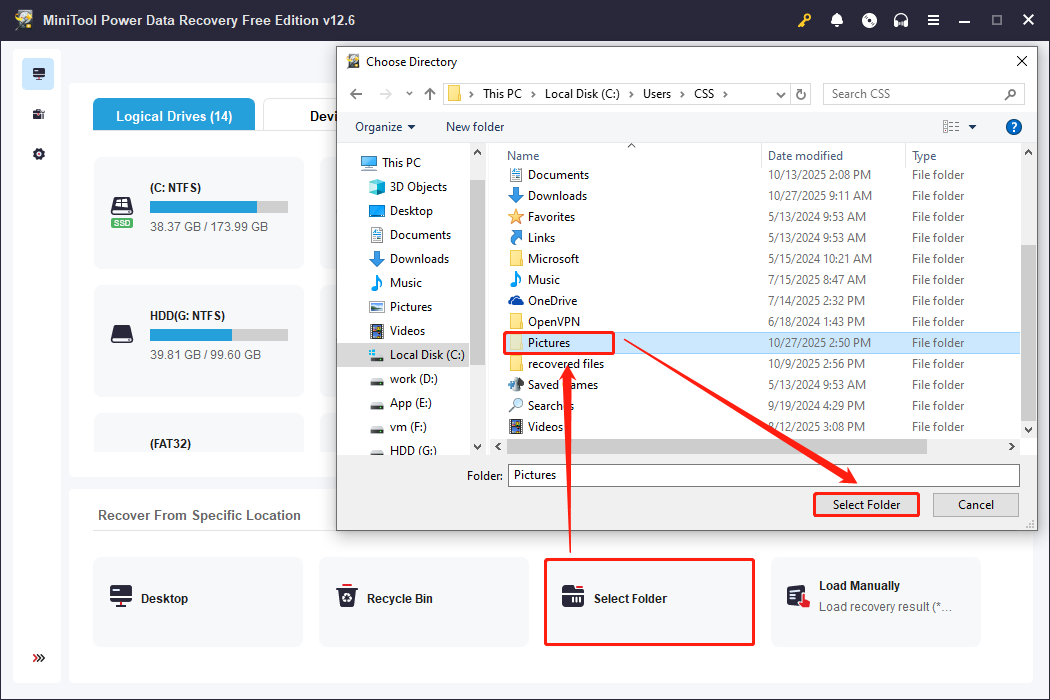
Step 1. Scan the Pictures folder.
On the home page of this MiniTool file restore tool, click Select Folder, choose the Pictures folder, and hit Select Folder.
The software will start to scan the folder for lost, deleted, and existing files.
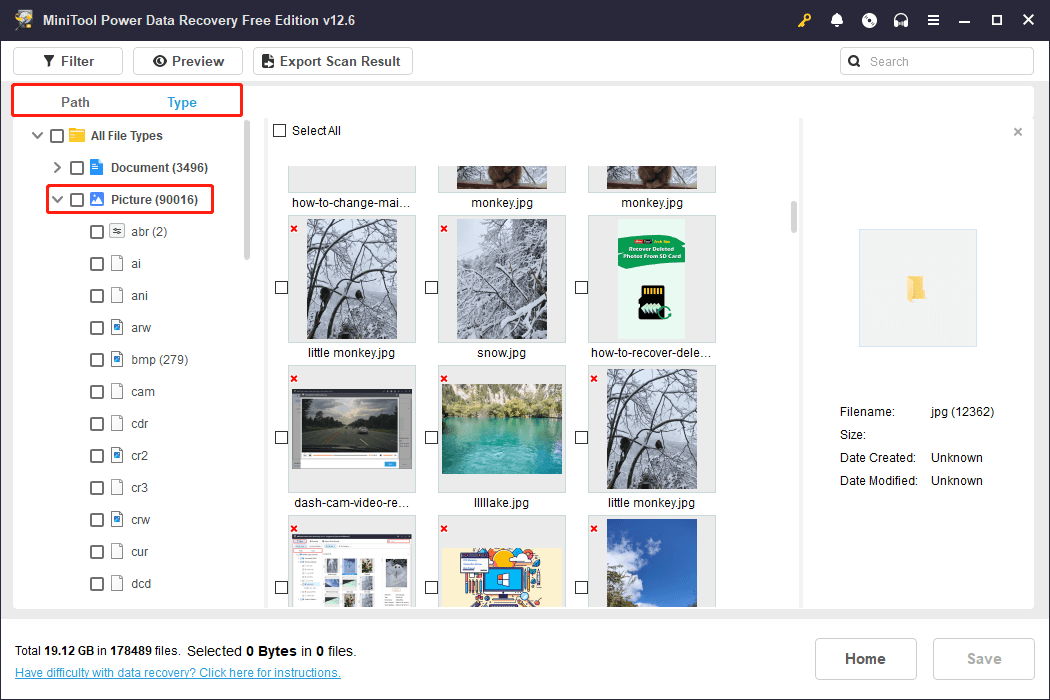
Step 2. Find and preview your picture files.
After scanning, the found files will be listed under both Path and Type. You can browse through your files under them.
- Path: Lists files according to their original folder structure.
- Type: Classifies files by file type and data format. To view pictures only, focus on the Picture section.
If you want to further narrow down the file list, use Filter or Search:
- Filter: Filter files by file type, modification date, file size, and file category.
- Search: Search for a certain file by using its partial or complete file name.
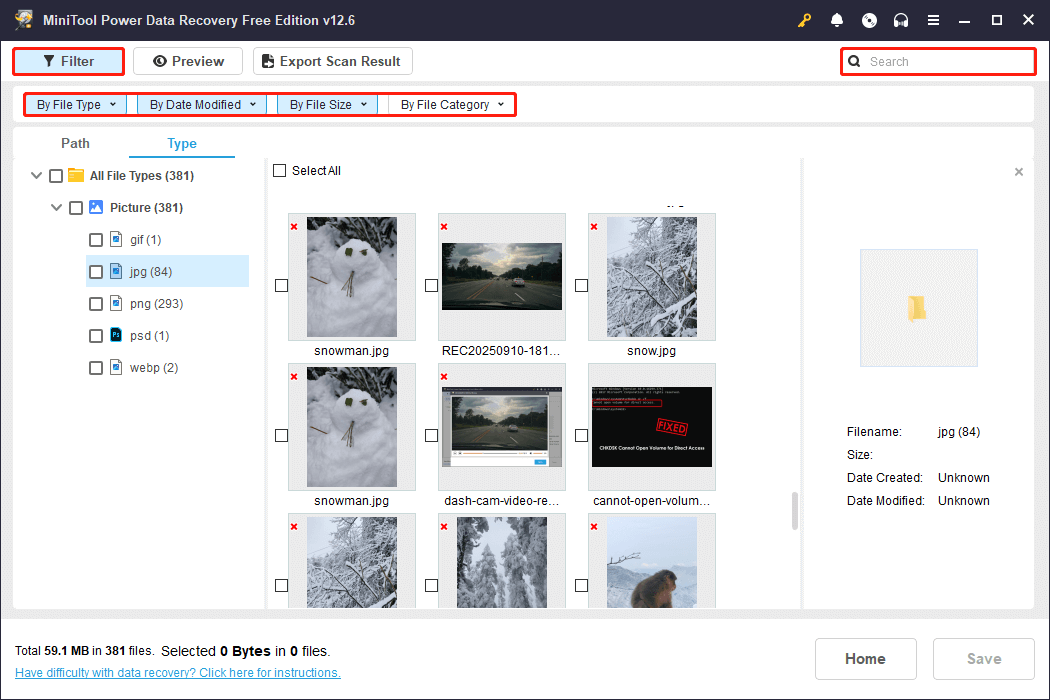
To avoid recovering unnecessary or corrupted files, it is recommended to preview each desired image. To preview a file, simply double-click it.
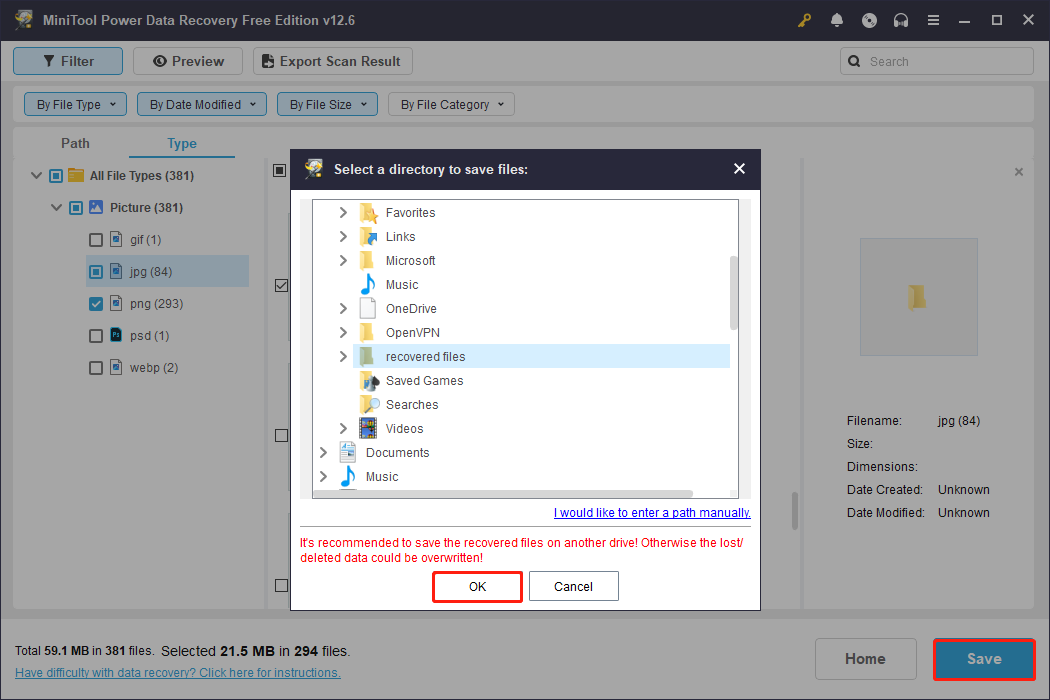
Step 3. Save desired pictures.
Once you have confirmed and ticked all the pictures you want to recover, click the Save button.
In the new window, choose a location separate from the original Pictures folder and click OK. The restore process will start.
The free edition allows you to recover only the first 1 GB of files. To recover more than this limit, you will need to upgrade to the full edition.
Bottom Line
When the Pictures folder disappears from Windows 10/11, try restarting your device or changing folder options first.
If that does not help, recreate the folder manually, reset its location, or tweak the registry.
If the Pictures folder is restored but the images inside it are lost, retrieve them by checking the Recycle Bin, scanning backups, or using MiniTool Power Data Recovery.
If you need any help with MiniTool’s data restore tool, please reach out to the support team at [email protected].
About The Author

Position: Columnist
Shirley holds a bachelor’s degree in English and has been an editor at the MiniTool Team for many years. She specializes in IT-related content, with a focus on data recovery, file backup, disk management, and other technical topics. She is committed to delivering clear, accurate, and practical solutions to help users resolve common computer issues.
User Comments :