Where Do Windows Screenshots Go
Windows enables people to capture screenshots by pressing the corresponding hotkeys. It is quite convenient but also brings trouble to some people, such as Windows not saving screenshots to Screenshots folder. A real case is shown here:
Ever since the Windows update the screenshot function changed to where the window pops up after pressing Prt Sc and allows you to choose from multiple options (screenshot one screen, screenshot monitor only, screenshot both, etc.) but it stopped saving screenshots to my folder. How do I fix it to save it to my screenshot folder again? - MidnightDesert135reddit.com
Check the Save Location of Screenshots
Possibly, this problem arises because of the changed save location of those screenshots. You can try to find those screenshots via the following locations:
- The Clipboard history: If you screenshot a screen with the Snipping Tool, you can go to the Clipboard to find your screenshot by pressing Win + V.
- Quick Access: You can find the recently opened or created files in Quick Access in File Explorer. Press Win + E to open File Explorer and scroll down on the right pane to locate the wanted screenshots. If the default save location has changed, you can right-click on the image and choose Properties to check its specific location.
Should you be unable to locate a screenshot that you have recently taken, it is likely that it has been deleted from your device. Then, the next section is where you are supposed to go.

How to Recover Lost Screenshots on Windows
For the sake of recovering lost screenshots on Windows, you can trust reliable photo recovery software, like MiniTool Power Data Recovery. This free file recovery software can scan your hard drive and list all the found files like documents, photos, videos, audio, compressed folders, etc.
As for photo recovery, this software supports a wide range of file formats for photos, including JPEG, PNG, GIF, DNG, ARW, TIFF, and more. Even if your screenshots are permanently deleted, as long as they are not overwritten, MiniTool Power Data Recovery provides an opportunity to recover them. You can download and install this software and follow the step-by-step guide to get the lost screenshots back.
MiniTool Power Data Recovery FreeClick to Download100%Clean & Safe

Step 1. Scan the Save Location of the Screenshots
After getting this secure data recovery service, launch it to enter the main interface which lists all the partitions on your device.
If you remember the specific save location of the lost screenshots, choose the specific location at the bottom section. You should navigate to the target folder and click Select Folder to scan it.

When the specific location is not clear to you, scan a partition under the Logical Drives tab, generally the C drive, or the whole disk under the Devices tab.

Step 2. Locate the Target Pictures Using Multiple Features
The scan duration lasts for a few minutes depending on the number of files and file size. In order to get the most files, do not stop the scan process midway. On the result page, utilize the specific features to locate the screenshots.
- Path: All scanned files are sorted by their original path by default in Existing Files, Deleted Files, and Lost Files. Expand the corresponding folders to find the lost screenshots.
- Type: Next to the Path tab, files under this tab are classified in accordance with the file formats. Typically, screenshots are saved in the PNG file format. Thus, you can go to the Picture classification and expand the PNG sort to look through the lost screenshots.
- Filter: This feature functions to screen out unnecessary files based on the filter criteria set by you. You can change conditions like file size, file type, file category, and file last modified date to reduce the distributions on the result page.
- Search: Working as another filter feature, the Search function helps to locate a specific file. You can type the name of the screenshot into the search box and press Enter to filter out target items. If you haven’t changed the file name of screenshots, just type screenshot into the search box.

Step 3. Recover the Required Pictures
As you get the free edition of MiniTool Power Data Recovery, there is only 1GB of free file recovery capacity. Thus, to enhance the data accuracy, it is essential to make good use of the Preview feature. Select and double-click on the screenshot to verify the content. The Preview feature allows you to check pictures, documents, videos, audio, and other files in advance.
Once you have confirmed the required photos, tick them and click the Save button to choose a destination for them. Remember to choose a new file path to avoid data overwriting, which may result in data recovery failure.

This is the complete guide to recovering lost screenshots on Windows. If there are more than 1GB of screenshots or other files, select a premium edition to accomplish the whole data recovery process. You can obtain specific information on different editions from this License Comparison page.
Bonus Tip: Back up Important Screenshots Before Losing
Regardless of the tool’s effectiveness, data recovery is always a risky process. Hence, to ensure data security, the best way is to back them up before losing. MiniTool ShadowMaker works well in safeguarding files by providing automatic and period backup features. You can get this tool and experience its robust backup features for free within 30 days.
MiniTool ShadowMaker TrialClick to Download100%Clean & Safe
Step 1. Launch the software and change to the Backup tab in the main interface.
Step 2. In the following interface:
- Click SOURCE. You should navigate to the Screenshots folder and click OK.
- Click DESTINATION to choose a save location for the backups and click OK.
Step 3. Click Options to change the backup configurations based on your situation. Under the Backup Scheme tab, you can choose a required file backup type. Changing to the Schedule Settings tab, you can set an automatic backup on a daily, weekly, monthly, or even basis. Click OK to save your changes.

Step 4. Click Back Up Now to start your backup task.
How to Fix Screenshots Not Saving in Pictures Folder
The above content shows you how to find or recover screenshots when encountering Windows not saving screenshots to Screenshots folder. In fact, this problem happens owing to the insufficient permission of the Screenshots folder or the corrupted registry file. The following methods aim to help you fix or prevent this issue. Keep reading and give them a try.
Way 1. Press Win + Print Screen to Capture Screenshots
Some people encounter the screenshots not saving to the proper file path because of the improper capture key combinations. If you only press the Print Screen key, the screenshots might be saved to OneDrive instead of the Screenshots folder. In this case, you can try to press the Win + Print Screen key combination to capture screenshots.
If you have enabled to save screenshots to OneDrive by accident, follow the next steps to stop it.
Step 1. Click on the OneDrive icon in the system tray and choose the gear icon at the top right corner.
Step 2. Select Settings from the dropdown menu. Under the Sync and backup tab, toggle the switch of Save screenshots I capture to OneDrive to Off.

Way 2. Grant Full Permission to the Screenshots Folder
Another reason for screenshots not saving in Pictures folder is the insufficient folder permission. When you have no right to write new data into the folder, the screenshots will not save to it absolutely. Now, let’s check and grant the full permission of the Screenshots folder on your device.
Step 1. Press Win + E to open File Explorer and navigate to the Screenshots folder under the Pictures folder.
Step 2. Right-click on it and choose Properties from the context menu.
Step 3. Change to the Security tab and click Edit.
Step 4. In the following window, you should choose the current account under the Group and user names section to ensure you have full control of the current folder.

Please note that if you have no right to tick the Full control option, you can try to take ownership of the folder, which also allows you to get full access.
Way 3. Modify the Windows Registry Editor
If the broken registry file is the culprit of Windows not saving screenshots to Screenshots folder, you should change the configuration of the registry file via Windows Registry Editor to try to fix this problem.
Before starting the following steps, you are heartily recommended to back up the registry keys or your whole computer. Improper configuration may cause severe problems, including device failure. MiniTool ShadowMaker assists you in backing up files and disks within a few clicks. You can get this tool to have a try!
MiniTool ShadowMaker TrialClick to Download100%Clean & Safe
Now, follow us to dive into the specific steps of repairing the corrupted registry file.
Step 1. Press Win + R to launch the Run window.
Step 2. Type regedit into the dialog and press Enter to launch the Windows Registry Editor.
Step 3. Copy and paste the following path to the address bar and hit Enter to locate the Explorer key quickly.
Computer\HKEY_CURRENT_USER\SOFTWARE\Microsoft\Windows\CurrentVersion\Explorer
Step 4. On the right pane, find and double-click on the ScreenshotIndex registry. You need to change the Value data to 695 and choose Decimal in the Base section.

Step 5. Click OK to save changes.
In order to fully apply the modification, you can restart your computer and take a screenshot to check if it appears in the Screenshots folder.
Way 4. Run the CHKDSK
The last method is for repairing the file system issues that may hinder the saving process of your screenshots. The CHKDSK command line utility is a Windows built-in tool to help check file system integrity and repair problematic system file issues. Utilize this tool with the steps below.
Step 1. Press Win + R to open the Run window.
Step 2. Type cmd into the dialog and press Shift + Ctrl + Enter to run Command Prompt as administrator.
Step 3. Type CHKDSK X: /f /r and hit Enter to execute it. You should replace the X parameter with the actual drive letter, in this case, the letter C.
Then, you will be asked whether to check the volume the next time the system restarts because the volume is in use. Type Y and press Enter.

Restart your computer and wait for the computer to complete the check and enter the operating system automatically. Afterward, check if your problem is resolved.
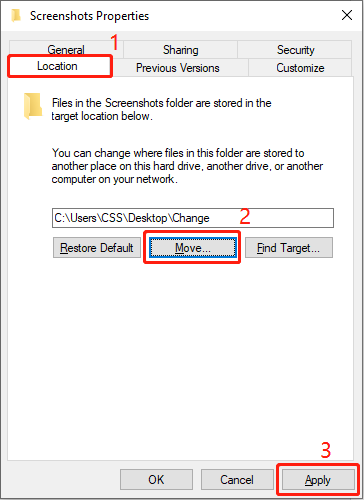
How to Change the Save Location of Screenshots
By default, Windows will save the screenshots to the Screenshots folder under the Pictures one. Some people want to change the save location to save the screenshots to a preferred or more convenient location. Here is how to change the location.
Step 1. Press Win + E to open File Explorer on your computer.
Step 2. Choose Pictures at the left sidebar and find the Screenshots folder on the right pane.
Step 3. Right-click on it and choose Properties.
Step 4. Change to the Location tab in the following window and click Move. You can now navigate to your preferred location and click Select Folder to confirm your option.
Step 5. Click Apply to change the save location.
Conclusion
To sum up, this post shows you how to fix Windows not saving screenshots to Screenshots folder and introduces powerful tools to recover lost screenshots and back up crucial ones to avoid data loss.
If you have any puzzles using MiniTool software, please contact us at once via [email protected]. We are zealous in helping you.
User Comments :