Files missing from Quick Access in Windows 10/11 are usually caused by display issues rather than actual file deletion. Try fixing Quick Access through File Explorer settings, cache reset, or PC rebooting. If the files are missing from the original location, use a data recovery tool to restore them.
Problem: Files Missing From Quick Access
File Explorer’s Quick Access feature allows you to access and view pinned locations, frequently used folders, and recent files in one area, simplifying navigation.
Sometimes, you may encounter pinned folders vanishing after a reboot, an empty recent files list, or network drive shortcuts showing “element not found“ errors.
The “file missing from Quick Access” issue can disrupt your workflows, delay work, and risk permanent data loss.
There are two common scenarios when “Quick Access files disappeared” appears:
- Situation 1. Due to the incorrect settings or system glitches, Quick Access doesn’t show files. In fact, the files are not really missing and still exist on the PC.
- Situation 2. The files and folders are lost or deleted from the PC, and you can’t find them in the original location.
To resolve Quick Access file loss effectively, you should first determine if the issue stems from display errors (non-deletion) or actual file removal (deletion).
Core Causes of Quick Access File Loss
Files missing from Quick Access usually happen for two reasons:
- The files still exist, but File Explorer cannot display them because of corrupted cache, disabled folder settings, damaged profile corruption, or system glitches.
- The original files were deleted, moved, or lost due to disk issues.
#1. Non-Deletion-Related Causes (Files Still Exist)
Here are the common causes of non-deleted Quick Access file loss:
- Corrupted Quick Access Cache: File Explorer crashes or software conflicts may cause a corrupted cache, leading to pinned and recent files disappear.
- Unstable File Explorer: Issues in File Explorer can prevent Quick Access folders from loading properly.
- Incorrect Folder Options: If settings like “Show recent files in Quick Access” or “Show frequently used folders in Quick Access” are disabled, Quick Access may appear empty despite the files being intact.
- User Profile Corruption: The user profile corruption can disrupt synchronization with Quick Access, often due to malware, improper shutdowns, or hard drive errors.
- Network Drive Disconnection: Inconsistent connections to network drives can cause “missing” prompts in Quick Access, even though the files remain on the network.
- Windows Update Issues: Problematic Windows updates can change File Explorer settings, causing pinned items to become unresponsive or vanish.
#2. Deletion-Related Causes (Files Are Permanently Lost)
Here are several factors that cause files to be lost from Quick Access:
- Unintentional Deletion: You may accidentally delete the original files (through Delete, Shift + Delete, or the context menu) and clear the Recycle Bin. When the source files are deleted, they consequently vanish from Quick Access.
- Drive Issues: Formatting a drive, encountering RAW disk errors, or partition corruption can lead to the loss of files pinned to Quick Access.
- System Failures or Malware Attacks: Crashes, blue screen errors (BSOD), or malware infections can damage or delete files, leading them to disappear from Quick Access.
Key Distinction:
Non-deletion problems hide files from Quick Access, while deletion problems mean the files are lost and require professional data recovery software to recover them.
First, read on to learn the methods to unhide files from Quick Access.
How to Recover Non-Deleted Missing Files From Quick Access
If the “Quick Access not showing recent files” problem occurs and you can locate them via their original paths, try these targeted fixes to restore their display.
Fix 1. Uncheck the Show Recommended Section Option &Show All Folders
If the “Show all folders” option is enabled, File Explorer displays all folders in the navigation pane, which may compress or obscure the Quick Access section.
For Windows 11, there is a feature called “Show recommended section”. When it is enabled, the Recommended section replaces Quick Access.
Here is how to disable these two features.
>> To disable Show all folders:
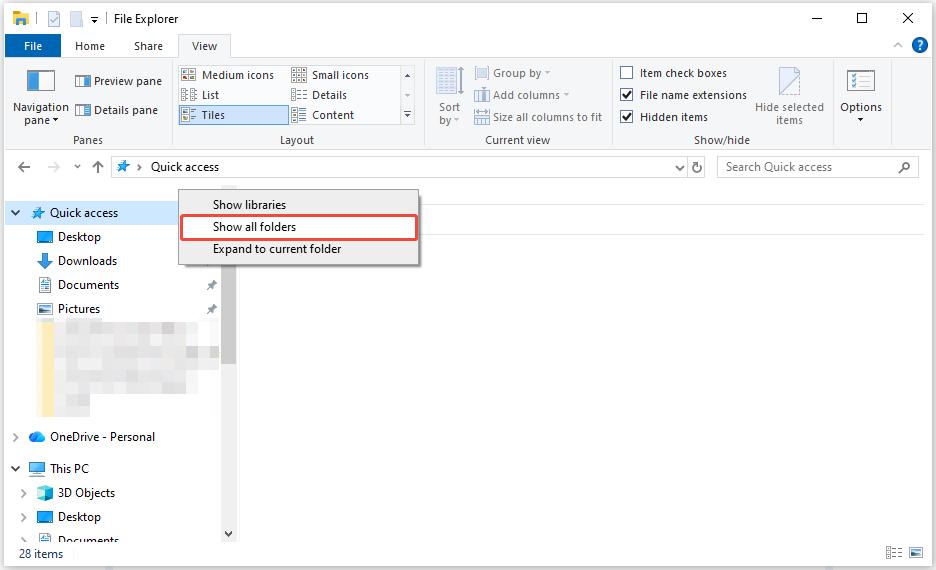
Step 1. Press Win + E to open File Explorer and right-click the left sidebar (Navigation Pane).
Step 2. Uncheck Show all folders.
>> To disable Show recommended section:
Step 1. Launch File Explorer. Click the See more icon in the top toolbar and choose Options.
Step 2. In the General tab, deselect the Show recommended section option located under the Privacy section.
Step 3. Click OK to confirm the change.
If these two features are already unchecked, but the issue persists, proceed to the next solution.
Fix 2. Restart File Explorer
Temporary system glitches will cause Quick Access to malfunction. Restarting File Explorer can resolve minor cache or process errors.
Here’s how to do it:
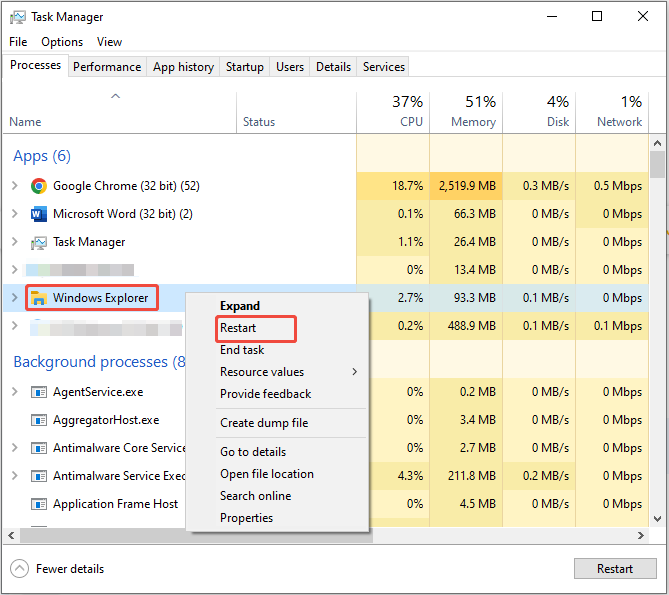
Step 1. Press Ctrl + Shift + Esc to open Task Manager.
Step 2. Find and right-click Windows Explorer, then select Restart.
After restarting, reopen File Explorer to check if Quick Access files have reappeared.
Fix 3. Adjust Folder Options Settings
To resolve files missing from Quick Access, ensure Quick Access is configured to show recent and pinned items.
Here’s how to check these settings:
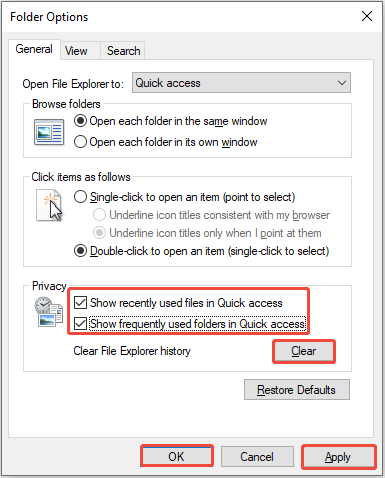
Step 1. Press Win + E to open File Explorer, and then click the three-dot menu > Options (Windows 11) or View > Options (Windows 10).
Step 2. On the General tab, check both Show recently used files in Quick access and Show frequently used folders in Quick access under the Privacy section.
Step 3. Click Clear to refresh the cache.
Step 4. Click Apply and OK. Close and reopen File Explorer to test.
Fix 4. Reset Quick Access Folders & Clear Cache
A corrupted cache in the folder view or personalization settings is often a major reason for Quick Access malfunction.
Resetting Quick Access folders can rebuild the cache and restore the proper display of pinned and recent items. Follow these steps to do it:
Step 1. Press Win + E to launch File Explorer.
Step 2. Navigate to the View tab and select Options.
Step 3. Go to the View tab and click on Reset Folders.
Step 4. Click Yes to confirm.
>> For advanced cache clearing:
Step 1. Press Win + R to open the Run dialog box.
Step 2. Type shell:recent and press Enter to open the Recent folder (C:\Users[Your Username]\AppData\Roaming\Microsoft\Windows\Recent).
Step 3. Delete all files in this folder (these are Quick Access cache shortcuts).
Restart your PC and recheck Quick Access files.
Fix 5. Re-Pin Folders
If specific pinned folders are missing, re-pinning them restores their shortcuts in Quick Access, ensuring they are displayed correctly.
Here’s the breakdown to re-pin items:
Step 1. Locate the original folder via its known path (e.g., Desktop, Documents).
Step 2. Right-click the item and select Pin to Quick Access.
Go to the Quick Access section to check if the folder is pinned here.
Fix 6. Create a New Administrator Account
If the issue persists, a corrupted user profile may be the cause. To fix it, consider creating a new user profile:
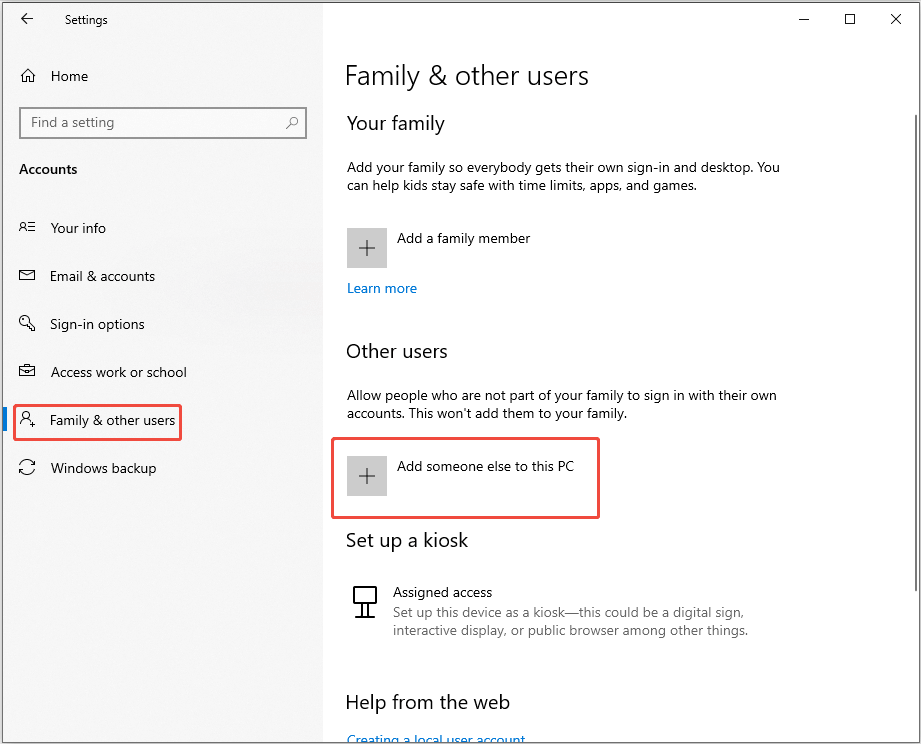
Step 1. Press Win + I to open Settings and go to Accounts > Family & other users.
Step 2. Click Add someone else to this PC to create a new local administrator account.
Step 3. Sign out of your current account and sign in to the new one.
Finally, verify if Quick Access is functioning properly in the new profile.
If it is, transfer your data (documents, photos, etc.) from the old profile to the new one and continue using it.
Fix 7. Run DISM and SFC
System file corruption can break Quick Access functionality. Use built-in tools (SFC and DISM) to repair damaged files.
Follow the steps:
Step 1. Press Win + S to open Windows search, type cmd, right-click Command Prompt, and select Run as administrator.
Step 2. Copy and paste the following commands one by one, then press Enter after each line:
- Dism /Online /Cleanup-Image /CheckHealth
- Dism /Online /Cleanup-Image /ScanHealth
- Dism /Online /Cleanup-Image /RestoreHealth
Step 3. Once the commands have completed, copy and paste sfc /scannow and press Enter.
Restart your PC and open File Explorer to see if the Quick Access files appear.
Fix 8. Check for Updates
Ensure that the Windows operating system is completely up-to-date, as this can help resolve known issues that may lead to files disappearing from Quick Access.
To check the Windows update:
Step 1. Press Win + I to open Windows Settings and go to Update & Security.
Step 2. Click the Check for updates button. If any update is available, download it.
After updating, open File Explorer to check if your Quick Access feature works normally.
The above solutions will only be effective if the original files are still present. If you can’t find the files in the original locations, they may have been permanently deleted.
In such a situation, proceed to the next part to learn how to recover missing Quick Access files.
How to Recover Lost Files From Quick Access
When Quick Access files are missing due to permanent deletion, disk formatting, or other common data loss scenarios, basic troubleshooting won’t suffice.
In this case, you need a data recovery tool to recover your files.
MiniTool Power Data Recovery, a free data recovery tool, offers a reliable, user-friendly solution to recover the original files.
Here are some key advantages:
- Broad Compatibility: Works with Windows 11/10/8/8.1 and supports various storage devices (HDDs, SSDs, USB drives, SD cards) as well as file systems (NTFS, FAT32, exFAT).
- 2000+ File Types Supported: Restores documents, images, videos, audio files, and more, which encompass all standard files found in Quick Access.
- Preview Before Recovery: Allows you to verify file integrity before recovery, ensuring you only retrieve functional files.
- Safe & Non-Destructive: Recovers files without overwriting current data, preventing secondary data loss.
- 1 GB Free Data Recovery: Allows you to recover 1 GB of files for free.
Step-by-Step Guide to Recover Missing Quick Access Files
Now, follow these steps to recover deleted files that were missing from Quick Access:
Step 1. Download and install MiniTool Power Data Recovery by clicking the button below.
MiniTool Power Data Recovery FreeClick to Download100%Clean & Safe
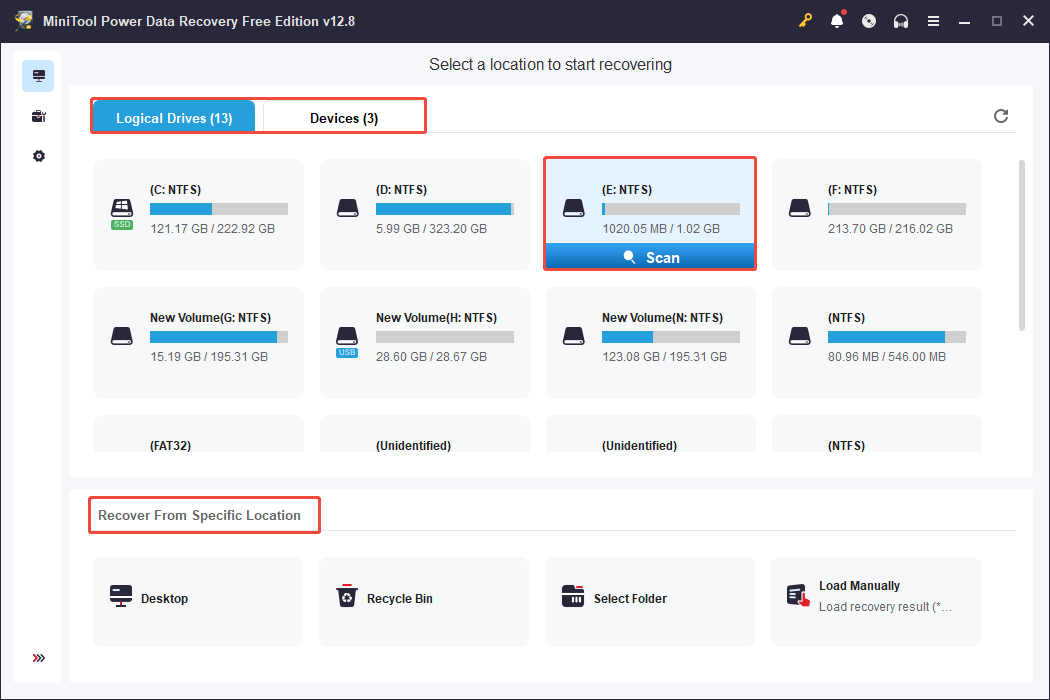
Step 2. Launch MiniTool Power Data Recovery. The main interface (Logical Drives) displays detected partitions.
The Devices section shows the detected storage devices.
The Recover From Specific Location section allows you to recover files from the Desktop, the Recycle Bin, and a specific folder.
Select a partition/location/entire disk where the missing files were originally saved and click Scan.
Here, we choose the E drive to scan.
Step 3. Once the scan process is finished, find the wanted files through the original location under the Path tab.
Additionally, to recover specific file types, switch to the Type section to view files by their types and formats.
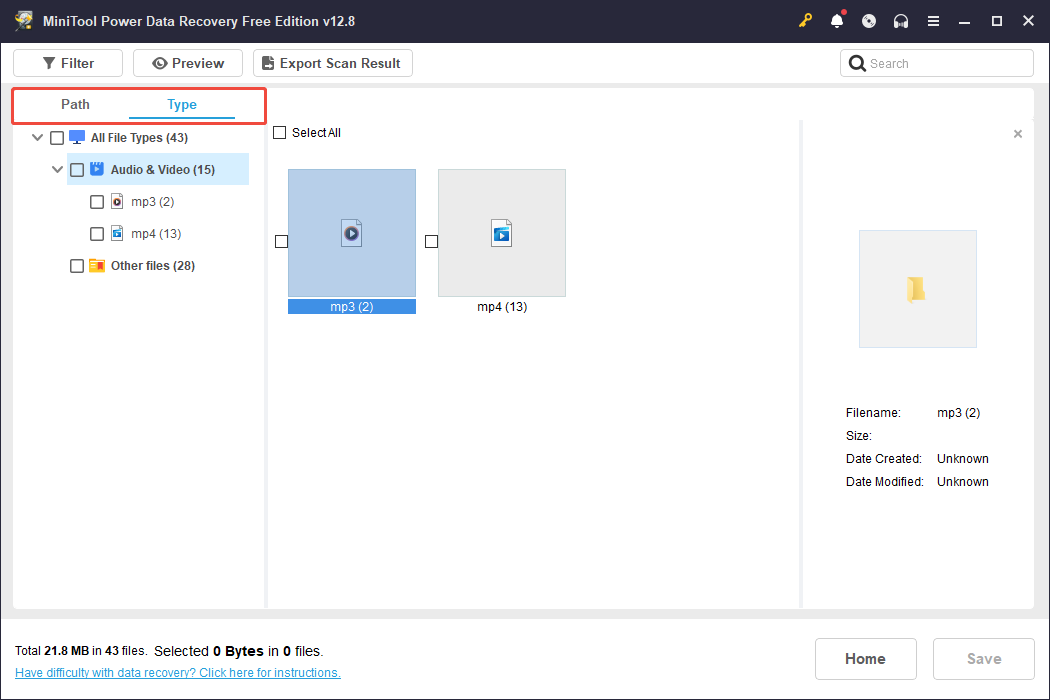
Additionally, you can use the Filter feature to narrow results by file type, date modified, file size, and file category. Furthermore, try searching for the file name directly to locate the wanted files.
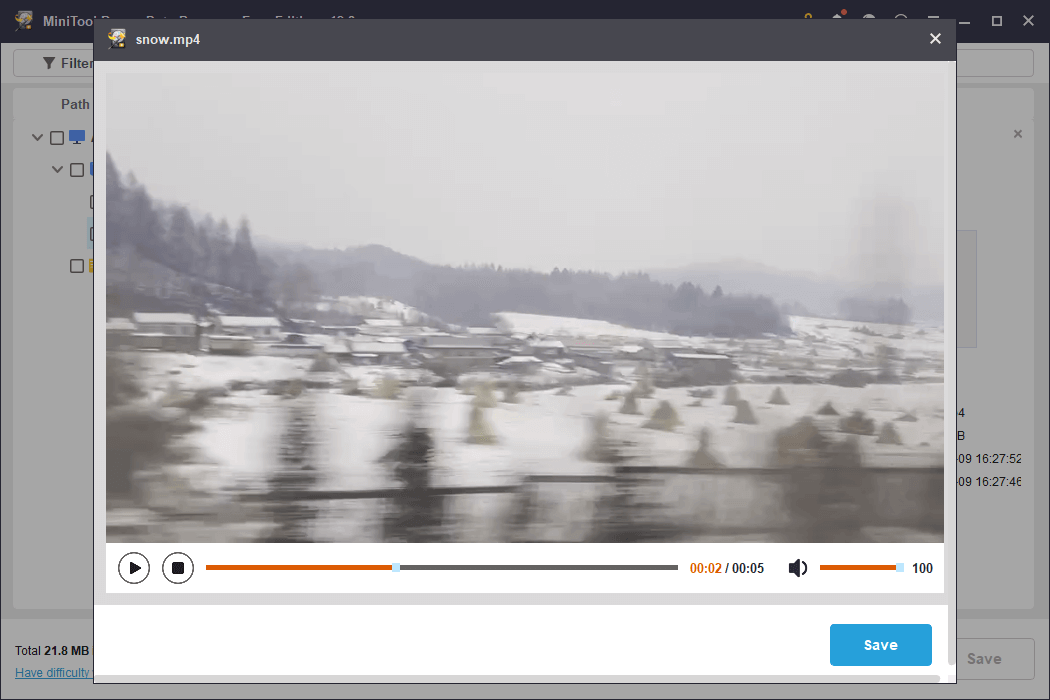
Double-click a file to preview, which can help you confirm it’s the one you need.
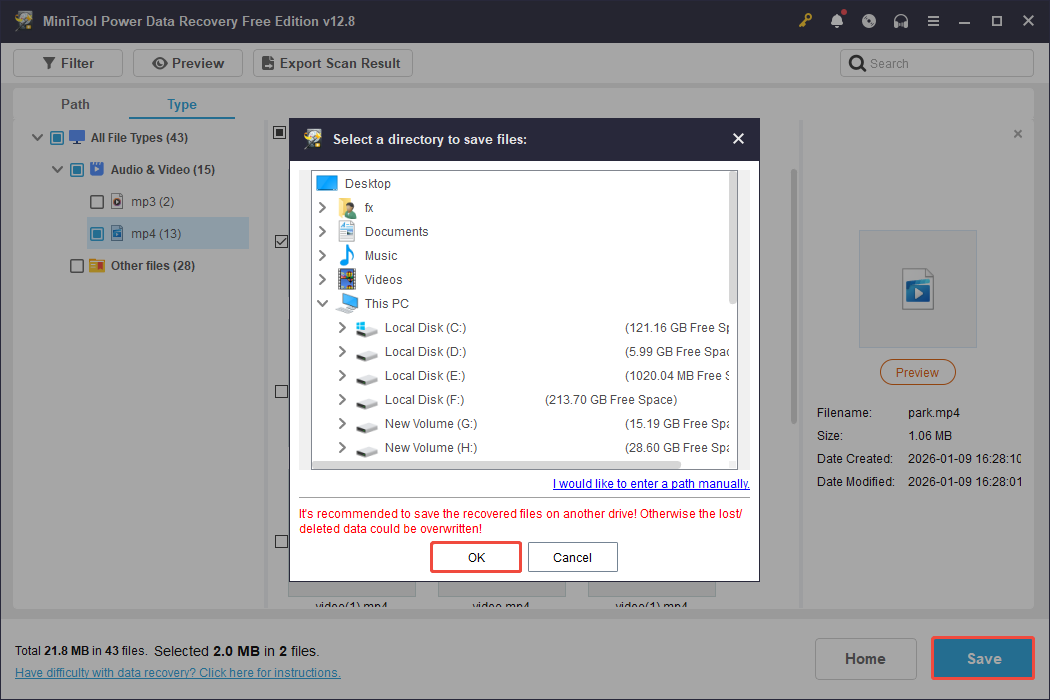
Step 4. Select the files you want to recover and click Save. Choose a safe storage path (different from the original disk) and click OK to start recovery.
Step 5. Once the recovery is complete, locate the recovered folders and right-click them to select Pin to Quick Access.
Quick Access will now display the files normally, as the underlying source files are restored.
Conclusion
In summary, if you are facing the “file missing from Quick Access” issue on your PC, verify whether they have been deleted or are simply not displayed.
For non-deleted missing Quick Access files, try the mentioned workarounds one by one until they reappear.
For deleted or lost files, opt for MiniTool Power Data Recovery, a free and robust data recovery tool, to rescue your data safely.
For any questions about MiniTool data recovery software, the technical support team can provide timely and detailed assistance. Feel free to contact them at [email protected].
Files Missing From Quick Access FAQ
To fix it, try resetting folder options, clearing File Explorer history, rebuilding the Quick Access cache, or enable hidden navigation settings.
To fix this issue, restart File Explorer, restart the computer, clear the Quick Access cache, or drag the folder to Quick Access.
About The Author

Position: Columnist
Shirley holds a bachelor’s degree in English and has been an editor at the MiniTool Team for many years. She specializes in IT-related content, with a focus on data recovery, file backup, disk management, and other technical topics. She is committed to delivering clear, accurate, and practical solutions to help users resolve common computer issues.
User Comments :