About Windows Screenshots
Taking screenshots is one of the most common operations in daily computer use. Whether saving crucial moments at work or sharing exciting game highlights, Windows offers a variety of flexible screenshot methods.
The following section guides you through Windows’ screenshot functionality, helping you use this skill more efficiently.
How to Screenshot & Where Are Screenshots Stored on Windows
This section tells you how to screenshot on Windows and where screenshots are stored.
- Print Screen (PrtScn) key: Take a full screenshot. The screenshot will only be copied to the clipboard and will not be saved automatically. You need to manually paste it into applications such as Word, Paint, or Photoshop, and then save it.
- Alt + PrtScn: Capture the currently active window. The screenshot will appear at the clipboard.
- Win + PrtScn: Take a full screenshot. The screenshot will be automatically saved to Pictures > Screenshots folder.
- Win + Shift + S: Access the Snip & Sketch tool directly. After taking a screenshot, a notification will appear in the bottom right corner of the screen. Click it to open the screenshot in the Snip & Sketch editor, click Save as, and choose a location to save it manually.
If you don’t see your screenshots in the corresponding position, they may be lost. Read on to learn about the common causes of screenshot loss.
Why Did Your Screenshots Get Lost
Sometimes, screenshots on Windows disappear. Below are detailed explanations of some common causes.
1. The screenshots were copied only to the clipboard.
When using PrtScn/Alt + PrtScn/Win + Shift + S, screenshots are not saved automatically. They can only be pasted into an application. If not pasted and saved in time, the screenshot will be lost after clearing the clipboard.
In this case, you usually need to re-capture the screen.
2. The save path may be different or changed.
Win + PrtScn saves screenshots to the Screenshots folder by default. If this folder is deleted or the path is modified, screenshots may not show up.
3. The screenshots were deleted accidentally or emptied from the Recycle Bin.
Saved screenshots may be accidentally deleted. If the Recycle Bin is also emptied, they cannot be directly retrieved.
4. The hard drive or system had a problem.
Hard drive failure or abnormal system updates may cause screenshot files to be lost or inaccessible.
5. The storage location was confused.
Different screenshot methods save screenshots in different locations. If you are not familiar with the default paths of these tools, it is easy to mistakenly believe that the screenshots are lost.
After knowing about the possible reasons, it’s time to recover deleted screenshots on Windows.
Case 1: Recover Recently Deleted Screenshots
For the recently lost screenshots, try undoing deletion by pressing Ctrl + Z, searching your PC, showing hidden files, and restoring from the Recycle Bin.
Solution 1: Press Ctrl + Z to Undo Deletion
On Windows, Ctrl + Z is the Undo shortcut, which can undo the most recent deletion. It only works when the folder window is not closed or the operation history has not been cleared.
If you accidentally delete a screenshot, as long as the deletion is still in the current session’s operation history, press Ctrl + Z. The deleted screenshot will be restored to its original location.
Should this method fail, attempt the next one.
Solution 2: Search Your PC
When Windows screenshots are lost, try searching your PC. The system indexes common folders, such as the Screenshots folder. If you forget the save path or mistakenly consider the screenshots are missing, the search function can quickly locate them.
Step 1: Press Win + E to open File Explorer.
Step 2: In the left pane, navigate to the This PC section.
Step 3: Search for .png or screenshot to find any lingering copies.
If this method fails, continue trying the next one.
Solution 3: Show Hidden Screenshots
Some screenshots may be hidden by the system or by yourself. Therefore, they are not displayed properly in the folder, making them appear missing.
By enabling the Hidden items option, the system will rediscover these hidden screenshots.
Step 1: Open File Explorer and switch to the View tab.
Step 2: Check the Hidden items option.

All previously hidden files and folders will be revealed. If this method is not effective, carry out the next one.
Solution 4: Restore from the Recycle Bin
If none of the above methods work, check the Recycle Bin. This is a temporary storage area where all files deleted on your internal hard disks go (except those deleted with Shift + Delete).
Deleted files in the Recycle Bin can be retrieved before it is emptied. Here is how to restore deleted screenshots on Windows from this folder.
Step 1: Open the Recycle Bin and find the target screenshots.
Step 2: Select and right-click them, and select Restore.
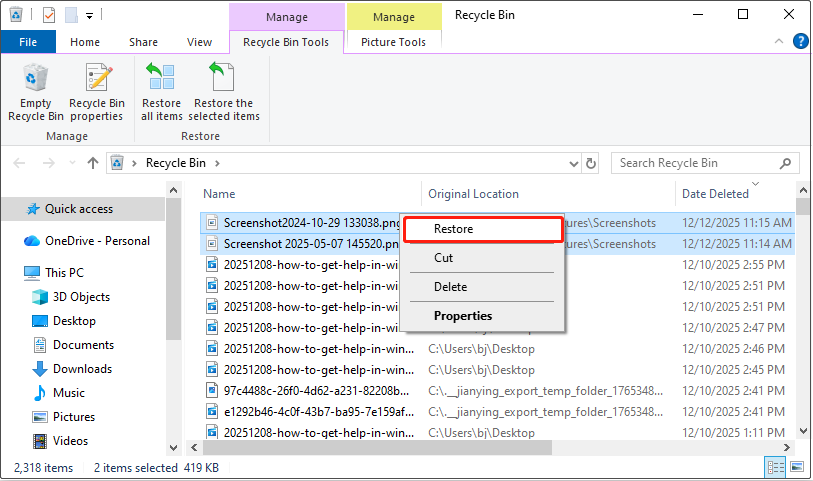
The screenshots have been restored to their original location.
Case 2: Recover Permanently Lost Screenshots
If you have permanently deleted your screenshots, recover them using File History or data recovery software.
Solution 1: Make Use of File History
When Windows screenshots are lost, the File History feature can help you recover them from previous backups. This assumes you enabled this feature before the files were lost.
Once the feature is enabled, it saves historical versions of files in the library folders, including pictures. Therefore, even if screenshots are deleted or overwritten, they can be restored to their original state via File History.
Step 1: Open File History
Type File History in the taskbar search box and press Enter. This will open a window displaying files and folders you’ve backed up using File History.
Step 2: Locate the screenshots files
Locate the Pictures folder or the other folders where you stored your screenshots.
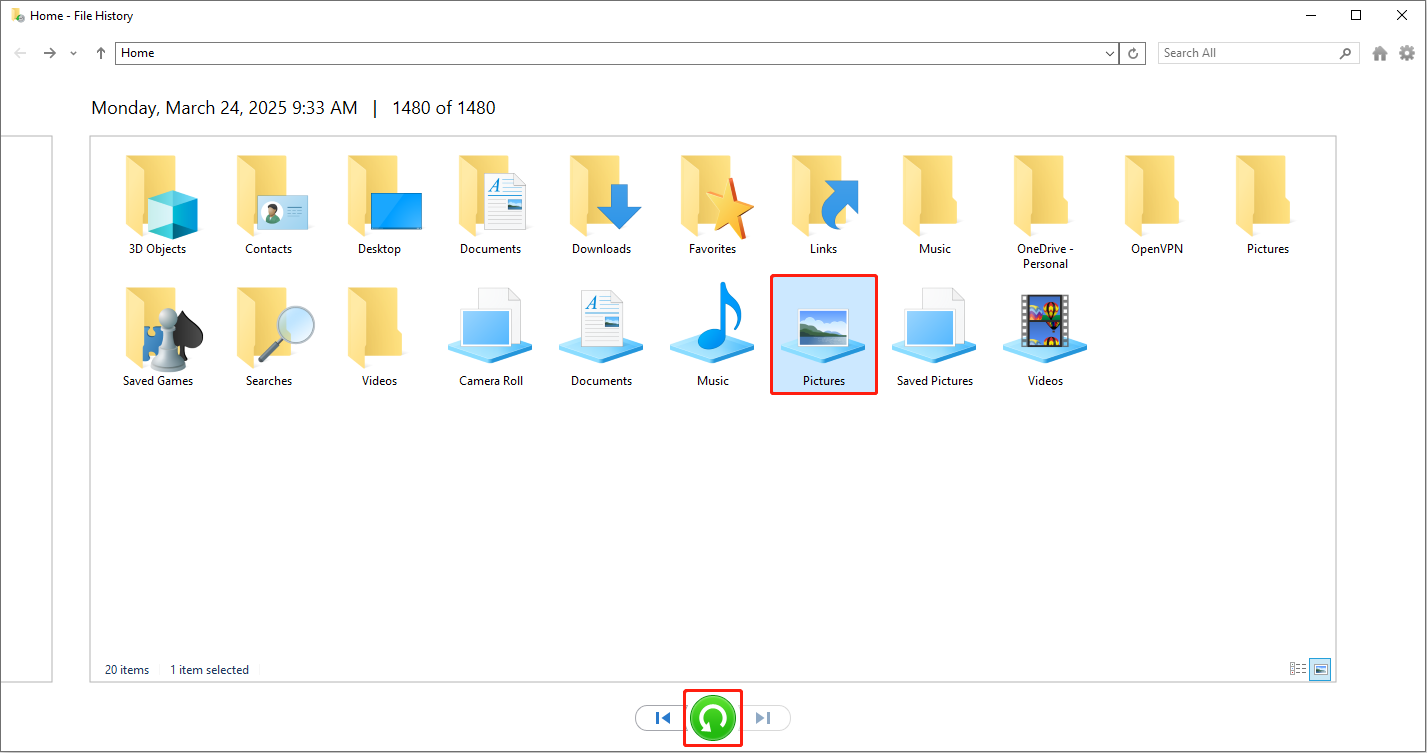
Step 3: Browse historical versions
Use the left and right arrows at the bottom of the window to view backup versions of this folder from different dates. Find the version containing your lost screenshots.
Step 4: Restore the Pictures folder or files
Select the Pictures folder or the screenshot files you want to restore. Click the green Restore button at the bottom of the window. The screenshots will be restored to their original location.
If you haven’t enabled File History, proceed to the next method.
Solution 2: Try Windows File Recovery
Windows File Recovery is a free command-line tool from Microsoft. It is used to recover deleted or lost files in Windows systems. This tool supports devices such as hard drives, USB flash drives, and SD cards.
It lacks a graphical interface and requires operation via Command Prompt or PowerShell. Here is how to use it to recover deleted screenshots on Windows.
Step 1: Download and install Windows File Recovery.
Step 2: Type Windows File Recovery in the Windows search box and press Enter.
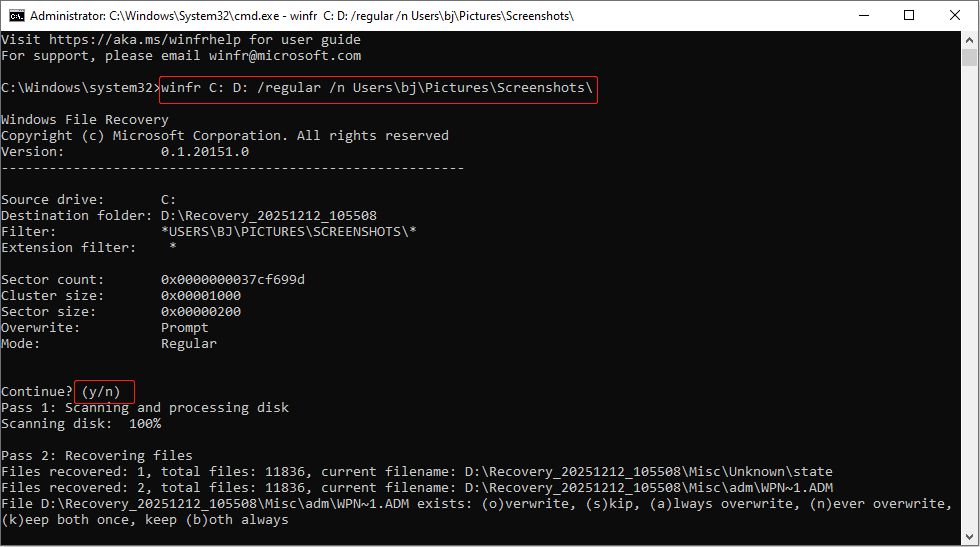
Step 3: Input winfr <source-drive>: <destination-drive>: /recovery-mode /n *.<filter> and press Enter.
For example, type winfr C: D: /regular /n Users\bj\Pictures\Screenshots\ and press Enter to recover screenshots from the Screenshots folder to the D drive. Here, “bj” represents the username.
Step 4: When asked to continue, type Y and press Enter.
If this approach doesn’t work, move on to the next.
Solution 3: Use MiniTool Power Data Recovery
When it comes to file recovery, MiniTool Power Data Recovery is definitely worth trying. Here are some of its strengths and features.
- Supports various picture formats. Windows screenshots are typically saved as PNG by default. However, you can also choose JPG or BMP depending on the tool. MiniTool supports recovering all types of pictures.
- Supports multiple data loss scenarios. Whether it’s an accidental deletion, a Recycle Bin emptying, a hard drive formatting, or a system crash, this tool can perform a deep scan and attempt recovery.
- Supports diverse storage devices. It can not only recover screenshots from your local hard drive, but also supports external hard drives, USB flash drives, SD cards, and other devices. This is very useful if you save screenshots to external storage.
- Has a strong compatibility. This tool can be used on Windows 11/10/8/8.1. And it supports multiple file systems, such as FAT32, exFAT, and NTFS.
- Includes a file preview function. Before restoring, you can preview screenshots to confirm if they are the pictures you need. This avoids the hassle of restoring a large number of useless files.
This free file recovery software allows you to recover 1 GB of files for free. Download and install it to recover lost screenshots on Windows.
MiniTool Power Data Recovery FreeClick to Download100%Clean & Safe
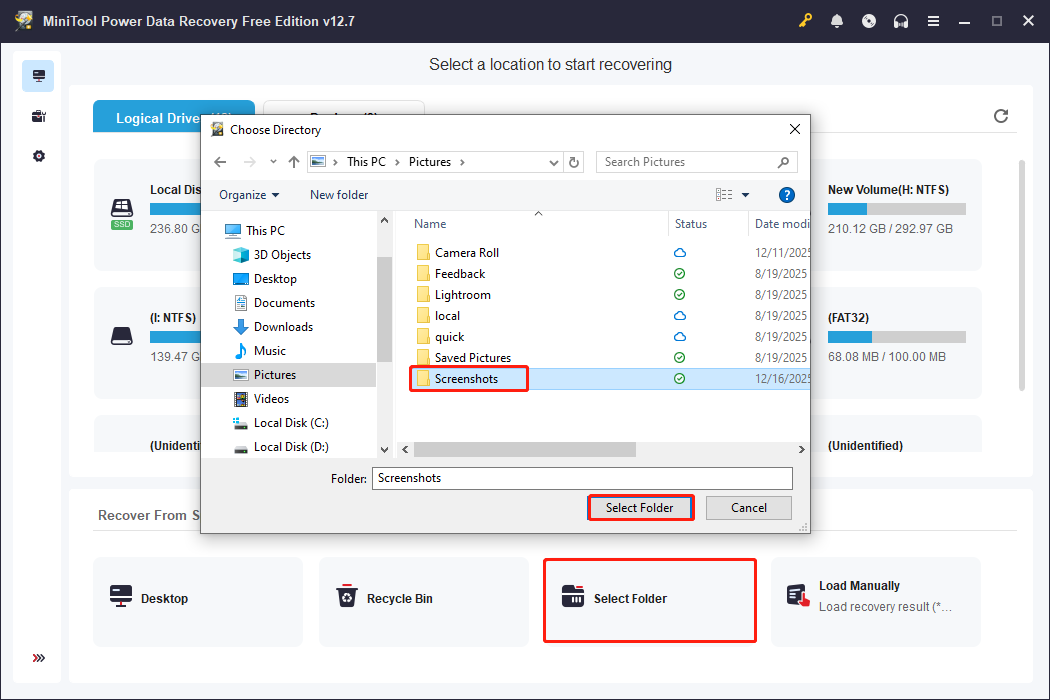
Step 1: Scan the Screenshots folder
Launch MiniTool Power Data Recovery. In the Recover From Specific Location section, locate the Select Folder module and click Browse. Select the Screenshots folder or any other folder and click Select Folder.
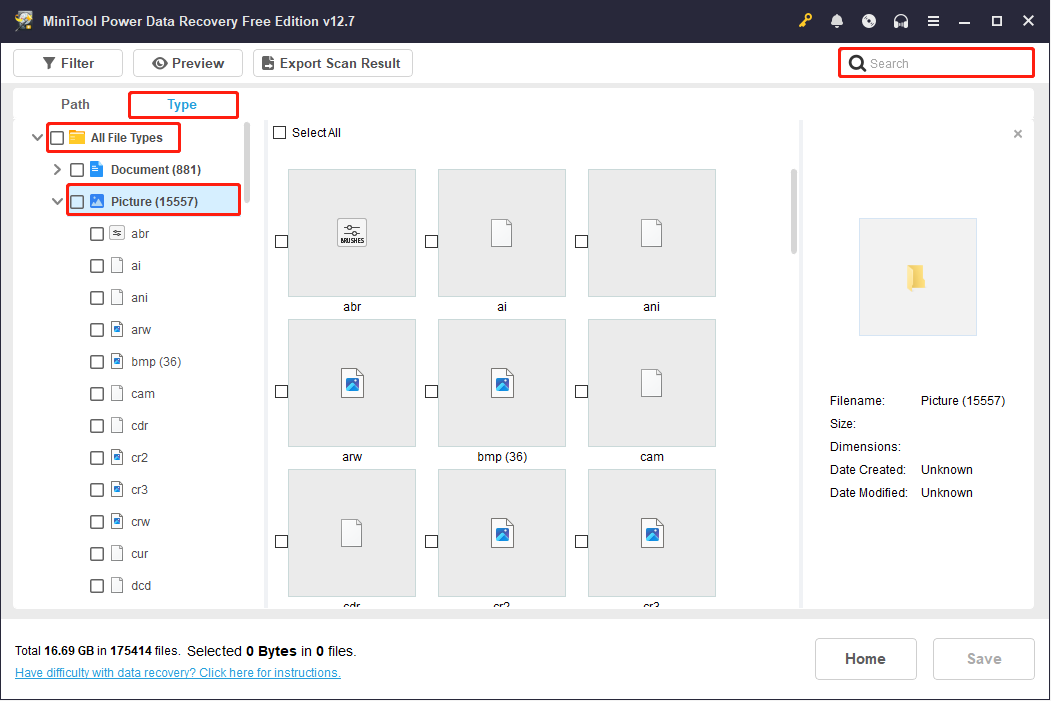
Step 2: Locate the target screenshot file
When the scan process ends, switch to the Type tab and expand All File Types > Picture to show all picture formats. Expand the corresponding format to locate the target screenshots.
You can also type a partial or full filename in the Search box and press Enter to search for the screenshots directly.
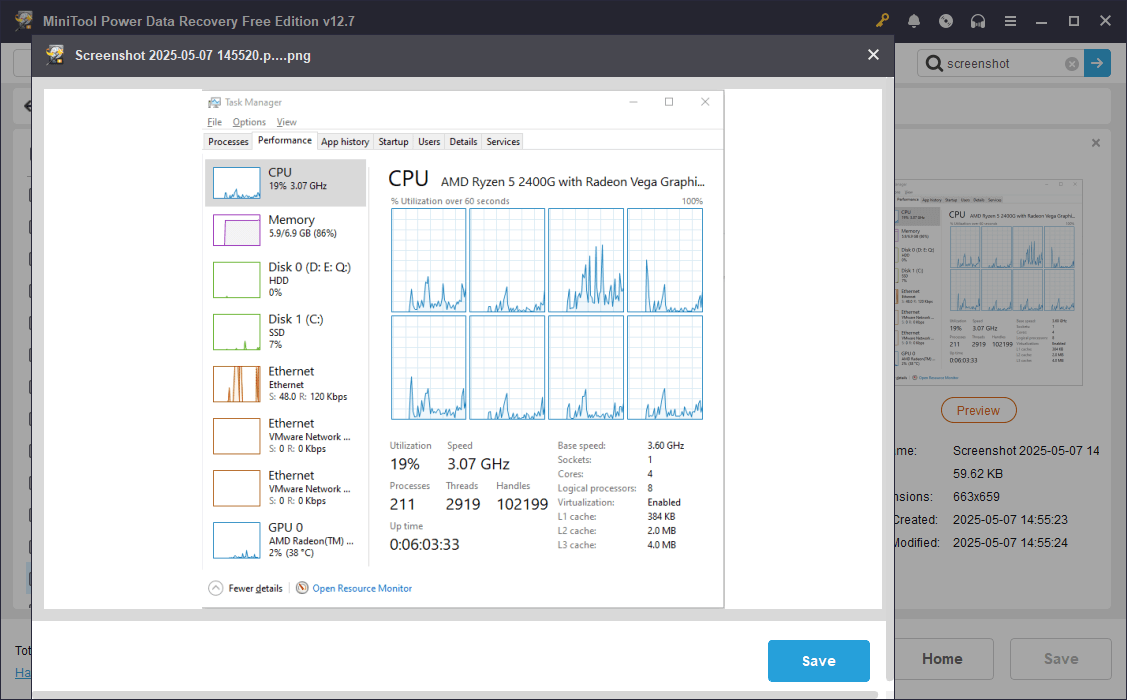
Step 3: Preview the found screenshots
After finding the target files, check the file content to confirm if they are correct. Double-click them, and the preview window will pop up.
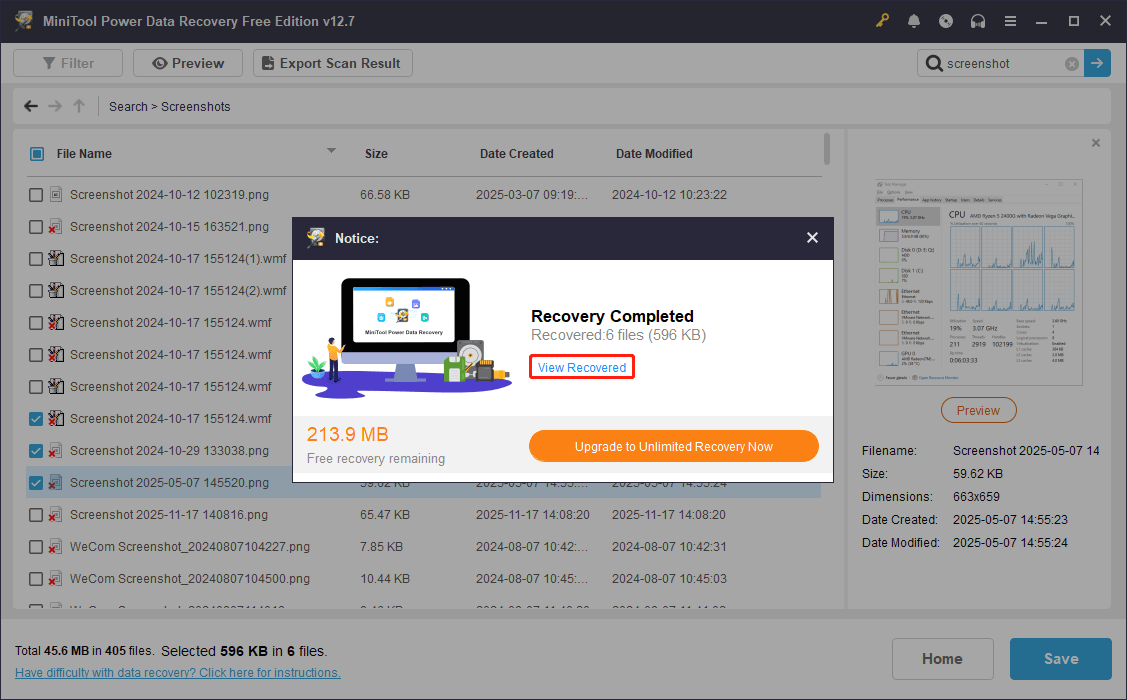
Step 4: Save the required screenshots
Once the files are confirmed, check them and click Save. In the directory window, choose a target path and click OK. Wait for the recovery process to complete.
When it ends, the Recovery Completed window will appear. Click the View Recovered button to check your recovered files.
Now, your deleted screenshots have come back. To prevent them from being lost again, check the following section.
How to Protect Your Screenshots on Windows
To ensure the security of screenshots, the following protection measures are recommended.
1. Use the correct keyboard shortcut.
Avoid using only PrtScn or Alt + PrtScn. It’s recommended to use Win + PrtScn. This will save the screenshot directly to the Screenshots folder, reducing the risk of loss.
2. Save screenshots promptly.
If you usually use Win + Shift + S to take screenshots, be sure to save them immediately after taking the screenshot. This will prevent you from losing the data if you forget to save it.
3. Enable clipboard history.
Enabling clipboard history allows you to view recent screenshots using the Win + V keys. The screenshots can be retrieved even if you forget to save them.
4. Establish a consistent save path.
Create a dedicated Screenshots folder and make it a habit to save all screenshots to it. A consistent save path makes them easier to find. It also prevents screenshots from being scattered in different locations and accidentally deleted.
5. Enable backup and sync.
Enable OneDrive, Google Drive, or File History to automatically sync screenshot folders to the cloud or backup drive. In this manner, even if local files are deleted or the system encounters problems, they can be restored from the backup.
To Sum Up
At the beginning, this post explains how to screenshot and where screenshots are saved on Windows.
Next, it analyzed some of the possible reasons why screenshots might be lost.
Then, the methods about how to recover deleted screenshots on Windows are listed.
- For recently deleted screenshots, undo deletion by pressing Ctrl + Z, search your PC, show hidden files, or check the Recycle Bin to get them back.
- For permanently deleted screenshots, use File History, Windows File Recovery, or MiniTool Power Data Recovery to rescue them.
Finally, take the executable tips to protect your important screenshots.
Should you have any questions regarding the MiniTool product, contact us at [email protected].
About The Author

Position: Columnist
Chelsea graduated from university with a major in English. She has a strong interest in English writing. It is this passion for writing that led her to become an English editor. Her articles mainly foucus on data recovery and other computer industry news. As an energetic and outgoing girl, Chelsea enjoys listening to music, singing, riding bikes, and eating in her spare time.
User Comments :