A Windows update can sometimes lead to file loss. You can often recover files after Windows update. In many cases, files are not deleted but moved to Windows.old, another user profile, or hidden locations. If files are permanently deleted, built-in backup solutions and data recovery software may help restore them.
Files missing after a Windows update are often recoverable. Before using recovery software, check whether your files are stored in the Windows.old folder or hidden under another user profile. If the files cannot be found, a data recovery tool may help recover them as long as they have not been overwritten.
You may find that your files are missing from your desktop or other folders after a primary Windows update.
In fact, your files are likely not really lost or deleted, and they may be moved, hidden, or temporarily inaccessible in a wrong user profile or account.
If the files are really missing, the good news is that most post-update file loss is recoverable with built-in Windows tools and reliable data recovery software.
Before proceeding to the specific methods to recover files after Windows update, first check the reasons why files go missing.
Why Do Files Disappear After Windows Update
Below are the most common reasons for files missing after a Windows update:
1. Windows.old Folder Auto-Deletion
When you upgrade Windows, such as from Windows 10 to 11, the system automatically creates a folder named Windows.old.
This folder contains your previous system files and personal data. It is retained for 10 to 30 days, after which it will be deleted.

2. Temporary Profile Loading
During a Windows update, system glitches, interrupted installations, or profile registry errors may cause Windows to load a temporary user profile.
This profile has a blank desktop and lacks personal files, but your data remains safe in your original user folder, inaccessible from the temporary profile.
3. User Profile Corruption
Updates will modify the user profile registry entries. If the update process is interrupted by a power failure, abrupt shutdown, or other reasons, your user profile may become corrupted.
Windows may not be able to access the corrupted profile, causing your files to appear as if they have been deleted.
4. File Path Reset or Migration
Sometimes, Windows updates may change the default locations for the Desktop, Documents, Pictures, and Downloads folders.
Your files aren’t really lost, and they’re relocated to another user directory or a hidden folder, making them hard to find.
5. Software Incompatibilities
Conflicts arising between the latest update and installed software may result in files associated with those applications becoming unreachable or being deleted.
6. Accidental Deletion During Update
In rare situations, Windows update cleanup tools may mistakenly delete your files stored in system-related directories, such as C:\Users\Default or temporary folders.
7. Hidden Files or Drive Letter Changes
After an update, Windows may hide user folders or change the drive letter of your disk partition, making your files invisible.
Additionally, external drives connected during the update may lose their drive letters, preventing access to saved files.
Now, read on to learn how to recover deleted files after a Windows update.
How to Recover Files After Windows Update
We’ve listed 6 reliable, easy methods to recover lost files after Windows 11 update. Try them one by one.
First Step to Try:
As we mentioned above, sometimes your files are not really missing, and they may be hidden or moved.
Therefore, consider searching for missing files across the entire device using Search:
- Press Win + E to open File Explorer.
- In the left navigation panel, click on This PC.
- In the Search This PC text box located at the top right corner, type in the name of the file that is missing.
Method 1. Check the Windows.old Folder
After a major Windows update, your system will automatically generate a Windows.old folder containing data from the previous Windows installation.
This folder is a backup and can prove invaluable if files are lost during the update. Here’s how to access it:
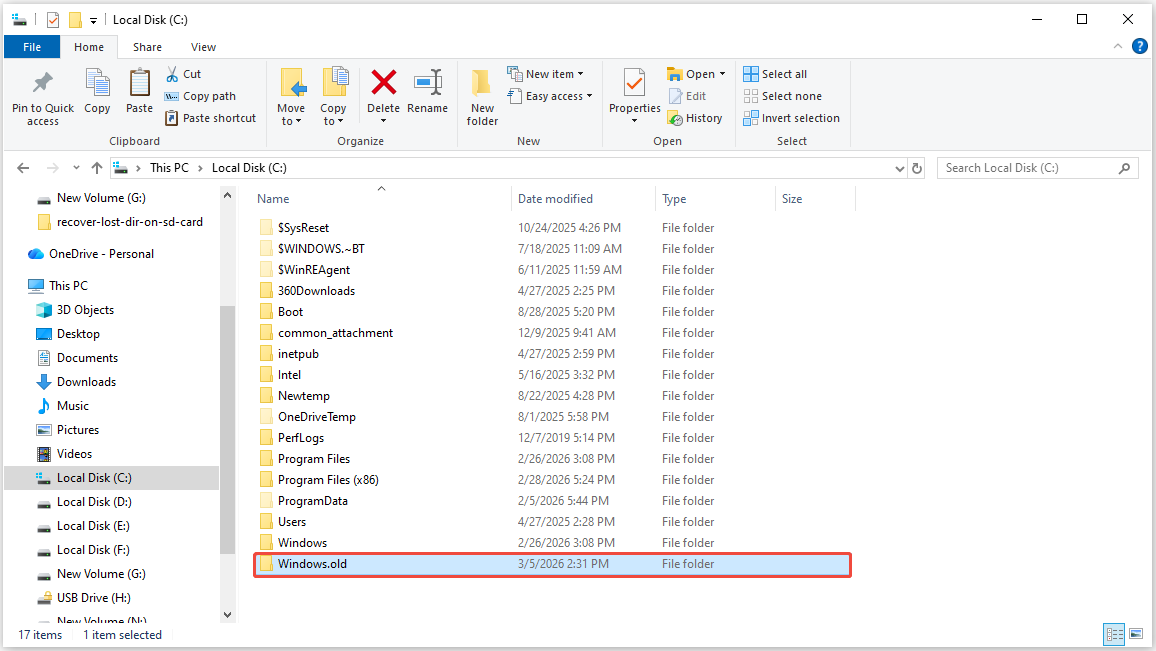
Step 1. Press Win + E to launch File Explorer.
Step 2. Navigate to your system drive (typically C:). Find and open the Windows.old folder located in the root directory.
Step 3. You will find your familiar folders: Desktop, Documents, Pictures, Downloads, Music, and Videos. Choose the wanted files or folders, right-click them, and select Copy.
Step 4. Paste the files into your current user profile or another secure location.
If you don’t have the Windows.old folder, proceed to the next solution to recover deleted files.
Method 2. Check for a Temporary Profile
If your desktop shows blank and your settings have reset, you may be operating under a temporary profile.
In this case, your original files remain secure in your primary user directory. Follow these steps to revert to your main profile:
Step 1. Press Win + I to open Windows Settings, go to Accounts, then navigate to the Sync your settings option.
Check if you’re using a temporary profile. If so, you’ll see the message: “You are logged on with a temporary profile. Roaming options are currently unavailable.”
Step 2. Log out of your existing account by clicking Start Menu > User Icon > Sign out. Restart your computer to end the temporary profile session.
Step 3. Log in with your original user account.
After logging into your original profile, your desktop files, documents, and settings should reappear.
Method 3. Use MiniTool Power Data Recovery
If you’re not logged into a temporary profile, it usually means your files are truly lost. In this case, data recovery software is needed.
Recovering deleted files with data recovery software is usually easy if you avoid writing new data to the disk, as this can overwrite the deleted files and hinder recovery.
MiniTool Power Data Recovery is one of the best data recovery programs. The software is available for Windows 11/10/8/8.1, and offers a variety of features to help you recover data.
Here are some key features for this free data recovery tool:
- Recovers 2000+ file types, including photos, videos, documents, archives, and more.
- Scans the system drive for lost user profile files after updates.
- Preview files before recovery to ensure integrity.
- Free edition recovers up to 1GB of data.
- Read-only design to avoid overwriting or damaging your disk.
Download and install MiniTool Power Data Recovery by clicking the button below.
MiniTool Power Data Recovery FreeClick to Download100%Clean & Safe
Here’s the breakdown to recover lost files after a Windows update using this MiniTool data recovery tool:
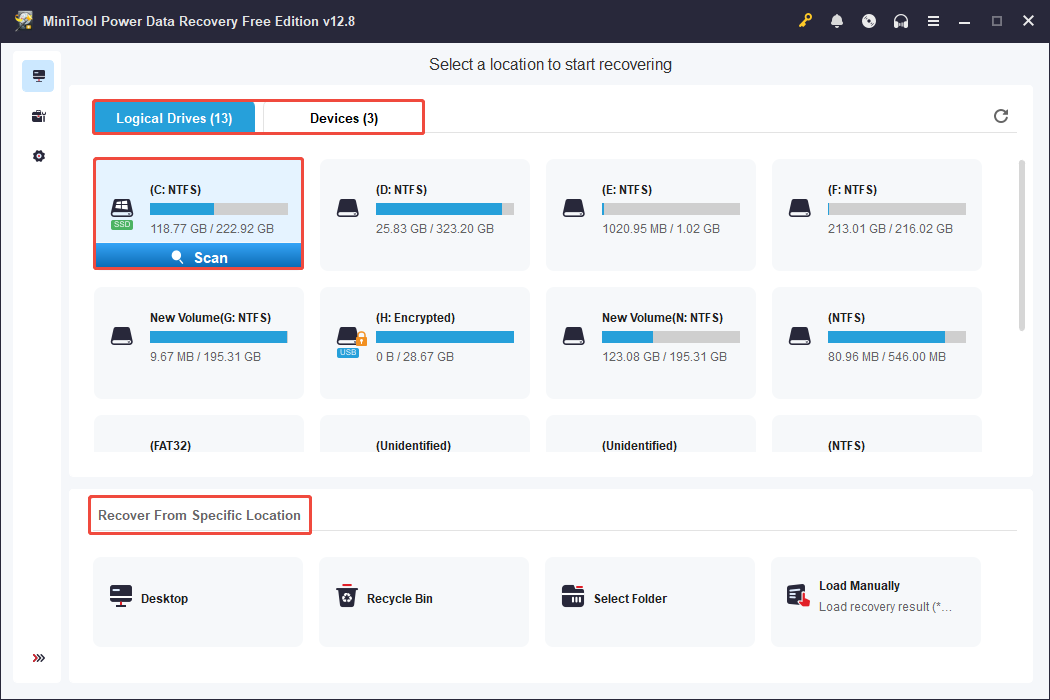
Step 1. Launch MiniTool Power Data Recovery to enter its main interface. Here you will see three sections:
- Logical Drives: In this tab, you will find all the partitions on your internal and external drives. Typically, these partitions are shown with information such as volume size, drive letter, and file system.
- Devices: By switching to this tab, you can view all the entire disks connected to your computer.
- Recover From Specific Location: This section offers you three quick options for scanning and recovering files, which include the Desktop, the Recycle Bin, and a specific folder.
To begin the recovery process, choose the drive, disk, or location from which you want to restore deleted files, and then click Scan.
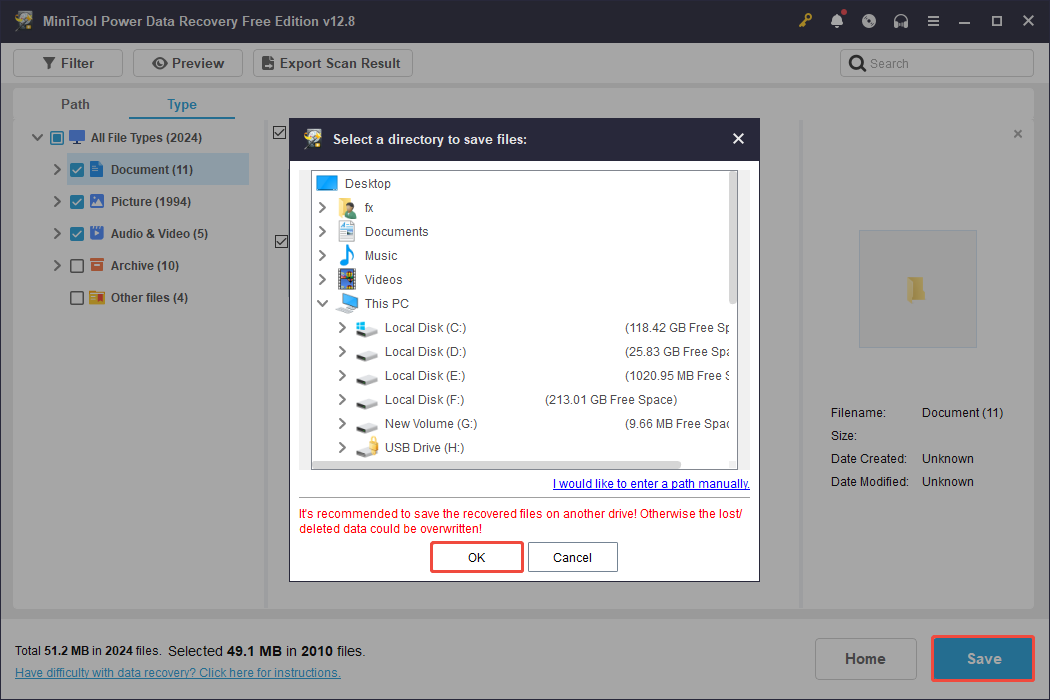
Step 2. After the scanning is completed, open each folder under Path to locate the files you wish to recover.
Additionally, access the Type tab to view the detected files sorted by their type and format.
If you’re having trouble finding specific files among a large list, you can use the Filter and Search options to narrow down the scan results.
- The Filter option gives you multiple options to narrow down files by type, size, modification date, and file category.
- The Search feature allows you to find a specific file by entering either a partial or complete file name.

It’s important to preview the files you intend to recover for verification, then check the box next to the file name to prepare for recovery.
To preview a file, just double-click on it.

Step 3. Finally, click the Save button. In the pop-up window, select a secure file destination to store the restored files and click OK.
After the recovery process is finished, you can navigate to the chosen folder to verify that the files are accessible and not corrupted.
If you’re prompted to upgrade the software to recover additional files, it means that your 1 GB of complimentary file recovery capacity has been exhausted.
In this situation, consider upgrading to the full edition to retrieve the remaining files. You might find the MiniTool Power Data Recovery License Comparison helpful.
Method 4. Restore From the Backups
File History is the built-in backup tool in Windows that automatically saves versions of your personal files.
If you enabled File History and created a backup on an external storage drive using it before the system update, recover lost files from the backup.
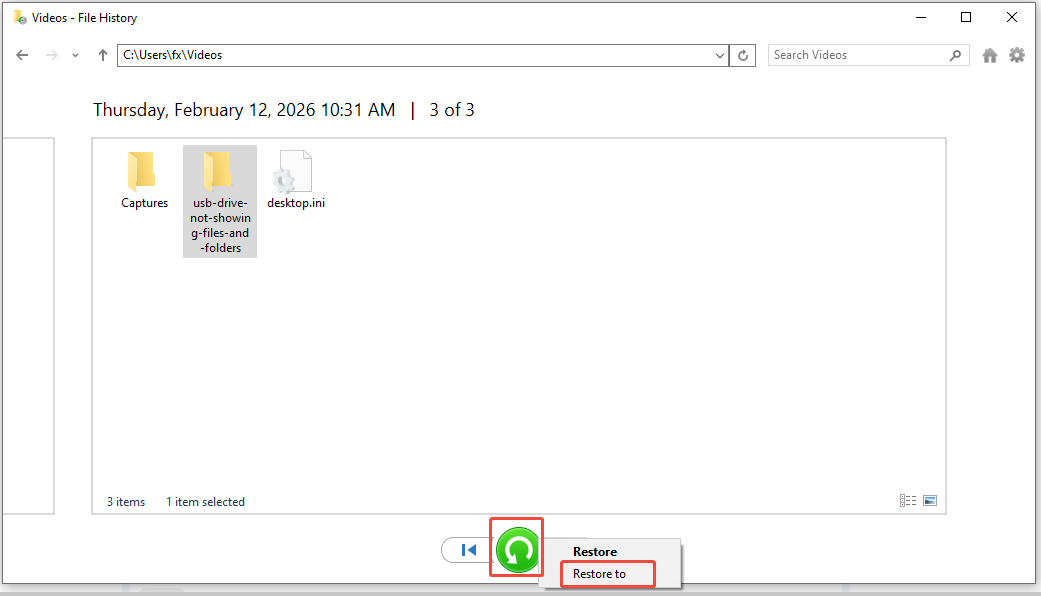
Step 1. Connect the external drive or go to the network location where you store File History backups.
Step 2. Press Win + S to open the Windows search bar, type Restore your files with File History in the box, and press Enter.
Step 3. The File History window will show backed-up folders: Desktop, Documents, Pictures, and so on.
Step 4. Navigate to the folder with your missing files and select the files or folders you want to restore.
Step 5. Click the green Restore button to return files to their original location, or right-click the button and choose Restore to to save them to a new location.
If you have not activated File History or do not have any other backups, try the next solutions.
Method 5. Enable the Windows Administrator Account
If you set up a new Microsoft account when you upgraded from an earlier version of Windows, your files could be stored in a disabled administrator account.
Following the update to Windows 11, the administrator account that you might have created could be disabled automatically.
In this situation, you will need to activate this account and log back in to access your files by following these instructions:
Step 1. Press Win + S to open the Windows search bar, type Computer Management in the box, and press Enter.
Step 2. When the Computer Management window appears, select Local Users and Groups under the System Tools category from the left side of the pane.
Step 3. Double-click Users in the right-hand side of the pane, and then double-click on Administrator to access its properties.
Step 4. If the Account is disabled box is checked, uncheck it.
Step 5. Click Apply, then click OK.

Log in using the administrator account and try to locate your missing files.
Method 6. Use Windows File Recovery
Windows File Recovery is Microsoft’s free command-line recovery tool for Windows 10 and 11. It recovers deleted or lost files from your computer after updates.
Here’s a step-by-step guide to use it:
Step 1. Download Windows File Recovery from the Microsoft Store and install it.
Step 2. Launch the tool. It will open a command-line window.
Step 3. Type the basic recovery command and press Enter (replace C, D, and the following path with your drive letter and location):
winfr C: D: /n \Users\Username\Desktop\
- C: = Source drive
- D: = Destination drive (save recovered files here, different from the source drive)
- /n = Specify the folder to scan (e.g., Desktop, Documents)
Step 4. Press Y to confirm and start the scan and recovery.
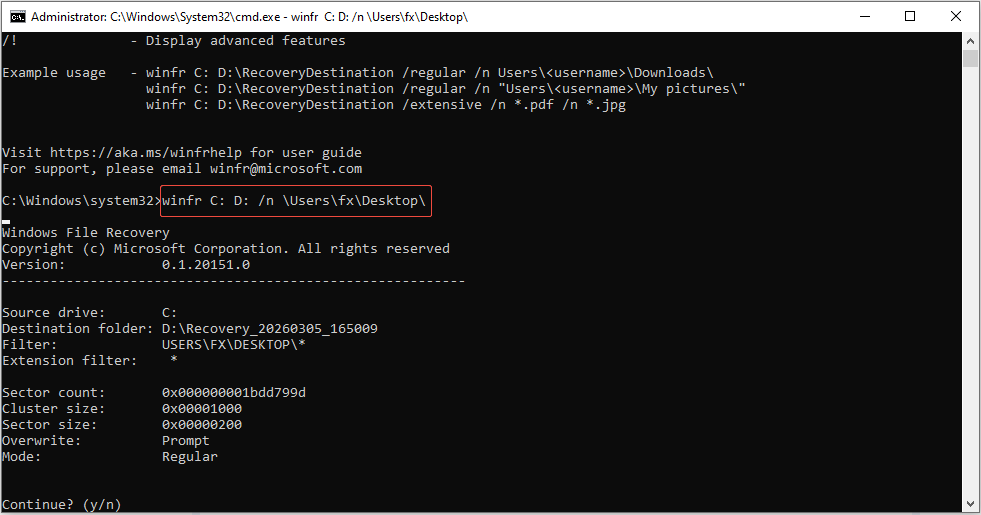
The tool will recover files to the specified destination drive. Afterwards, open the target location to access your recovered files.
Final Words
To sum up, this comprehensive guide offers 6 solutions to recover files after Windows update. If you have the Windows.old folder, try recover files from it.
If you are signed in to a temporary profile, log out and sign in to a correct one. Additionally, check the backups that you have created.
Sometimes, your administrator account may be disabled, which leads to the loss of files after a Windows update. In this case, enabling it can fix the issue.
If they do not work, use MiniTool Power Data Recovery or Windows File Recovery to get your files back.
If you have any problems when using MiniTool Power Data Recovery, please do not hesitate to contact the support team via [email protected].
Windows Update File Recovery FAQ
For users who prefer a more intuitive recovery process, third-party data recovery software may be a better choice.
In most cases, restarting your computer and signing back into your original account can restore access to your files.
About The Author

Position: Columnist
Shirley holds a bachelor’s degree in English and has been an editor at the MiniTool Team for many years. She specializes in IT-related content, with a focus on data recovery, file backup, disk management, and other technical topics. She is committed to delivering clear, accurate, and practical solutions to help users resolve common computer issues.
User Comments :