Issue: Recycle Bin Corrupted in Windows 11/10
A corrupted Recycle Bin often triggers persistent pop-up errors saying “The Recycle Bin on C:/ is corrupted”, as the picture shows below:

In most cases, this error causes grayed-out menu options, deleted files not being displayed, or the inability to empty the Recycle Bin.
When this issue occurs, many users may assume that a system reinstallation is required or that deleted files have been permanently lost.
The good news is that a corrupted Recycle Bin can be repaired using Windows’ built-in tools, and files can be recovered before performing fixes.
Before proceeding to fixes, understanding the causes of Recycle Bin corruption is essential for preventing future issues and finding quick fixes.
Why Does the Recycle Bin Become Corrupted?
Below are the most common triggers of the Recycle Bin corruption in Windows:
- Abrupt Shutdowns: Power failures or forced restarts during file operations can corrupt the Recycle Bin, damaging its index and resulting in unreadable data.
- File System Errors: Issues like bad sectors on hard drives or logical errors in SSDs can disrupt the structure of the $Recycle.bin folder, leading to corruption.
- Malware and Viruses: Malicious software may target the Recycle Bin, modifying or deleting its contents.
- Corrupted System Files: Windows uses core system files, including DLL files and shell components, to manage the Recycle Bin. If these files are missing or corrupted, the Recycle Bin may malfunction, leading to corruption errors.
- Interrupted Operations: Canceling a large file move to the Recycle Bin or closing File Explorer mid-operation can cause the $Recycle.bin folder to be corrupted.
- Permission Issues: Loss of admin rights or misconfigured permissions for the $Recycle.bin can prevent proper access, triggering false corruption warnings.
Some fixes for a corrupted Recycle Bin will permanently delete all files inside the Recycle Bin.
Therefore, before trying troubleshooting methods, it’s important to restore the Recycle Bin first.
Immediate Step: Recover Data From the Corrupted Recycle Bin
If you have accidentally deleted some important files when the Recycle Bin became corrupted, it is possible to recover them from it.
Even if the Recycle Bin won’t open, using professional data recovery software can rescue the files in the Recycle Bin.
MiniTool Power Data Recovery is a top-tier file recovery tool that can easily recover lost/deleted data from the Recycle Bin without causing any damage to the original files.
This free data recovery tool offers three modules for quickly recovering data from specific locations: Desktop Recovery, Recycle Bin Recovery, and Specific Folder Recovery.
It allows you to scan the corrupted Recycle Bin individually, saving you significant time and effort. Supported file types to recover include pictures, videos, documents, and other types.
This tool allows you to recover 1GB of files for free.
Now, download and install MiniTool Power Data Recovery on your PC by clicking the button below.
MiniTool Power Data Recovery FreeClick to Download100%Clean & Safe
Here are the instructions to recover files from the Recycle Bin using this data recovery tool:
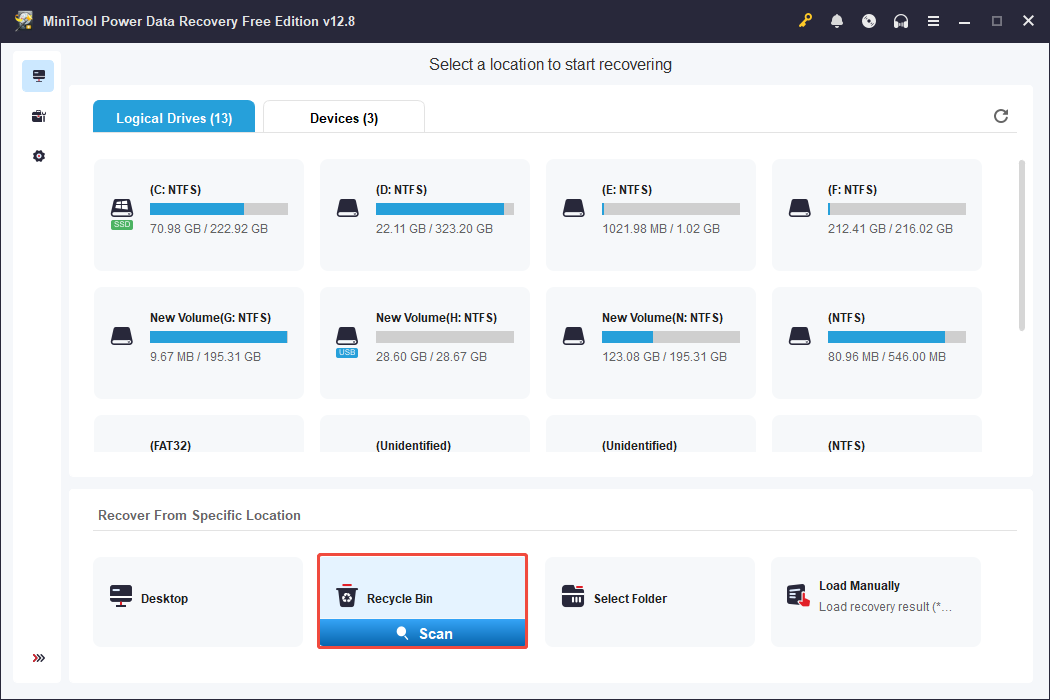
Step 1. Open the Software and Scan the Recycle Bin
Double-click on the MiniTool Power Data Recovery icon to launch it and load the disk information.
In the Recover From Specific Location section, you have the option to scan the desktop, the Recycle Bin, or a specific folder. The Logical Drives section displays all disk partitions.
You can recover files either from the Recycle Bin or from the original disk partition where the lost files were located.
Here, we select the Recycle Bin option and click Scan.
This scanning process may take some time, so it’s important to be patient until it finishes.
Step 2. Locate the Desired Files
Once the scanning is completed, all files will be displayed under the Path tab, allowing you to navigate according to their original folder structure.
In addition, consider using the following options to quickly find the files you wish to recover:
- Type: Automatically organizes the scan results by file type, such as pictures, audio, video, and more. This is a useful choice if you are looking for a specific type of file.
- Filter: This feature allows you to apply several filters at the same time, including file type, file size, modification date, and file category.
- Search: Type the file name or a keyword in the search box and press Enter. The relevant files will be displayed.
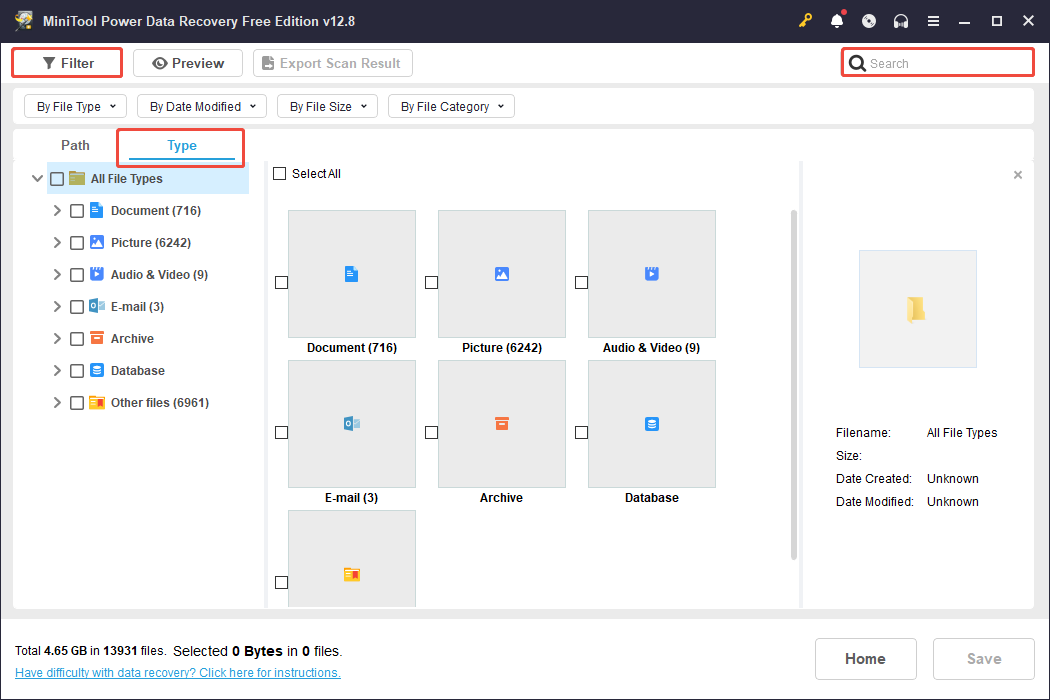
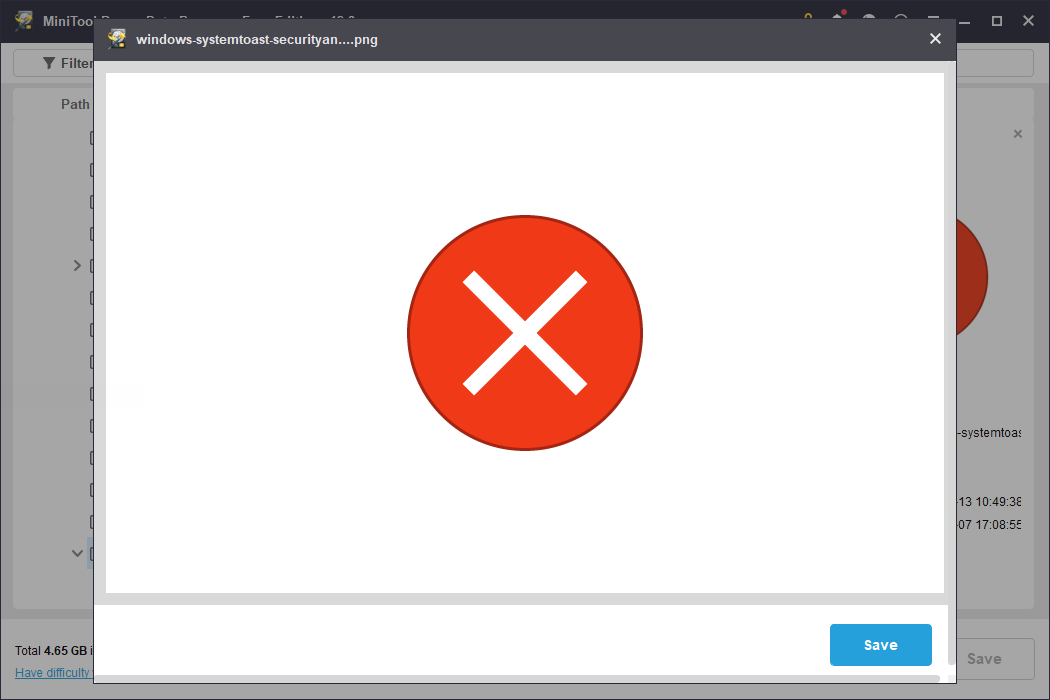
To verify the accuracy of the files, this tool provides the Preview feature that allows you to view the file content before proceeding.
Simply double-click on the file to preview.
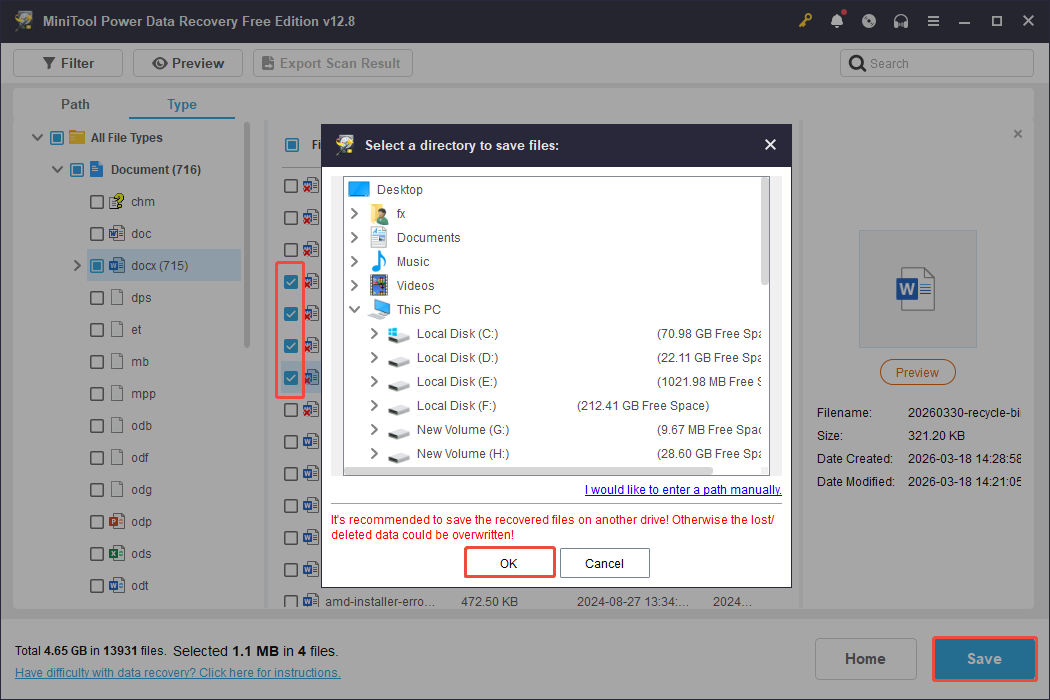
Step 3. Save the Needed Files
Confirm the files you wish to recover and check them, then click the Save button.
In the pop-up window, choose a new location to save the recovered files, and then click OK to start the recovery process.
How to Fix the Corrupted Recycle Bin
We provide six solutions on how to fix corrupted Recycle Bin in Windows 11/10, from the easiest and quickest to more complex and thorough approaches.
All of these methods use only the built-in tools available in Windows, and there’s no need for any unsafe downloads.
Fix 1. Reset the Recycle Bin
Resetting the Recycle Bin can delete the damaged $Recycle.bin folder and force Windows to create a new and functional version.
Here’s how to do it:
Step 1. Press Win + S to open the Windows search bar, type Command Prompt in the box, right-click it, and then choose Run as administrator.
If the User Account Control (UAC) prompts, click Yes.
Step 2. Type the following command and press Enter:
rd /s /q C:\$Recycle.bin

Step 3. Close the Command Prompt and restart your computer.
Windows will rebuild the Recycle Bin folder upon boot-up. Test by deleting a sample file and trying to restore it in the Recycle Bin, and it should function normally.
If not, continue to try the next solutions to repair the corrupted Recycle Bin.
Fix 2. Use CHKDSK
If the Recycle Bin corruption is triggered by bad sectors or file system damage, the CHKDSK utility can scan and repair errors that disrupt the Recycle Bin.
Follow these steps to run CHKDSK:
Step 1. Run Command Prompt as administrator.
Step 2. Type this command and press Enter (C: refers to the system drive; substitute with your actual drive letter): chkdsk C: /f /r.
Step 3. You might encounter a prompt to ask for confirmation. Type Y and press Enter, then reboot your PC.
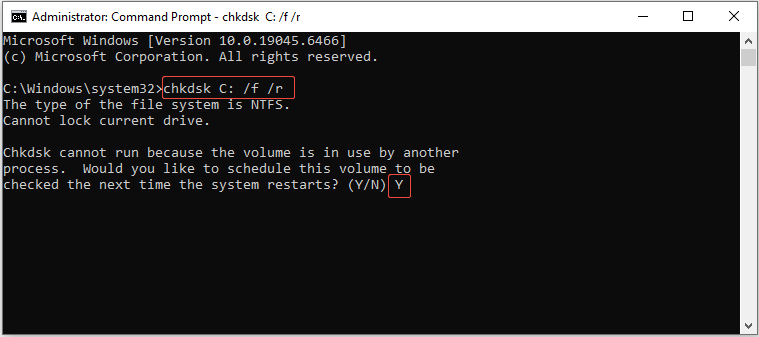
CHKDSK will execute before Windows loading, searching for bad sectors and correcting file system issues.
After it finishes, verify the status of the Recycle Bin.
Fix 3. Run DISM and SFC
The Recycle Bin relies on Windows system files. If these files are corrupted, SFC and DISM can restore them to their original condition.
Here’s the breakdown on how to use DISM and SFC:
Step 1. Press Win + S to open the Windows search bar, type Command Prompt, then press Shift + Ctrl + Enter to run it as administrator.
Step 2. Run the DISM command: DISM /Online /Cleanup-Image /RestoreHealth.
Step 3. After that, run the SFC scan: sfc /scannow.
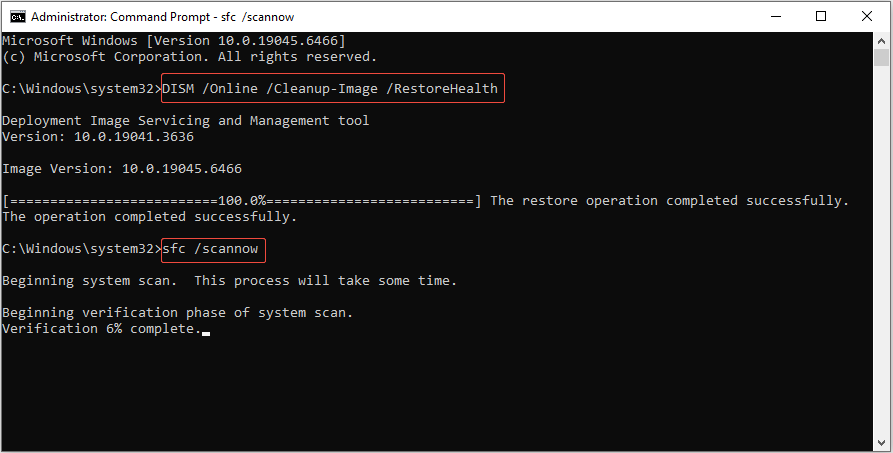
Once SFC has completed, you will receive one of two messages:
- “Windows Resource Protection did not find any integrity violations”: This means there’s no corruption in the system files.
- “Windows Resource Protection found corrupt files and successfully repaired them”: This indicates the system files have been fixed.
- “Windows Resource Protection found corrupt files but was unable to fix some of them”: This indicates that some corrupted system files cannot be repaired. Replace them with a known copy by following Microsoft’s SFC guide.
Step 4. Restart your computer and check the Recycle Bin.
Fix 4. Delete the $Recycle.bin Folder
If the command-line reset and repair don’t work, manually remove the corrupted $Recycle.bin folder using File Explorer.
Here’s how to do it:
Step 1. Press Win + E to launch File Explorer.
Step 2. Select the View tab at the top, then check the box for Hidden items.
Step 3. Go to your system drive (typically C:), find the $Recycle.bin folder, right-click it, then choose Delete.
If a permission prompt appears, select Continue and provide admin access.
If necessary, delete the $Recycle.bin folder from all other drives (D:, E:, and other letters).
Step 4. Empty your desktop Recycle Bin to clear the deleted folder and then restart your computer.
Upon startup, Windows will generate a new $Recycle.bin folder, resolving any corruption.
Step 5. Right-click on an empty area of your desktop to select Personalize.
Step 6. Proceed to the Themes section and click on Desktop icon settings. Tick the box for Recycle Bin and press the OK button.
Fix 5. Scan for Malware
Malware and viruses may corrupt the Recycle Bin to hide files or disrupt system tasks. A full system scan will remove malicious software and restore bin functionality.
In this situation, opt for using Windows Security, a built-in and free Windows tool:
Step 1. Press Win + I to open Settings, then go to Update & Security > Windows Security > Virus & threat protection.
Step 2. In the pop-up window, click Scan options under the Quick scan button in the left panel.
Step 3. Select Full scan and click the Scan now button.
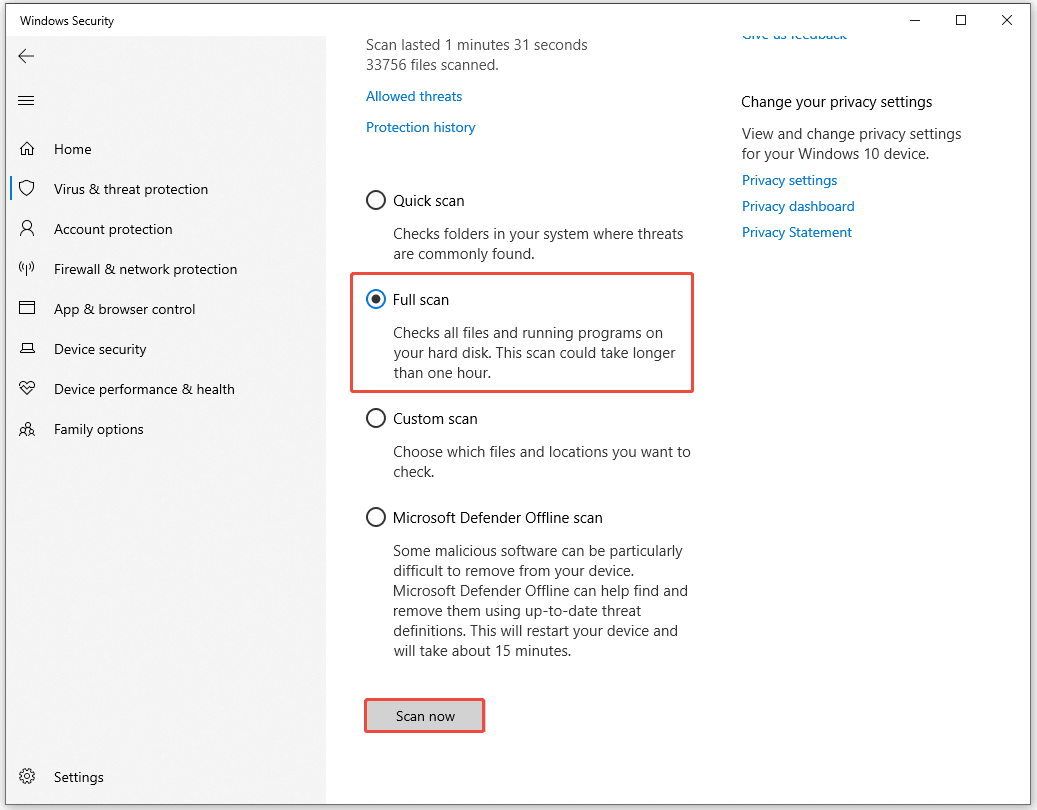
If malware is found, follow Windows Security’s prompts to remove it, then restart your PC.
If the above solutions fail to fix the Recycle Bin corrupted error, go to the last method.
Fix 6. Perform a System Restore
If the Recycle Bin corruption happens after a Windows update, a software installation, or a system modification, consider using System Restore.
This solution can bring your computer back to a stable restore point. Follow the steps to do it:
Step 1. Press Win + S to open the Windows search bar, type Create a restore point, then press Enter to continue.
Step 2. In the System Properties window, click on System Restore.
Step 3. In the new window, click Next, and then choose a restore point that is dated before the corrupted Recycle Bin issue first occurred.
Step 4. Click Next > Finish and verify the restoration.
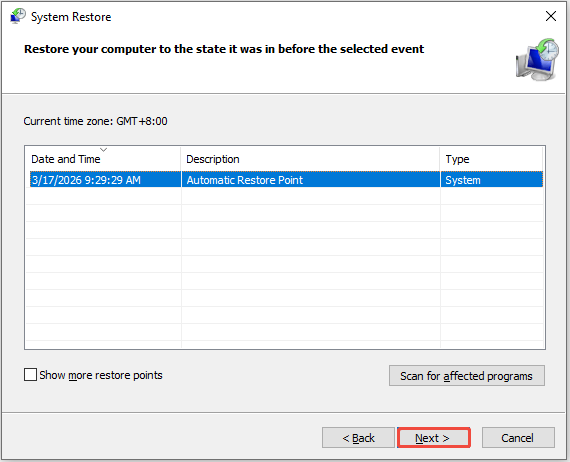
Your computer will reboot and revert system files and settings. Once the process is finished, the Recycle Bin should operate as it did before the corruption.
Bottom Line
To sum up, this comprehensive guide introduces the common reasons for the “Recycle Bin corrupted” error and solutions to fix it.
Before trying the fixes, it’s important to recover your important files from your Recycle Bin or internal hard drive using MiniTool Power Data Recovery.
After recovering, try the outlined six solutions one by one until the issue is resolved. When using the command-line tools, you need to be careful to type the correct commands.
If you have any inquiries while using MiniTool Power Data Recovery to recover data, please feel free to reach out to us at [email protected].
About The Author

Position: Columnist
Sandy became an English editor after graduation. She is devoted to finding effective solutions for diverse IT problems and provides articles on data recovery, data backup, and computer partitions and drives. In her spare time, she likes listening to music and playing games.
User Comments :