

A USB flash drive may show much less storage space than expected, such as a 128GB flash drive appearing as 32GB in Windows.
This issue can make the drive’s actual capacity unclear, reduce the available storage space, and sometimes indicate potential data loss. First, understand why the USB drive is showing the wrong size.
Why Is My USB Drive Showing Wrong Size
A USB drive showing the wrong size does not necessarily mean its physical storage is damaged.
This can happen when a bootable USB installer leaves behind a 32GB partition, part of the drive is unallocated, the file system is corrupted, or the device has fake capacity.
Here are the details.
1. A Bootable USB Drive Has Leftover Partitions
Creating Windows installation media changes the drive’s partition layout. During the process, Windows creates a 32GB ESD-USB partition for installation files and leaves the remaining space unallocated or RAW.
For example, a 256GB USB drive may appear as a 32GB drive after it has been used to create installation media.

2. The USB File System Is Corrupted
File system corruption can prevent Windows from reading a USB volume correctly. As a result, the USB drive may show 0 bytes in File Explorer or appear as RAW in Disk Management.
3. Part of the USB Drive Is Unallocated
Unallocated space is disk space that does not belong to any partition. File Explorer does not include unallocated space in the capacity shown for an existing USB partition.
4. The USB Drive Has Fake Capacity
Some counterfeit USB flash drives report a larger capacity than their physical memory can actually support.
After understanding why your USB drive is not showing its full capacity, follow the methods below to fix the problem.
How to Fix a USB Drive Not Showing Full Capacity
Before running a fix, check the USB drive status in Disk Management.
Step 1. Right-click the Start button and choose Disk Management.
Step 2. Locate the USB drive and determine whether the drive contains an ESD-USB 32GB partition, unallocated space, or a RAW volume.
The following methods address different situations. Choose the one that matches what Disk Management shows.
Method 1. Extend the Existing Partition
Applicable case: Disk Management shows an existing NTFS partition with unallocated space right next to it, and you want to combine the space into one larger volume.
Follow the steps below to extend a partition:
Step 1. In Disk Management, right-click the existing USB partition you want to extend and choose Extend Volume.
Step 2. Click Next to continue.
Step 3. Specify how much unallocated space to add and click Next.
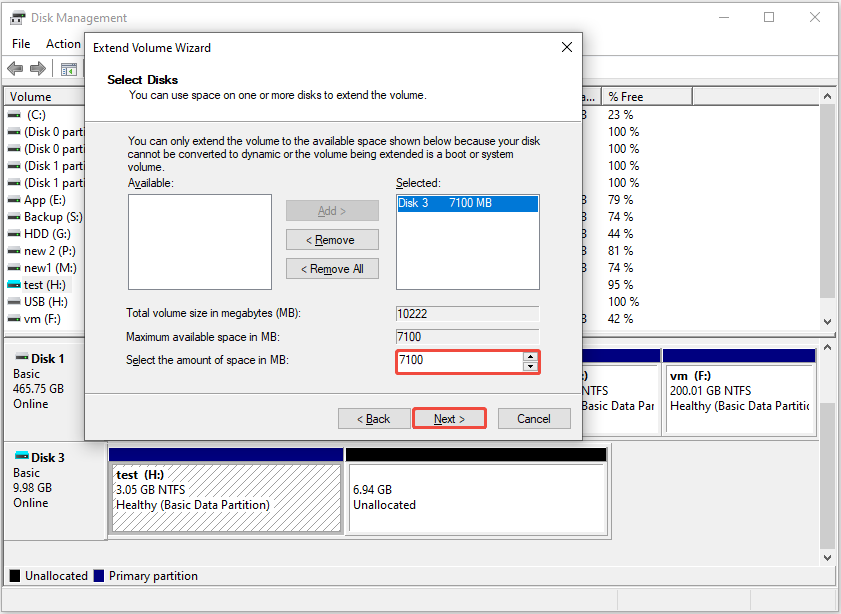
Step 4. Click Finish.
If Extend Volume is grayed out, the unallocated space may not be immediately to the right of the partition, or the file system is not supported.
In this case, use a free third-party disk manager, MiniTool Partition Wizard, to extend the partition, or use the following method.
MiniTool Partition Wizard FreeClick to Download100%Clean & Safe
Method 2. Repartition the USB Drive
Applicable case: You want to repartition the USB drive to a single usable volume, but Extend Volume is not available.
Deleting existing partitions and repartitioning the drive can reclaim space that is divided among several partitions.
Step 1. In Disk Management, right-click each partition you intend to remove and select Delete Volume. Repeat for other partitions on the target USB drive.
Step 2. Once the USB drive is shown as unallocated, right-click the unallocated area and choose New Simple Volume.
Step 3. In the wizard, use the maximum available size if you want one partition occupying the entire available disk space, and then click Next.
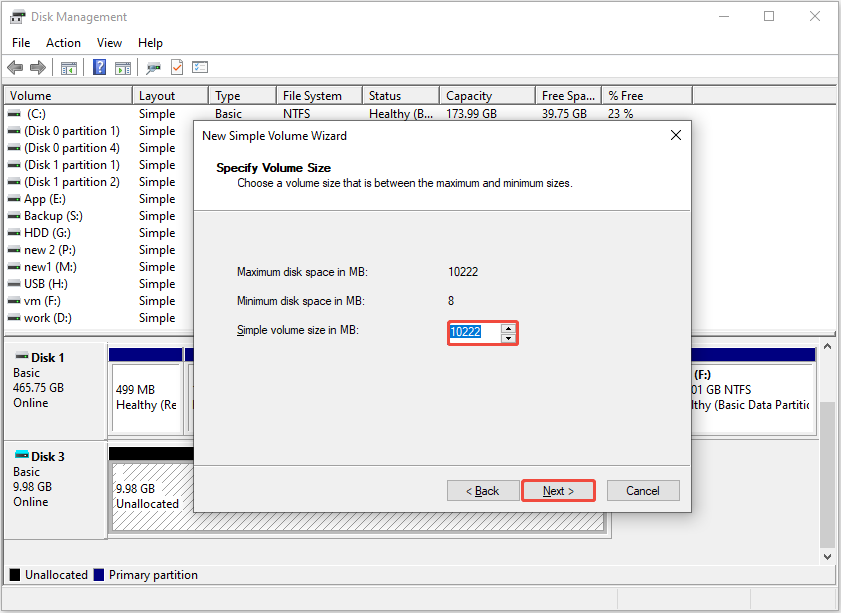
Step 4. Assign a drive letter, choose a file system, and type a volume label. Complete the wizard and check the new partition in File Explorer.
Method 3. Format the USB Flash Drive
Applicable case: The USB drive has an existing partition, but its file system is corrupted.
Formatting recreates the file system on a volume. It is useful when the partition layout is already correct, but the volume shows 0 bytes and cannot be accessed properly.
1. How to Recover Files from a USB Drive with a Damaged File System
If your USB drive shows as RAW or shows 0 bytes, use MiniTool Power Data Recovery to scan your drive and rescue recoverable files.
MiniTool Power Data Recovery is a Windows recovery tool that can scan USB drives for documents, photos, videos, emails, and other types of data. It supports recovery scenarios involving file system errors, deleted files, lost partitions, and formatted drives.
It provides you with a free edition that supports recovering 1GB of files for free.
MiniTool Power Data Recovery FreeClick to Download100%Clean & Safe
Step 1. Select the USB drive to scan
Run the software to enter its main interface. Under Logical Drives, select the USB partition you want to recover files from and click Scan.
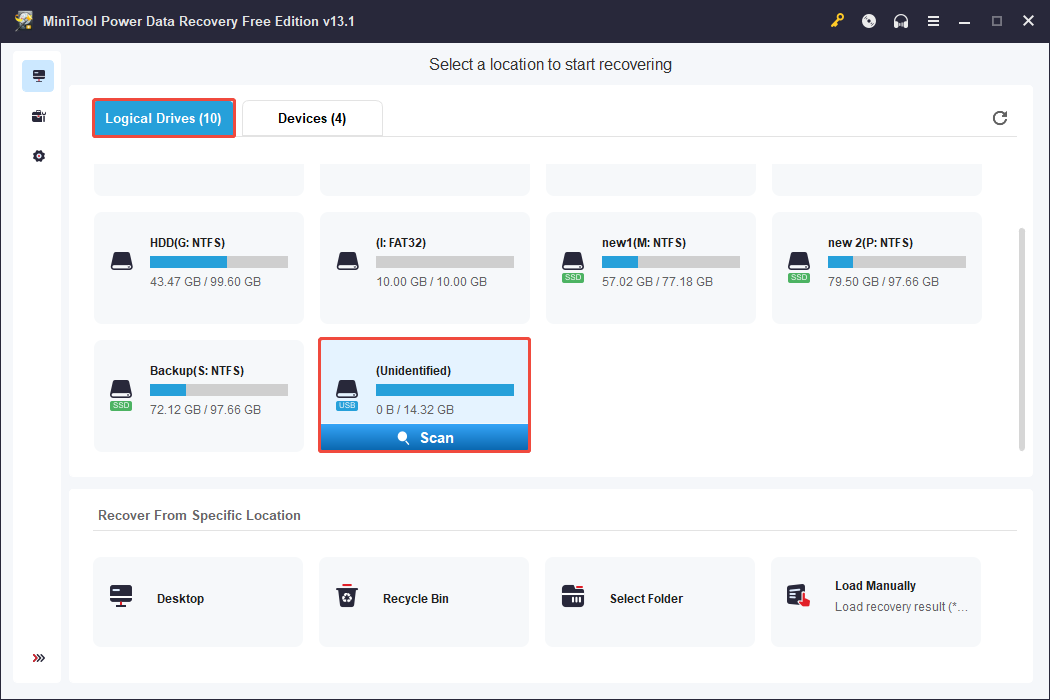
Wait for the scan to finish so the software can search for as many recoverable files as possible.
Step 2. Find required files
After scanning, browse the results using the Path and Type views. Path helps you locate files through their folder structure, while Type groups files by category, such as documents, pictures, videos, and audio.
You can also use the Filter feature to narrow down the results further.
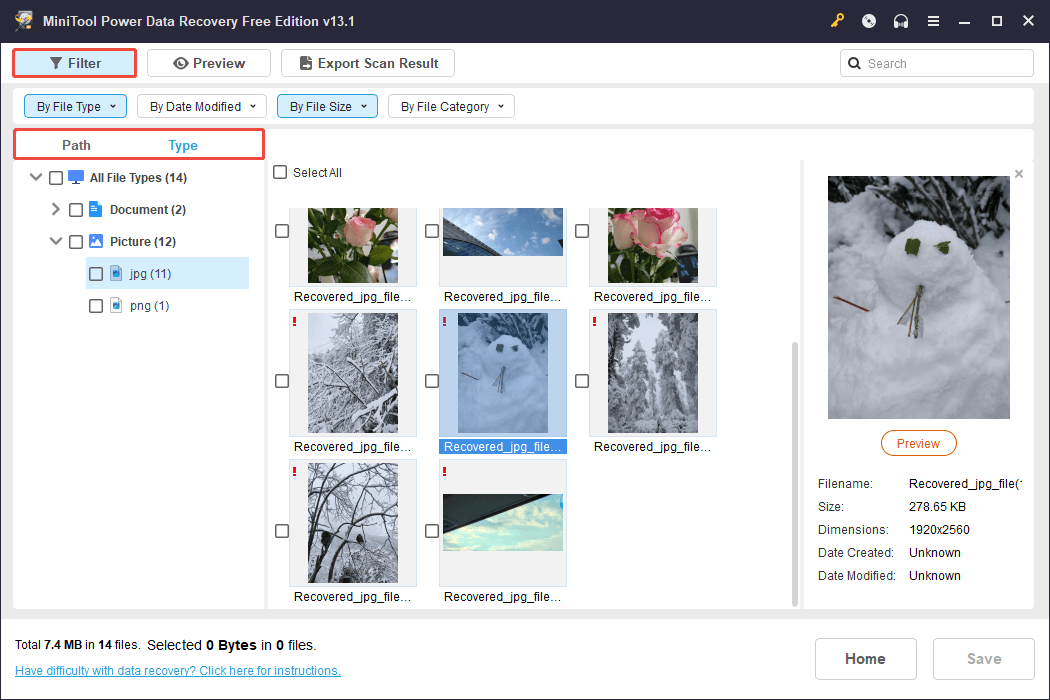
Step 3. Save the wanted files to another location
Select the files you want to recover and click Save. Choose a destination on your computer’s internal drive or another healthy removable storage device.
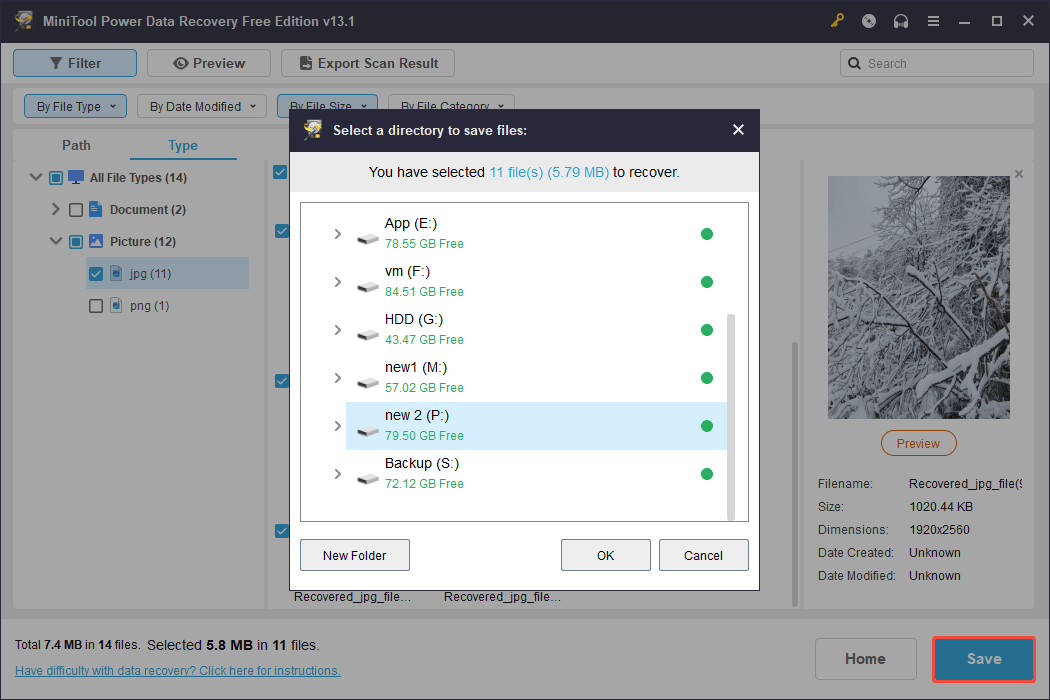
After recovery, open several of the saved files to verify that they are usable.
2. How to Format a USB Drive
After recovering important files, it is time to format the drive to restore the USB drive back to full capacity.
Step 1. Open Disk Management.
Step 2. Right-click the USB drive partition and choose Format.
Step 3. Enter a volume label if desired, choose a suitable file system, and keep the quick format option selected.
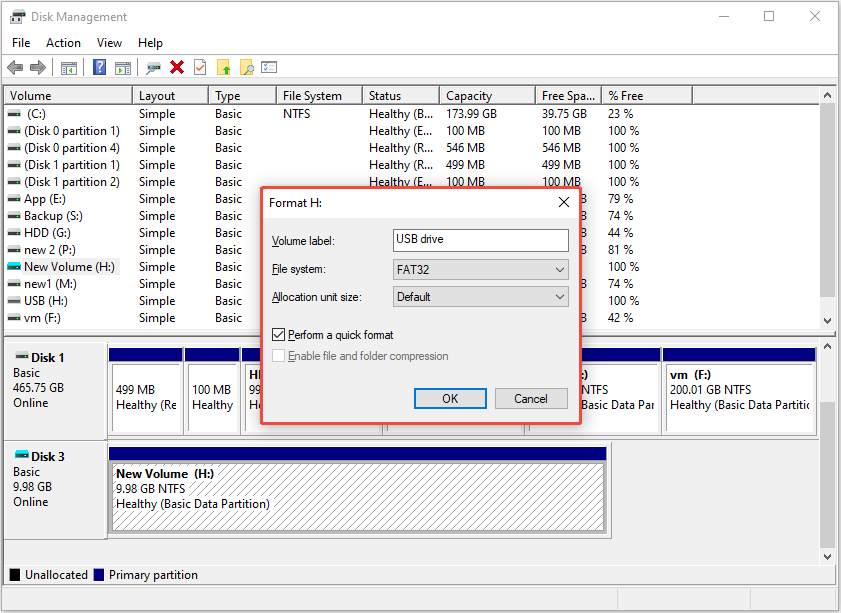
Step 4. Confirm the formatting operation and wait for it to finish.
After formatting, open File Explorer and check whether the volume is accessible and displays the expected size.
Method 4. Clean the USB Drive and Create a New Partition
Applicable case: The USB drive has a problematic partition layout that cannot be corrected easily in Disk Management.
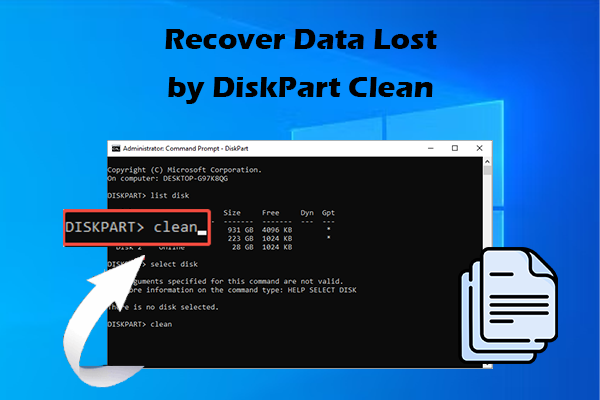
DiskPart’s clean command removes the selected disk’s partition and volume formatting information. It is more destructive than formatting an existing volume and should be used carefully.
Step 1. Open Command Prompt as an administrator.
Step 2. Type the following commands one at a time, and press Enter after each:
- diskpart
- list disk
- select disk # (Replace # with the actual number of the USB drive)
- clean
- create partition primary
- format fs=fat32 quick (you can replace fat32 with ntfs or exfat if desired)
- assign
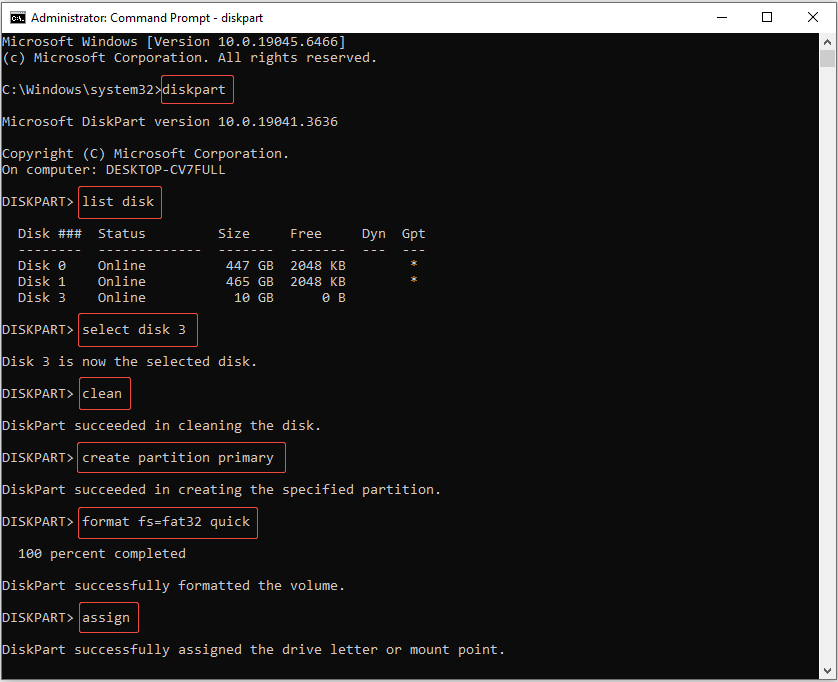
If the commands fail, or if the USB drive still reports a smaller physical capacity than expected, do not repeatedly clean and format it. Investigate the device’s actual capacity instead.
How to Check and Fix a Fake USB Drive with the Wrong Capacity
Some USB drives report more storage than they can physically support. In this case, you can test the drive’s actual usable capacity.
Test the Actual USB Drive Capacity with H2testw
H2testw is a Windows utility that helps identify counterfeit-capacity drives and storage devices with write or read errors.
It verifies storage by writing test data to the drive and then reading it back to check whether the data remains intact.
To test a USB drive with H2testw:
Step 1. Download H2testw from Google and extract the downloaded files.
Step 2. Launch the H2testw executable file to run the software and select the English interface if necessary.
Step 3. Click Select target and choose the correct USB drive.
Step 4. Choose the option to use all available space and click Write + Verify to write test data and then read it back for verification.
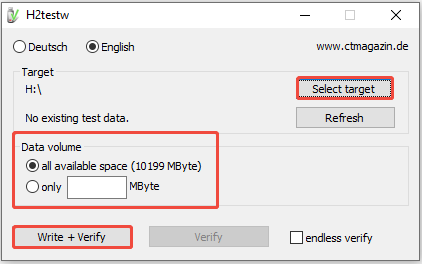
Wait for the test to finish, then examine the report for the amount tested and any errors.
How to interpret the results:
- No errors found: The tested space passed verification without reported errors.
- Data errors detected: The drive may have fake capacity, defective flash memory, or another storage issue.
- Capacity mismatch: The advertised capacity of the disk may not be entirely usable.
If a full-capacity test consistently shows that the drive cannot reliably store the amount of data it claims to support, repartitioning or formatting will not fix the underlying hardware limitation.
In this case, stop storing important files on the device and contact the manufacturer to request a refund or replacement.
How to Prevent USB Drive Capacity Problems
To prevent USB capacity issues and reduce the risk of data loss, follow these precautions:
- Buy USB drives from reputable sellers. Choose reliable brands and authorized retailers to reduce the risk of purchasing counterfeit-capacity devices.
- Safely eject the USB drive. Avoid unplugging it while files are being transferred or written, as this can cause file system corruption.
- Back up important files regularly. Keep another copy of your data on a separate storage device or in cloud storage. MiniTool ShadowMaker supports local backups and file synchronization with cloud services such as Google Drive and OneDrive.
MiniTool ShadowMaker TrialClick to Download100%Clean & Safe
Conclusion
When a USB drive is not showing full capacity, the first step is to open Disk Management and identify the cause rather than immediately formatting the disk.
Then you can choose a repair method that matches the problem and recover important files before performing any operation that could make them irrecoverable.
Should you have any questions while using MiniTool products, please contact the tech support team at [email protected].
USB Drive Showing Wrong Size FAQ
In addition, a counterfeit USB drive cannot gain additional physical storage even through formatting.
First, check whether the files are hidden by enabling Hidden items in File Explorer. If the drive shows as RAW in Disk Management or the files remain inaccessible, recover important data before attempting repairs or formatting the drive.
About The Author

Position: Columnist
Shirley holds a bachelor’s degree in English and has been an editor at the MiniTool Team for many years. She specializes in IT-related content, with a focus on data recovery, file backup, disk management, and other technical topics. She is committed to delivering clear, accurate, and practical solutions to help users resolve common computer issues.
User Comments :