Why Does an SSD Report Wrong Size on Windows
When you check the capacity of your SSD, you may find that the displayed disk space in File Explorer is smaller than the actual capacity.
In some cases, this difference is normal and occurs due to the use of different units of measurement. However, in most cases, additional steps are required to fully utilize the capacity of your SSD.
First, it is important to understand the difference between advertised capacity and actual capacity.
Understanding the Difference Between Advertised and Actual SSD Capacity
Disk manufacturers typically use the decimal system to calculate disk capacity, where 1KB equals 1000 bytes. However, Windows uses the binary system to calculate disk space, where 1KB equals 1024 bytes.
As a result, the actual disk space shown in File Explorer is usually less than the capacity advertised by the manufacturer.
For example, a 480GB SSD may show only around 447GB in Windows. The larger the disk capacity, the greater the difference between the two values.
In such cases, the SSD capacity is normal due to different calculation methods.
However, if the displayed capacity significantly differs from the actual capacity, the issue is typically caused by other factors instead of the calculation method.
Continue reading to determine the cause in your case.
Make Sure the Disk Is Not Fake
Some fake disks often falsely advertise a larger capacity than the actual storage space. To rule out this possibility, you can use a professional utility like CrystalDiskInfo to check the brand, model, health status, and other information of your SSD.
If the disk manufacturer information is not detected or if the brand differs from what was advertised, the SSD may be fake. In such cases, you should contact the seller to return the disk.
If the disk information appears normal, proceed to the next step.
Check the Disk Capacity in Disk Management
The root cause of the incorrect disk space is usually not visible in File Explorer. To find the underlying issue, you need to open Disk Management.
Right-click the Start button and choose Disk Management to check if your SSD reports the wrong size due to any of the following reasons:
Unallocated space
If there is unallocated space on the SSD, it will not be considered as available storage. As a result, the displayed size in File Explorer will appear smaller than the actual capacity.
Unassigned drive letter
Sometimes, an SSD is divided into multiple partitions. If some partitions do not have a drive letter assigned, they will be invisible in File Explorer. This can make the visible space smaller than the actual size.
Hidden partition
Partitions that are hidden by disk management tools will not appear in File Explorer. These hidden partitions may be the reason why the SSD reports wrong size.
RAW partition
If the file system of the SSD is corrupted or unrecognized by the system, the partition will turn to RAW in Disk Management. In this case, the disk may appear inaccessible or show incorrect capacity information.
MBR disk size limitation (2TB)
For an SSD using the MBR partition table, the maximum partition size supported is 2TB. If the SSD exceeds 2TB, the system will not recognize the additional space.
Next, start fixing the problem to restore the full capacity of your solid-state drive.
How to Fix SSD Showing Wrong Capacity
Based on the reasons why your SSD is not showing the correct size, the solutions vary. Common methods include extending the partition, converting the MBR SSD to GPT, unhiding the partitions, or repartitioning the SSD.
Follow the instructions that correspond to your disk status.
Fix 1. Extend the Volume
To fully utilize the unallocated space on the SSD, consider extending the existing partition. Disk Management offers the Extend Volume feature, but there are some requirements:
- The unallocated space must be adjacent to the right of the partition you want to extend.
- The existing partition must be formatted with the NTFS (or RAW) file system. For exFAT partitions, refer to the exFAT partition extension guide.
Follow the steps below to extend the volume:
Step 1. In Disk Management, right-click the existing partition and choose Extend Volume.
Step 2. Click Next to continue.
Step 3. Specify the amount of available space and click Next.
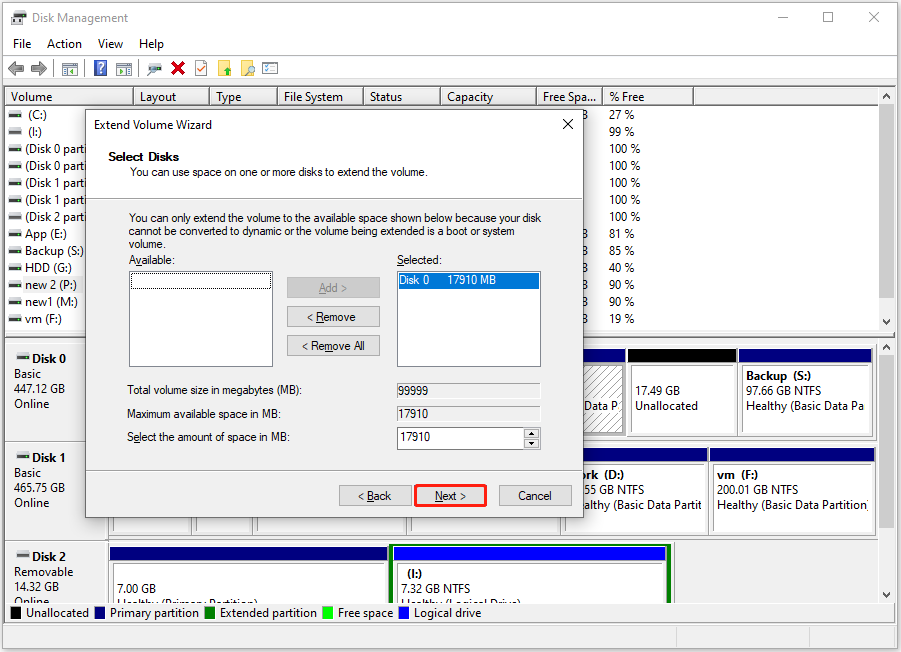
Step 4. Click Finish.
If the Extend Volume option is grayed out, consider using MiniTool Partition Wizard to extend the partition.
MiniTool Partition Wizard supports extending partitions to both adjacent and non-adjacent unallocated space for free. The unallocated space can be located either to the left or right of the existing partition.
It supports the FAT32 and NTFS file systems.
MiniTool Partition Wizard FreeClick to Download100%Clean & Safe
Step 1. Launch MiniTool Partition Wizard to enter its main interface. Select the existing partition and choose Extend Partition from the left menu bar.
Step 2. Choose the unallocated space from the Take Free Space from drop-down menu. You can drag the slider left or right to specify the disk space. After that, click OK.

Step 3. Click Apply to confirm.
Alternatively, you may consider creating a new partition on the unallocated space to use it separately. Right-click the unallocated space, choose New Simple Volume, and follow the on-screen instructions to partition the drive.
Fix 2. Convert the SSD to GPT
If the SSD uses the MBR partition table, the maximum usable disk size is limited to 2 TB. Any space beyond this will appear as unallocated and be unusable. Additionally, MBR supports no more than four primary partitions.
If the SSD is larger than 2TB, it is recommended to convert it to GPT to overcome these limitations.
Converting MBR to GPT through DiskPart or Disk Management requires deleting all partitions and data on the disk. Therefore, it is advisable to use MiniTool Partition Wizard to convert MBR to GPT without data loss.
MiniTool Partition Wizard FreeClick to Download100%Clean & Safe
Step 1. Select the MBR SSD and click Convert MBR Disk to GPT Disk from the left sidebar.
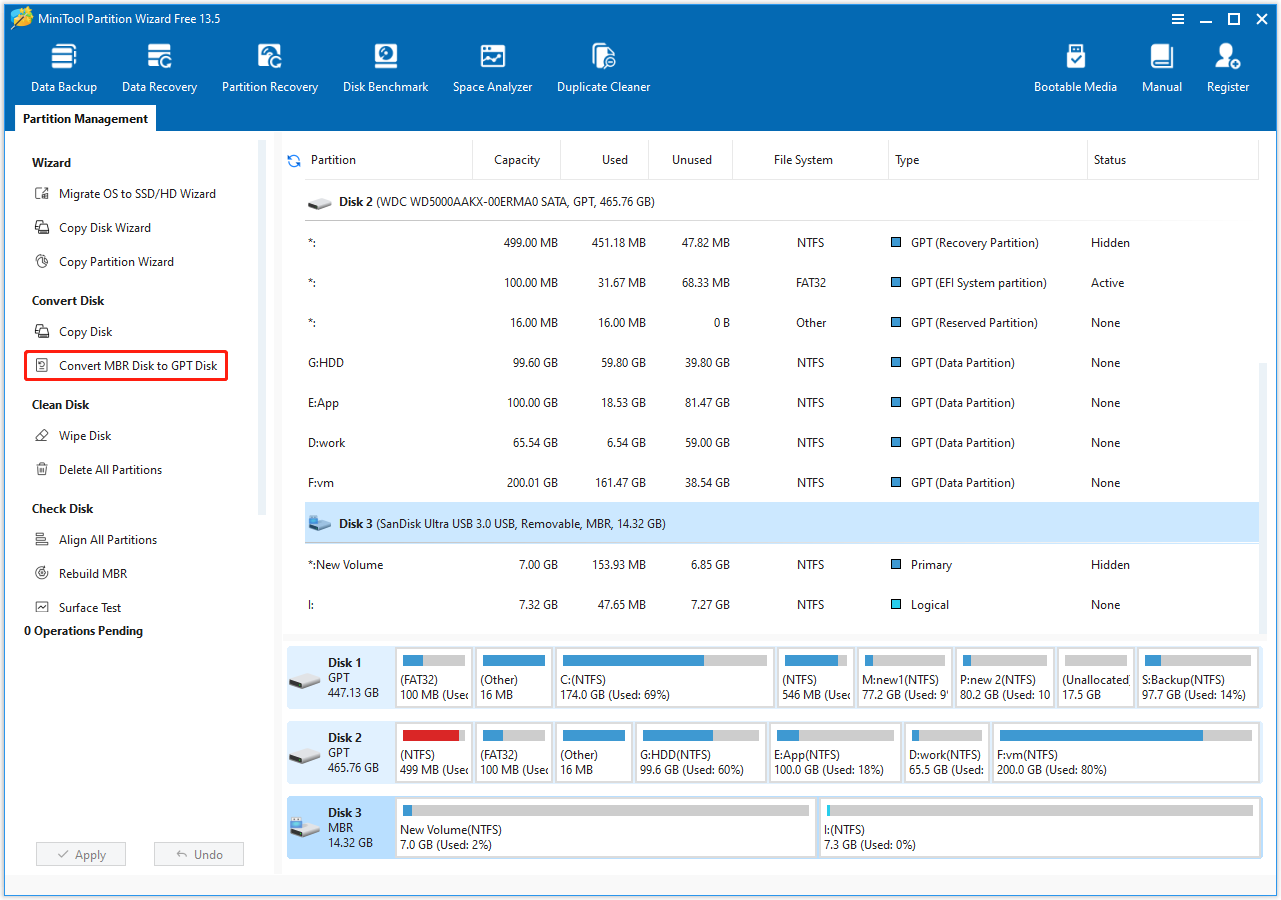
Step 2. Click Apply to confirm the action.
If this method does not apply to you, proceed with the following ones.
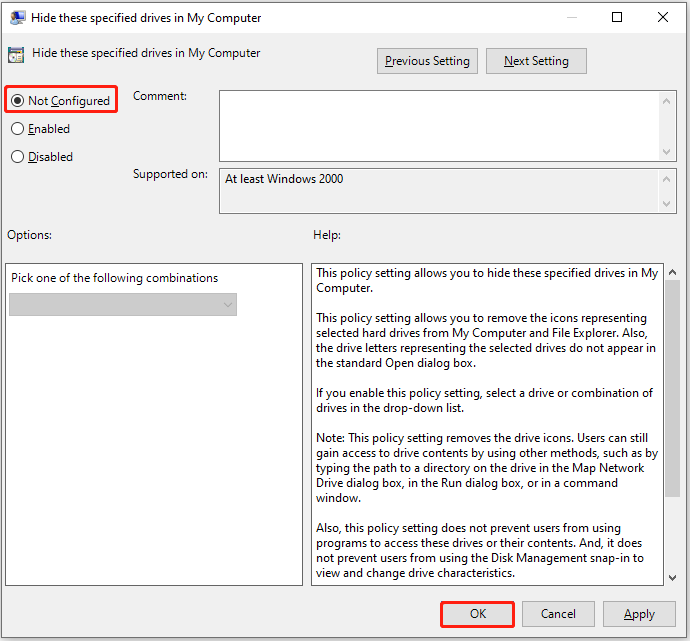
Fix 3. Show Hidden Partitions
Partitions hidden through the Group Policy Editor will not appear in File Explorer, causing the total size of the SSD to appear smaller than it actually is. In this case, you can change the group policy to unhide the drive.
Step 1. Press Windows + R to open Run. Then, input gpedit.msc in the text box and press Enter.
Step 2. Navigate to User Configuration > Administrative Templates > Windows Components > File Explorer.
Step 3. In the right panel, double-click Hide these specified drives in My Computer.
Step 4. In the new window, select Not Configured and click OK.
In addition, if the SSD partition is hidden by a partition manager, you need to use the corresponding software to unhide the volume.
For example, to hide a partition using MiniTool Partition Wizard, follow these steps:
Step 1. On the main interface of this partition magic, select the hidden partition and click Unhide Partition from the left sidebar.
Step 2. Choose an available drive letter and click OK.
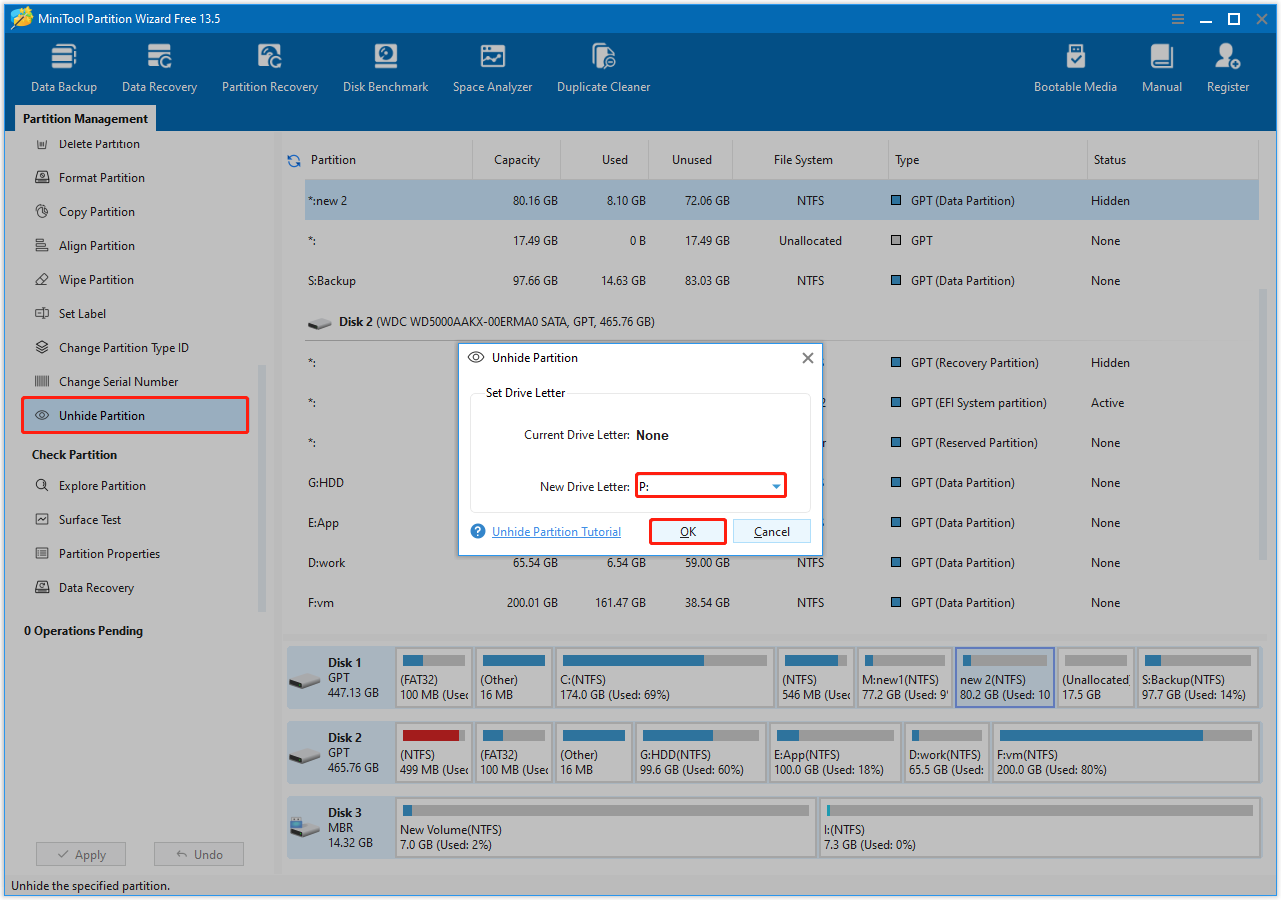
Step 3. Click Apply to confirm.
If this solution does not suit your cases, continue with the following approaches.
Fix 4. Assign a Drive Letter
Similar to hidden partitions, volumes without a drive letter will not appear in File Explorer, making the total disk size seem less than its actual capacity. Under these circumstances, adding a drive letter will resolve the issue.
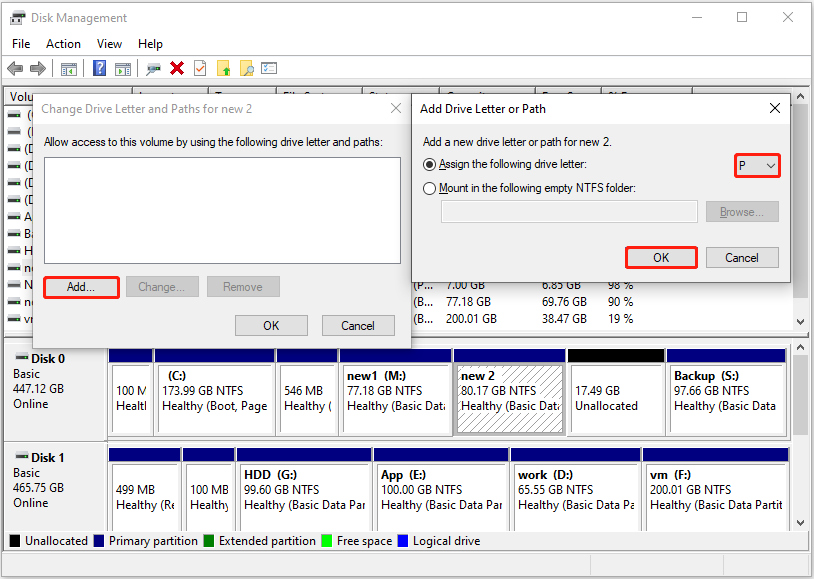
Step 1. Open Disk Management.
Step 2. Right-click the target partition and choose Change Drive Letter and Paths.
Step 3. Click Add, then choose an available drive letter from the drop-down menu and click OK.
Fix 5. Run CHKDSK
Issues with the disk file system or the presence of bad sectors can also affect the correct display of disk space. Running CHKDSK can help repair the file system’s integrity and mark bad sectors to resolve the issue.
Follow these instructions to run CHKDSK:
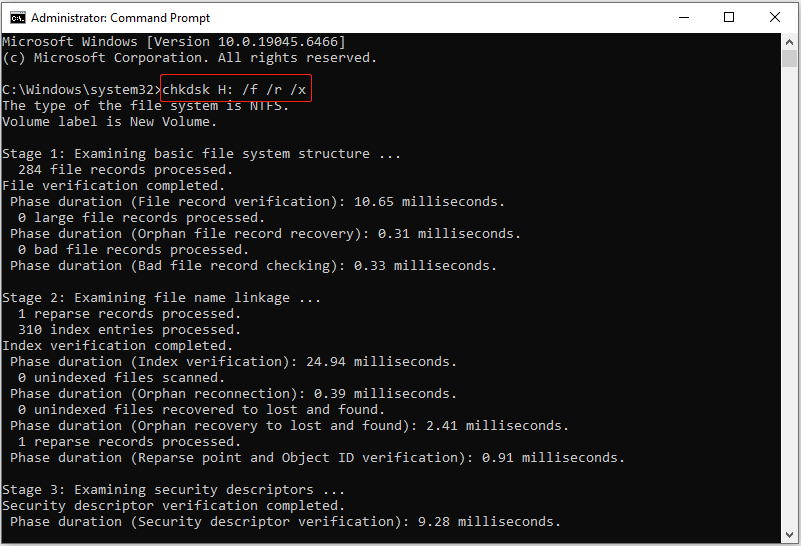
Step 1. Run Command Prompt as an administrator.
Step 2. Input chkdsk drive letter: /f /r /x and press Enter.
Replace the drive letter with the actual letter of your SSD. For example, to repair the H drive, execute chkdsk H: /f /r /x.
- /f: Fixes any errors CHKDSK finds on the selected SSD.
- /r: Locates bad sectors on the disk and attempts to recover any readable information.
- /x: Forces the drive to dismount before the CHKDSK process begins.
If CHKDSK fails to restore the full capacity of your SSD, try the next solution.

Fix 6. Clean the Disk
When the SSD is not showing all space due to severe file system corruption or other disk failures, the best method is to completely clean the disk and repartition it.
Follow the instructions below to clean the SSD by using DiskPart:
Step 1. Type cmd in the Windows search box. When the Command Prompt option appears, right-click it and choose Run as administrator.
Step 2. Input the following commands one by one, and press Enter after each:
- diskpart
- list disk
- select disk # (replace # with the actual number of the SSD)
- clean
- create partition primary
- format fs=ntfs quick (you can replace ntfs with fat32, exfat, or another supported file system)
- exit
Fix 7. Format the SSD
Formatting is the process of removing all files from a disk and rebuilding the file system. It is typically considered a last resort for resolving many disk-related issues.
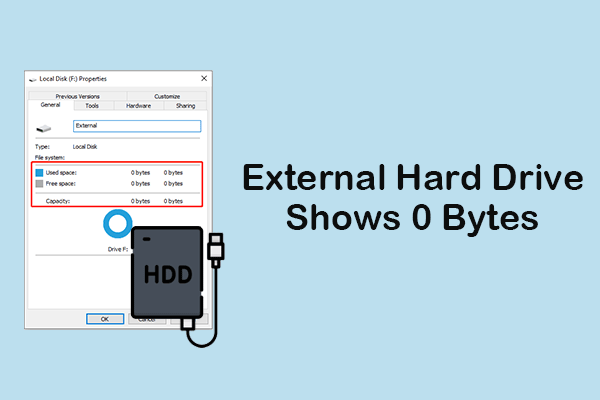
If the disk shows 0 bytes in disk properties and appears as RAW in Disk Management, this is an effective solution.
However, if there are important files stored on the SSD, it is recommended to recover them before proceeding with the formatting.
Before Disk Formatting: Recover Files From the SSD
To recover files from an inaccessible SSD, MiniTool Power Data Recovery is required. Here are the main features of this free data recovery software.
| Feature | Description |
| File type support | Supports recovering a wide range of file types, including documents, videos, photos, audio, and emails. |
| Data loss situations | Effective in many data loss scenarios, including file system corruption, partition loss, and a RAW drive. |
| Compatibility | Fully compatible with Windows 11, 10, 8.1, 8 and other file storage media, including HDDs, USB drives, and SD cards. |
| Free edition | Supports 1 GB of free data recovery. |
| Ease of use | Features a user-friendly interface and is simple to operate. |
MiniTool Power Data Recovery FreeClick to Download100%Clean & Safe
Follow the guide below to recover files from an SSD:
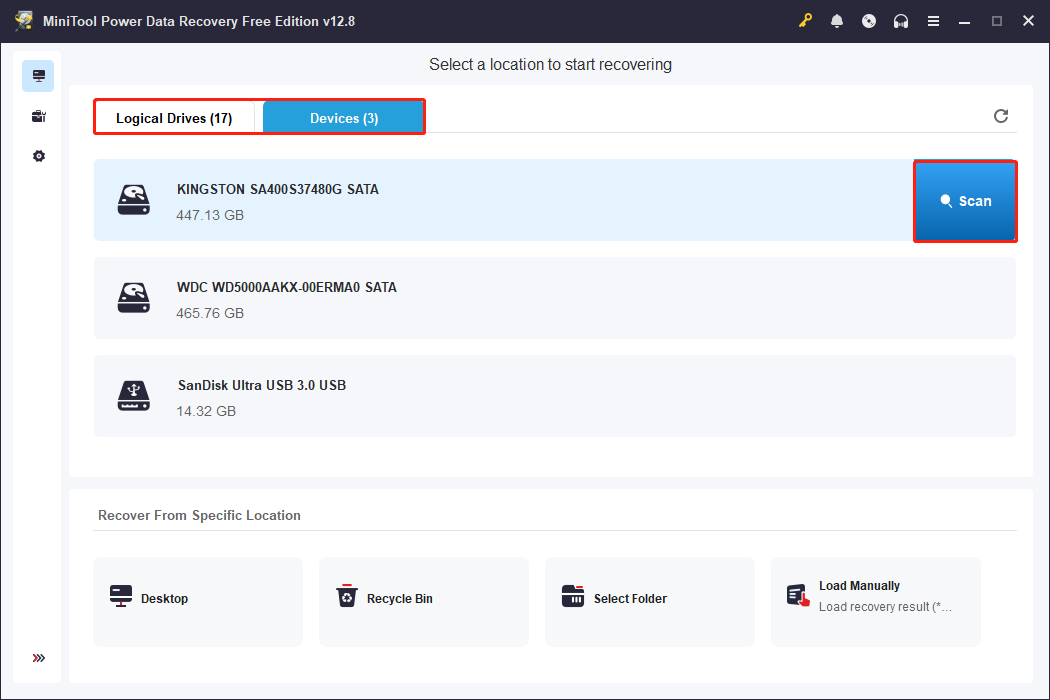
Step 1. Launch MiniTool Power Data Recovery to get its main interface. Under Logical Drives, select the SSD partition and click Scan. Alternatively, you can go to Devices to scan the entire SSD.
Step 2. After the scan is completed, all found files will be listed in the scan results window. Browse through your files by using these two views:
- Path: Displays found files according to the folder structure, allowing folder recovery.
- Type: Categorizes files by file type and data format, which is suitable for recovering a specific type of file.
In addition, the Filter and Search features can simplify the data search process.
- Filter: Filters out unwanted files by file type, data modification date, file size, and file category.
- Search: Allows you to search for a file by using a partial or complete file name.
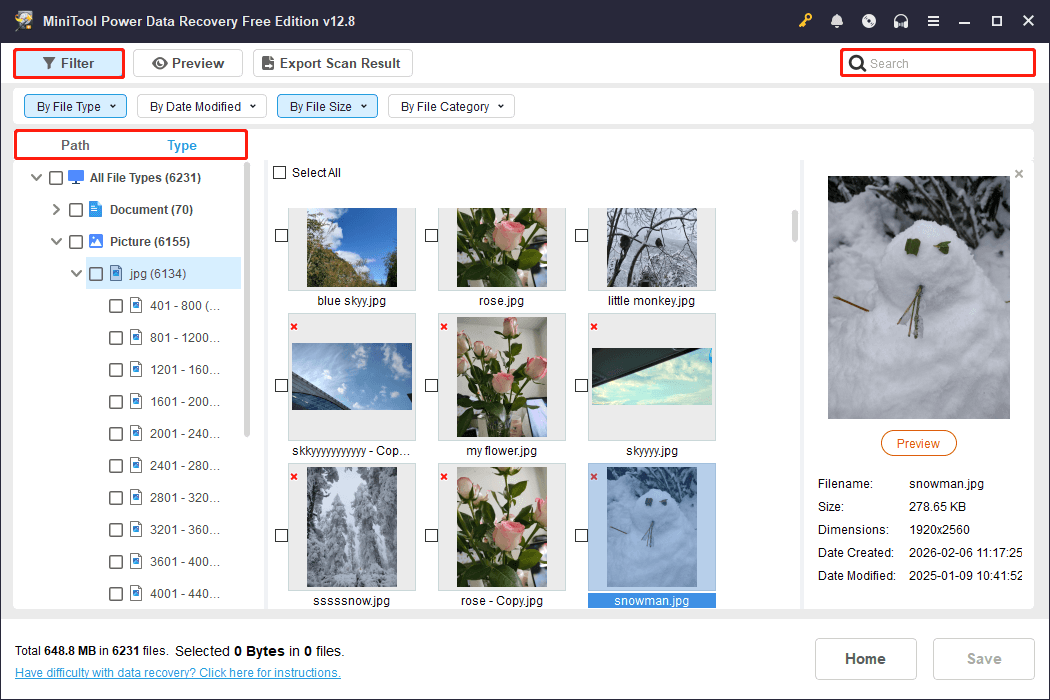
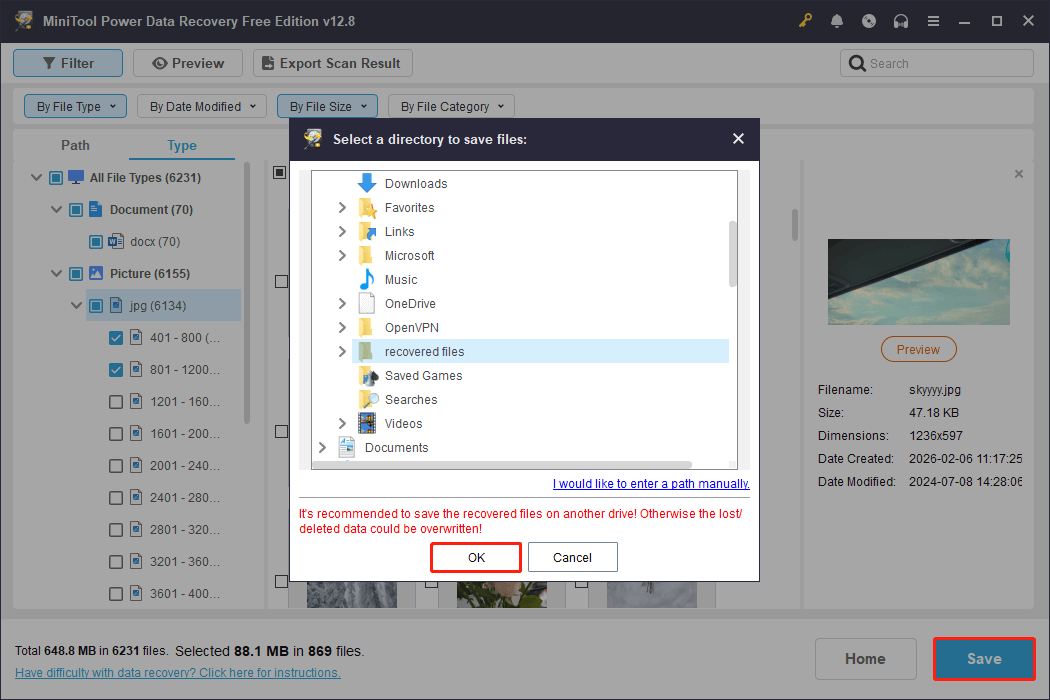
Step 3. Double-click on the files you want to recover to preview the content. Finally, select all the required files and click Save. In the new window, choose a safe location and click OK to store the recovered files.
Once you have ensured that all required files are recovered, you can close the recovery software and proceed with formatting the SSD.
Steps to Format the SSD
We walk you through the steps to format the SSD from Disk Management:
Step 1. Right-click the RAW SSD partition and choose Format.
Step 2. Specify the volume label and file system. Keep the Perform a quick format option checked, and then click OK.
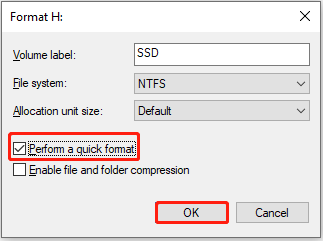
Step 3. Click OK again to confirm and wait for the process to complete. After that, right-click the disk and choose Properties, and the capacity should be displayed correctly.
After learning how to fix a regular SSD that shows incorrect capacity, the next part explores a special case where a cloned SSD reports an incorrect size.
SSD Not Showing Correct Size After Cloning
SSD showing less space after cloning is usually due to the following reasons:
- The cloning software is set to clone the source partition only, without resizing it to fit the new disk size.
- Unallocated space on the source disk is cloned to the target disk, but the unallocated space will not appear in File Explorer.
- Hard drive errors may have occurred during the disk cloning process.
To utilize the full disk capacity, you can extend the cloned partition. Alternatively, consider re-cloning the disk and ensuring that the option to fit the new disk size is enabled.
Fix 1. Extend the Partition
To make full use of the unallocated space after cloning, use MiniTool Partition Wizard to extend the cloned partition.
When extending the system drive, back up important files first, or use the bootable edition of this partition manager to avoid boot failures.
MiniTool Power Data Recovery FreeClick to Download100%Clean & Safe
Fix 2. Re-Clone Your Disk
Re-cloning the source disk to the SSD is also an effective solution.
During the cloning process, ensure that the option, such as “Fit partitions to entire disk”, is enabled to fully utilize the available disk space.
Reliable SSD cloning software includes Clonezilla, GParted, and MiniTool Partition Wizard.

Bottom Line
When your SSD reports an incorrect size, start by checking its status in Disk Management.
- If there is unallocated space, extend the partition.
- When the disk exceeds 2TB, convert it to GPT.
- If there are hidden partitions, unhide them or assign a drive letter.
Furthermore, checking for file system errors or repartitioning the disk are also feasible solutions.
During the repair process, it is recommended to back up important files beforehand to prevent data loss.
Should you encounter any issues while using MiniTool products, please send an email to the support team at [email protected].
About The Author

Position: Columnist
Shirley holds a bachelor’s degree in English and has been an editor at the MiniTool Team for many years. She specializes in IT-related content, with a focus on data recovery, file backup, disk management, and other technical topics. She is committed to delivering clear, accurate, and practical solutions to help users resolve common computer issues.
User Comments :