An Overview of “The Semaphore Timeout Period Has Expired”
“The semaphore timeout period has expired” is a common I/O timeout error message in Windows systems.
It means that an operation (usually file read/write or network transfer) did not complete within the specified time, causing the system to report an error.
It commonly occurs in two situations: during file transfers and when accessing the disk. Here are some possible causes for this error.
- Security software interference: Firewalls or antivirus software block file transfers, causing system timeouts.
- Unstable network environment: High latency, packet loss, or abnormal router configuration can prevent data from being returned within the specified time.
- File system limitation: The FAT32 file system cannot transfer a single file larger than 4 GB. The system will report a timeout error when attempting to transfer the file.
- Storage device issues: Bad sectors on the hard drive, unstable interface, or damaged USB/SATA cable can block read/write requests.
- Outdated driver or firmware: The hard drive driver is outdated, causing delays or interruptions during transmission.
After getting a better understanding of this error, the next step is to resolve it.
Case 1: “The Semaphore Timeout Period Has Expired” When Copying Files
File transfer essentially relies on continuous disk read/write or network data exchange. Once the underlying operation times out, the system will abort the transfer process.
This section explains how to fix the semaphore timeout period has expired error when file copying is interrupted.
Fix 1: Check Hardware Connections
A transmission interruption is most likely due to a device connection failure. Therefore, check the hardware connection first.
If the connection is intact, proceed with the following method.
Fix 2: Open the Folders on Both Devices Simultaneously
Ensure that both the origin and destination devices on both ends of the transfer are open.
If you need to copy files from a computer to your phone, open both the folder on the phone and the folder containing the files you want to copy on the computer.
While copying large files, refresh your phone’s folder view every one or two minutes.
Fix 3: Disable Firewalls and Antivirus
Firewalls or antivirus software may block or delay data transfers on disks and networks, causing system timeouts.
Temporarily disabling them can help rule out interference from security software.
To disable the Firewall:
Step 1: Right-click the Windows button and choose Settings.
Step 2: Click Update & Security > Windows Security > Firewall & network protection.
Step 3: Select and click your active network (e.g., Private network).
Step 4: Toggle the Microsoft Defender Firewall switch to Off.
To disable the Windows Defender antivirus:
Step 1: In the Windows Security tab, click Virus & threat protection.
Step 2: Under Virus & threat protection settings, click Manage settings.
Step 3: In Real-time protection, toggle the button to Off.
If this method doesn’t help, try the next one.
Fix 4: Reset Network Settings
Incorrect network configuration or corrupted cache may cause data transmission interruptions or delays, triggering timeouts.
Resetting network settings can clear erroneous configurations and caches, restoring the connection environment and refreshing transmissions.
Step 1: Press Win + I to open Settings and click Network & Internet.
Step 2: Scroll the list to find the Network reset option and click it.
Step 3: Click the Reset now button, then restart your PC.
If this approach does not work, continue with the following one.
Fix 5: Update the Disk Driver
An outdated disk driver may cause read/write requests to fail, triggering timeouts. Updating the driver can fix compatibility issues and improve data transfer stability.
Step 1: Press Win + X and choose Device Manager.
Step 2: Expand Disk drives, right-click the disk, and select Update driver.

Step 3: In the new window, click Search automatically for drivers.
Follow the on-screen instructions to complete the whole process.
After the driver is updated, check if the timeout error is fixed. If this fails, move on to the next step.
Fix 6: Run CHKDSK
Bad sectors or file system errors on the disk may prevent read and write requests from being completed promptly.
Running CHKDSK can detect and repair these problems, restoring the disk’s normal responsiveness.
Step 1: Type Command Prompt in the Windows search bar, right-click the best match, and select Run as administrator.
Step 2: When prompted by UAC, click Yes to continue.
Step 3: Type chkdsk <drive letter>: /f /r (e.g., chkdsk G: /f /r) and press Enter.
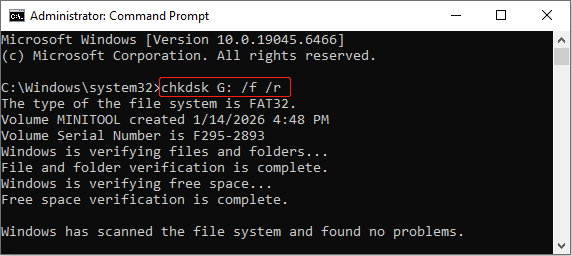
When the process ends, try copying files again to check if this issue is fixed.
Fix 7: Convert FAT32 to NTFS
The FAT32 file system cannot handle single files larger than 4GB, which can easily lead to transfer interruptions and timeouts.
Converting FAT32 to NTFS can overcome this limitation and improve file read/write stability.
Step 1: Search for cmd in the Windows search bar, right-click Command Prompt, and select Run as administrator.
Step 2: Type convert <drive letter>: /fs:ntfs and press Enter. Replace <drive letter> with the actual letter (e.g., convert G: /fs:ntfs).
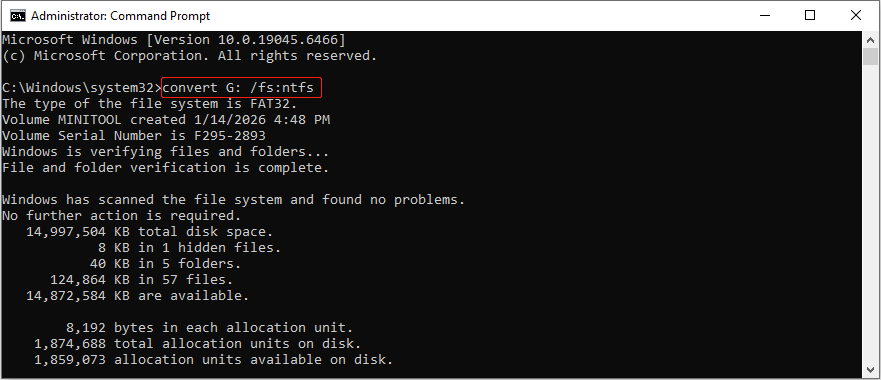
The conversion will start. Wait for it to complete.
Case 2: “The Semaphore Timeout Period Has Expired” When Accessing the Drive
When a low-level read/write request times out, disk data cannot be read or written normally, resulting in the message “Drive is not accessible.”
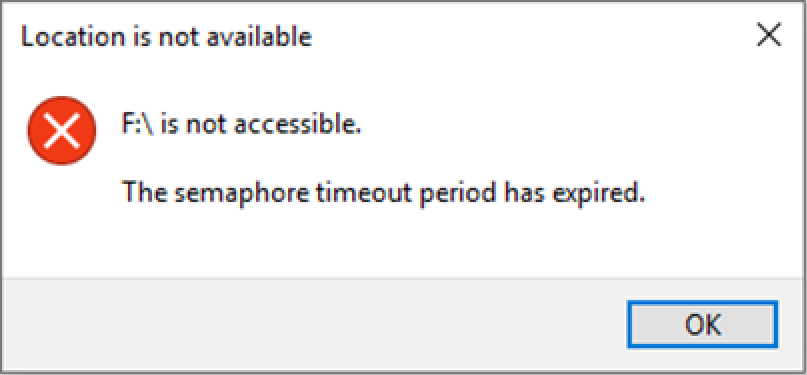
This section shows you how to fix the semaphore timeout period has expired when the drive is inaccessible.
Method 1: Troubleshoot Memory Usage
Excessive memory usage or memory leaks can prevent the system from processing disk or network requests on time, resulting in timeouts.
Checking and reducing memory usage can identify and resolve issues related to insufficient resources or abnormal memory consumption.
Method 2: Run CHKDSK
When a disk becomes inaccessible due to a timeout, running CHKDSK can check and repair file system errors, mark bad sectors, and attempt data recovery.
This helps the system re-establish normal access to the disk.
Step 1: Open Command Prompt as an administrator.
Step 2: Type chkdsk G: /f /r and press Enter. Replace G with the drive letter of your drive.
Wait for the repair process to complete.
Method 3: Uninstall All USB Drivers
Uninstalling and reinstalling all USB drivers can clear misconfigurations and restore normal device communication, thus fixing access issues for USB storage devices.
Step 1: Press Win + X, then select Device Manager from the menu.
Step 2: Click the View menu, then select Show hidden devices to display previously connected devices.
Step 3: Expand Universal Serial Bus controllers. Then, right-click each entry (especially the grayed-out ones) and select Uninstall device.
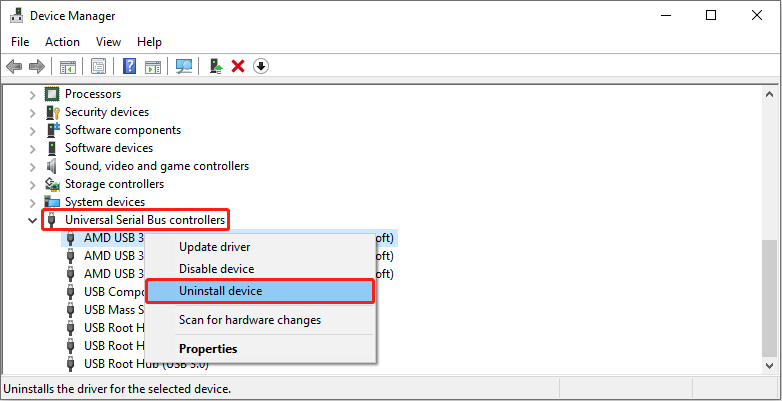
Step 4: Restart your computer to allow Windows to detect the USB port and automatically reinstall the driver.
Should this solution fail, attempt the subsequent method.
Method 4: Perform a Clean Boot
Third-party startup items or services may interfere with disk operation, causing timeouts and resulting in disk inaccessibility.
Performing a clean boot can troubleshoot problems by loading only essential system services. This helps determine if software conflicts are causing the error.
Step 1: Press Win + R, type msconfig, and press Enter to open System Configuration.
Step 2: Go to the Services tab, select the Hide all Microsoft services checkbox, and click Disable all.
Step 3: Switch to the Startup tab and click Open Task Manager.
Step 4: Select an unnecessary program and click Disable. Repeat this process for all unnecessary items.
Step 5: Close Task Manager, and in the System Configuration window, click Apply > OK.
Finally, restart your computer when prompted. After entering the clean boot state, check if you can access your disk without errors.
- If the error disappears, enable services or startup items one by one to locate the source of the conflict. If it is caused by a program, uninstall it.
- If the error remains, the problem is unrelated to third-party software, and you need to check your hardware or system settings.
If none of these methods work, format your drive.
Method 5: Format the Disk to Normal
Formatting a disk can clear faulty file systems and rebuild a stable storage structure. This helps resolve access problems caused by timeouts.
Formatting will wipe all data on the disk. Therefore, use data recovery software to recover files from the inaccessible drive in advance.
Action 1: Recover data from an inaccessible drive
This professional data recovery software, MiniTool Power Data Recovery, is a good choice for inaccessible disk recovery. Here are its advantages.
- Multiple data loss scenarios: Besides disk inaccessibility, it can also handle various data loss scenarios such as partition loss, accidental deletion, and incorrect formatting.
- Strong compatibility: This tool supports diverse storage devices, including hard drives, USB flash drives, and SD cards, making it suitable for different recovery needs.
- Wide file types: It is capable of recovering almost all file types, including documents, pictures, videos, and audios.
- Free edition: This free data recovery software allows you to recover 1 GB of files for free.
Download and install it on your computer to start recovering files.
MiniTool Power Data Recovery FreeClick to Download100%Clean & Safe
Step 1: Launch the software and scan the problematic drive
Open MiniTool Power Data Recovery. In the main interface, there are two scan options.
- Under Logical Drives, find the inaccessible partition and click Scan.
- Under Devices, locate the whole disk and click Scan.

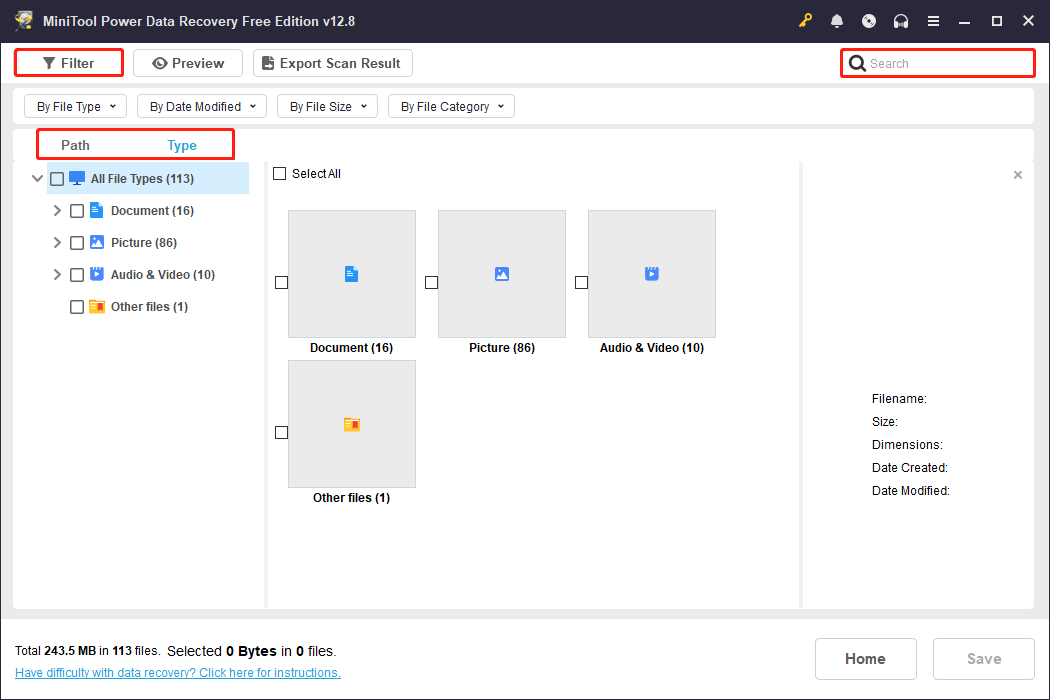
Step 2: Find the target files using Path, Type, Filter, and Search
Wait for the scan process to complete. When it ends, find files by using the following features.
- Path displays scan results according to the original folder path. Expand Deleted Files, Lost Files, or Existing Files to find the files.
- Type categorizes files based on file type, such as document, picture, video, audio, and more.
- Filter provides four filter criteria, file type, modification date, file size, and file category. Click the Filter button and set them to narrow the scope.
- Search allows you to search for a specific file by filename. Type the full or partial filename in the box and press Enter to lock the target file.
Once you found the files, double-click them to preview. The Preview feature allows you to view pictures, audios, videos, and more. This helps confirm whether the file is correct and complete.
Step 3: Save the needed files to a safe place
When the required files are confirmed, select them and click Save. In the pop-up window, choose a path and click OK to store the recovered files.
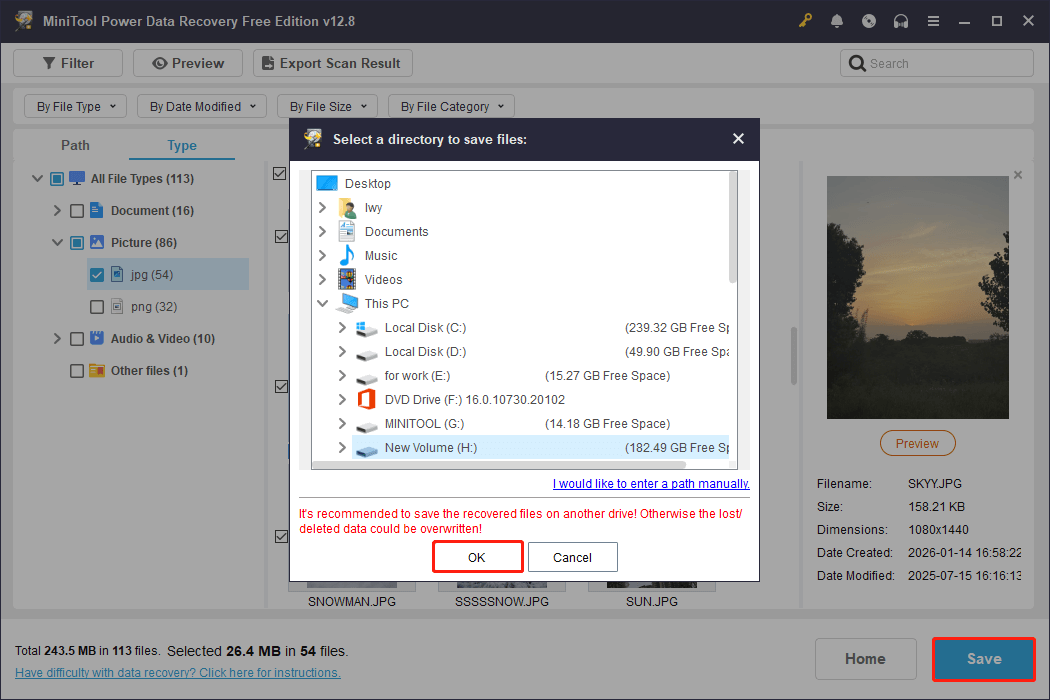
If the free recovery capacity remaining on the Recovery Completed window shows 0, upgrade to a full edition to continue restoring files.
Action 2: Perform a format
With file security ensured, formatting becomes imperative. Here are two tools to help you format your drive.
With Disk Management:
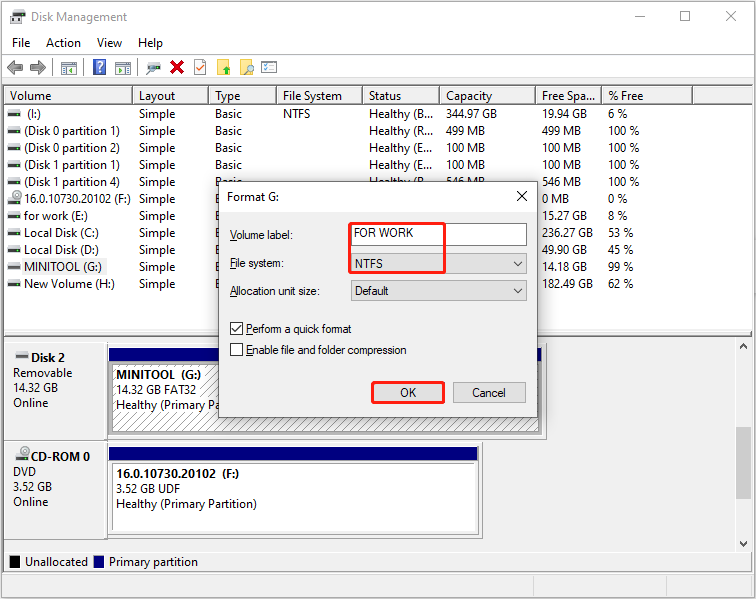
Disk Management is a built-in tool on Windows used to manage hard drives and other storage devices. Here is how to use it to format your drive:
Step 1: Press Win + X and choose Disk Management.
Step 2: Right-click the target drive and choose Format.
Step 3: Enter a volume label, choose a file system, and click OK.
With MiniTool Partition Wizard:
MiniTool Partition Wizard is a powerful partitioning tool. It offers a more intuitive and flexible interface than Windows’ built-in Disk Management.
This tool supports multiple file systems (such as NTFS, FAT32, exFAT, etc.) and can handle large partitions and complex disk structures.
Step 1: Download and install the software, and then launch it.
MiniTool Partition Wizard FreeClick to Download100%Clean & Safe
Step 2: Select the target drive and click Format Partition under Partition Management.
Step 3: Type a partition label, set a file system, and click OK.
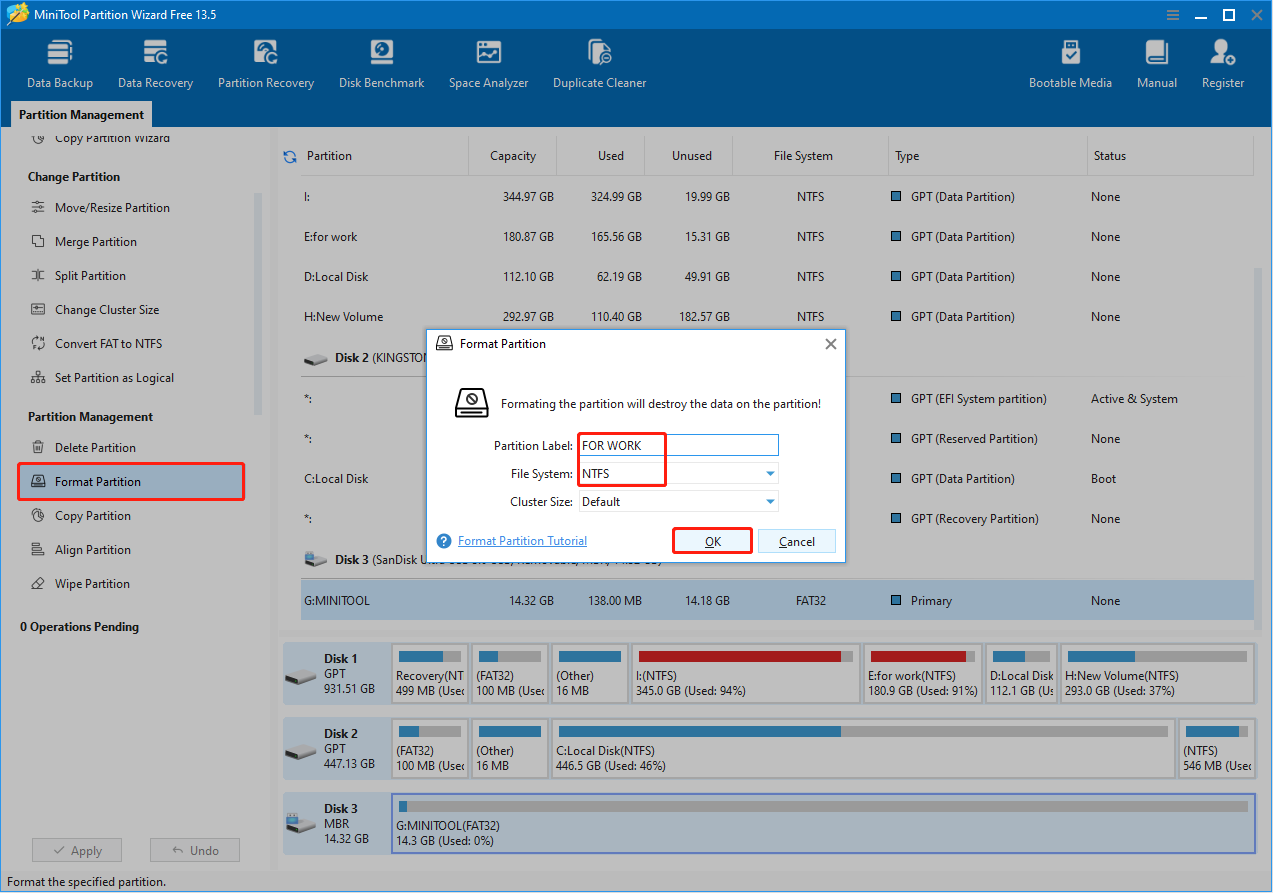
Step 4: Click the Apply button to make the change take effect.
Wrapping Things Up
The “The semaphore timeout period has expired” error can be divided into two situations.
- File copying is interrupted. In this case, try disabling the firewall temporarily, resetting network settings, updating disk drivers, running CHKDSK, or converting FAT32 to NTFS.
- The disk cannot be accessed. In this case, try uninstalling all USB drivers, performing a clean boot, or formatting the drive.
Feel free to contact us at [email protected] with any questions about MiniTool products.
About The Author

Position: Columnist
Chelsea graduated from university with a major in English. She has a strong interest in English writing. It is this passion for writing that led her to become an English editor. Her articles mainly foucus on data recovery and other computer industry news. As an energetic and outgoing girl, Chelsea enjoys listening to music, singing, riding bikes, and eating in her spare time.
User Comments :