The I/O device error will prevent you from accessing your disk to view the files. Do you have any idea why this error occurs and how to fix it? What if there are some significant files on the inaccessible disk? Now read this post to learn how to use MiniTool Power Data Recovery to recover your files and fix the I/O device error.
Overview of the I/O Device Error
“I/O device error when initializing hard drive. Hello. When I try to initialize my second hard drive - a pop-up says the request could not be completed because of an I/O device error. I really need this fixed ASAP, so I can start using the extra space the hard drive will give me. Has anyone ever seen or had this problem before? Your help is much appreciated. Thank you.”answers.microsoft.com
I/O device error, full name “Location is not available. Disk is not accessible. The request could not be performed because of an I/O device error”, is a very common disk error. It usually occurs during various disk operations, such as trying to open the disk to access files, initialize the disk, format the disk, write data to the hard drive, etc.
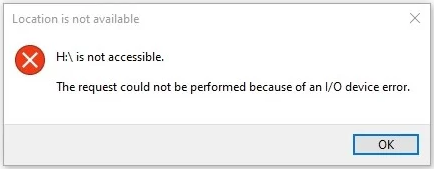
This error usually means that your computer cannot read or write data on the disk, thus preventing you from accessing it. Diverse types of disks, including internal HDD/SSD hard drives, external hard disks, USB flash drives, SD cards, CDs/DVDs, etc., may encounter this error.
Why Does the I/O Device Error Occur
Why do you experience the I/O device error Windows 10/11? There are a variety of reasons for the I/O device error, ranging from simple disk connection problems and driver problems to complex file system corruption or hardware failures.
Regardless of the cause, the disk repair process may result in data loss or more serious disk damage, especially when the disk has serious file system errors. Therefore, if the disk contains important files, we always recommend that you recover your files on it before performing disk repair.
Recommended: Recover Files From Inaccessible Disk Before Disk Repair
How can you recover files from inaccessible disk with the I/O device error? You can use MiniTool Power Data Recovery, the best free data recovery software designed and developed for Windows 11/10/8.1/8. Why does this tool stand out among many data recovery software and is worth using? Here are the main reasons:
- Strong adaptability: It works well on data recovery for various types of disks, including HDDs, SSDs, USB flash drives, SD cards, CDs/DVDs, and more. It is good at handling various data loss or inaccessibility scenarios, such as disk formatted, disk partition lost, disk turned into RAW, external hard drive not recognized, virus deleted files, etc.
- Seamless and secure data recovery: All kinds of files, encompassing documents, videos, photos, audio, emails, archives, etc. are supported for recovery. Designed with the read-only functionality, it can help restore your files without writing new data to the disk so that it won’t bring any damage to the inaccessible disk and files on it.
- Intuitive interface and simple recovery steps: Its interface is intuitive and clear, and the built-in functions are prominently displayed. Moreover, its operation steps are simple and clear, thus data recovery can be easily completed without a complicated learning process.
- Multiple software editions: This tool provides you with various software editions, covering the free edition to personal editions and business editions. It can fulfill your data recovery needs in different scenarios. It is worth noticing that it has a bootable edition that can help recover files from an unbootable computer.
- Attentive customer support: It has 24*7 customer support to ensure that you can get efficient and professional help during software download, registration, and use.
Now, download and install the free edition of MiniTool Power Data Recovery on your computer, and then follow the instructions below to rescue your data.
MiniTool Power Data Recovery FreeClick to Download100%Clean & Safe
Step 1. Select the Disk to Scan
Launch MiniTool Power Data Recovery Free and its main interface will be displayed. On its home page, your internal or external hard disk partitions will be displayed under Logical Drives. Move your cursor to the target one where you want to recover files and click the Scan button. If there are multiple partitions and it is difficult to determine which one is the target, you can switch to the Devices tab where all disks are listed. Then select the target one and click Scan.
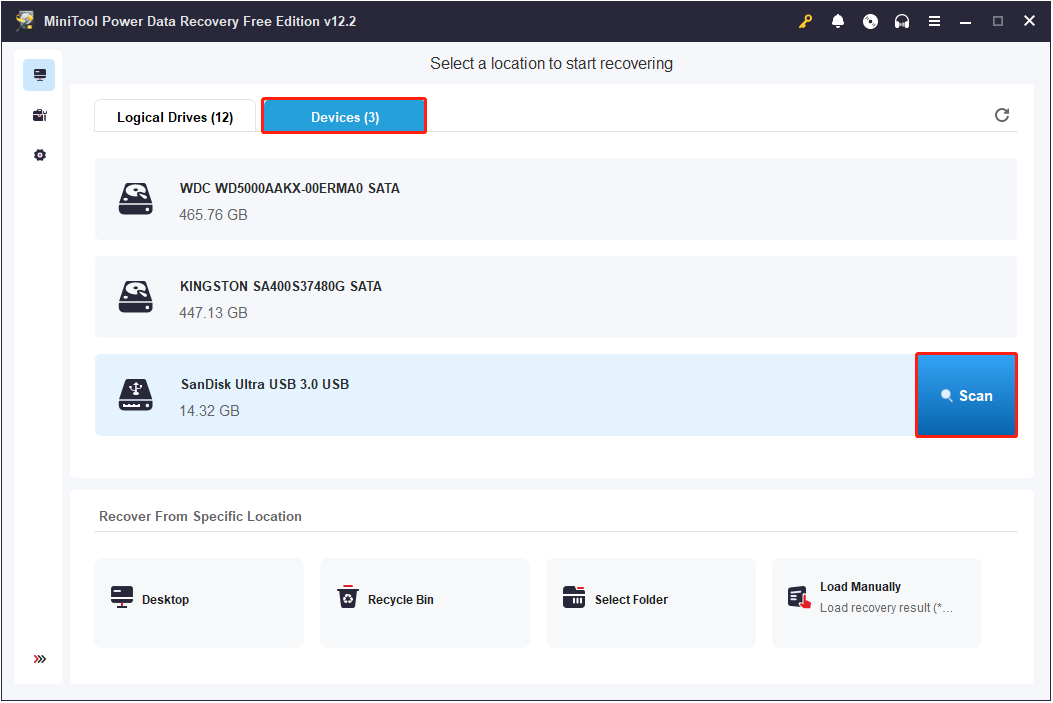
Usually, the data scanning will take some time to complete, which is related to the disk status and the amount of data. To get the optimal disk scanning outcomes, you need to wait until the scan is completed automatically instead of interrupting it.
Step 2. Find and Preview the Files You Want to Recover
After scanning, all files, including the deleted, lost, and existing items, are listed in the scan result window. You have two options to find the needed files:
- Path: This is where all found files are displayed in a tree structure by default. You need to unfold each folder to find the needed items. If the disk and data scan are in good condition, you have a chance of recovering the files with the original structure.
- Type: Under this tab, all files are classified by file type and file format. Expand the All File Types tab, the target file type, and the data format sequentially, then you can view all files in that format.
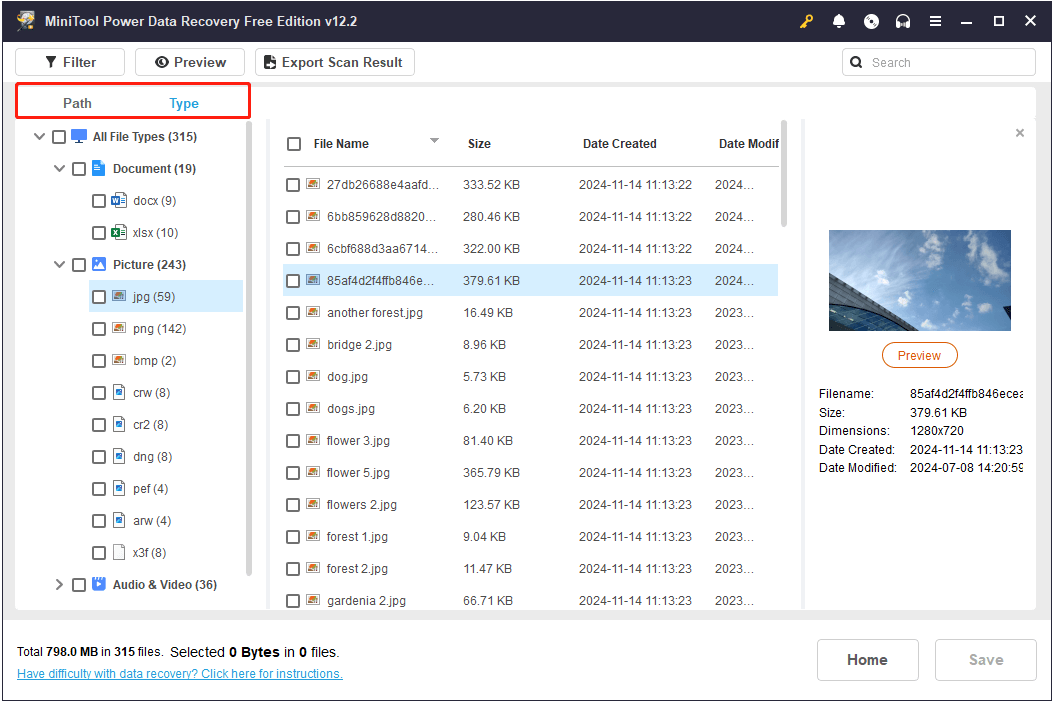
If you still have trouble locating the desired files, you can make use of the Filter and Search features to perform rough screening and precise searches.
- Filter: After clicking the Filter button in the upper left corner, several options will show up, enabling you to filter out unnecessary files by file type, file modification date, file size, and file category. You can set up one or more filtering conditions to narrow down the file list. To avoid repeated file selection operations, try to set the filtering conditions at one time.
- Search: This feature is used to search for certain files whose names contain a specific keyword. Simply type the keyword of the file name you remember and press Enter, then you will see the search results.
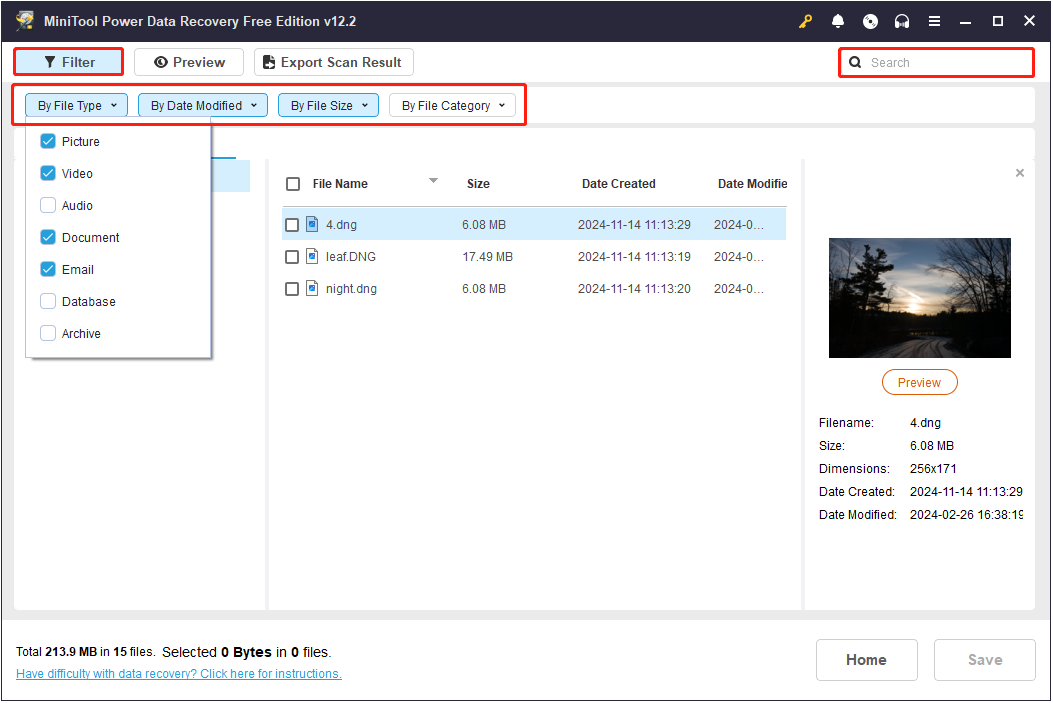
Furthermore, this file restore tool supports free file preview for almost all types of files. You can simply double-click on a file to preview it.
Step 3. Save the Needed Files
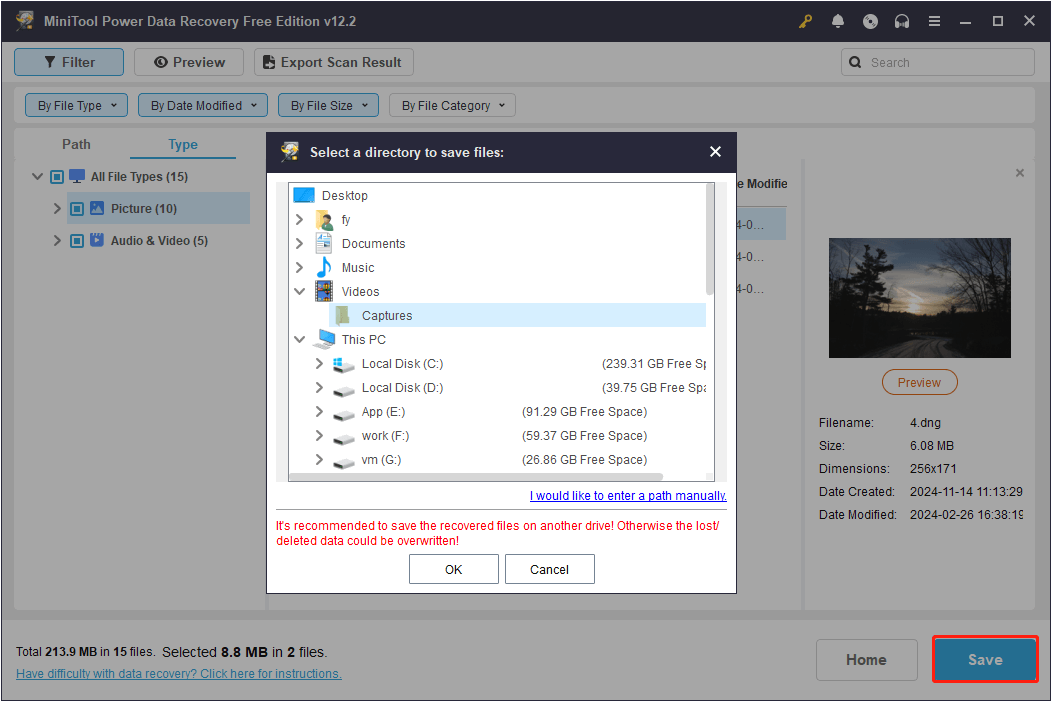
Finally, make sure you have selected all the files you want to recover, and then click Save in the bottom right corner. In the pop-up window, select a directory to store them. If the total size of the selected files does not exceed 1 GB, they will all be recovered for free. If it exceeds, the excess part will not be recovered unless you upgrade the software to an advanced edition according to the prompt on the screen.
How to Fix I/O Device Error on Windows
After recusing your files from the disk, you can take measures to resolve the I/O device error without worrying about file loss.
Basic Troubleshooting Steps:
Occasionally, the I/O device error is simply caused by an unstable or faulty disk connection. To verify if this is the case, you can check if the cable is loose or the connector is damaged. You can also try changing a port or computer to check if the problem is fixed. If the disk is still inaccessible, you need to use the following methods for disk repair.
Solution 1. Update/Reinstall the Disk Driver
Disk drivers act as a bridge between the operating system and your storage device and are very important for the proper functioning of the disk. If the disk driver is outdated, incompatible, or damaged, it can cause a range of problems including the I/O device error. In this case, updating or reinstalling the disk driver is the most effective solution.
Step 1. On the taskbar, right-click the Windows logo button and choose Device Manager.
Step 2. Expand the Disk drives category. Then right-click the problematic disk and choose Update driver.
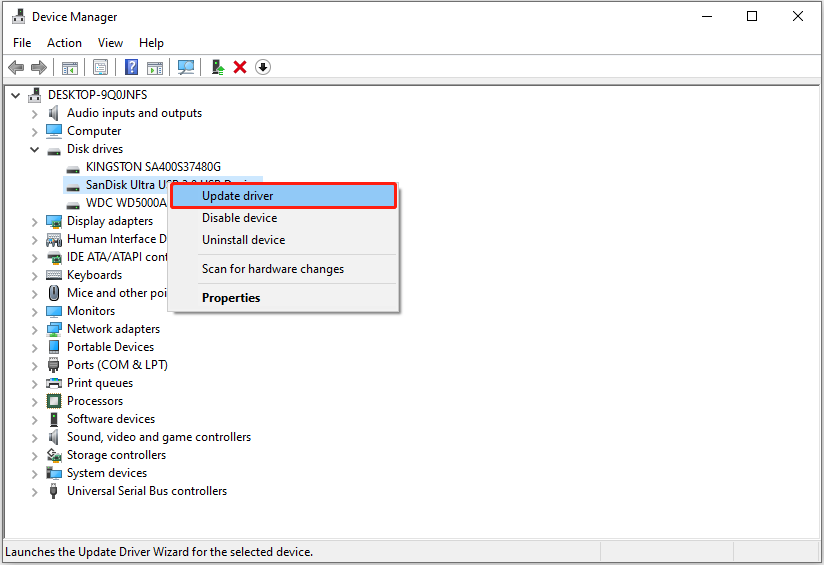
Step 3. Select Search automatically for drivers.
If after updating the disk driver, the I/O device error persists, you can uninstall and reinstall the driver. Right-click your disk and choose Uninstall device. Then restart your computer and the most appropriate driver will be automatically installed.
Solution 2. Check the Disk for File System Errors
File system problems can cause read and write operations to fail, generating the I/O device error or some other errors. Typically, there are three ways to check and repair file system corruption.
Option 1. Use the Error-Checking Tool
- Press the Windows + E key combination to open File Explorer.
- Go to the This PC section. Right-click on your disk and choose Properties.
- Switch to the Tools tab, and hit Check under Error-checking.
Option 2. Use CHKDSK Command Line
- Type cmd in the search box on the taskbar. When the Command Prompt option shows up, right-click it and choose Run as administrator.
- Type chkdsk [drive letter]: /f and press Enter. You need to replace the drive letter with the actual one of your problematic disk.
Option 3. Use MiniTool Partition Wizard
MiniTool Partition Wizard is a professional and powerful disk manager. It can also help detect and resolve file system errors for free. Additionally, as an all-in-one tool, it can help create/resize/format partitions, convert disks, clone disks, measure disk read/write speed, analyze disk usage on a computer, and so on.
Download and use it to check for and fix file system errors.
MiniTool Partition Wizard FreeClick to Download100%Clean & Safe
- Open the installed MiniTool Partition Wizard. On the right panel, select the disk partition, and then choose Check File System from the left toolbar.
- Tick the Check & fix detected errors option and hit Start. Wait for the process to be completed.

Solution 3. Format the Disk
Formatting is also a proven solution to remove the I/O device error. You can format the disk in File Explorer, Disk Management, or using MiniTool Partition Wizard.
MiniTool Power Data Recovery FreeClick to Download100%Clean & Safe
Here are the steps to format the disk.
- In File Explorer: In the This PC section, right-click your disk and choose Format. Select a file system, input a volume label, tick Quick Format, and click Start.
- In Disk Management: Right-click your disk and choose Format. Set up the volume label and file system, tick Perform a quick format, and click OK.
- In MiniTool Partition Wizard: Select the partition, and scroll down the left menu bar to choose Format Partition. Configure the partition label and file system, and click OK. In the bottom left corner, click the Apply button.
Solution 4. Send to Disk Maintenance Center
If all the above methods fail to fix the I/O device error, the disk may have a physical failure. You may need to seek help from a professional disk repair technician instead of repairing it yourself.
Bonus Tip: Back up Hard Disk Files
By now, you have probably solved the I/O device error and recovered your data. Whether you have done it easily or with difficulty, it is necessary to back up your data to avoid secondary disk errors or data loss in the future.
If you are looking for a professional and reliable file backup tool, you can try MiniTool ShadowMaker. It is a powerful tool that can safely back up your files, folders, partitions, disks, and systems to internal or external hard drives, USB drives, and shared folders.
If you are not sure whether it suits you, you can download and install its trial edition to have a try. This edition allows you to use it for free within 30 days.
MiniTool ShadowMaker TrialClick to Download100%Clean & Safe
See this tutorial: A Comprehensive Guide on How to Back up Files (Windows 10/11).
Bottom Line
As you can see, the I/O device error is not unresolvable as long as you use the methods above. Also, secure data recovery is easy to perform with MiniTool Power Data Recovery at hand.
If you have any confusion about MiniTool software, feel free to contact the support team for assistance via [email protected].



User Comments :