When using cameras, mobile phones, or other devices in daily life, we often come into contact with portable storage media such as SD cards. Although they are small, they carry a lot of valuable data – photos, videos, documents, etc.
However, during use, have you ever encountered a situation where the SD card suddenly becomes “read-only” and cannot delete or write files? This is likely that the SD card is locked. This article will help you understand the information about SD card lock and unlock to help you better manage and protect your data.
About SD Card Lock and Unlock
Why Do You Need the Lock Feature
The purpose of locking the SD card is to prevent writing, protect data from being deleted, or prevent others from accessing it. The locking methods can be divided into physical locking and software-level locking. To help you get the most out of this SD card lock or unlock feature, here are its key use cases.
- Prevent accidental deletion of important data. Some photographers lock their memory cards immediately after shooting to ensure that the original footage is not accidentally deleted during the transfer and backup process.
- Block virus transmission. After using the SD card in a public print shop, lock the SD card to prevent auto-execution viruses on infected devices from destroying the files on the card.
- Maintain the integrity of the system disk. Raspberry Pi users lock the configured system card to prevent the system files from being tampered with and becoming unbootable.
- Ensure compliance with data protection requirements. After the original data collected by researchers in the field is locked, the requirements for archiving research data that cannot be tampered with can be met.
- Enable secure data transfer. Lawyers will store evidence submitted to the court on a locked SD card to ensure that the content is not modified in the transmission chain.
Why Can’t You Unlock SD Card
Sometimes, you may find that the SD card cannot be unlocked. Why does this happen? Actually, there are several reasons why your SD card cannot be unlocked. Read on to learn more about the possible causes.
- The physical write-protect switch is not turned off. There is usually a small sliding switch on the side of a standard SD card. What does lock and unlock mean on an SD card? If it is in the “Lock” position, the system will identify it as unable to write or format.
- Driver or system recognition abnormality. Sometimes the computer does not correctly recognize the SD card due to driver issues or poor interface contact, causing it to appear locked and preventing it from being unlocked by regular methods.
- The write-protect attribute is not cleared (software level). Even if the physical switch is turned off, the SD card may still be set to “read-only” by the system.
- The physical write-protect switch is damaged. If the small lock switch on the SD card is broken or stuck, the card may cannot be unlocked.
How to Lock and Unlock SD Card on Windows
SD cards can typically be locked and unlocked using a physical switch or by changing certain properties. However, some special card locking situations may require different approaches. Continue reading for more details.
Situation 1: Physical switch unlocking (90% of the problems are solved by this step)
Firstly, you can use the physical switch to unlock it. This is the simplest and most direct way.
- Remove the SD card. Remove the SD card from your phone, camera, or card reader.
- Find the SD card lock and unlock position. Look at the left edge of the SD card (opposite the gold finger). Find a micro slider with an arrow or labeled Lock.
- Push the slider. Push the slider away from the locked position; it is unlocked when the slider moves to the top (a slight click is heard) and the metal contacts underneath are exposed.
- Plug the device back in. Insert the SD card back into the device and check if the write protection is removed. To lock the SD card, slide the switch back to the gold contacts until it clicks into place.
Situation 2: When the SD card shows Read-only
When the SD card displays Read-only, it means that the system prohibits write operations, and files cannot be deleted. Here are some ways to unlock it.
Method 1: Unlock the SD card using CMD
If it is clear that the SD card is not physically locked but locked for other reasons, you can try to unlock it using CMD (Command Prompt). Using CMD to unlock the SD card can remove the write protection, allowing you to read and write data on the card again. The specific steps are as follows.
Step 1: Type CMD in the Windows search bar, right-click Command Prompt, and choose Run as administrator.
Step 2: When prompted by UAC, click Yes to continue.
Step 3: Type the following commands in turn, and just press Enter each time:
- diskpart
- list disk
- select disk # (# should be replaced with your SD card number.)
- attributes disk clear readonly
Method 2: Unlock the SD card in Registry Editor
The registry is the core configuration database of the Windows system. By modifying specific key values, you can control the read and write permissions of the storage device, thereby removing the “read-only” status of the SD card. Here is how you can do it.
Step 1: Press the Win + R keys to open the Run dialog.
Step 2: Type regedit in the window and click OK to open Registry Editor.
Step 3: Navigate to the following address:
Computer\HKEY_LOCAL_MACHINE\SYSTEM\CurrentControlSet\Control\StorageDevicePolicies
Step 4: Right-click the StorageDevicePolicies folder, select New > DWORD (32-bit), and rename it as WriteProtect.
Step 5: Double-click the WriteProtect key, set its value data to 0, and then click OK.

Step 6: Close the Registry Editor and reconnect the SD card. To enable write protection and lock the SD card again, you can set the value data to 1.
Situation 3: SD card is not locked, but the device prompts that it is locked
There is a situation where your SD card is unlocked, but when you plug it into the device, it still reminds you that you need to unlock it before you can use it. At this time, you can plug the SD card into your computer, back up its data, and then format it. Here is how you can do it.
Step 1: Insert your SD card into your computer.
Step 2: Right-click the Start button and choose File Explorer.
Step 3: Right-click the SD card partition and choose Format.
Step 4: Set the file system, allocation unit size, and volume label.
Step 5: Tick the box for Quick Format and click Start. Wait for the format process to be completed.
But what if the drive is disabled? Don’t worry. In this case, you need to recover data from the SD card first. After that, perform a format. When it comes to data recovery, I have to recommend that you use professional data recovery software to recover files.
There are several very practical reasons to use MiniTool Power Data Recovery to recover SD card data, especially when faced with situations such as file system corruption, drive formatting, or other logical issues.
- Powerful deep scanning function. It can perform deep sector-level scans on SD cards, allowing for the recovery of files even after disk formatting or partition loss.
- Support for multiple data loss scenarios. Whether it is accidental deletion, virus attack, system crash, file system error, or SD card prompt “inaccessible”, it provides recovery solutions.
- Strong compatibility and support for multiple file types. Supports recovery of more than 100 types of files, such as documents, pictures, videos, audio, etc., suitable for multiple devices, such as camera cards and mobile phone memory cards.
- Simple operation, suitable for non-professional users. With simple operation instructions, you can successfully recover files in just a few steps. The interface is intuitive and suitable for users without a technical background to get started quickly.
This free file recovery software allows you to restore 1 GB of files without a cent. Now, download and install it on your computer to do an SD card recovery.
MiniTool Power Data Recovery FreeClick to Download100%Clean & Safe
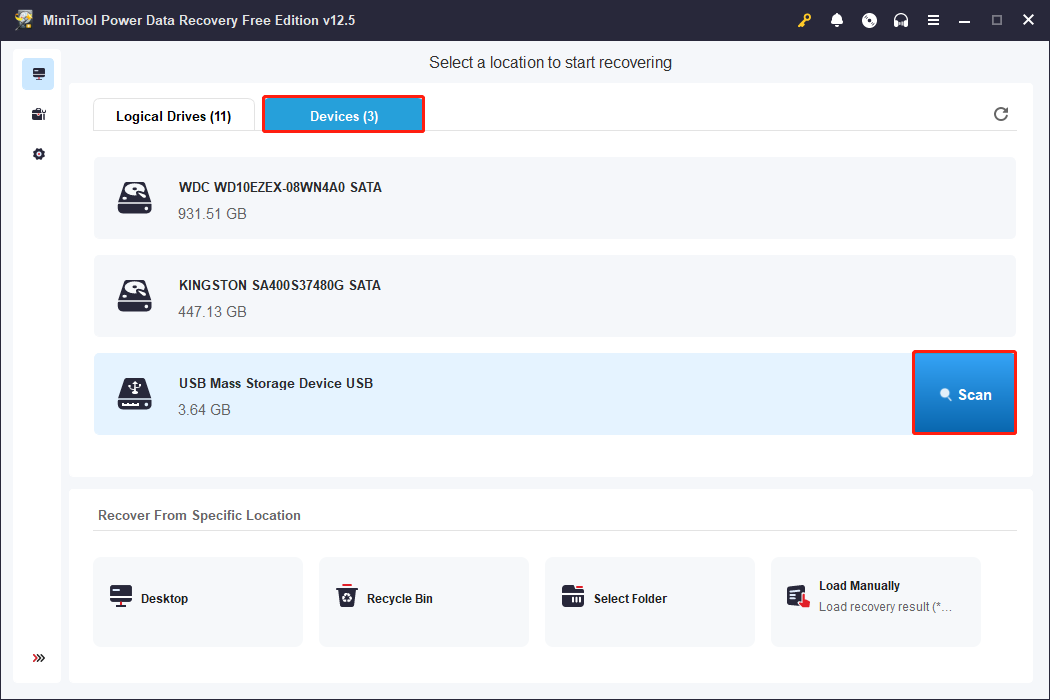
Step 1: Launch MiniTool Power Data Recovery and enter the main interface. In the Logical Drives section, all partitions, including lost, deleted, or existing partitions, are listed. Next to it, the Devices tab shows all the disks connected to your computer. Move your cursor on the SD card section and click Scan to scan for data.
Step 2: This process may take a while. For the more complete scan results, you need to wait patiently for the process to be finished. Once the scanning ends, find files under the Path tab according to the file structure. If you find it a little difficult to find the target file, try the following features.
MiniTool Power Data Recovery provides multiple features to help you quickly locate the files you need to recover from a large number of scan results. Type, Filter, and Search are the most commonly used and practical features. Here are their detailed introductions:
- Type: Classifies the scan results by file type (such as pictures, documents, videos, audio, etc.). Suitable for use when you don’t remember the file name but know the file type.
- Filter: Provides a variety of filtering conditions, including file type, file size, modified date, and file category. Filtering by file type (such as only displaying documents or videos) can greatly narrow the range of results and save search time.
- Search: Allows you to search for files by keywords in their names, making it ideal for situations when you remember the full or partial file name.

These features can be used in combination, such as first using Type to find pictures, then using Filter to limit the size range, greatly improving recovery efficiency.
Step 3: After finding the target file, you may wonder how to check if it is the correct one. As a comprehensive tool, it provides a Preview feature to help you check the file’s content. Double-click the file or select the file and click the Preview button.

Step 4: After confirming the file, you can proceed to the last step. Tick the boxes for all the required files and click the Save button. In the pop-up window, choose a new location to store the recovered files and click OK to start the recovery process.
When the Recovery Completed window shows up, it means your files have been restored to the specified location. This pop-up window will also display the size of the restored files and the remaining free recovery capacity.

However, you know it supports recovering 1 GB of files for free. What if it is used up? Don’t worry. It offers a full edition to retrieve files without limit. You can get it in the MiniTool Store.
After recovering files, it is recommended to format the SD card, which can reinitialize the file system and restore the SD card to a “usable state”.
Situation 4: Locked by BitLocker
If your SD card is locked with BitLocker encryption, you will need to enter your password or use your recovery key to unlock it. If you cannot unlock it, you can only format your SD card first and then perform an SD card data recovery.
Bottom Line
Although the SD card lock and unlock function seems simple, it is an important design to protect data. Understanding the principles can make it easier for us to face problems such as data cannot be written and device recognition abnormalities.
If you have any questions about MiniTool Power Data Recovery, don’t hesitate to tell us via [email protected].
About The Author

Position: Columnist
Chelsea graduated from university with a major in English. She has a strong interest in English writing. It is this passion for writing that led her to become an English editor. Her articles mainly foucus on data recovery and other computer industry news. As an energetic and outgoing girl, Chelsea enjoys listening to music, singing, riding bikes, and eating in her spare time.
User Comments :