Issue: Boot Configuration Data Missing on Windows 10
“Boot Configuration Data missing” is a common error message during Windows startup. It indicates that the system cannot find or read the BCD.
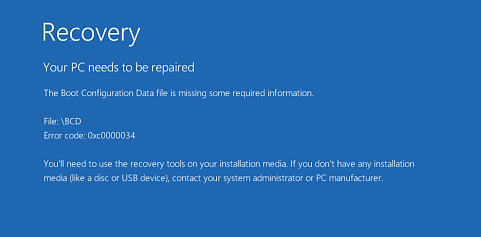
You will see a blue screen message such as “Your PC needs to be repaired” or an error code like 0xc0000034.
If you haven’t encountered this problem before, you might be very confused. First, learn about the details of Boot Configuration Data.
What Is Boot Configuration Data
Boot Configuration Data (BCD) is a boot configuration mechanism introduced in Windows Vista. It replaces the boot.ini file in older versions of Windows.
This data is a core component of the Windows operating system used to manage the boot process. It stores Windows boot options based on BIOS or UEFI boot modes.
The location of the Boot Configuration Data depends on whether the operating system is BIOS-based or UEFI-based.
- For BIOS-based systems, the BCD is located in the \Boot\Bcd directory of the active partition.
- For UEFI-based systems, the BCD is located in the \EFI\Microsoft\Boot\BCD path of the EFI system partition (ESP).
Therefore, the BCD is important in the operating system. What would happen if it is lost?
What Happens When Boot Configuration Data Is Missing
When you see the error message “The Boot Configuration Data is missing”, it means the system cannot find or read the critical information needed to start Windows. The following situations may occur:
- System boot failure: When you start your computer, it will directly enter the Windows Recovery Environment and require repair.
- Black screen or blue screen: The computer may keep getting stuck on the blue screen.
- Unable to enter safe mode: The system can’t perform a basic boot and enter safe mode.
Why does “Boot Configuration Data missing” happen? Read on to learn about the possible factors.
Why Does “Boot Configuration Data File Is Missing” Occur
The “BCD missing” error typically occurs when Windows cannot find or access the necessary startup configuration. Here are some common causes.
- Sudden power outage or forced shutdown: This may cause disk write interruption, corrupting BCD files.
- Hard drive failure or bad sectors: The system disk has physical damage and cannot read boot data.
- Virus or malware attacks: Some viruses tamper with or delete startup-related files.
- Incorrect disk partitioning operation: The partition containing BCD was accidentally deleted or formatted using a partitioning tool.
- System update failure: An interruption or error during the update process may have corrupted the startup configuration.
- BIOS/UEFI settings error: The boot order or mode settings are incorrect (such as UEFI/Legacy conflict).
After knowing the reasons, it’s time to resolve the problem of Boot Configuration Data missing.

How to Fix the Problem of Boot Configuration Data Missing
In this part, learn how to run Startup Repair, rebuild BCD, set the correct partition as active, or reinstall Windows to get rid of the “BCD missing” issue.
Method 1: Run Startup Repair
Startup Repair is a built-in recovery tool on Windows operating systems. It is designed to automatically detect and repair critical boot problems, including missing or corrupted BCD files.
It restores boot functionality by scanning system files and rebuilding necessary boot components. This requires no advanced command-line operations.
Since the system cannot start normally, run Startup Repair using Windows installation media:
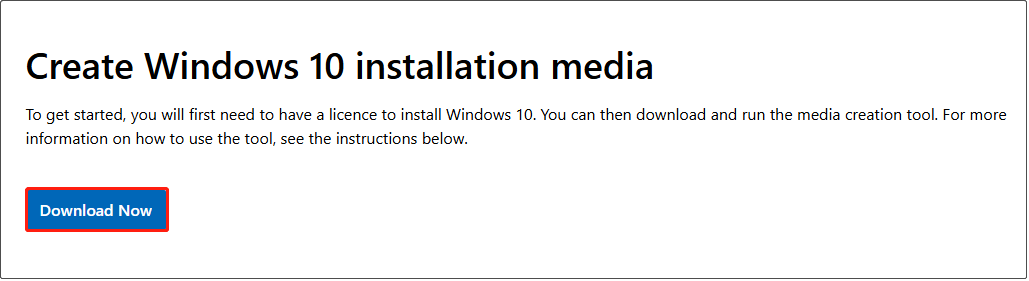
Step 1: Create Windows installation media on a working computer
Insert a blank USB drive into a working computer. Visit the Windows 10 download page. Locate Create Windows 10 installation media and click Download Now. After the download is complete, run MediaCreationTool.exe and follow the wizards to create the installation media.
Step 2: Boot from the USB drive
Insert the Windows installation disk into your non-bootable computer, and restart your computer.
During the startup process, press the specific key, such as F2, F12, Del, or Esc, to enter the BIOS/UEFI boot menu. Then select the USB drive as the boot device to start the system from it.
Step 3: Start the Startup Repair
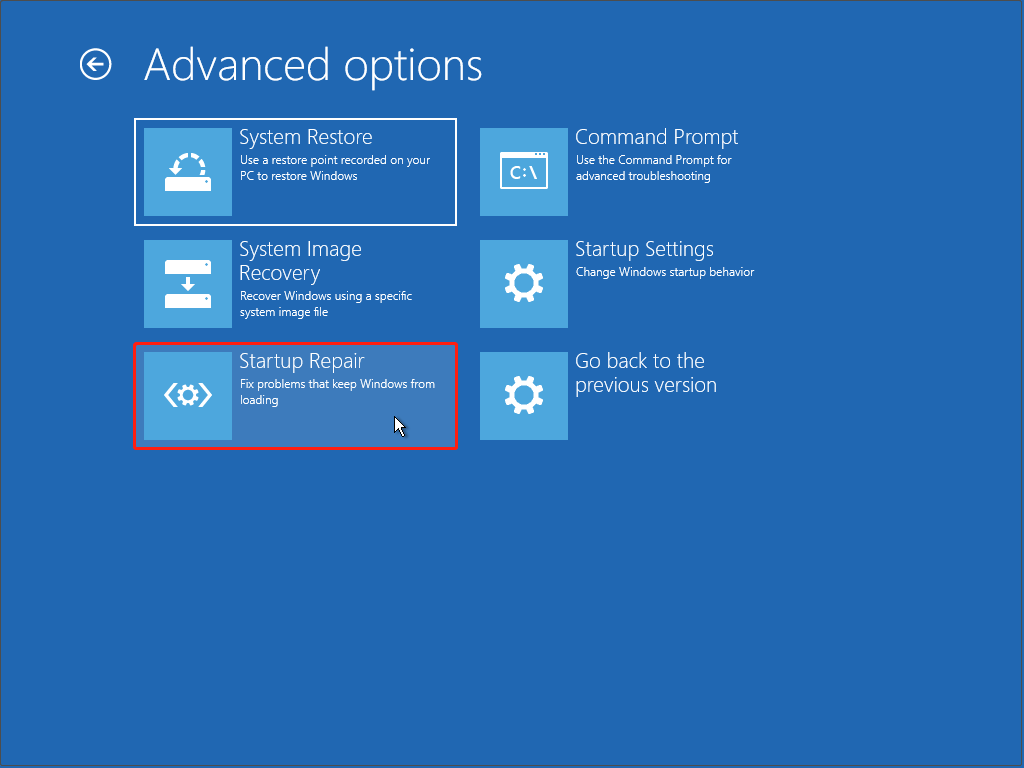
After entering the installation interface, select your language and click Next. Then, select Repair your computer in the bottom left. In the Choose an option window, select Troubleshoot > Advanced options > Startup Repair.
After Startup Repair finishes, the system will display whether the repair was successful. Restart your PC and check if Windows can load normally.
If this method doesn’t work, proceed with the next one.
Method 2: Rebuild BCD Using the Bootrec Command
The command “bootrec /rebuildbcd” scans the system for all available operating system installations and adds them back to the BCD store.
This repairs the boot configuration and restores normal system startup. This is one of the key steps in fixing boot problems. Here is how to do it:
Step 1: Open the Command Prompt
Follow the steps in Method 1 to enter the Advanced options window. Then, click Command Prompt to open it.
Step 2: Execute the Bootrec command
In Command Prompt, type bootrec /rebuildBcd and then press Enter. When it completes, type Yes and press Enter.
If the startup problem persists, you can export and delete the BCD store, and then run this command again. This will ensure that the BCD store is completely rebuilt. Type the following commands one by one, pressing Enter after each:
- bcdedit /export C:\BCD_Backup
- c:
- cd boot
- attrib bcd -s -h -r
- ren c:\boot\bcd bcd.old
- bootrec /rebuildBcd
Step 3: Restart your computer
Close the Command Prompt, and restart your computer to see if it starts successfully.
Should this approach fail, try the following method.
Method 3: Set the Correct Partition as Active
The active partition is the primary partition marked as active on a hard drive using an MBR partition table. During startup, the BIOS searches for the first active partition and loads the operating system’s boot loader from it.
If an incorrect partition is set as active, the system will be unable to find the correct boot files. Setting the correct system partition as active ensures that the boot loader can correctly locate and load the operating system.
MiniTool Partition Wizard features the Set Active and Set Inactive functions. It can help you fix system startup problems caused by an incorrect active partition.
MiniTool Partition Wizard FreeClick to Download100%Clean & Safe
Since your computer cannot boot normally, we recommend using MiniTool Partition Wizard Pro, which does not require a Windows operating system. Here are the specific steps:
Step 1: Launch MiniTool Partition Wizard on a working computer. On its main interface, click Bootable Media to create a bootable CD/DVD or USB flash drive.
Step 2: Insert the boot disk into the faulty computer and set it to boot from that disk. After booting, you will enter the software’s main interface.
Step 3: Select the partition that contains the boot files, typically the System Reserved partition, or the Windows partition if no System Reserved exists. Then choose Set Active from the left-hand operation panel.
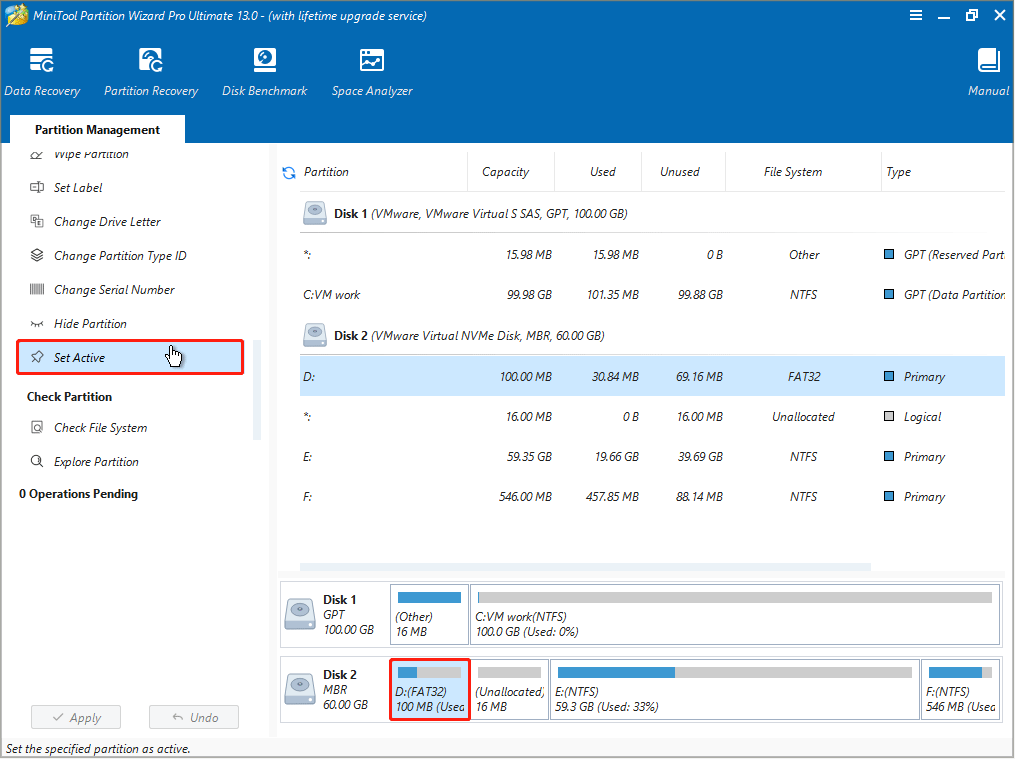
Step 4: Click the Apply button in the lower left corner to save the changes.
After completing the above steps, restart your computer to check if it can boot normally.
If the issue persists, continue with the last resort.
Method 4: Perform a Clean Installation
When the Boot Configuration Data for your PC is missing, performing a clean install is the last resort.
The BCD is the core configuration file for Windows boot. If it is severely corrupted, the system will be unable to recognize the boot path.
A clean install completely rebuilds the boot structure, system files, and registry. This avoids potential boot errors or residual problems, thus restoring the system to normal operation.
Before you do: recover data from a non-bootable computer
Before reinstalling your operating system, it’s crucial to rescue your data, as system reinstallation may overwrite existing partitions and format the disk. This results in the permanent loss of important files.
MiniTool Power Data Recovery offers powerful scanning capabilities. Even if the system fails to boot, the hard drive can be accessed via a boot disk.
This software is capable of recovering various file types and doing multiple device recovery, such as external hard drive recovery, SD card recovery, etc. It is compatible with Windows 11/10/8/8.1. With a clean interface and simple operation, it is easy to use for a novice.
Before you begin, do the following preparations:
- A working computer
- A blank USB flash drive (8 GB or larger recommended)
- MiniTool Power Data Recovery Bootable
- Target computer (the one that won’t boot)
After everything is ready, proceed with data recovery.
Step 1: Create a bootable disk on a working computer
1.1. Download, install, and launch MiniTool Power Data Recovery Bootable.
1.2. On the main interface, click the Bootable Media icon in the upper right corner. Insert the USB flash drive, and then click WinPE-based media with MiniTool plug-in.
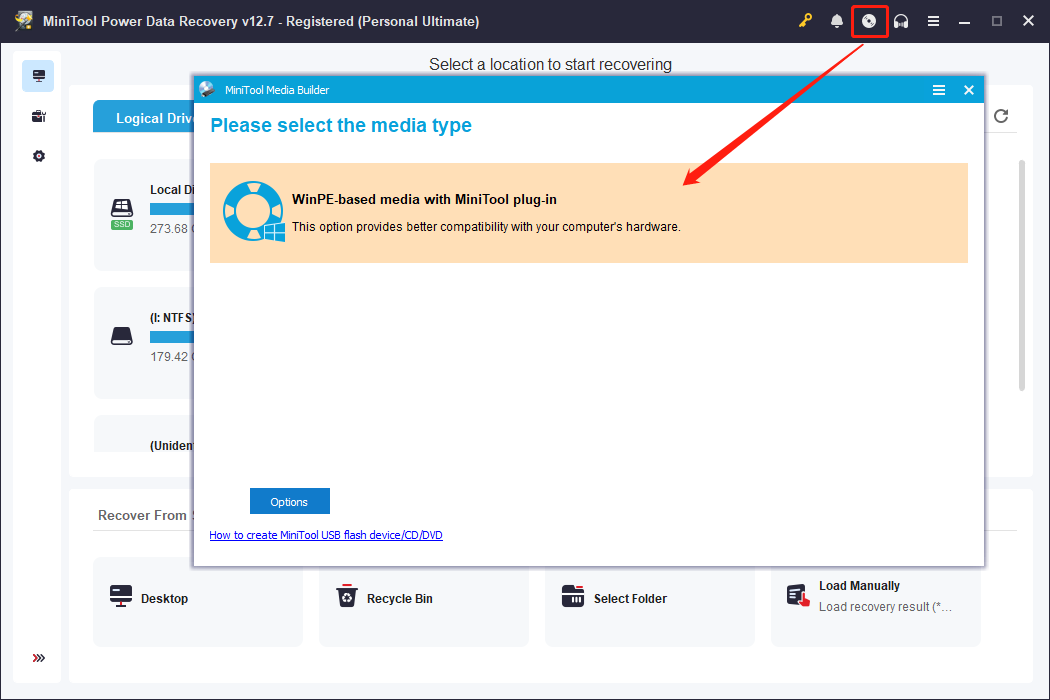
1.3. Select the USB Flash Drive as the target. It will begin creating the bootable disk.
Step 2: Boot the target computer from USB
2.1. Insert the prepared USB boot disk into the computer that cannot boot.
2.2. Start the computer and enter the BIOS settings (usually press F2, F12, Esc, Delete, etc. during startup).
2.3. Go to the Boot tab and change the boot order to boot from the bootable USB disk. Then, you will enter the MiniTool WinPE environment.
Step 3: Recover data using MiniTool
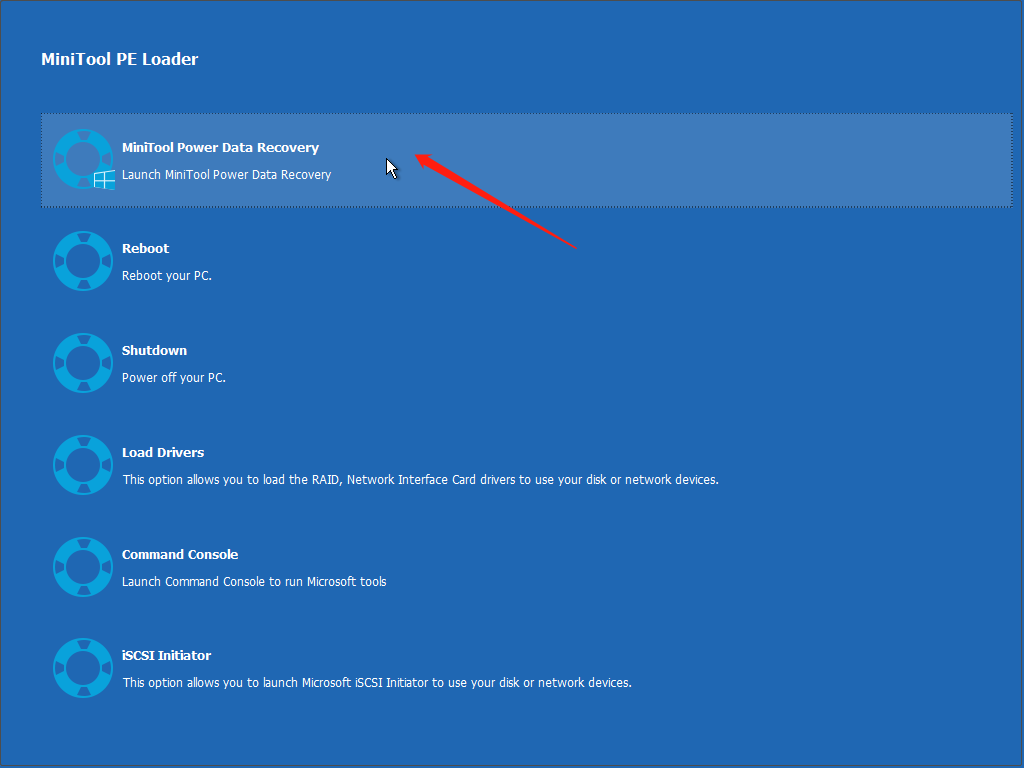
3.1. In the MiniTool PE Loader interface, select MiniTool Power Data Recovery to launch it.
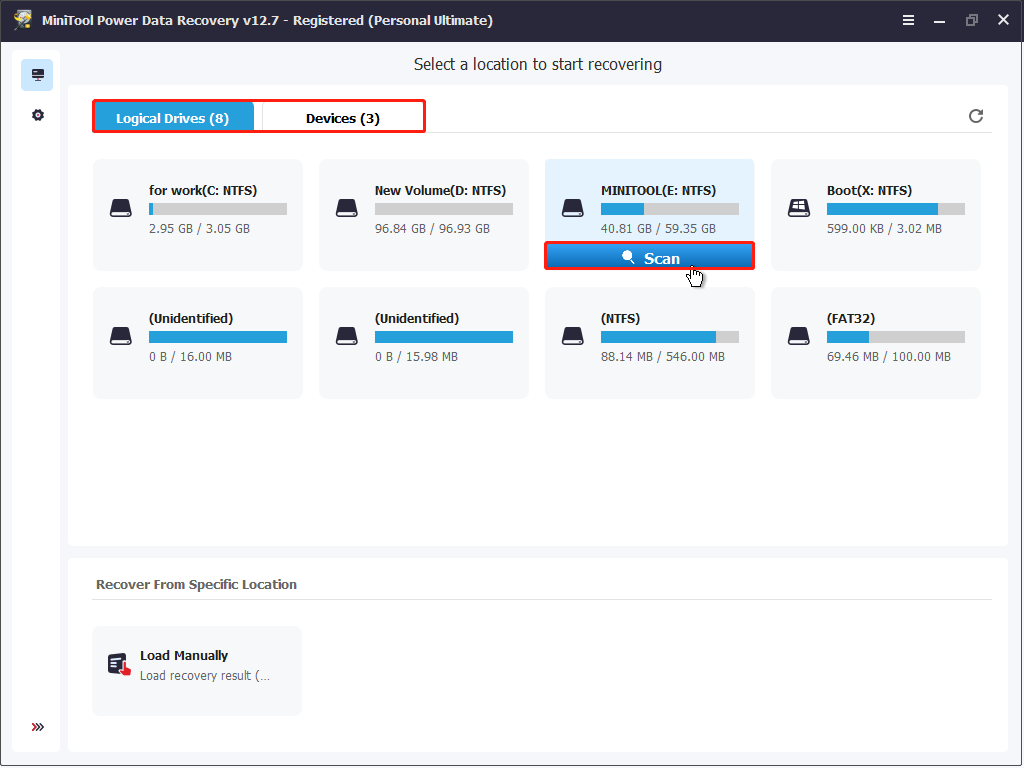
3.2. On the main interface, select the system partition (note that in WinPE it may not appear as C:) and click Scan.
3.3. Wait for the scan to complete, then start searching for target files. MiniTool provides several file-finding features:
- Path: Categorizes found files by file structure.
- Type: Displays scan results by file type (e.g., documents, pictures, videos, etc.).
- Filter: Filters scan results by file type, modification time, file size, and file category.
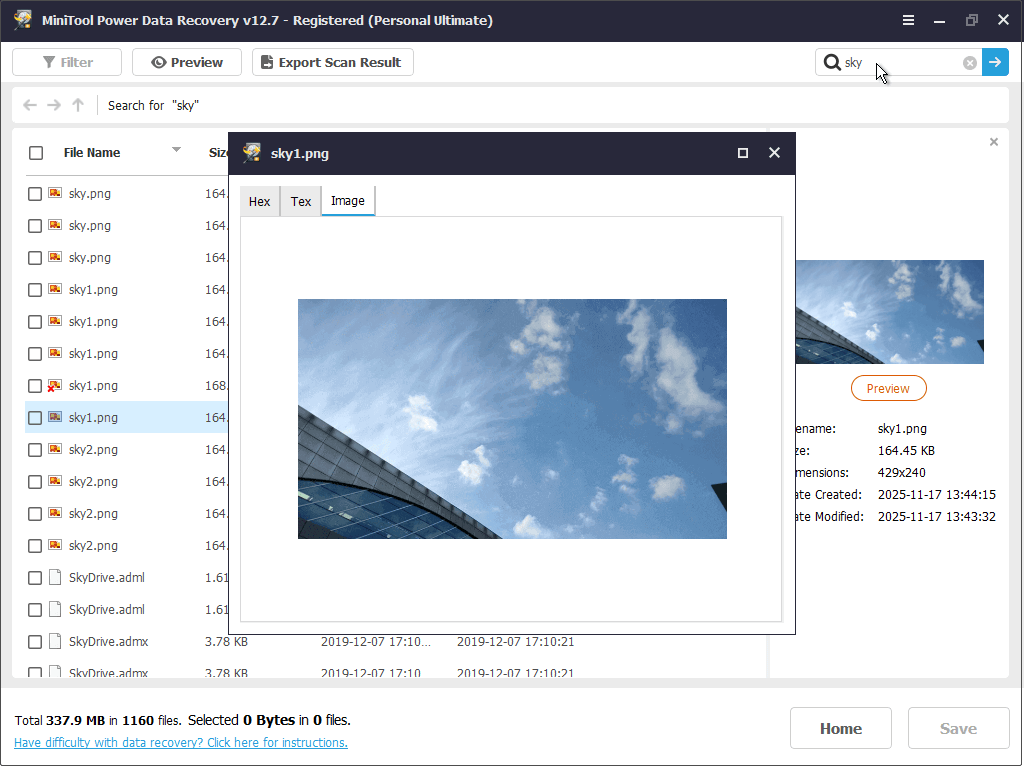
- Search: Supports entering the keywords of the filename to find the specific file quickly.
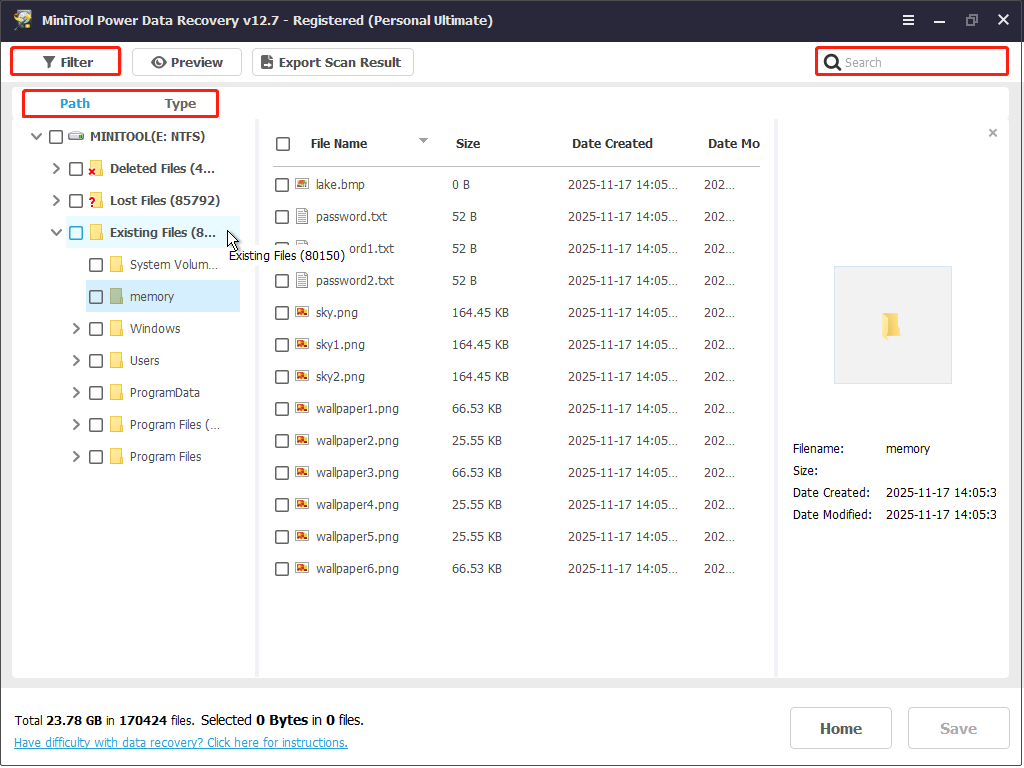
3.4. Once you locate the file, double‑click it. If preview is supported, the file’s contents will be displayed, allowing you to confirm whether it is the correct file.
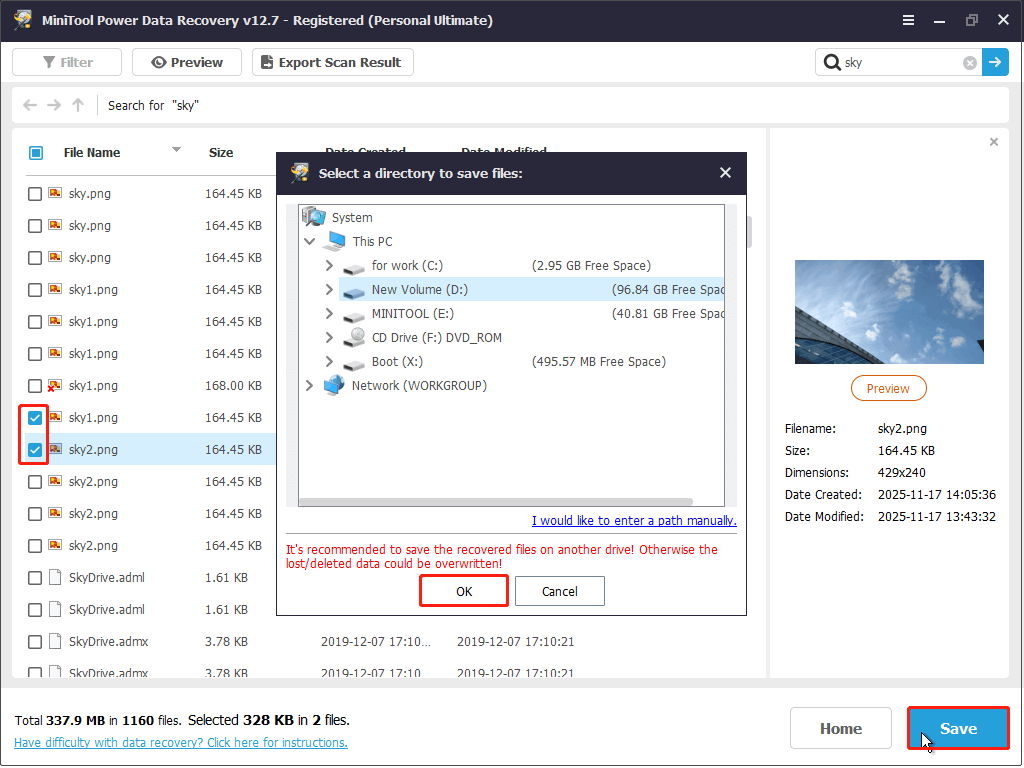
3.5. After confirming, select the files you want and click Save. Choose a safe disk as the save location. Finally, click OK to start the recovery process. When the Recovery Completed window shows, the files are recovered successfully.
After restoring the important data, you can reinstall the operating system. Here is how to perform a clean installation:
Step 1: Create an installation media on a working PC
Connect your blank USB to a working PC. Download and run the Media Creation Tool. Then follow the prompts to create an installation USB drive.
Step 2: Boot from Windows installation media
Connect the installation media to your unbootable PC. Repeatedly press F2, F12, Esc, or Delete to enter the BIOS settings during the boot process.
In BIOS, set the USB drive as the preferred boot device and then press the corresponding key as prompted.
Step 3: Complete personalization settings and authorize installation
Follow the guide to complete personalization settings and then click Next.
On the Choose installation options page, select Install Windows 10 > I agree to delete everything, including files, apps, and settings, and click Next.
Step 4: Install Windows 10
When the Choose where to install Windows 10 window pops up, delete all partitions on Disk 0 that are not listed as Unallocated space. Select Disk 0 Unallocated Space and then click Next.
The Ready to Install window will then appear, where you need to select Install to begin the reinstallation process.
Wait for the reinstallation process to finish. After it is completed, the system should be able to boot normally.
MiniTool Power Data Recovery FreeClick to Download100%Clean & Safe
To Sum Up
The Boot Configuration Data plays a crucial role in the computer’s operation. If it disappears, your computer will fail to boot.
This post provides several effective approaches to fix it, such as running Startup Repair, using the Bootrec command to rebuild BCD, setting the correct partition as active, or reinstalling Windows.
Most importantly, before doing a clean install of Windows, recover your data with MiniTool Power Data Recovery from your non-bootable computer.
If you have any concerns about MiniTool products, contact us through [email protected].
About The Author

Position: Columnist
Chelsea graduated from university with a major in English. She has a strong interest in English writing. It is this passion for writing that led her to become an English editor. Her articles mainly foucus on data recovery and other computer industry news. As an energetic and outgoing girl, Chelsea enjoys listening to music, singing, riding bikes, and eating in her spare time.
User Comments :