Issue: Windows Needs to Be Repaired
Windows 10 is one of the most widely used operating systems. However, even the most stable systems are subject to faults—blue screens, boot failures, system file corruption, and network connectivity issues.
These problems are not only frustrating but can also impact your productivity and overall work life. Luckily, Microsoft and third-party developers offer a variety of built-in features and free tools to help you safely repair Windows 10 free without losing data.
Common Windows 10 Issues
Before repairing, let’s first look at some problems that Windows 10 users may encounter.
- System file corruption: This can occur due to a virus infection or hard drive failure, preventing the system from booting or running properly.
- Startup failure: The computer may freeze on the logo screen, display a blue screen, go black, or reboot endlessly.
- Update issue: Windows updates may fail to install, show error messages, or cause system instability such as black screens, blue screens, or unexpected reboots.
- Malware attack: With a virus infection, files may be deleted or corrupted, abnormal pop-ups or program errors may appear, and the system may even fail to start.
- Performance degradation: The system may slow down, freeze, or experience frequent errors, impacting the user experience.
How to repair Windows 10? You should choose the corresponding method according to the specific situation. The following are two common situations.
Case 1. Repair Windows 10 When the Computer Boots Normally
Applicable to: System slowdown, frequent errors, and some functions cannot be used.
Before Repair: Back up Files
Before repairing your system or hardware, back up your important files. This ensures they aren’t lost due to operational errors.
MiniTool ShadowMaker is a powerful backup tool designed to protect important files. It provides comprehensive data backup and recovery functions. This helps you back up important files and allows you to restore files when necessary.
In addition, it can also be scheduled to perform automatic backups, preventing you from forgetting to perform manual operations. Download and install it to have a 30-day free trial.
MiniTool ShadowMaker TrialClick to Download100%Clean & Safe
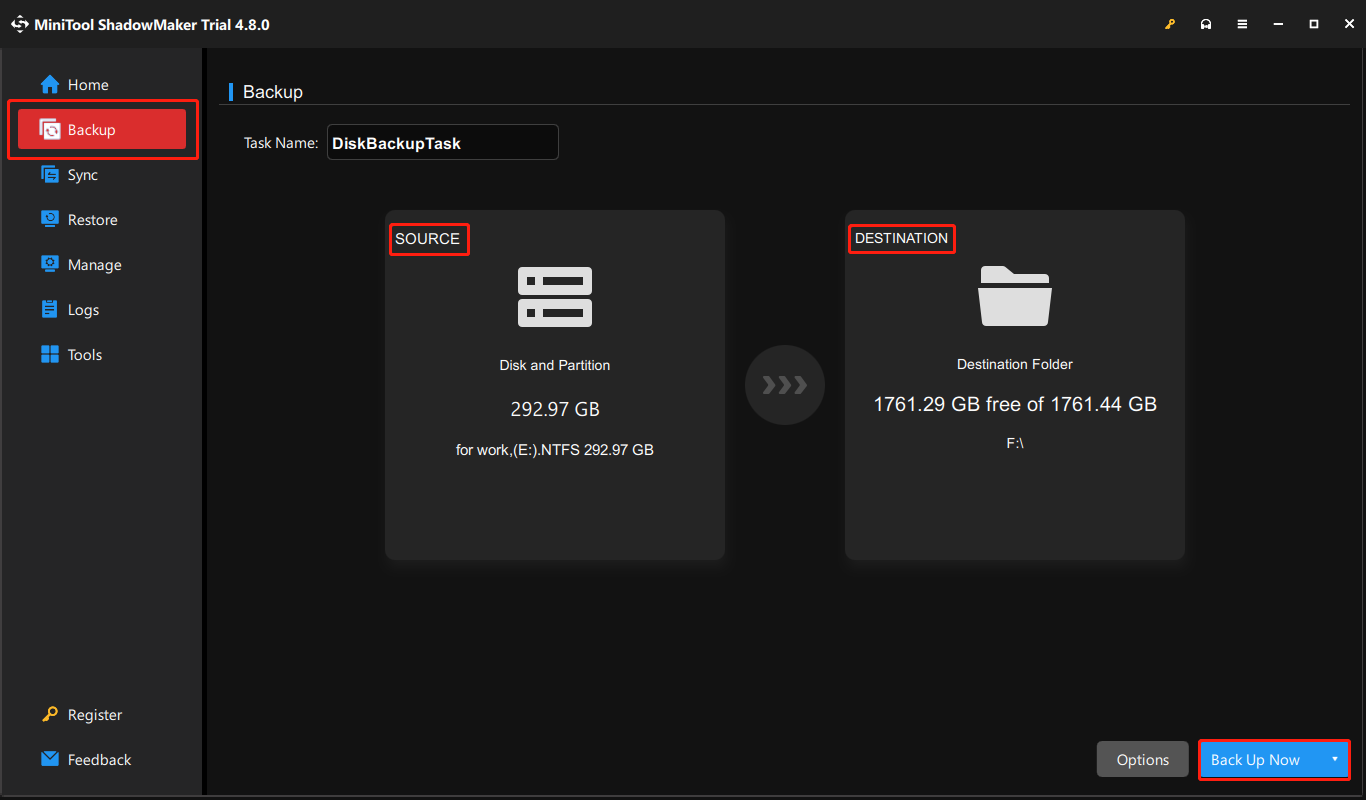
Step 1: Launch the software
Launch MiniTool ShadowMaker and click the Keep Trial button to enter the main interface.
Step 2: Select a backup source
Switch to the Backup section. Then, click the SOURCE area > Disk and Partitions or Folders and Files. Browse your computer and select the data you want to back up.
Step 3: Select a backup destination
Click the DESTINATION area, and select a location to save the backup files, such as an external hard drive or a network location.
Step 4: Set backup options (optional)
Click Options to set the compression level, encryption password, and more. In the Schedule Settings section, you can schedule automatic backups.
Step 5: Start the backup
Click Back Up Now to start the task. Wait for the backup to complete and then check if the backup files have been successfully saved.
After completing a backup, you can perform a Windows 10 repair with confidence.

Way 1: Run DISM and SFC
When Windows 10 boots but experiences system anomalies, update failures, or program crashes, running DISM and SFC can help.
SFC (System File Checker) scans and replaces corrupted system files, while DISM (Deployment Image Servicing and Management Tool) repairs the system image itself, ensuring SFC works properly.
Using them together can help restore system stability, resolve potential errors, and prevent further problems.
Step 1: Open an administrative Command Prompt
Press Win + S to open the Windows search bar, type cmd, right-click Command Prompt, and choose Run as administrator. When prompted by UAC, click Yes to continue.
Step 2: Run DISM and SFC commands
Type the following commands one by one in the prompt window, and press Enter after each.
- DISM /Online /Cleanup-Image /CheckHealth
- DISM /Online /Cleanup-Image /ScanHealth
- DISM /Online /Cleanup-Image /RestoreHealth
Once done, keep typing sfc /scannow to start scanning and repairing corrupt system files in Windows 10.

Way 2: Run the Related Troubleshooters
When your PC has a problem but still starts up normally, running the related troubleshooters in Windows 10 is also a quick way. They can help you identify and resolve common problems without in-depth technical knowledge.
Step 1: Right-click the Windows button and choose Settings.
Step 2: Click Update & Security > Troubleshoot > Additional troubleshooters.
Step 3: Browse the list and click the appropriate troubleshooter. Then, hit Run the troubleshooter.
The system will automatically start detecting problems and trying to fix them. Some troubleshooters will ask you to select a device or confirm an action. Just follow the prompts to complete it.
Way 3: Use “Reset This PC”
The “Reset This PC” feature can also repair Windows 10. It reinstalls the system and clears the source of the problem while allowing you to preserve personal files (if you choose the “Keep” option). This can restore your computer to a clean, stable state without having to reinstall or format it manually.
Step 1: Press Win + I to open the Settings app.
Step 2: Click Update & Security > Recovery.
Step 3: In the right pane, click Get started under the Reset this PC section.
Step 4: Choose Keep my files and click Next twice.
Step 5: Click Reset in the Ready to reset this PC window to start the process.
Way 4: Perform a System Restore
Performing a System Restore is a safe way to fix problems by undoing recent system changes and returning your computer to an earlier working state without reinstalling the operating system or affecting personal files.
Step 1: Type Control Panel in the Windows search bar and press Enter.
Step 2: Click Recovery > Open System Restore.
Step 3: In the pop-up window, click Next to continue.
Step 4: Choose a system restore point and click Next.
Step 5: Finally, click Finish to confirm the change.
These are methods that work if your computer can boot normally. If you cannot boot your computer, continue to the next part.

Case 2. Repair Windows 10 When the System Won’t Boot
Applicable to: Windows cannot enter the desktop environment.
Boot into WinRE First
Accessing WinRE, which contains the repair tools, is a crucial step in repairing an unbootable Windows. If your computer won’t boot normally, force it into the recovery environment using the following method:
Step 1: Press the Power button to turn on the computer.
Step 2: When the Windows logo appears on the screen, press and hold the Power button for 5-10 seconds to force a shutdown.
Step 3: Repeat this process three times. On the third attempt, allow the computer to restart fully. The computer should automatically proceed to the Choose an option screen, which is the entry point to WinRE.
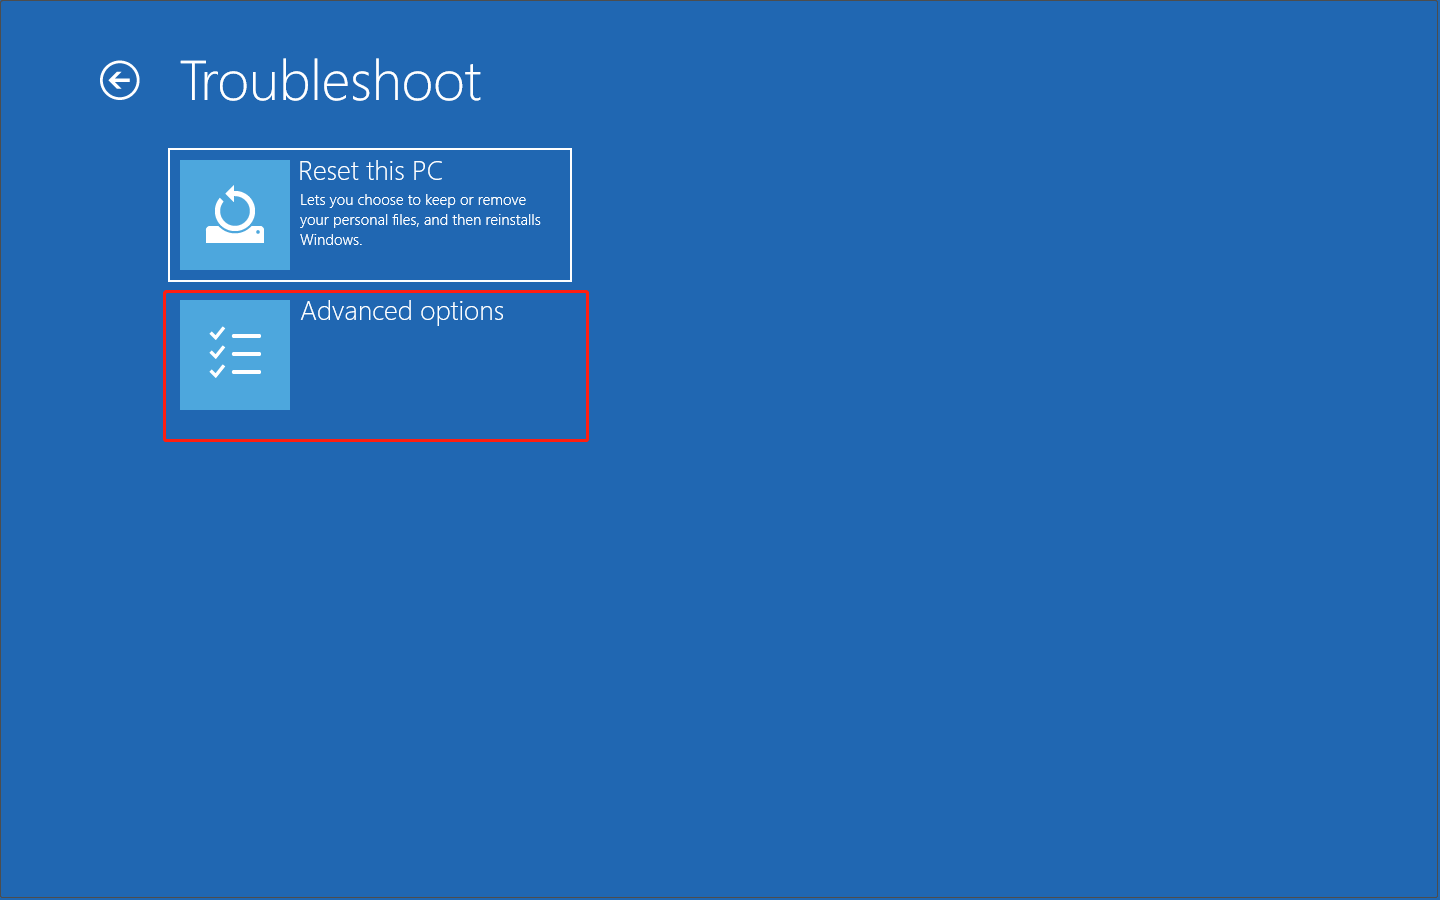
Once you reach the Choose an option page, select Troubleshoot > Advanced options to get started.
Way 1: Access Startup Repair
Using Startup Repair is the simplest solution and should be your first attempt. This tool automatically scans for and repairs common startup problems, such as corrupted system files or startup configuration errors.
Step 1: In the Advanced options menu, select Startup Repair and follow the prompts.

Step 2: Select your user account, enter the password if required, and then click Continue.
This tool will automatically scan and repair boot problems. The following issues will be checked:
- Corrupted or missing system files
- Boot Configuration Data (BCD) errors
- Master Boot Record (MBR) corruption
- Incompatible drivers or registry errors
If the repair is successful, your PC will restart normally. If the repair fails, continue to the next step.
Way 2: Execute the BootRec Commands
If Startup Repair doesn’t resolve the problem, you can use Command Prompt to manually repair startup files and check the disk for errors.
Step 1:In the Advanced options menu, select Command Prompt.
Step 2: Enter the following commands one by one, pressing Enter after each:
- bootrec /fixmbr (Repairs the Master Boot Record)
- bootrec /fixboot (Writes a new boot sector)
- bootrec /scanos (Scans all disks for Windows installations)
- bootrec /rebuildbcd (Rebuilds Boot Configuration Data)
Step 3: Finally, type exit, then click Continue or Restart to start the computer.
Way 3: Run a System Restore
If the problem occurred after a recent change, you can try rolling back the system. This will not affect your personal files.
Step 1: In the Advanced options menu, select System Restore.
Step 2: The System Restore wizard will open. Click Next to proceed.
Step 3: Select a restore point. You can click Scan for affected programs. It allows you to review the software that will be removed before performing the restore process. And prepare yourself by noting which programs will need to be manually reinstalled after the restore is complete.
Step 4: Click Next, then Finish to begin the restoration.
The system will restart and apply the selected restore point.
Way 4: Uninstall Recent Updates
After Windows updates, the system may have compatibility issues, causing it to fail to start. In this case, you can try uninstalling the updates.
Step 1: In the Advanced options menu, select Uninstall Updates. You’ll see two options:
- Uninstall latest quality update. It removes the most recent cumulative update.
- Uninstall latest feature update. It removes the most recent major version upgrade.
Step 2: Select the appropriate option based on what you want to remove, and follow the on-screen instructions to confirm and begin the uninstallation.
Step 3: Once the update is removed, return to the main menu and choose Continue to boot into Windows.

Way 5: Try “Reset This PC”
If your computer won’t boot, you can also use WinRE to perform a “Reset This PC”. This feature can help you fix system problems, restore factory settings, or even erase all data and start over.
Step 1: Start “Reset this PC”
Go back to the previous level. In the Troubleshoot screen, click Reset this PC. You will see two options as follows and click one according to your needs.
- Keep my files (remove apps and settings, but keep personal files)
- Remove everything (completely erase the system, including files, apps, and settings)
Step 2: Select an installation method
You will be asked how to reinstall Windows. If system files are severely corrupted, choosing Cloud download is safer. If you’re just cleaning the system, choosing Local reinstall is faster.
- Cloud download: Download the latest system image from Microsoft servers (requires an internet connection and at least 4 GB of data)
- Local reinstall: Reinstall the system using local recovery files (faster, but may retain existing system corruption)
Step 3: Confirm and start the reset
Review your choices, then click Reset to begin. Your PC will restart and begin the reset process. This may take some time.
Way 6: Perform a Clean Installation
When Windows 10 won’t boot and standard repair methods fail, perform a clean installation can be a last resort.
It eliminates system-level issues, including corrupted boot files, system components, and driver conflicts, restoring the system to a clean, stable initial state, ensuring smooth operation.
However, reinstalling the system will clear all data on the system drive, so you need to recover data from your unbootable computer in advance.
Phase 1: Recover data from an unbootable computer first
When the system cannot start, you cannot access the desktop, documents, or download folders in the usual way. And these locations often store critical information. Once you start reinstalling Windows, the original data will be cleared.
Therefore, you need to use a boot disk or connect the hard drive to another computer for data recovery in advance. This is a very necessary step. Here, I recommend you use MiniTool Power Data Recovery to recover files from an unbootable computer.
MiniTool Power Data Recovery FreeClick to Download100%Clean & Safe
MiniTool supports data extraction from unbootable Windows 10 systems, including those experiencing a blue screen, black screen, or system crash. You can create bootable media to access the hard drive and recover files.
Follow the steps below to use MiniTool Power Data Recovery Bootable to recover files from your non-bootable computer.
Step 1: Create a bootable disk
1.1: Connect a blank USB flash drive to the computer.
1.2: Go to the MiniTool Power Data Recovery Bootable page and download the software. After installation ends, launch the software.
1.3: Click the disc icon in the upper-right corner to open MiniTool Bootable Media Builder. Then follow the on-screen instructions to create a bootable disk.
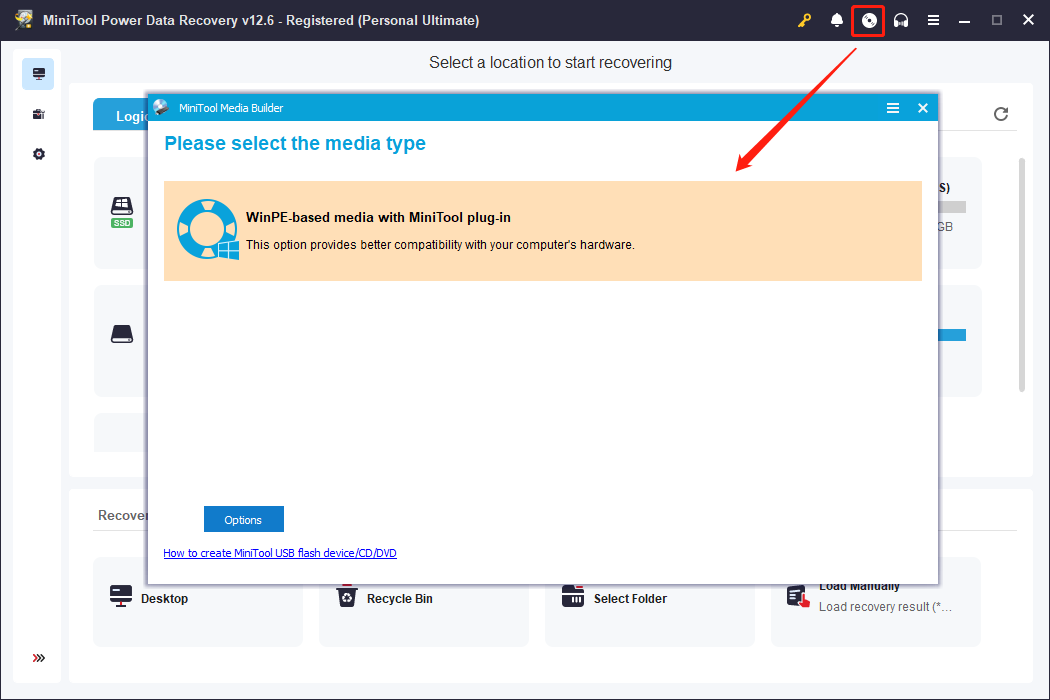
1.4: When this process ends, click Finish and remove the disk.
Step 2: Boot your computer from the bootable disk
2.1: Connect the disk to your unbootable Windows 10 computer.
2.2: Restart your PC and press F2, F12, Esc, Delete, etc., during startup to enter BIOS.
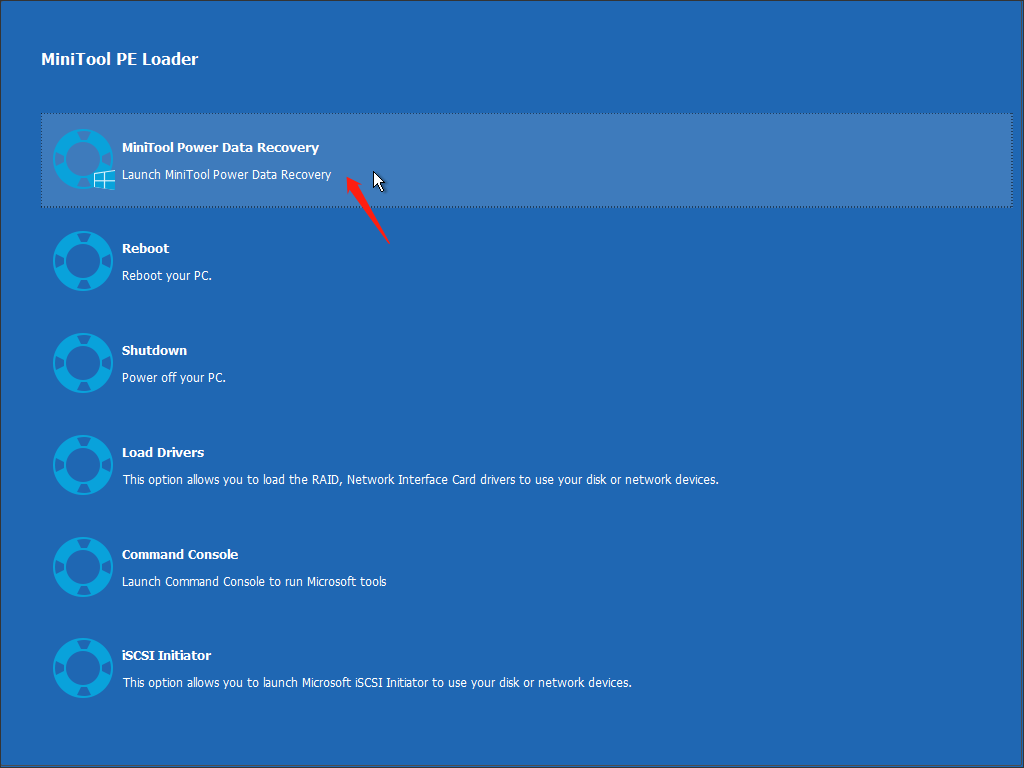
2.3: Switch to the Boot tab and change the boot order to boot from the bootable USB disk. After startup, you will enter the WinPE of MiniTool. Click MiniTool Power Data Recovery to run it or let it start automatically.
Step 3: Scan partitions/disks and save files
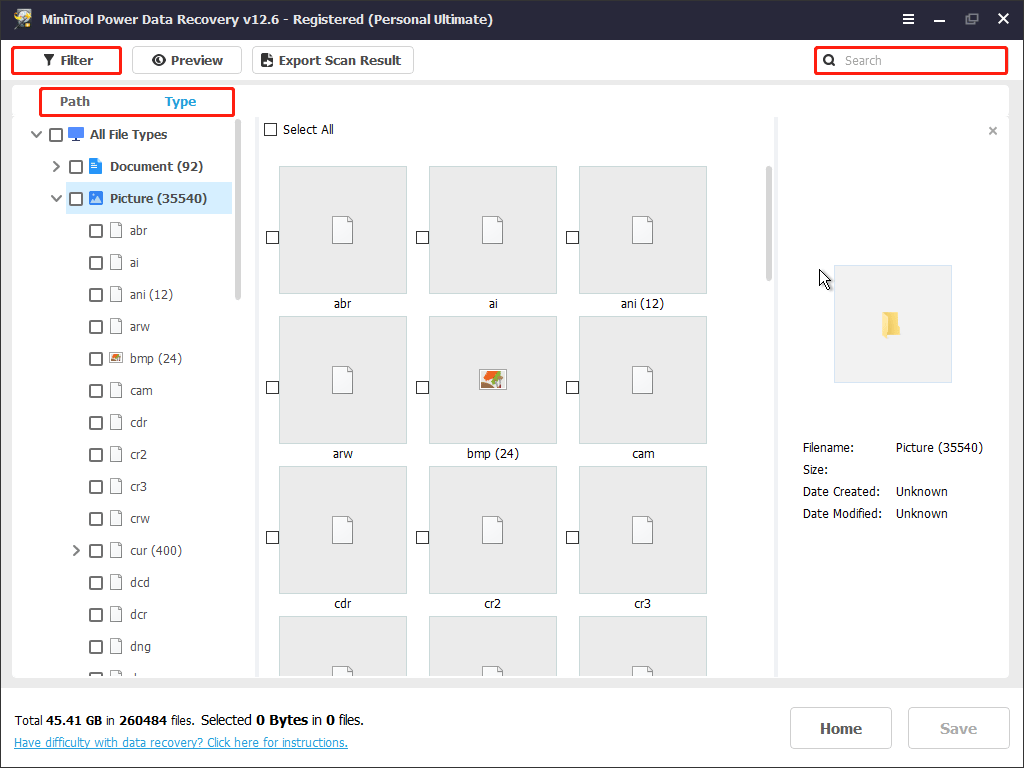
3.1: On the homepage of this recovery tool, you will see two scan options:
- Logical Drives: Includes all disk partitions on the computer.
- Devices: Lists entire hard disks.
Since reinstalling the system generally only affects the system drive, select the system drive under Logical Drives and click Scan. If necessary, switch to Devices to scan the entire disk.

3.2: This scanning process will take some time. It is recommended to wait for it to complete for the most complete results.
After it ends, you will see the files arranged according to their original paths under Path. If you want to find files according to the file structure, this tab is suitable for you. There are also some other filtering features to help you locate the target file quickly.
- The Type feature automatically categorizes scan results by file type, such as images, documents, audio, and videos.
- The Filter feature allows you to filter files by file type, modification time, file size, and file category.
- The Search feature supports searching for files by full or partial name to quickly find target files in the scan results.
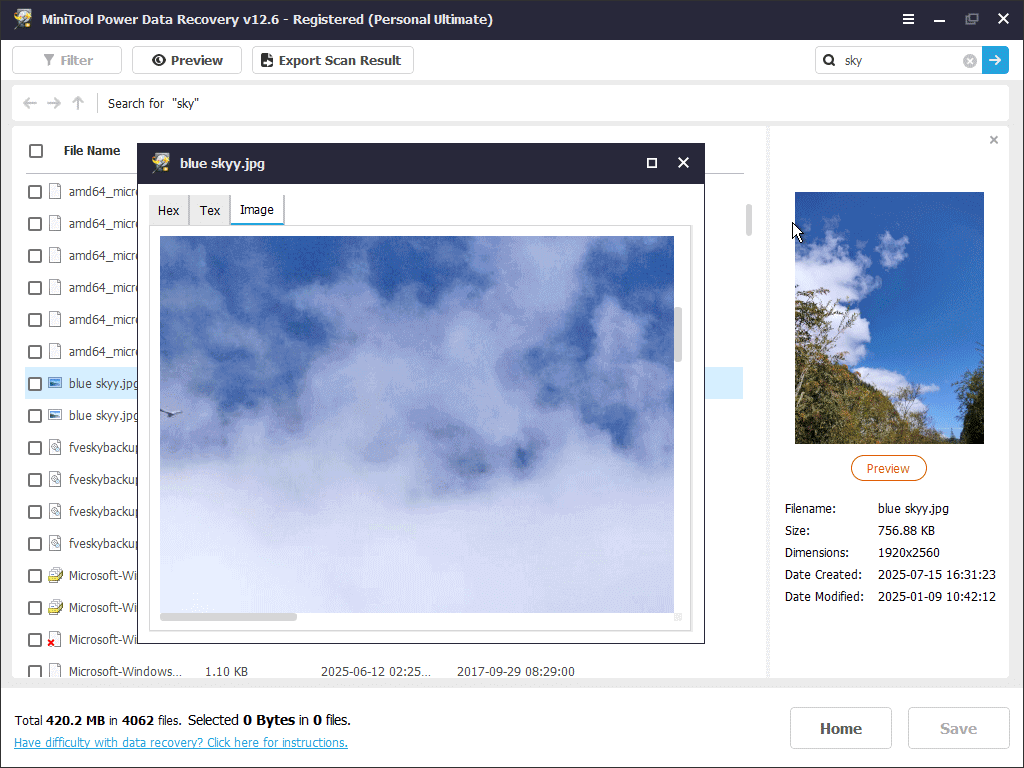
3.3: Use the Preview feature to view the file contents before recovery to ensure you are finding the correct file. This not only saves time but also prevents you from recovering invalid or duplicate data.
Just double-click the files one by one. A pop-up window will display a preview of the content.
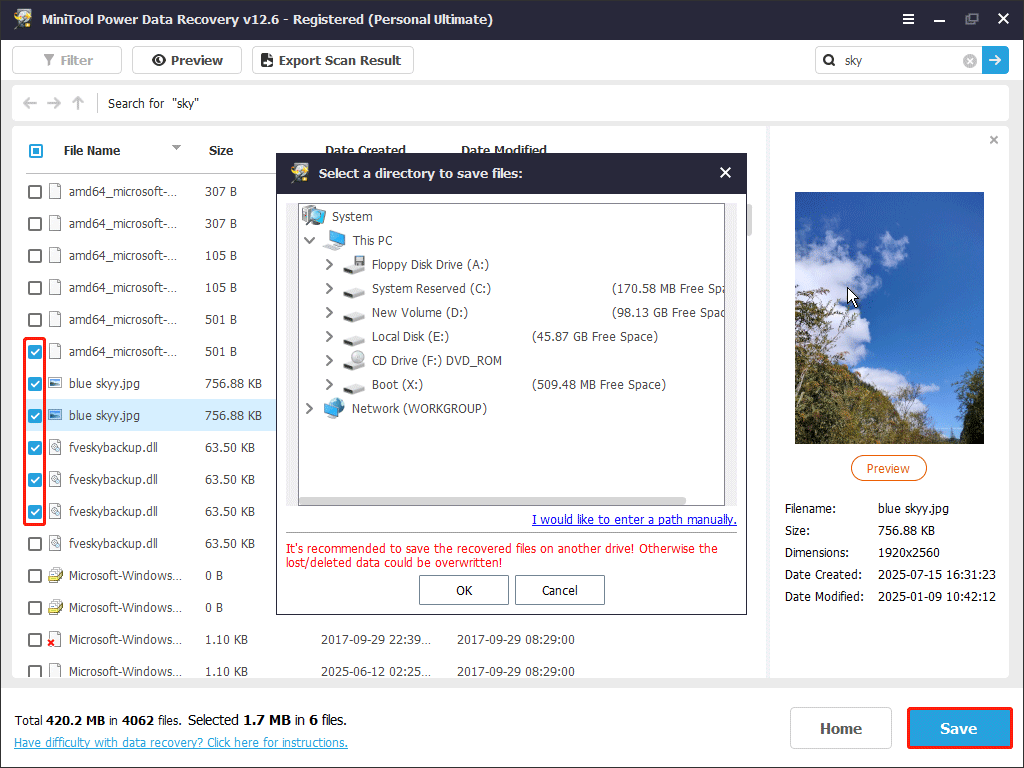
3.4: Check all the desired files and click Save. In the directory window, choose an external hard drive to store the recovered files. Finally, click OK to start the recovery.
Once your files are restored, you can create Windows installation media and use it to reinstall Windows.
Phase 2: Reinstall Windows 10
Step 1: Create an installation media on a working computer
Go to the Windows 10 download website, and click Download Now under Create Windows 10 installation media. After the download is complete, run MediaCreationTool.exe. The media creation tool will guide you through creating the installation media.

Step 2: Boot from the Windows installation media
Connect the installation media to the unbootable computer. During the boot process, repeatedly press the F2, F12, Esc, or Delete key to enter the BIOS. Once in the BIOS, set the USB drive as the primary boot option and press F10.
Step 3: Enter the installation interface
Complete the personalization settings, and then click Next. In the Choose installation options window, select Install Windows 10 > I agree to delete everything, including files, apps, and settings, then click Next.
Step 4: Delete partitions and install Windows 10
In the Choose where to install Windows 10 window, delete all partitions on Disk 0 that are not listed as Unallocated space. Select Disk 0 Unallocated Space, and then click Next. In the Ready to Install window, select Install. Windows begins reinstalling.
After the system is installed, move the recovered files to any folder you like for easy access.

How to Protect Your Computer
Although a faulty computer can be repaired to a large extent, it will always take time and energy, so you should protect your computer well to avoid unnecessary failures.
1. System maintenance and performance optimization
- Regularly clean junk files: Use the Disk Cleanup tool or third-party software to clear cache and temporary files.
- Manage startup items: Disable unnecessary startup programs to improve boot speed.
- Update the system and drivers: Keep the operating system and hardware drivers up to date to fix bugs and improve compatibility.
2. Security and virus prevention
- Enable antivirus software: Use antivirus software, such as Windows Defender or a third-party antivirus tool, and perform regular full scans.
- Enable a firewall: A firewall can prevent unauthorized network access. It’s recommended to also use a router hardware firewall.
- Download programs from the official website: Avoid installing programs from unknown sources to prevent malware intrusion.
3. Data protection and backup strategies
- Regularly back up important files: Use an external hard drive, cloud storage, or system image tool to create a backup.
- Use File History or System Restore points: This allows for quick recovery in the event of a problem.
- Encrypt sensitive data: Use BitLocker or a third-party encryption tool to protect private files.
Wrapping Things Up
How to repair Windows 10? It depends on the specific situation. If Windows boots normally, you can try running DISM/SFC, resetting the computer, and performing a System Restore.
If it doesn’t boot normally, first boot into WinRE, then use the Windows 10 repair tool, such as Startup Repair and Command Prompt, or try uninstalling recent updates.
None of that works? Try reinstalling Windows, but remember to recover data from your unbootable computer first.
If you have any questions about MiniTool products, feel free to contact us through [email protected].
About The Author

Position: Columnist
Chelsea graduated from university with a major in English. She has a strong interest in English writing. It is this passion for writing that led her to become an English editor. Her articles mainly foucus on data recovery and other computer industry news. As an energetic and outgoing girl, Chelsea enjoys listening to music, singing, riding bikes, and eating in her spare time.
User Comments :