Could Not Connect to the Network Keep Your Device on Black Screen
The “could not connect to the network keep your device on” error usually appears after Windows updates are installed. In some cases, it also occurs during a regular startup after a computer shutdown.
This error typically indicates that Windows fails to initialize the display driver during startup or that critical system files are damaged. In many cases, the issue is accompanied by the SrtTrail.txt error.
In Windows 11, this problem typically occurs after a startup failure triggers Quick Machine Recovery. When the recovery process fails to continue, and the system cannot resume normal startup, the black screen appears.
If the issue is not caused by severe system file damage, it can usually be resolved using standard repair methods.
However, in some cases, the PC may be stuck on the black screen, and only a clean installation of Windows can fully resolve it.
Under such circumstances, recovering important files becomes necessary. If the files are not needed, you can skip the data recovery process and proceed directly to the repair solutions.
Suggestion: How to Rescue Files From a Black Screen
When Windows cannot boot into the desktop, files can still be accessed and recovered using the Notepad tool or professional data recovery software.
Option 1. Use Notepad
Notepad can be used as an emergency data transfer tool when the system fails to boot into the desktop. It functions as a simplified file manager and allows you to access internal hard drives and copy files to an external hard drive.
This method only works when the disk is still accessible and the file system is not severely corrupted. It cannot recover deleted or lost files.
Follow the steps below to transfer files using Notepad:
Step 1. Insert an external hard drive or USB drive into the computer.
Step 2. On the black screen with the “could not connect to the network” error displayed, press Enter on your keyboard to enter WinRE.
Step 3. Click Troubleshoot > Troubleshoot > Advanced options > Command Prompt.
Step 4. Input notepad and press Enter.
Step 5. In Notepad, click File > Open > This PC.
Step 6. Open the drives, find the files you want to transfer, right-click them, and click Copy.
Step 7. Navigate to This PC, open the external hard drive, right-click the blank space, and click Paste.
Duplicate the process until all required files are copied and pasted.

Option 2. Use MiniTool Power Data Recovery
If you are unable to access your files using the Notepad tool, consider using MiniTool Power Data Recovery to rescue your data.
MiniTool Power Data Recovery FreeClick to Download100%Clean & Safe
MiniTool Power Data Recovery Bootable is specifically designed to recover files when a computer cannot boot into the desktop.
It has a Bootable Media Builder that allows you to create a bootable recovery disk and use it to access and recover files from the malfunctioning system.
This tool is fully compatible with Windows 11/10/8.1/8. It supports data recovery from HDDs and SSDs and can recover various file types, including documents, pictures, videos, audio files, emails, and other data formats.
Follow the steps below to create a bootable recovery disk and recover your files.
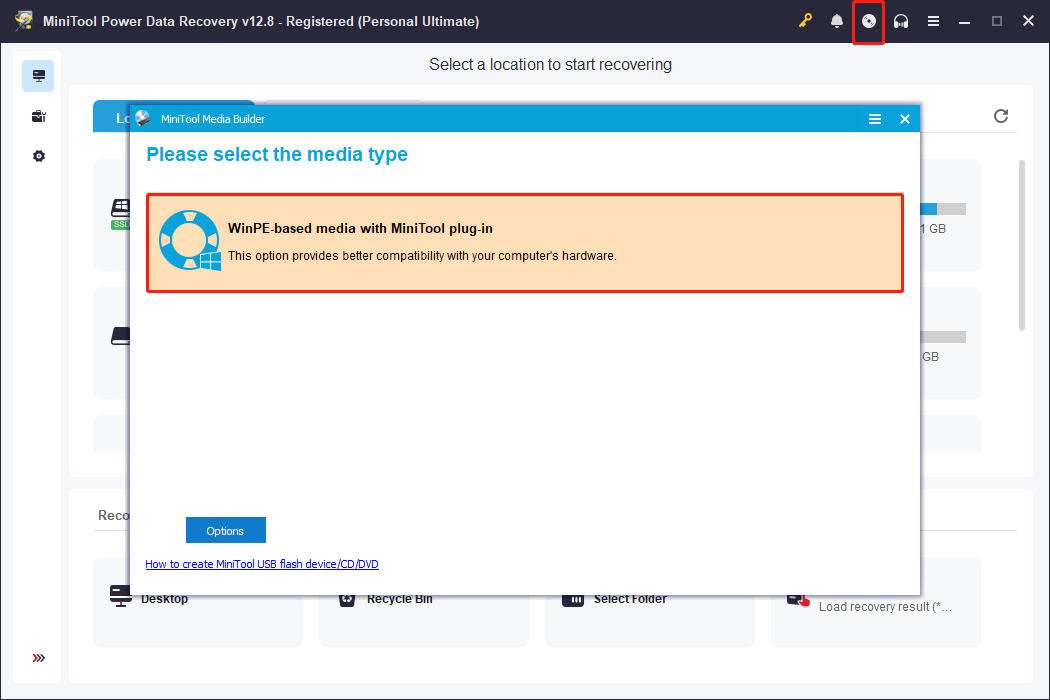
Process 1. Create a bootable USB drive.
Step 1. Connect the USB drive to the working computer. Recommended USB drive size: 4 GB to 64 GB.
Step 2. Get and run the bootable edition of the recovery tool. On the main interface, click the Bootable Media Builder icon.
In the new window, click WinPE-based media with MiniTool plug-in and follow the prompts to create a bootable USB drive.
Process 2. Boot into the problematic computer.
Step 1. Insert the bootable USB drive into the computer that displays a black screen.
Step 2. Restart the computer. During startup, press the BIOS key, such as F8, F12, Esc, or Del, to enter the BIOS interface.
Step 3. Switch to the Boot tab and set the burned USB drive as the first boot option. After that, press Enter or F10 to boot from the USB drive.
Step 4. Follow the on-screen instructions to launch MiniTool Power Data Recovery.
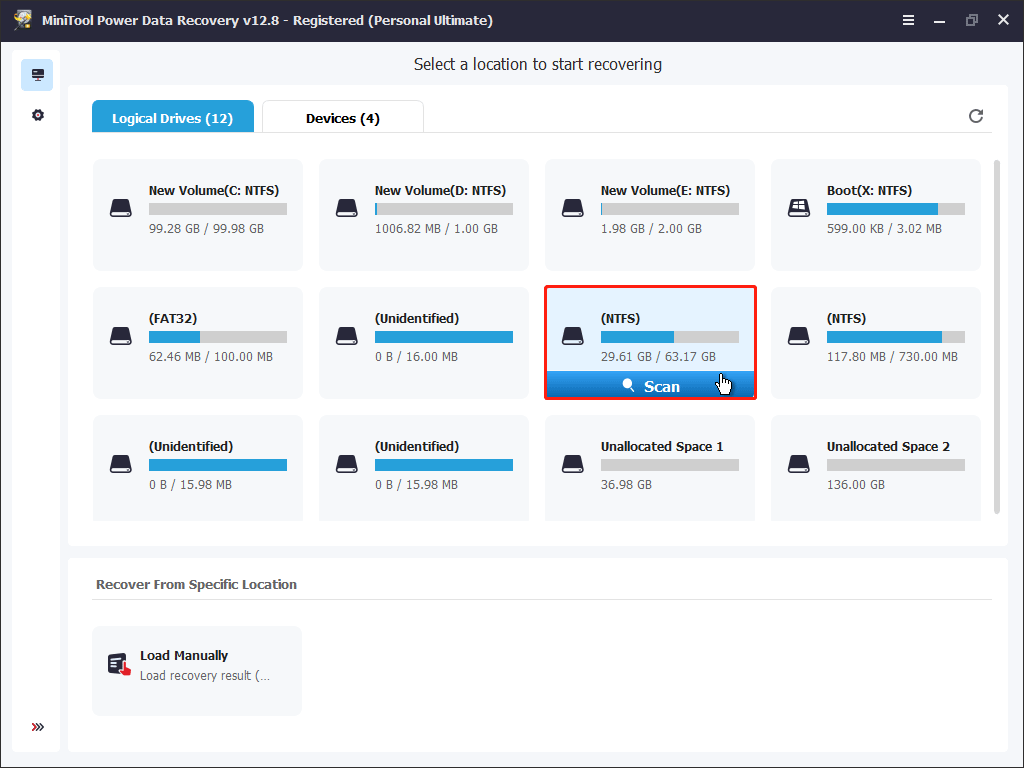
Process 3. Scan the disk and recover files.
Step 1. On the main interface of the recovery tool, select the drive you want to scan for files and click Scan. Since a Windows reinstallation usually affects only files on the system drive, it is recommended to recover files from that drive.
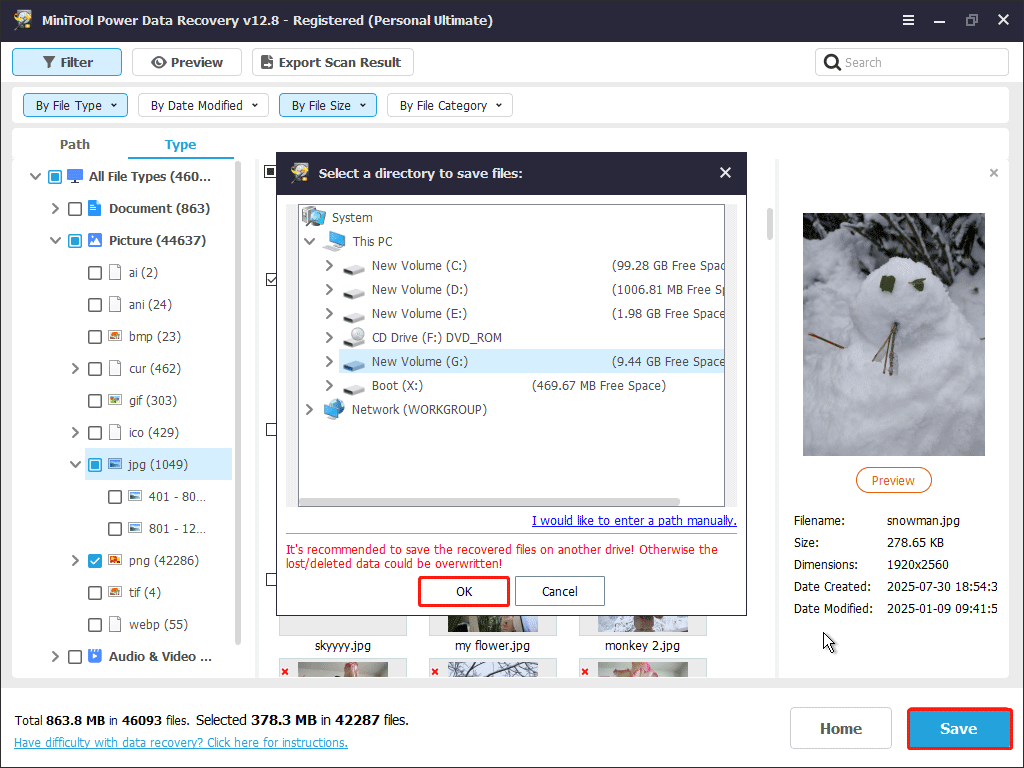
Step 2. After the scan finishes, start locating and selecting the files you need to recover. Path displays files according to file structure, while Type organizes files based on file type and data format.
In addition, you can use Filter or Search to locate the wanted files faster.
- Filter: Allows you to filter files by file type, date modified, file size, and file category.
- Search: Enables you to search for certain files by using a partial or complete file name.
Furthermore, you can double-click on the target files to preview their contents.
Step 3. Make sure all required files are selected and click Save. In the new window, choose an external hard disk and click OK to store the selected items.
Once the recovery process is complete, your files will be safe. Continue reading to learn how to fix the SrtTrail.txt black screen.
How to Fix Could Not Connect to the Network Black Screen
To fix the “could not connect to the network” error, start with simple steps, such as restarting the PC, clearing the CMOS, or performing a System Restore.
If these methods do not restore the system to normal operation, try more advanced solutions. Available approaches include repairing disk errors, adjusting BIOS settings, or performing a clean installation.
Fix 1. Restart the Computer
When the error message appears, follow the on-screen instructions to press Enter. In the new window, select Turn off your PC.
After the computer powers off, wait a few minutes, and then restart it. If the issue is caused by a temporary system glitch, Windows should boot into the desktop successfully without errors.
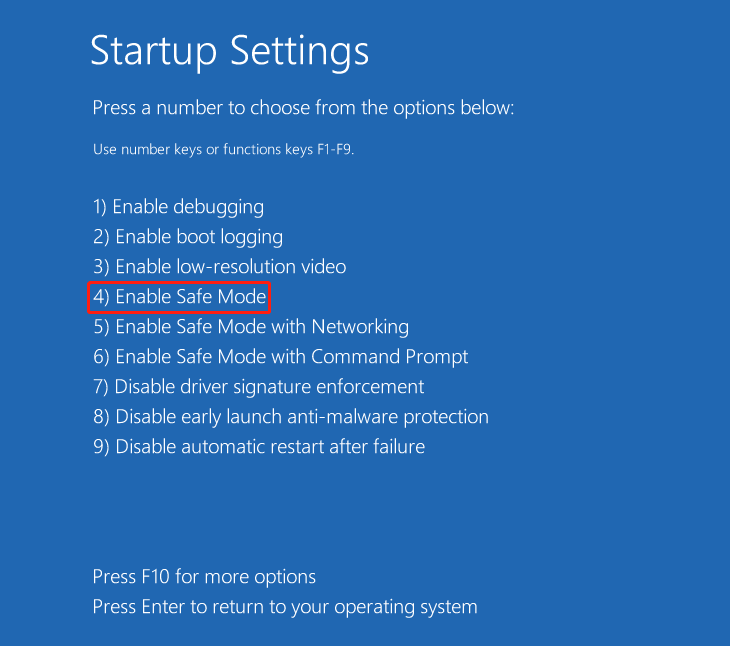
If the problem persists, try booting the system into Safe Mode.
Step 1. Press Enter to enter WinRE.
Step 2. Select Troubleshoot > Troubleshoot > Advanced options > Startup Settings > Restart.
Step 3. Press F4 to boot into Safe Mode. After that, restart your computer, and the error should disappear.
Fix 2. Reseat Hardware Components
The black screen error may also be related to hardware connection issues. Improperly seated or loose components can prevent the system from booting correctly.
To rule out this cause, try reseating the hardware components, such as RAM modules, graphics card, and power cables.
If this does not resolve the issues, continue with the following one.
Fix 3. Clear CMOS
Improper BIOS settings can prevent Windows from loading correctly and trigger the automatic recovery process. Clearing the CMOS restores the BIOS to its default settings and helps the system start normally.
We take Dell as an example to show you how to reset CMOS.
Step 1. Turn off your PC and unplug it from the power source. If you are using a laptop, remove the battery if possible.
Step 2. Open the case to find and disconnect the small coin-cell battery carefully.
Step 3. Press and hold the Power button for 10 to 20 seconds.
Step 4. Reconnect the power adapter (and battery) and close the case.
Step 5. Start your computer, and the system should boot normally.
Fix 4. Perform a System Restore
As mentioned above, the SrtTrail.txt black screen often starts after recent system changes. A System Restore reverts the system to a previous state, undoing recent changes that may cause the black screen.
Follow the steps below to perform a System Restore.
Step 1. Press Enter to enter WinRE.
Step 2. Click Troubleshoot > Troubleshoot > Advanced options > System Restore.

Step 3. Follow the prompts on your screen to complete the restore process.
If the black screen persists, try the following approaches.
Fix 5. Repair System Files and Disk Errors
Damaged Windows system files or disk file system corruption may also cause the boot failure. Repairing the system files and disk errors can help resolve the problem.
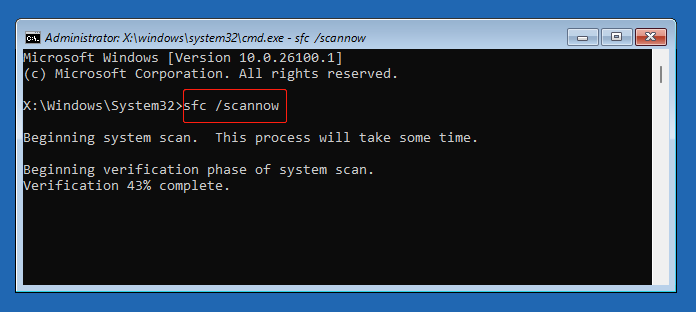
Repair system files:
Step 1. Enter WinRE and choose Troubleshoot > Troubleshoot > Advanced options > Command Prompt.
Step 2. Input sfc /scannow and press Enter to execute it.
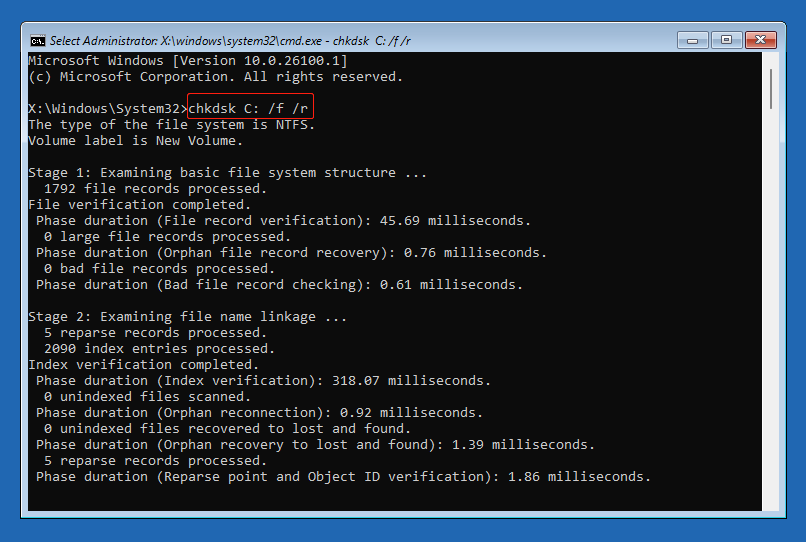
Repair disk errors:
Step 1. Open Command Prompt, type notepad, and press Enter.
Step 2. Click File > Open > This PC to identify the system drive and note the drive letter.
Step 3. Input chkdsk C: /f /r and press Enter. Replace C: with the drive letter of the system drive you identified.
- /f: Fixes file system errors on the disk.
- /r: Locates bad sectors on the disk and attempts to recover readable information.
Once the command is executed completely, restart your PC and check if the problem is resolved. If not, proceed with the following approaches.
Fix 6. Change the Boot Option
If there are multiple boot drives installed on your computer, Windows may try to boot from the wrong device, which can lead to startup failures. In this case, enter BIOS and set the correct drive as the boot device.
Step 1. Restart your computer. During boot, press the BIOS key, such as F2, F8, F12, or Del, to enter BIOS.
Step 2. Use the arrow keys on your keyboard to navigate to the Boot menu or a relevant option, depending on your BIOS version.
Step 3. Move the device you want to boot from to the first position and press F10 to save the change.
Step 4. Reboot your computer and check if the error disappears.
Fix 7. Disable EXPO or XMP
Features such as EXPO or XMP can sometimes lead to memory instability and trigger boot failures. In this case, disabling them can help restore system stability.
Step 1. Press the specific BIOS key during startup to enter BIOS.
Step 2. In the BIOS menu, check if it says Advanced Mode. If not, press F7 to access the advanced mode.
Step 3. Navigate to the Extreme Tweaker menu.
Step 4. Select Auto or Disabled for the AI Overclock Tuner option.
Step 5. Press F10 to save the settings. After that, restart your PC and verify if the problem has been fixed.
Fix 8. Do a Clean Installation
If all troubleshooting methods fail, the system may have severe corruption that cannot be repaired through standard recovery tools. In such cases, performing a clean installation of Windows may be the only effective solution.
Step 1. Create an installation media on a working computer.
Step 2. Insert the installation drive into the problematic computer. Then go to BIOS and boot from that drive.
Step 3. Follow the on-screen instructions to specify the language and keyboard settings and finish the installation process.
Recommended: Back Up System or Files Regularly
System errors, such as black screens, sometimes indicate deeper system instability. Creating regular backups can help protect your files and ensure quick and free data recovery if the problem reappears.
MiniTool ShadowMaker provides comprehensive backup solutions for Windows systems, including file backup, system backup, and disk or partition backup.
This software offers full, differential, incremental, and scheduled backups, allowing you to create flexible and customized backups based on your needs.
If necessary, get the trial edition to experience a 30-day free trial.
MiniTool ShadowMaker TrialClick to Download100%Clean & Safe
Step 1. Launch the software and click Keep Trial to continue.
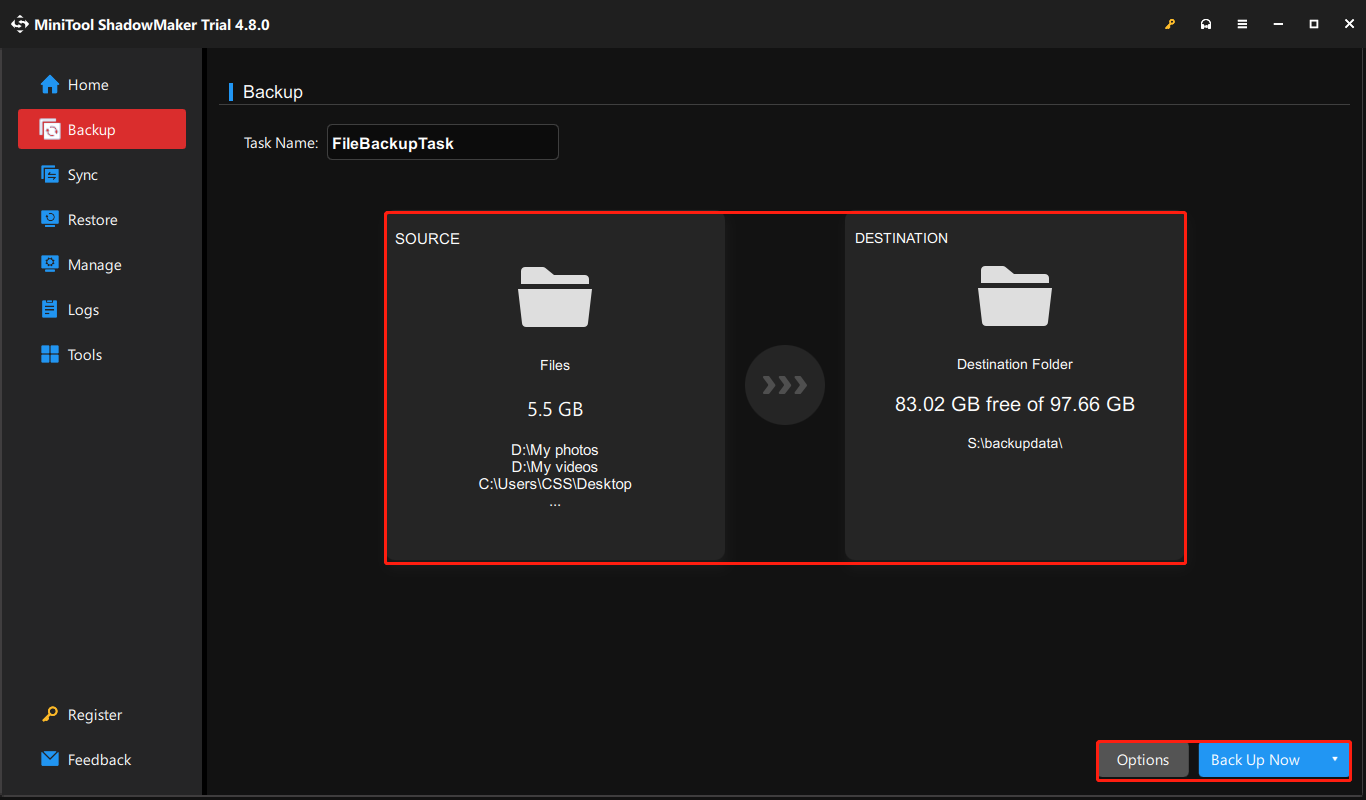
Step 2. Go to the Backup tab.
Step 3. In the SOURCE section, select the files or partitions you want to back up. If you want to back up the system, no manual changes are required, as all system-related partitions are selected by default.
In DESTINATION, select a safe drive to store the backup files.
Step 4. Click Options to specify the backup schemes and schedule settings.
Step 5. Click Back Up Now and wait for the backup process to complete.
Conclusion
To sum up, the “could not connect to the network black screen” usually indicates system failures or hardware issues. To resolve it, try restarting the device, resetting the CMOS, or reseating hardware components.
If these methods do not work, proceed with advanced fixes, including System Restore, disk repair, BIOS configuration adjustments, or a clean installation of Windows.
Before reinstalling Windows, it is strongly recommended to recover important files using Notepad or MiniTool Power Data Recovery Bootable.
If you experience any issues while using MiniTool products, please contact the support team at [email protected].
About The Author

Position: Columnist
Shirley holds a bachelor’s degree in English and has been an editor at the MiniTool Team for many years. She specializes in IT-related content, with a focus on data recovery, file backup, disk management, and other technical topics. She is committed to delivering clear, accurate, and practical solutions to help users resolve common computer issues.
User Comments :