Storage devices are essential parts of daily work and entertainment, storing everything from work documents to personal memories.
However, when accessing an internal or external hard drive, you may encounter the “device is not ready” error.
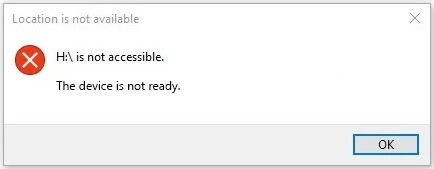
Error: Disk Is Not Accessible, The Device Is Not Ready
In most cases, the error arises under one of these two common scenarios:
- The disk that was previously working suddenly becomes inaccessible.
- A new disk triggers the error when initializing it in Disk Management.
When this error occurs, you are unable to format the drive back to a normal state.
Although the two scenarios differ, they often stem from similar causes. Common factors include system glitches, faulty USB ports, unstable power supplies, and partition table errors.
In the following sections, we will walk you through practical steps to fix the “device is not ready” error effectively.
Start With Basic Troubleshooting
Fortunately, in many cases, the error can be resolved through simple troubleshooting steps outlined below.
Reconnect the Drive
Unstable connections or device glitches are among the most common causes. Unplug the drive (if possible) and plug it back in firmly to ensure a proper connection.
Restart the Computer
A simple system reboot often clears temporary glitches that may prevent your disk from being accessed or initialized properly.
This step is especially important if the error occurs on an internal hard drive.
Try a Different USB Port
The current USB port may be damaged or malfunctioning. Switching to another port can sometimes resolve the issue.
Replace the Power Supply
This step is necessary for external hard drives that rely on their own power adapters rather than drawing power directly from the USB port.
If the power adapter is faulty, the drive may fail to work correctly. In such cases, the system may display the “device is not ready” error. Try using a different power adapter to rule out power-related issues.
Use a Different Computer
Testing the disk on another computer helps determine whether the problem is related to the drive itself or the computer.
If the drive functions well in another computer, the problem is with the original computer. If the error persists, the problem likely lies with the drive itself.
If the error persists, try the next solution.
Run CHKDSK to Fix File System Errors (Not Applicable for Unknown Devices)
Occasionally, the “device is not ready” error stems from file system corruption or bad sectors. In such cases, the CHKDSK utility can be helpful.
CHKDSK scans the drive for file system errors and attempts to repair them. Additionally, it can identify and isolate bad sectors, preventing the system from using those damaged areas.
Follow the steps below to run CHKDSK.
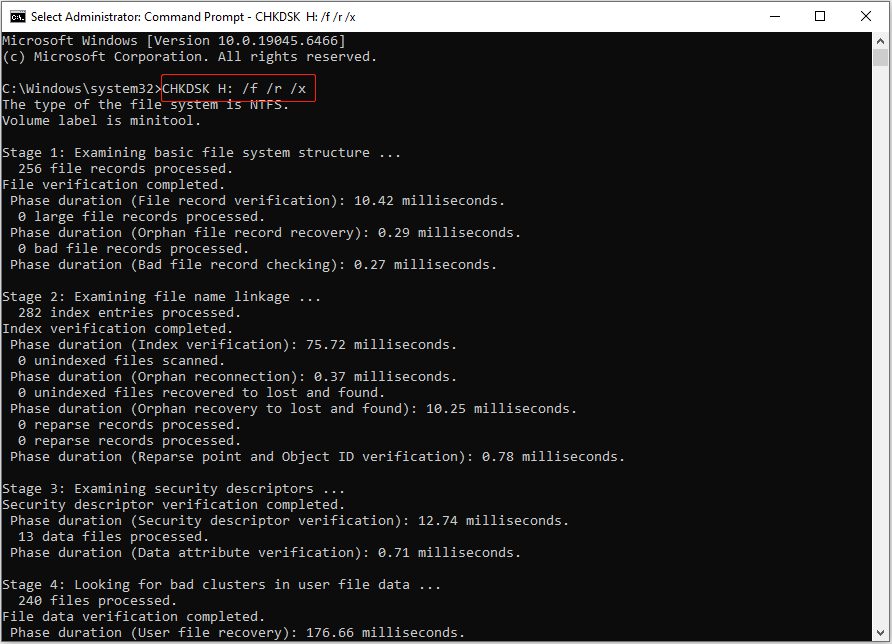
Step 1. Type Command Prompt in the Windows search box, then right-click it from the best results and click Run as administrator.
Step 2. In the command line window, type CHKDSK drive letter: /f /r /x and press Enter. Replace the drive letter section with the actual drive letter of the problematic disk.
For example, to repair the H drive, input CHKDSK H: /f /r /x and press Enter.
- /f: Finds and fixes file system errors on the specified disk.
- /r: Locates bad sectors on the disk and tries to recover readable data.
- /x: Forces the drive to dismount before checking for errors. It is required when the drive is in use.
After the CHKDSK scan completes, reconnect your drive or restart your computer to check whether the error disappears.
Recover Data From the Disk (if Necessary)
If none of the previous fixes have resolved the error, you may need to change the partition table, clean, or format the disk.
However, these operations will erase all existing data on the drive. If your disk contains important files, it is essential to recover them before proceeding.
To retrieve data from an inaccessible drive, use MiniTool Power Data Recovery. This professional and free data recovery software offers powerful features designed for various data loss scenarios.
- Handling various disk issues. It helps recover data from inaccessible drives, RAW disks, lost partitions, or formatted devices.
- Supporting multiple storage devices. It supports HDDs, SSDs, USB flash drives, SD cards, and other file storage media.
- Recovering all types of files. It is capable of restoring all types of files, including photos, videos, audio, documents, emails, and others.
- Offering a user-friendly interface. It features a clear interface and simple steps, making the recovery process fast and easy.
- Providing 1 GB of free data recovery capacity. The free edition allows you to save 1 GB of files for free.
Now, get the free edition of this software and start recovering files.
MiniTool Power Data Recovery FreeClick to Download100%Clean & Safe
Step 1. Scan the Inaccessible Drive
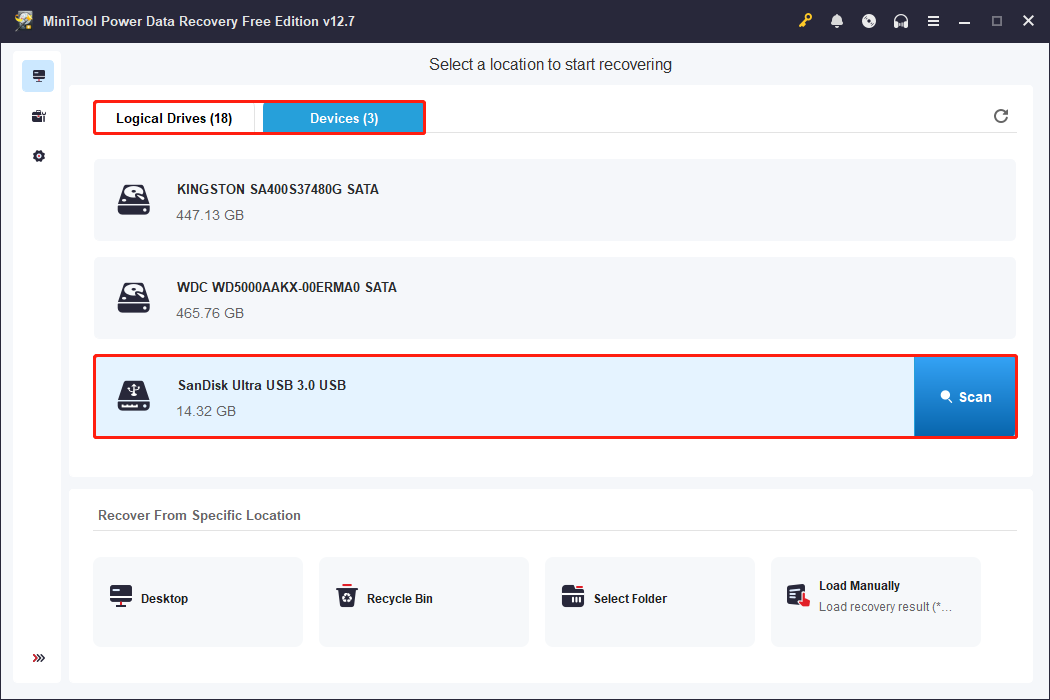
Make sure the drive is properly connected to your computer, and then launch the recovery software to enter its main interface.
Next, select the inaccessible drive under Logical Drives or Devices and click Scan.
Logical Drives displays all disk partitions, while Devices lists all physical disks connected to your computer.
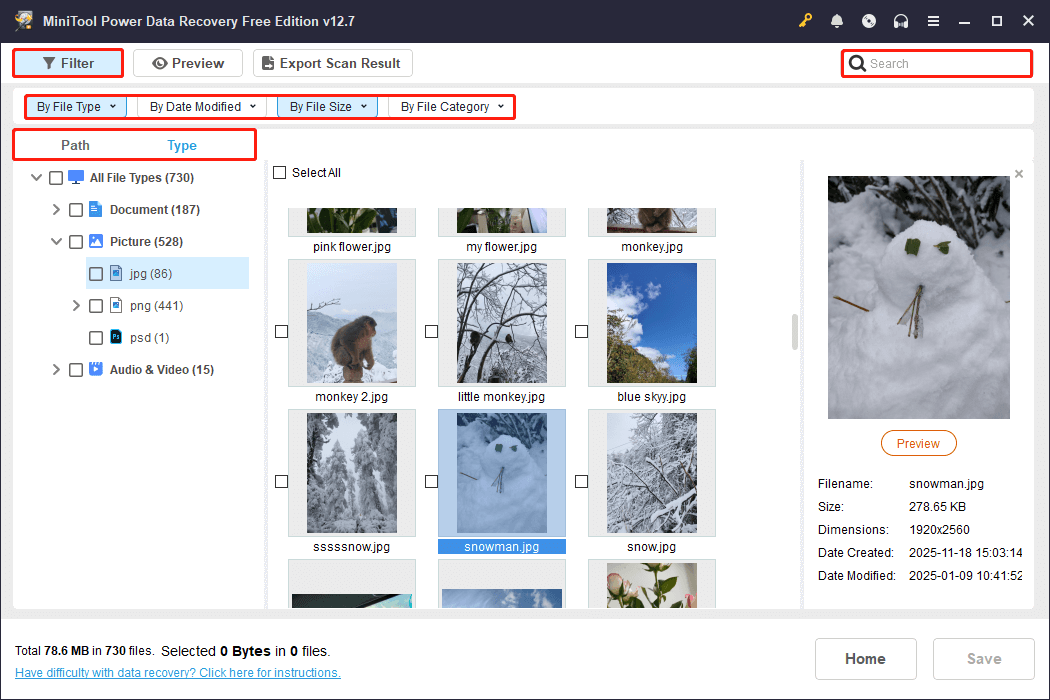
Step 2. Find the Files You Want to Recover
After the scan is complete, browse and locate your files using these helpful tools:
1. The Path and Type views
Two viewing modes are available for checking recovered files:
- Path: Browse files based on their original folder structure. Some files may have lost their original structure due to various reasons.
- Type: View files by file type, such as documents, images, videos, emails, and more.
2. The Filter tool
Use the Filter option to narrow down scan results by file type, modification date, size, and category. This is especially useful when dealing with a large number of recovered files.
3. The Search function
If you remember the name (or part of the name) of a specific file, type it in the search box and press Enter to quickly locate it.
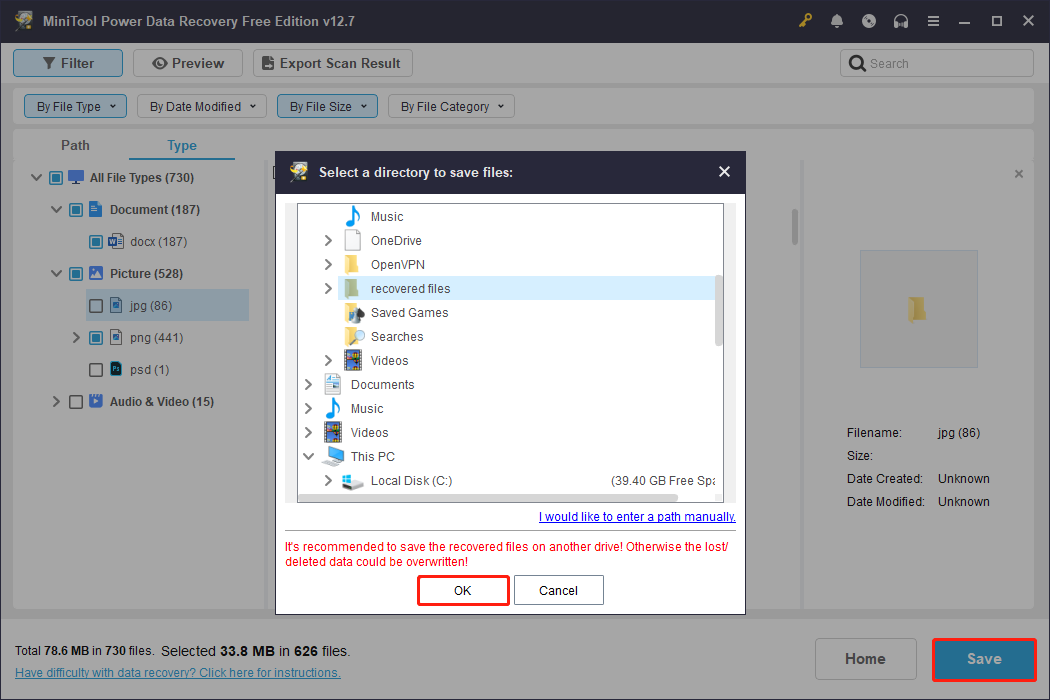
Step 3. Preview and Save Desired Files
MiniTool allows you to preview recovered files to confirm whether they are intact and worth restoring. To preview a file, double-click it in the scan results.
You can preview documents, images, audio, and video files, but note that only files under 100 MB (except for videos) can be previewed.
Once you have confirmed the files you need, select them and click Save. In the pop-up window, select a safe location and click OK to store them.
After recovering files, continue with the following advanced solutions.
Apply Advanced Fixes for the Device Not Ready Error
Advanced repair methods include converting the partition table between MBR and GPT, formatting the drive, and cleaning the disk.
These actions can help restore proper access and functionality of the inaccessible drive.
Change a Partition Table
When the disk partition table is damaged or incompatible with the system, the “device is not ready” error occurs.
To resolve this issue, change the partition table and format the disk to rebuild the disk structure.
To convert between MBR and GPT, use MiniTool Partition Wizard. This professional partition manager supports free conversion of data disks between MBR and GPT without data loss.
Click the button below to get this partitioning tool and follow the instructions to change the partition table.
MiniTool Partition Wizard FreeClick to Download100%Clean & Safe
Step 1. On the main interface of the partition manager, select the problematic disk. Then click the option in the left sidebar to change the partition table:
- For an MBR disk, click Convert MBR Disk to GPT Disk.
- For a GPT disk, click Convert GPT Disk to MBR Disk.
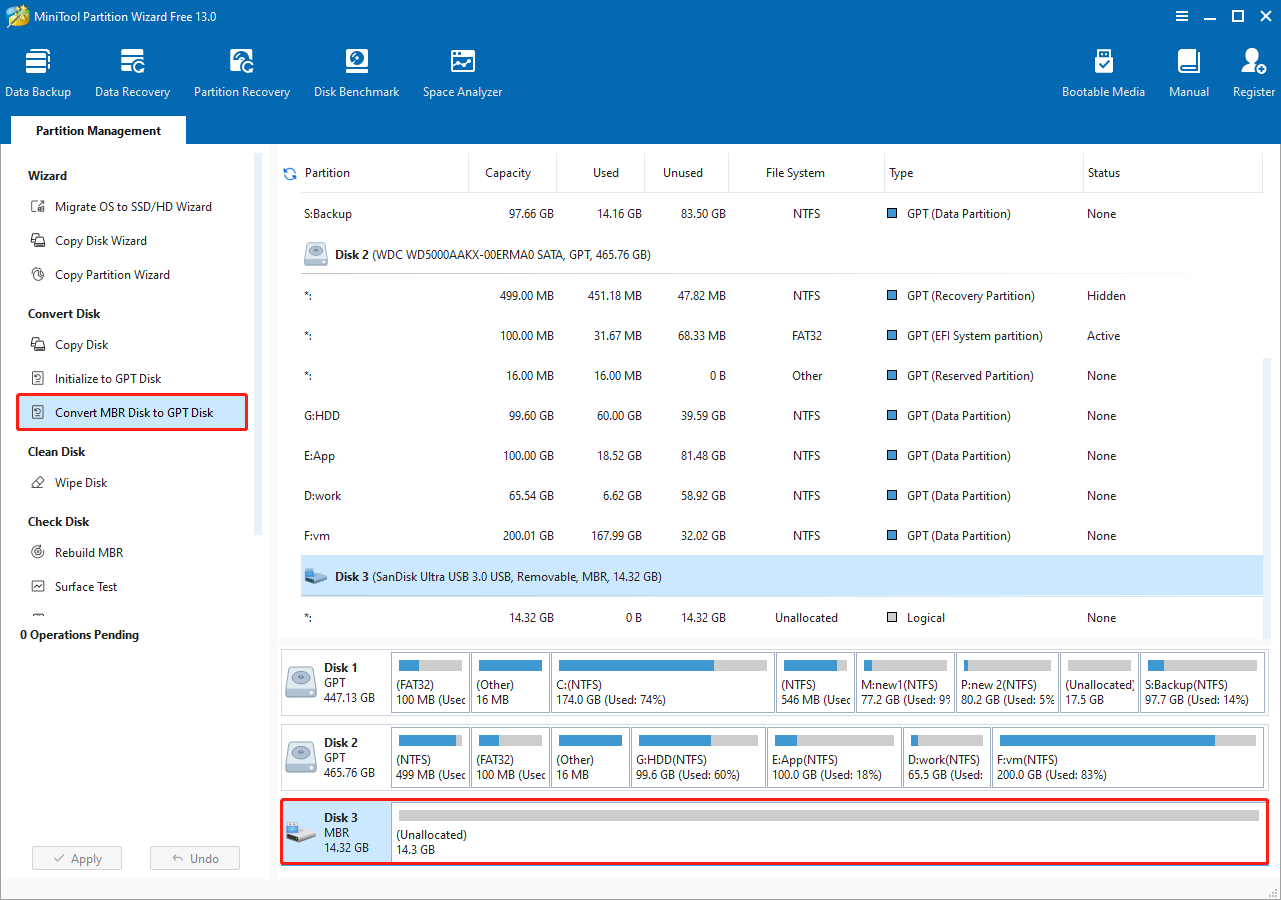
Step 2. Click Apply to confirm.
After converting the partition table, check if the drive is accessible or formattable.
To format the drive, select its partition on the right side, and then click Format Partition in the left sidebar.
In the new window, specify the partition label and file system, and click OK. Finally, click Apply to confirm.
Clean the Disk
Some reports have confirmed that using the clean command can resolve the problem by removing corrupted or incompatible partition information. This process effectively resets the disk’s partition table, allowing it to be initialized or formatted.
Follow the steps below to clean the disk via Command Prompt.
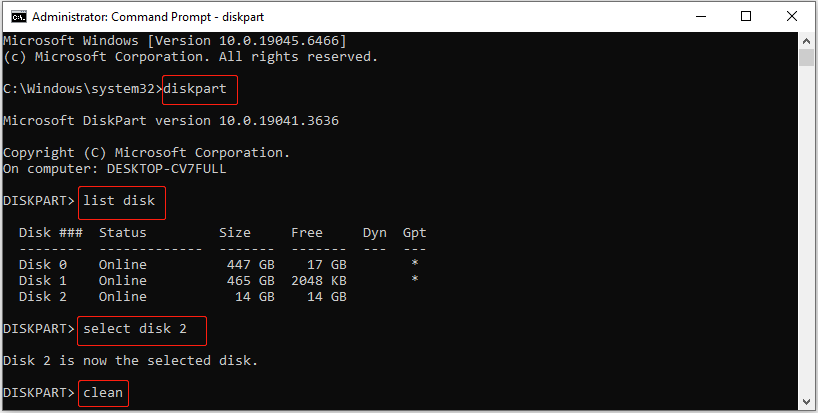
Step 1. Run Command Prompt as administrator.
Step 2. In Command Prompt, input the following commands, and press Enter after each one:
- diskpart
- list disk
- select disk # (replace # with the actual number of the problematic disk)
- clean
Step 3. Once the disk is cleaned, open Disk Management and check if you can initialize, partition, or format it.

Bottom Line
In conclusion, the “device is not ready” error can often be fixed through simple hardware reconnections or file system repairs. If these methods fail, try converting the partition table or using the clean command to reset the disk.
If you need any help when using MiniTool software, please send an email to the support team at [email protected].
About The Author

Position: Columnist
Shirley holds a bachelor’s degree in English and has been an editor at the MiniTool Team for many years. She specializes in IT-related content, with a focus on data recovery, file backup, disk management, and other technical topics. She is committed to delivering clear, accurate, and practical solutions to help users resolve common computer issues.
User Comments :