Reports indicate that external hard drives may unexpectedly disappear from File Explorer and appear as Unknown and Not Initialized in Disk Management.
When attempting to initialize the disk, a fatal device hardware error occurs and prevents the drive from being initialized successfully. Here is a true example:
My WD Elements 3TB external HDD doesn’t show up in Explorer. In the disk partition manager, it shows up but is not initialized, and I couldn’t initialize it, getting the fatal device error. Any suggestions on what I can do? It does have some data I don’t want to lose.reddit.com

This issue is common and can arise from multiple reasons.
Common Causes of the Fatal Device Hardware Error on Windows 10/11
The fatal device hardware error may be triggered by the following factors:
- Loose or faulty hardware connections. Damaged or loose cables, bad USB ports, or faulty disk enclosures can prevent the computer from communicating with the external hard drive correctly.
- Corrupted or outdated disk driver. A missing, incompatible, or corrupted disk driver can cause hardware errors when initializing or accessing the disk.
- File system corruption or bad sectors. Logical damage may disrupt the way your system communicates with the disk, thus triggering a fatal error.
- Physical damage to the disk. Internal mechanical failures or electrical faults may lead to permanent hardware failure, making the disk unreadable.
- Other faults. Malfunctions in computer components, system errors, or even software conflicts may also cause the error.
After understanding the possible reasons, apply repair methods to restore the disk to a usable state.
How to Fix the Fatal Device Hardware Error
To resolve the fatal device hardware error, begin with basic troubleshooting steps, such as reconnecting the disk, replacing the USB cable, or switching to a different USB port.
If these steps fail, consider verifying the SMART status, reloading volume information, checking for file system errors, or formatting the disk.
Continue reading for detailed instructions on each method.
Basic Troubleshooting Steps
To rule out connection issues, try these steps:
- Safely eject the external hard drive from your computer using the Safely Remove Hardware option. Wait a few seconds, then reconnect the disk.
- If the external disk is inside an enclosure, try replacing the enclosure with a different one.
- Use another USB cable.
- Connect the external hard drive to a different USB port on your computer.
- Test the external hard drive on another computer.
If basic actions fail to restore your disk to normal, more advanced repair methods may be necessary.
However, if the disk contains important files, it is strongly recommended to recover them first using MiniTool Power Data Recovery.
Recover Files Before Hard Drive Repair
MiniTool Power Data Recovery is a free data recovery software compatible with Windows 11/10/8/8.1 users.
It supports recovering over 2000 file types from external hard drives, internal hard disks, USB drives, SD cards, CDs/DVDs, and other storage media.
It is effective in various data loss situations, such as accidental deletion, partition loss, file system corruption, disk formatting, and more.
As long as the software detects the disk, it can thoroughly scan the drive and find all existing files as well as deleted files that have not been overwritten by new data.
This software has a free edition, which supports recovery of up to 1 GB of files at no cost. Download the free edition and launch it to begin hard drive recovery.
MiniTool Power Data Recovery FreeClick to Download100%Clean & Safe
Step 1. Scan the external hard drive.
On the main interface of this software, select your external hard disk under Logical Drives or Devices and click Scan.

Step 2. Find required files by using Path, Type, Filter, and Search.
Once the scan is complete, the recovered files are displayed in two main views: by original path and by file type.
- Path: Expand the folders and subfolders to locate the files you need in their original directories.
- Type: Browse files grouped by type and format. This is suitable if you need to identify specific file types such as documents, images, or videos.
For a large number of files, two additional features help you quickly narrow down the results:
- Filter: Use file filtering criteria such as file type, last modified date, file size, and file category to refine the displayed files.
- Search: Enter the complete or partial name of a file into the search bar and press Enter to instantly locate matching items.

Step 3. Preview and save desired files.
Double‑click the target files to preview and confirm they are the ones you need. Most video files can be previewed without restriction, while other file types should not be larger than 100 MB.
Finally, check all required files and click Save. In the new window, choose a safe location and click OK to store the recovered files.

When the recovery completes, you can navigate to the specified location to view the recovered files.
Once your data is secure, the next step is to fix the fatal device hardware error. Follow the outlined methods below sequentially.
Fix 1. Check the SMART Status
Self‑Monitoring, Analysis, and Reporting Technology (SMART) is a built‑in monitoring system in HDDs and SSDs. By reviewing the SMART status, you can assess whether your external hard drive may require repair or replacement.
How to run a SMART check? Use the built‑in CMD tool to get a simple status, or use a professional SMART checking tool to view detailed properties.
Option 1. Use Command Prompt.
Step 1. Type cmd in the Windows search box, right-click Command Prompt, and click Run as administrator.
Step 2. Type wmic diskdrive get status,model, and press Enter.
The model and status of each disk will be displayed.
- OK means no serious errors have been detected on the hard drive.
- Pred Fail means SMART has identified a potential or serious problem.

Option 2. Use third-party tools.
The wmic command only provides a simple SMART status of your disk. For a more comprehensive analysis, you need to use professional utilities such as CrystalDiskInfo or Hard Disk Sentinel.
The Wikipedia page on SMART outlines the key properties of SMART results. Refer to its explanations for details.
Fix 2. Load Volume Information
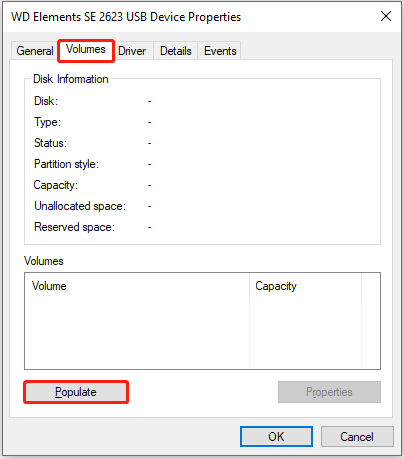
There is a Populate option in disk properties, used to load drive information for a quick disk check.
It does not modify or repair the disk but only displays detailed partition properties. However, some users reported that it can help resolve the fatal device hardware error.
Here are the steps:
Step 1. Right-click the Start button and choose Device Manager.
Step 2. Expand Disk drives.
Step 3. Right-click the problematic hard disk and choose Properties.
Step 4. Switch to the Volumes tab and click Populate.
Once the process is finished, open Disk Management to check if your drive is back to normal. If not, continue with the following solutions.
Fix 3. Run CHKDSK (Not Apply for Unknown Disks)
If the disk error is caused by file system corruption or bad sectors, you should run the CHKDSK utility with specific parameters to solve the problem:
- /f repairs logical file system errors automatically.
- /r locates bad sectors on the disk and marks them so Windows avoids using them.
- /x forces the volume to dismount before scanning if necessary.
Using these options together ensures that file system issues are fixed and bad sectors are isolated, while your data is preserved wherever possible.
This method has been proven effective for many users.
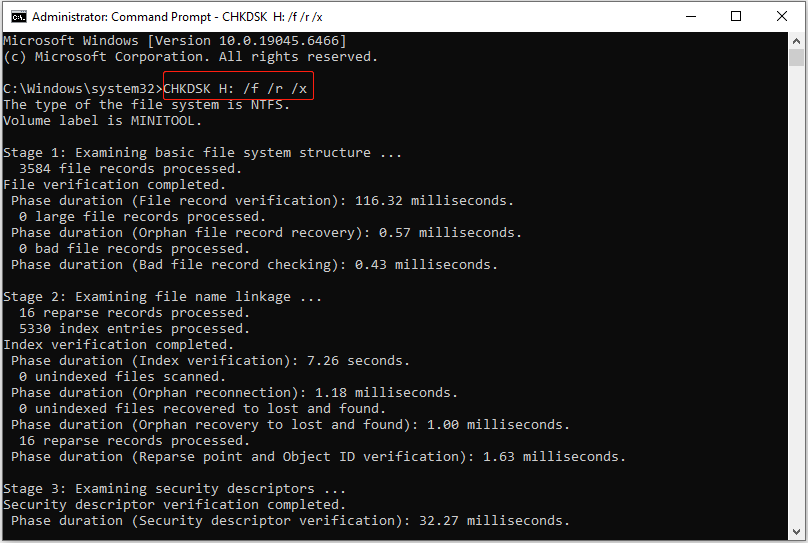
Here is how to run CHKDSK.
Step 1. Open Command Prompt as an administrator.
Step 2. Type CHKDSK H: /f /r /x in the command box and press Enter (replace H: with the actual drive letter of your external hard drive).
Sometimes you may receive an error message stating that CHKDSK is not available for RAW drives. In this case, open Disk Management, right-click the disk, and check whether it can be formatted.
If formatting is possible, follow the on-screen instructions to format the hard drive. If not, continue with the following solutions.
Fix 4. Format the Hard Drive in a Gaming Console
In addition to PCs, devices such as the PS5 and Xbox can also perform a disk formatting process.
When the Windows system cannot properly recognize the drive, the gaming console may bypass this status and rewrite the partition table and file system.
Many users have reported that formatting the unknown hard drive on a gaming console as extended storage makes it usable again or allows it to be initialized.
We will demonstrate how to format a hard drive in PS5.
Step 1. Connect your external hard drive to your PS5 via a USB Type-C port or a USB Type-A port.
Step 2. Go to Settings > Storage.
Step 3. Select USB Extended Storage > Format as USB Extended Storage.
During the formatting process, do not turn off the console or remove the drive, as this may cause damage to your device.
After the formatting process finishes, reconnect the disk to your computer to see if it is usable. If not, open Disk Management and check if it can be initialized successfully.
Fix 5. Update/Reinstall the Disk Driver
When the error is caused by a corrupted or incompatible disk driver, updating or reinstalling the driver can ensure that Windows communicates properly with your storage device.
To update the disk driver:
Step 1. Right-click the Windows logo button and choose Device Manager.
Step 2. Expand Disk drives.
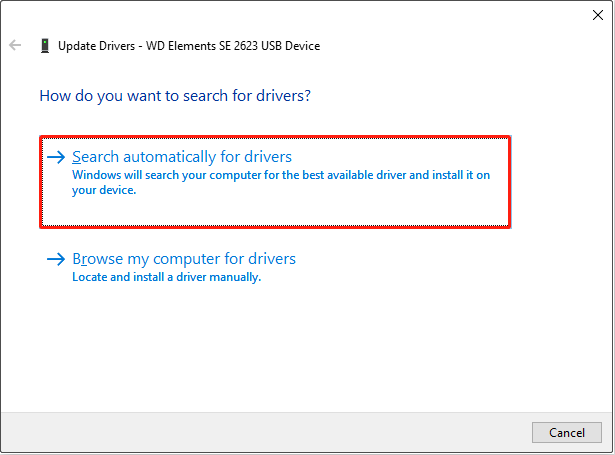
Step 3. Right-click the external hard drive and click Update driver.
Step 4. Click Search automatically for drivers. Windows will start to scan for available drivers for your disk, and you need to wait for the process to complete.
To reinstall the disk driver:
Step 1. In Device Manager, right-click your disk and choose Uninstall device.
Step 2. Click Uninstall to confirm.
Step 3. Restart your computer, and the system will automatically install a driver.
Fix 6. Send the Hard Disk for Repair
If you have tried all the methods listed above but the disk still cannot be initialized or accessed, it may indicate severe hardware issues.
In this case, software tools cannot repair the disk or recover files. You need to send the disk to a professional repair center. These centers often have advanced tools and clean environments specially designed for repairing disks.
For data security, before choosing a repair service, check online reviews to ensure you select a reputable one.
Recommended: Back Up Hard Drive Files Regularly
During daily use of disks and computers, various errors may occur unexpectedly, preventing access to your files. Therefore, backing up important data to multiple locations is essential.
This ensures that when disk failures or data loss occur, you can easily restore your data from backups.
Here are the common data backup methods:
- Manually copy and paste important files to another disk.
- Upload files to cloud services such as Google Drive, OneDrive, or Dropbox.
- Utilize Windows’ built-in backup tools like File History to back up your files.
- Use professional data backup software to create backup images. For example, MiniTool ShadowMaker allows you to back up files, folders, partitions, disks, and even Windows systems with ease. It offers a 30‑day free trial.
MiniTool ShadowMaker TrialClick to Download100%Clean & Safe
Final Words
To sum up, if you encounter the fatal device hardware error when initializing a disk, first try changing the USB cable, enclosure, USB port, or even the computer to rule out physical connection issues.
If that does not resolve the problem, check the SMART properties, reload the volume information, or repair file system errors. Moreover, if you have a gaming console, connect the hard drive to it and format the disk.
If all these methods fail, consider using data recovery software or seeking professional help to recover the files on the drive.
For any errors encountered while using MiniTool software, please contact the support team at [email protected] for timely and professional assistance.
About The Author

Position: Columnist
Shirley holds a bachelor’s degree in English and has been an editor at the MiniTool Team for many years. She specializes in IT-related content, with a focus on data recovery, file backup, disk management, and other technical topics. She is committed to delivering clear, accurate, and practical solutions to help users resolve common computer issues.
User Comments :