Situation: Computer Stuck on Preparing Automatic Repair Loop
“I started my Win 10 Pro machine after “sleeping” and instead of “awakening”. I’m stuck in a loop of “Preparing for Automatic Repair”. I can get into Command Prompt, but neither SFC nor CHKDSK will complete it. I hope that someone who has won this battle will come to my defense. Thanks all.tenforums.com
Preparing Automatic Repair is a repair process that starts automatically when your Windows system encounters a problem during startup. This process involves trying to repair startup files and settings and usually takes a few minutes to an hour to restore the system to normal. However, sometimes the computer may be stuck on the preparing automatic repair screen for several hours and cannot run Windows normally.

Under this circumstance, you may ask: Why does my computer keep saying preparing automatic repair?
Possible Causes for Windows 10 Automatic Repair Loop
There are usually several reasons for the constant automatic repair:
- There may be corrupted or damaged significant system files on your computer.
- Computer hardware components such as hard disk, memory, etc. are faulty.
- Viruses or malware are interfering with the normal running of the system.
- System disk problems, such as insufficient storage space, file system errors, etc., are interfering with system file reading or repair tasks.
- Some hardware drivers are incompatible with the system, leading to the automatic repair loop or unstable functioning.
- …
Faced with the black screen of preparing automatic repair, you can force start your computer to check if the system can boot normally. Press and hold the Power button for about 10 seconds until the computer completely shuts down. Wait a few seconds and then restart the computer. If it boots normally, you need to back up files immediately in case of a secondary black screen. After that, you can try the fixes listed below for troubleshooting.
MiniTool ShadowMaker TrialClick to Download100%Clean & Safe
If your computer is still stuck on the repair screen and cannot start, it is highly recommended to rescue your files first of all to avoid permanent file loss or corruption.

First Priority: Recover Files From Your Computer
Method 1. Boot Into Safe Mode
Safe mode is a diagnostic startup mode in which Windows only loads the minimum drivers and services. Therefore, sometimes the computer cannot start normally but can enter safe mode. So, you can try to enter the safe mode and insert a USB drive or external hard drive into your computer. Then copy and paste the important files to that disk for protection.
How to enter the safe mode?
Option 1. Use the Power button
- Press and hold the Power button of your device for 10 seconds to turn off the computer, then turn on it by pressing the Power button again. Then press the Power button again for about 10 seconds to turn off the device.
- Duplicate the same process until the “Automatic Repair couldn’t repair your PC” message pops up, and then click Advanced options.
- Select Troubleshoot > Advanced options > Startup Settings > Restart.
- Press F5 to start your computer in safe mode with networking.
Option 2. Use the installation media
- Connect a blank USB drive to a working computer, and create a Windows installation media.
- On the Windows setup screen, click Next.
- Select Repair your computer > Troubleshoot > Advanced options > Startup Settings > Restart.
- Press F5 to start your PC in safe mode with networking.
Method 2. Create a Bootable Disk
Suppose you are unable to access safe mode, you need to create a bootable data recovery media to boot the problematic computer and recover files. MiniTool Power Data Recovery, the best data recovery service for Windows, is certainly essential. It has a Bootable Media Builder feature that is designed to create a bootable USB drive or CD/DVD to start your computer and make it possible to scan your disks and rescue files.
This file recovery tool is suitable for Windows 11, 10, 8.1, and 8, and is capable of restoring data from HDDs, SSDs, and other types of file storage media. Either lost data or existing files can be restored by this tool safely and easily.
MiniTool Power Data Recovery FreeClick to Download100%Clean & Safe
Process 1. Create a bootable data recovery disk.
First, insert a formatted or blank USB drive into your working computer.
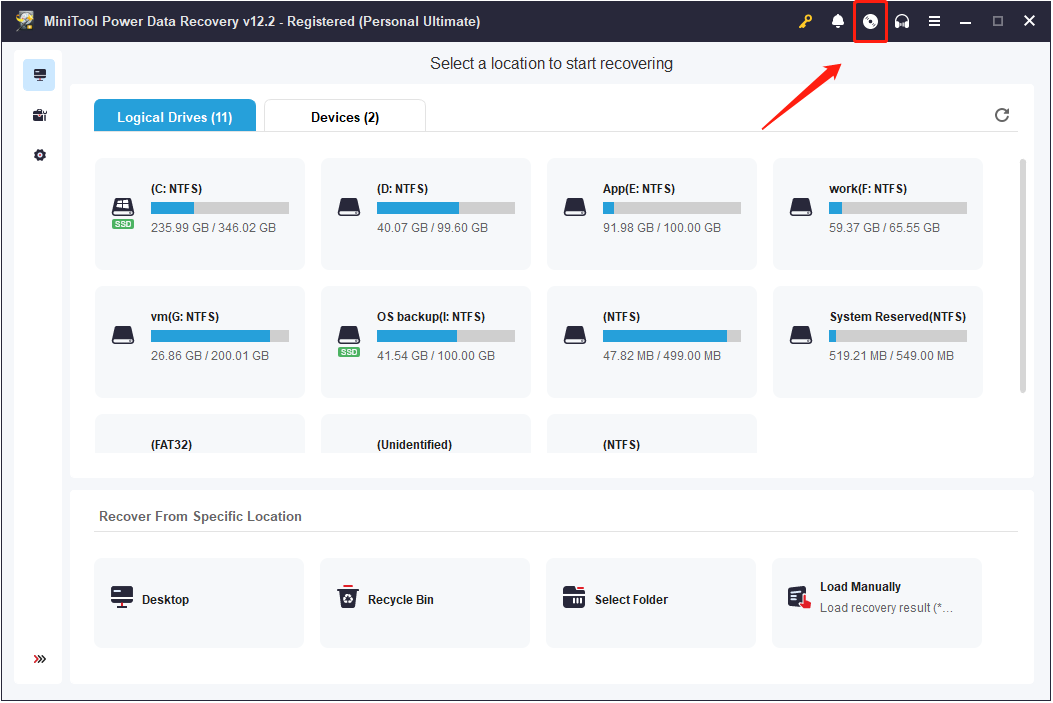
Second, launch the registered MiniTool recovery tool, and click the Bootable Media Builder button.
Third, click WinPE-based media with MiniTool plug-in, and then follow the on-screen instructions to complete the bootable disk creation.
Fourth, remove the bootable USB drive and connect it to the problematic computer. After that, restart the computer, and press F2, Delete, Esc, or other keys based on your motherboard manufacture during the boot process to enter BIOS. Change the boot order to start from the bootable USB disk, and then follow the prompts to launch MiniTool Power Data Recovery.
Process 2. Scan the disks and recover files.
When you see the main interface of MiniTool Power Data Recovery, you can start to recover your files.
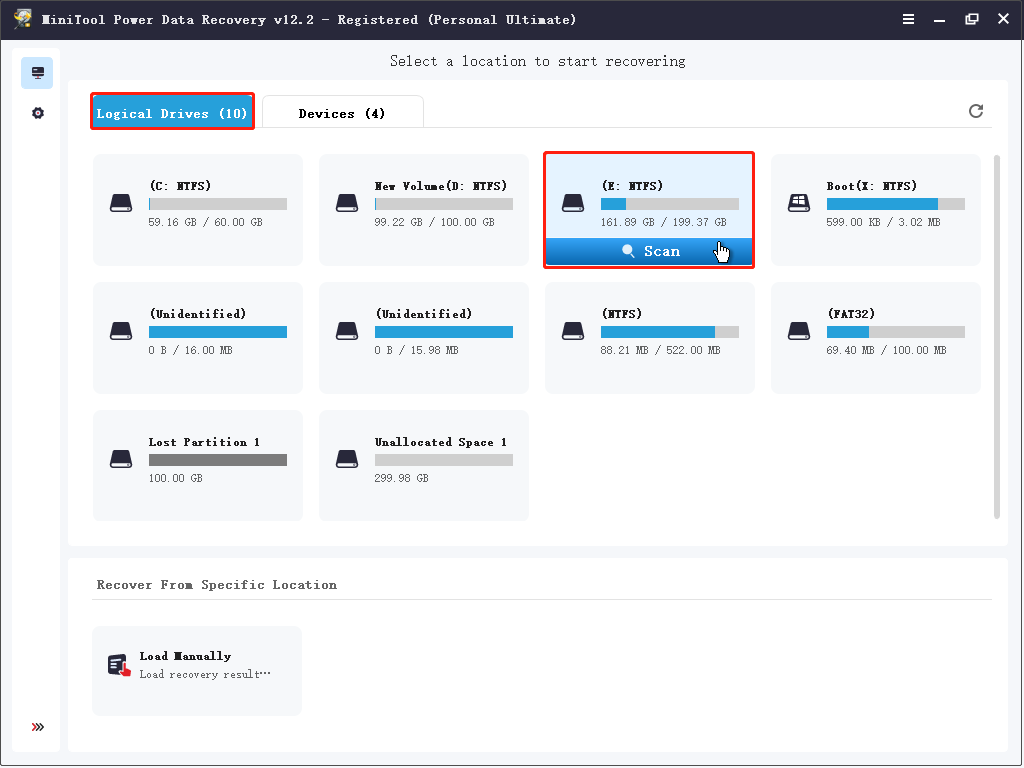
Step 1. Under Logical Drives, you can see all the partitions on your disks connected to your PC. Select the one from which you need to rescue files and click the Scan button to scan for deleted, lost, and existing files. Optionally, you can switch to the Devices tab and select the entire disk to scan.
Step 2. After the scan is completed automatically, you can unfold each folder under Path to find the needed files. You can focus on the Existing Files folder. Once you find a required item, tick the checkbox in front of its file name for preparation. If you prefer to view files in file type or even in a specific file format, you can go to the Type section.
Suppose you want to stay at the Path tab to view and find needed files by file type, you can make use of the Filter feature. It allows you to screen out unwanted files by file type, file modification date, file size, and file category. It is recommended to set up all the necessary filter conditions at one time to avoid repeated operations.
Moreover, assuming you only need to recover files with a certain name, you can type the file name in the search box and press Enter to display them all.
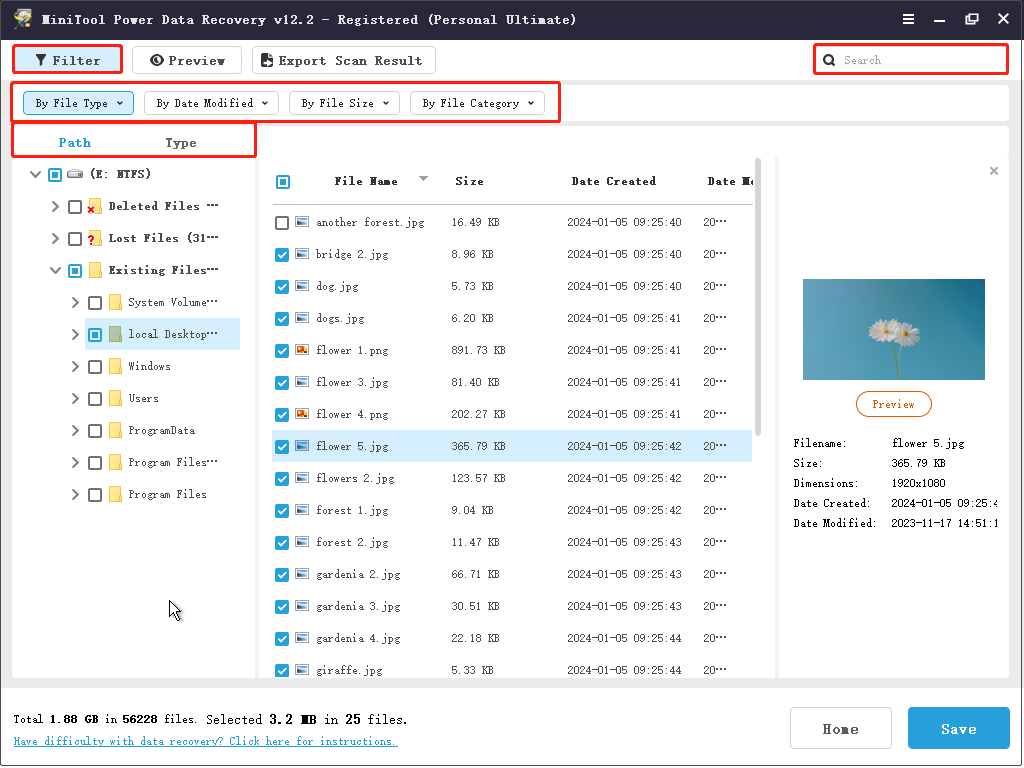
To prevent recovering unwanted or inaccessible files, you can preview the needed files before recovering them. You can only preview the files one by one by double-clicking on each of them. Most types of files can be previewed without restrictions, but some of them need to be no larger than 100 MB in size.
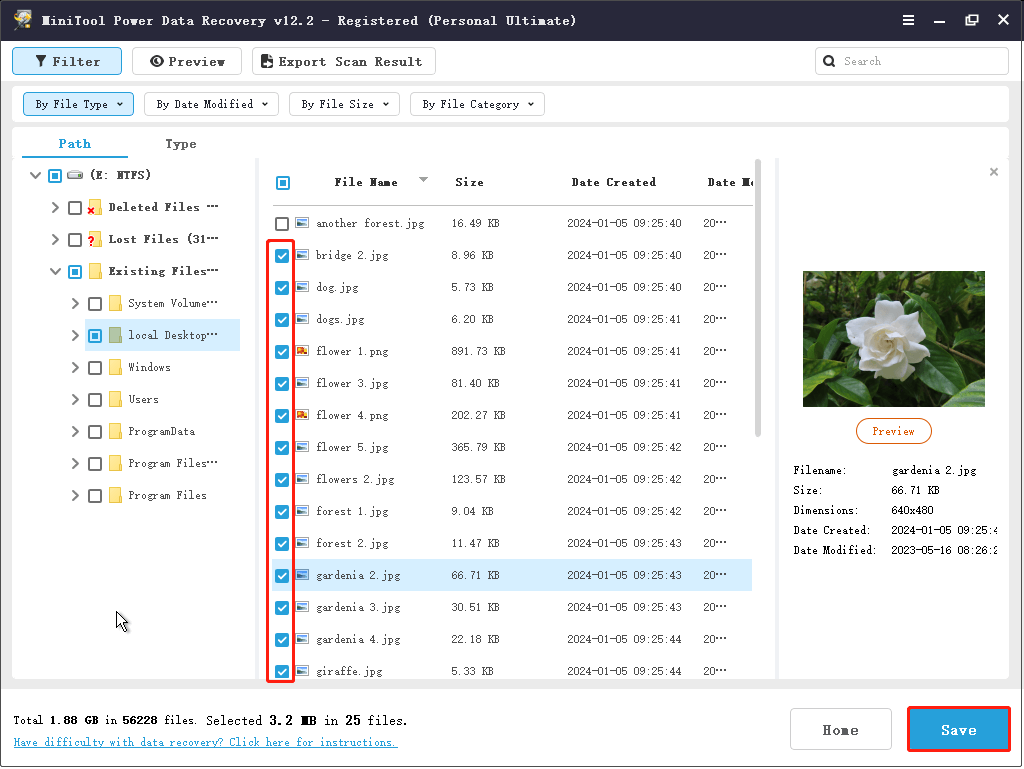
Step 3. Ensure that you have selected all the files you want to restore, and then click the Save button. When the new small window pops up, opt for the USB drive and click OK to store your files.
After rescuing your files without booting into Windows, you may need to reinstall Windows or send your device to a repair center for services.
How to Fix Preparing Automatic Repair Black Screen
Most of the following methods only work if your computer starts normally or you can enter safe mode. The following steps are described in terms of entering safe mode.
Way 1. Repair System Files
When the automatic repair is triggered by corrupted or missing system files, running the SFC command line to detect and repair these files is the ideal troubleshooting step.
Step 1. In the WinRE window, hit Troubleshoot > Advanced options > Command Prompt.
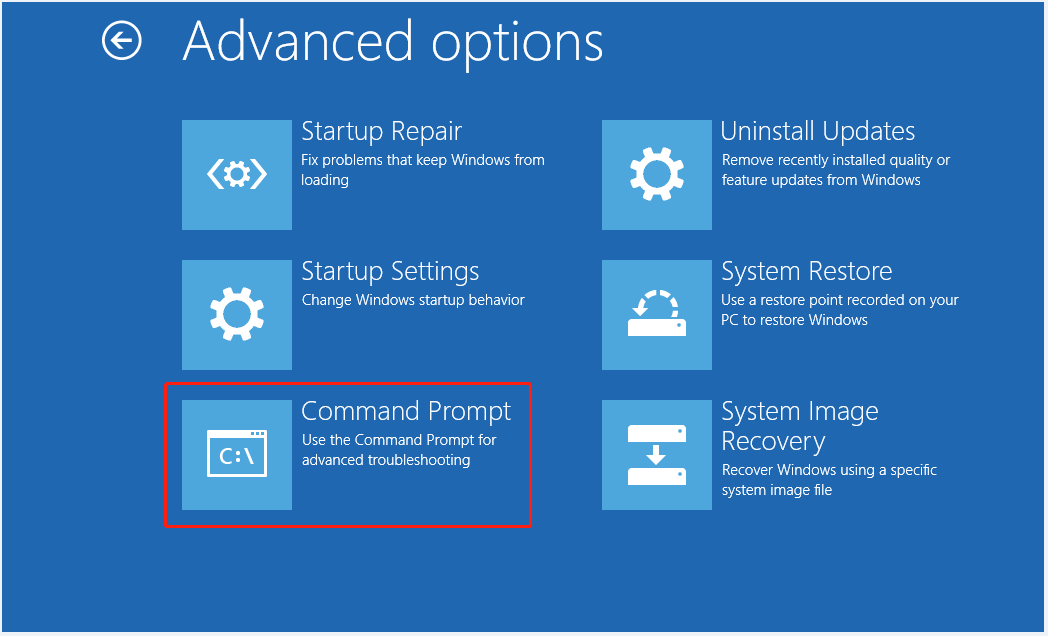
Step 2. Type sfc /scannow and press Enter. Wait for the process to complete, and then restart your computer to check if the automatic repair loop is resolved.
Way 2. Perform System Restore
Windows offers you a powerful feature called System Restore that can help revert your system from a problematic state to a previous normal state. If you have created a restore point when your device functions well, you can perform a system restore.
Step 1. In the Windows recovery window, select Troubleshoot > Advanced options > System Restore.
Step 2. Select a particular restore point from the available list and click Next to continue.
Step 3. Follow the on-screen instructions to complete the restore.
Way 3. Check the System Disk for Errors
When the repair loop is associated with the system disk errors, running the CHKDSK command line to detect and repair the file system errors or other failures is the corresponding solution. Here are the steps:
Step 1. Open the Command Prompt from the Windows recovery window.
Step 2. Type chkdsk /f /r /x C: and press Enter to scan the C drive for errors.
Way 4. Check for Viruses
Viruses or malware on your computer may modify registry settings, replace or delete critical system files, occupy system resources, etc., causing the system to be blocked and enter automatic repair. Under this circumstance, running a full virus scan is essential.
Step 1. Enter safe mode with networking.
Step 2. Press the Windows + I key combination to open Settings.
Step 3. Select Update & Security > Windows Security > Virus & threat protection > Scan options.
Step 4. Choose the Full scan option, and then click Scan now.

Way 5. Extend the System Partition
Sometimes, the repair loop may be caused by insufficient free space on the system partition. In this case, you can try to create a bootable disk by using MiniTool Partition Wizard, and then use it to extend the C drive. Note that only the upgraded edition of MiniTool Partition Wizard supports the creation of bootable disks. You can download the free edition first, and then upgrade it.
MiniTool Partition Wizard FreeClick to Download100%Clean & Safe
See: How to Extend Partition | MiniTool Partition Wizard Tutorial
Way 6. Reinstall Windows
If all the fixes above fail to restore your system to a healthy state, it may indicate that there are severe problems in your system. If this is the case, you may consider carrying out a fresh install by using a Windows installation media. Be aware that this action will remove all your personal files and apps, as well as delete and recreate all disk partitions. See this official tutorial: How to Reinstall Windows.
Recommended: Back up System/Files
In addition to the preparing automatic repair failure, your computer may also face other challenges that affect the startup or personal files. Therefore, to avoid risky data or system recovery, it is recommended that you develop a habit of backing up your system and important files regularly. Thus, you can easily restore the system and data from the backup.
MiniTool ShadowMaker is a professional and green PC backup software worth a try. Not only personal files/folders but also partitions/disks as well as Windows systems can be easily backed up by using this tool. Moreover, it provides you with multiple backup schemes (full backup, incremental backup, differential backup) so that you can choose a proper one according to your available storage space. Furthermore, it has flexible backup plans so that you can set your backup matters on a regular basis (daily, weekly, monthly, log on, and log off).
Download its trial edition which has a 30-day free trial to verify if this software suits you.
MiniTool ShadowMaker TrialClick to Download100%Clean & Safe
Here are some useful tutorials:
Wrapping Things Up
Several ways are outlined above to help you resolve the preparing automatic repair stuck issue. Also, the data recovery steps are described above to assist you in rescuing your data to prevent permanent file loss. Hope the information we provide is useful and timely.
Suppose you need any help with MiniTool software, please do not hesitate to email the support team via [email protected].
About The Author

Position: Columnist
Shirley holds a bachelor’s degree in English and has been an editor at the MiniTool Team for many years. She specializes in IT-related content, with a focus on data recovery, file backup, disk management, and other technical topics. She is committed to delivering clear, accurate, and practical solutions to help users resolve common computer issues.
User Comments :