When an external hard drive shows unallocated, recover data using data recovery software first. Then, check if it is accompanied by “Unknown” or “Not Initialized”. If it is, try initializing the disk. If it only shows “Unallocated”, try creating new partitions.
Issue: External Hard Drive Shows Unallocated on Windows
When an external hard drive shows Unallocated in Disk Management, it can be confusing. The hard drive is detected, and its capacity appears normal, yet you can’t access the data on it.
This phenomenon usually indicates a problem with the partition table or file system. The system cannot recognize the original partition and therefore marks the entire space as unallocated.
There are many reasons for this problem. Understanding the cause is the first step in subsequent troubleshooting and recovery.
Common Reasons Why an External Hard Drive Shows Unallocated
Some possible reasons are as follows:
- Partition table corruption or loss: The drive’s partition information is corrupted, and the system cannot recognize the partitions, causing unallocated space.
- Hard drive uninitialized or abnormal initialization: A new hard drive or a drive with a failed initialization may lack valid partition information, resulting in unallocated space.
- File system corruption: The hard drive originally had partitions, but the file system is corrupted seriously, preventing the system from mounting the partitions.
- Physical damage or bad sectors: The hard drive has severe bad sectors or physical damage, making partition information unreadable.
- Abnormal insertion/removal or power supply: Unstable power supply or a faulty interface during the insertion/removal of the device may lead to partition information loss.
After knowing about the factors, the next step is to recover data from the unallocated external hard drive and repair the disk.
Before Repair: Recover Data from the Unallocated Disk
When an external hard drive is unallocated, the data still exists, but the partition information is lost. If you attempt to repair it directly, the system might write a new structure, causing data loss.
Recovering the data first ensures that the original files are not affected during the repair process. This is best practice for data security.
Here are two options to recover data from the unallocated external hard drive.
Option 1: Recover Files Using MiniTool Power Data Recovery
MiniTool Power Data Recovery is a professional and powerful tool for data recovery.
This software can scan the entire disk, not just existing partitions. Even when the partition table is corrupted or the disk shows as unallocated, it can still scan and recover files.
Besides unallocated space, it can also handle formatted partitions, RAW partitions, and more.
This tool supports recovering various files, including documents, pictures, videos, and audios. The Preview function is provided for easy confirmation of file content.
It uses read-only mode to avoid further damage to your data. Most importantly, this free file recovery software allows you to restore 1 GB of files for free. Download and install it to recover files.
MiniTool Power Data Recovery FreeClick to Download100%Clean & Safe
Step 1: Select and scan the target drive
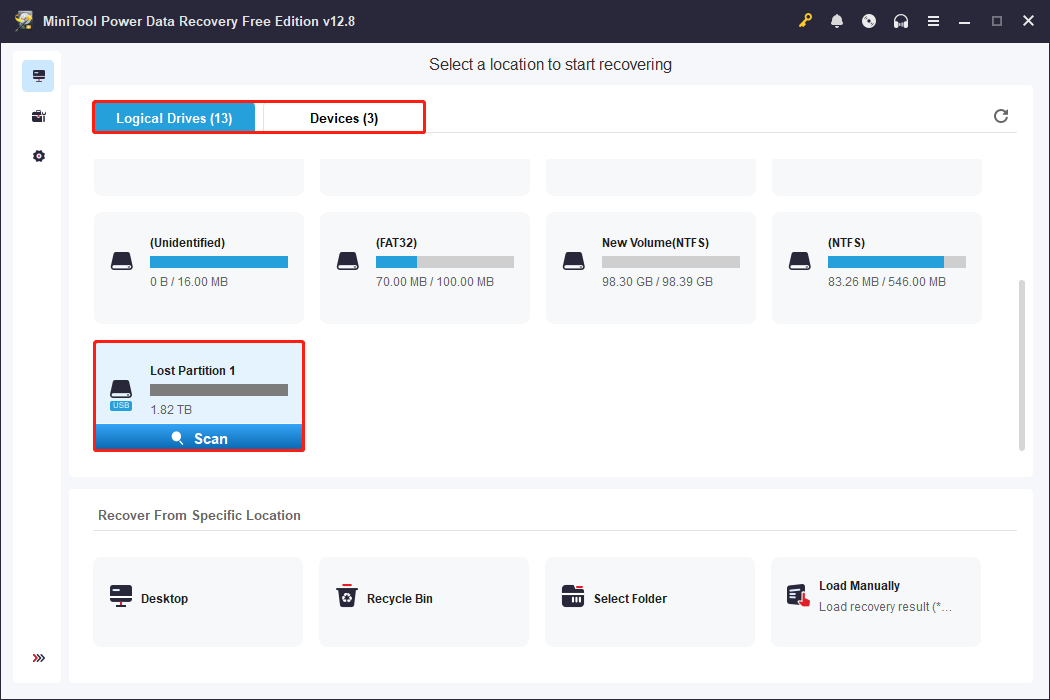
Launch the software to enter the main interface. Under Logical Drives, all the existing or deleted partitions are displayed. Select the lost partition or unallocated space and click Scan.
Alternatively, go to Devices and scan the whole disk. Then, wait for the scan process to complete.
Step 2: Find the target files using Path, Type, Filter, and Search
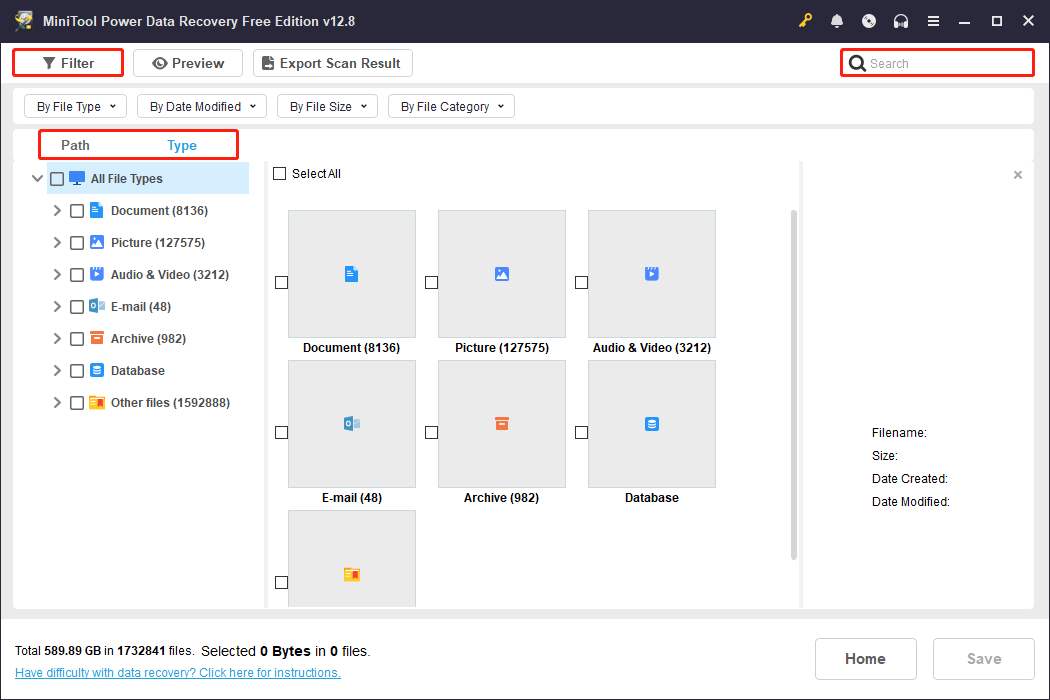
When the scan ends, use Path, Type, Filter, and Search to locate the files.
- Path: Lists scan results by the original folder path, allowing you to quickly locate files just like in File Explorer.
- Type: Categorizes files by file type, making it easy to quickly find pictures, videos, audios, and more.
- Filter: Filters results by file type, modification date, file size, and file category to further narrow down the search.
- Search: Directly enters a full or partial filename in the search box and press Enter to search for the specific file.
After finding the files, double-click them to preview. This helps check if the file is complete and correct.
Step 3: Recover files to a safe location
When the files are confirmed, select them and click the Save button. In the new window, choose a path for the recovered files and click OK. Wait for the recovery to complete.
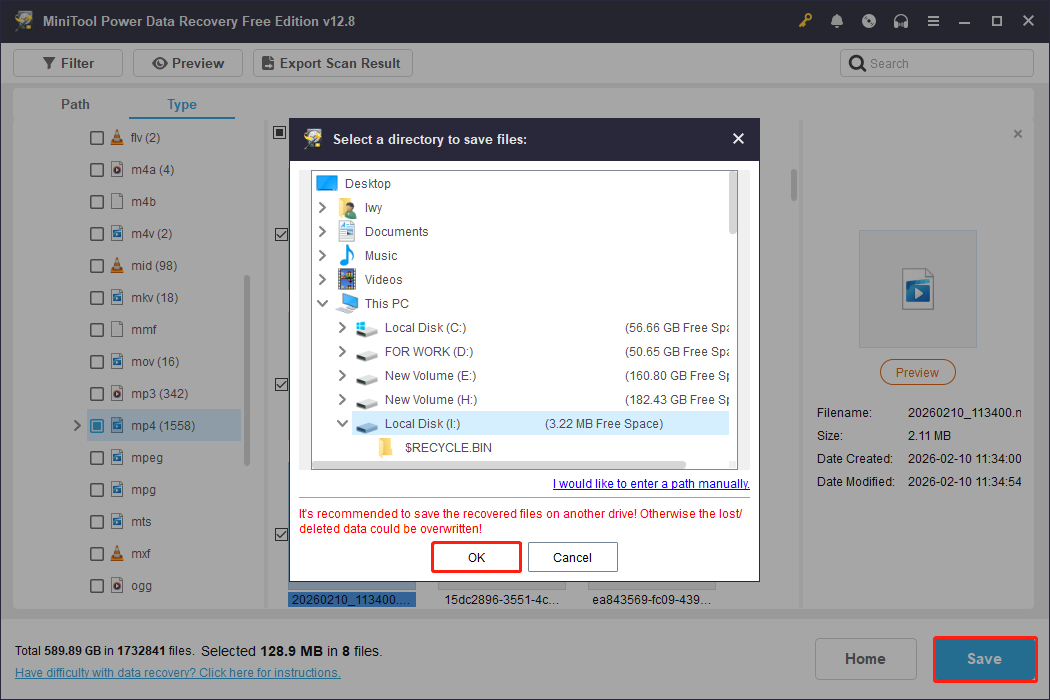
When the Recovery Completed window shows, click the View Recovered button to check your files.
Option 2: Recover Partitions Using MiniTool Partition Wizard
In addition to recovering files, you can also recover the entire partition. This section explains how to recover lost or deleted partitions in detail. For this purpose, a professional partition tool is recommended.
MiniTool Partition Wizard is a tool that integrates partition management and recovery. The interface is intuitive, and partition recovery can be completed in just a few steps.
This tool can not only recover partitions but also recover files within them, preventing data loss. The built-in partition recovery function can recover partitions lost due to accidental deletion, virus attacks, partition table corruption, system updates, and so on.
This software is compatible with Windows 7/8/8.1/10/11, as well as various devices, including external hard drives, USB flash drives, SD cards, and more.
Now, download the software and follow the steps below to do a partition recovery.
MiniTool Partition Wizard FreeClick to Download100%Clean & Safe
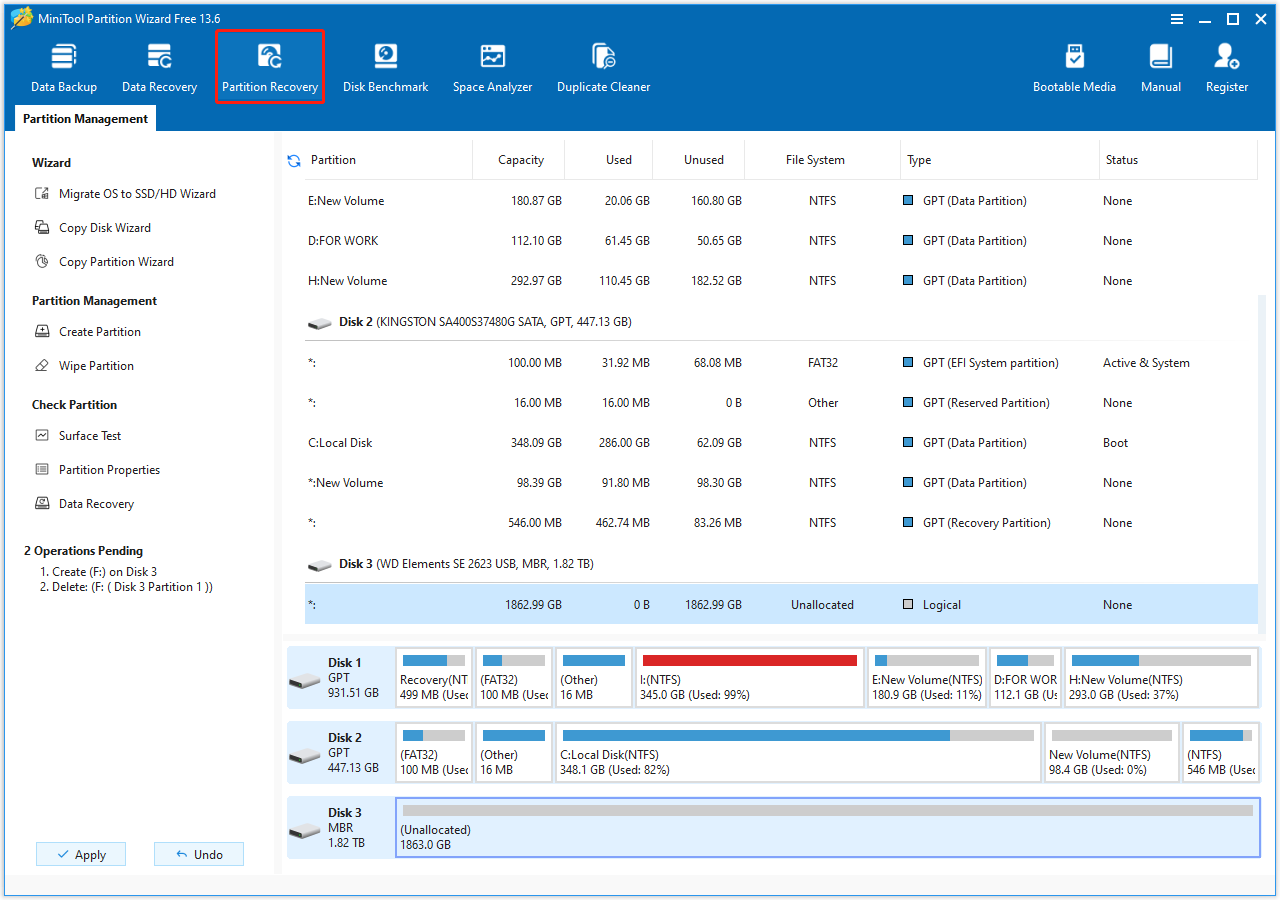
Step 1: Open the software and switch to the Partition Recovery module.
Step 2: Click Next, choose the target disk, then click Next to continue.
Step 3: Choose a scanning range from Full Disk, Unallocated Space, or Specified Range, then click Next.
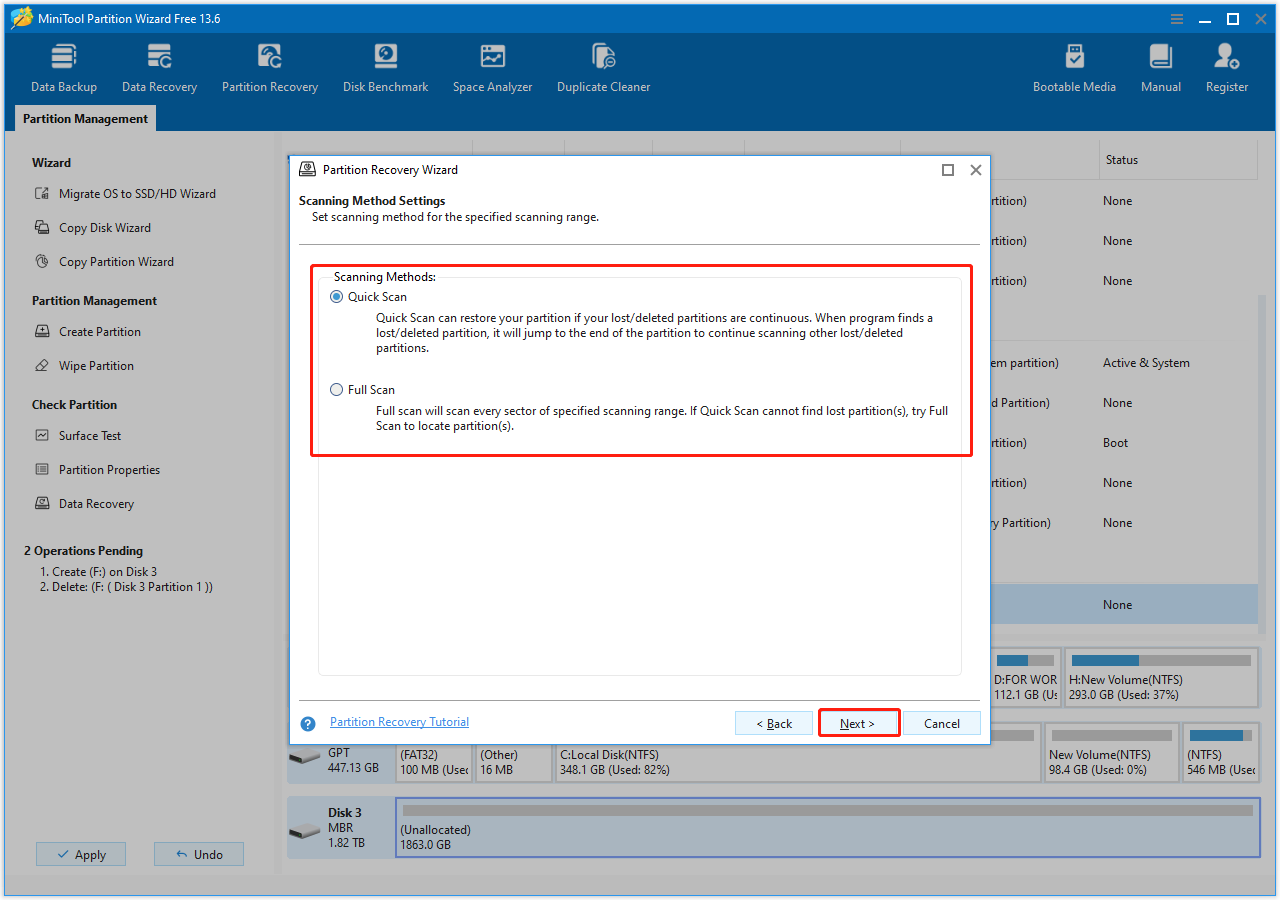
Step 4: Choose a scanning method from Quick Scan or Full Scan, then click Next.
Step 5: Finally, select all needed partitions and click Finish to save them.
When files are safe, repairing the hard drive should be urgent. The following sections outline two common situations and their corresponding solutions.
Case 1: Initialize the Disk When It Shows Unknown or Not Initialized
If your disk is accompanied by “Unknown” or “Not Initialized”, initializing it can restore it to normal. Without initialization, the disk cannot be partitioned or formatted, nor can it store data.
Initialization creates a basic partition structure and a Master Boot Record (MBR) or GUID Partition Table (GPT) for the disk. This allows the operating system to recognize and use it.
Here is how to initialize the disk in Disk Management and Command Prompt.
Option 1: In Disk Management
Disk Management is a secure and reliable tool that comes with Windows systems. It provides the function of initializing a disk, which can quickly create a partition table for the disk.
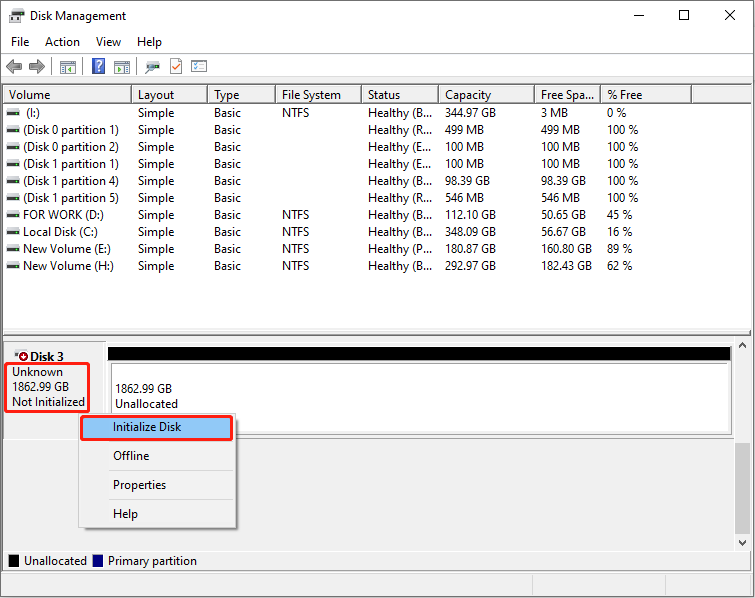
Step 1: Press Win + X and choose Disk Management.
Step 2: Right-click the target disk and choose Initialize Disk.
Step 3: Choose the preferred partition table type:
- GPT: Suitable for modern systems, supports disks larger than 2TB.
- MBR: Better compatibility, but limited to a maximum disk capacity of 2TB, with additional capacity remaining unusable.
After making your selection, click OK to complete initialization. After initialization, the disk will be in an unallocated state. Then, create and format partitions.
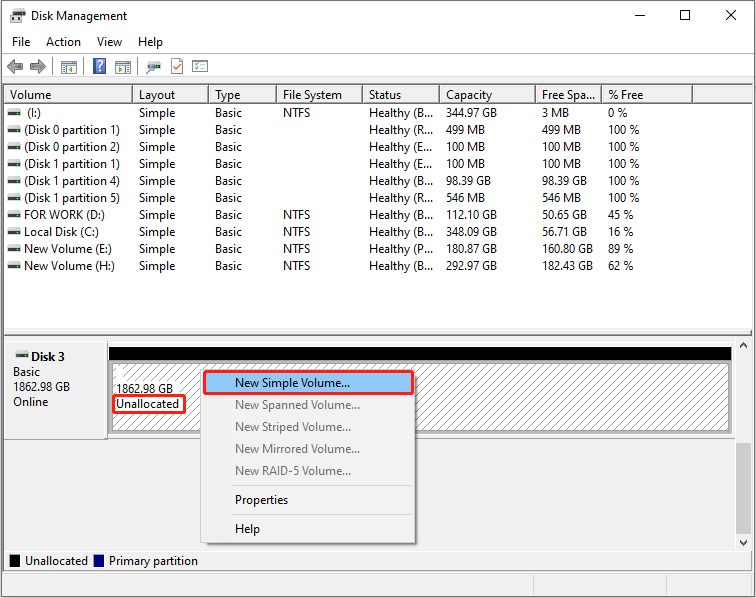
Step 1: Right-click the unallocated space and choose New Simple Volume.
Step 2: In the New Simple Volume Wizard window, click Next.
Step 3: Keep the default settings (use all space) or enter your desired size and click Next.
Step 4: Select an available drive letter and click Next.
Step 5: Choose the file system, customize the volume label, then click Next.
Step 6: Finally, click Finish to complete the creation.
Option 2: In Command Prompt
Command Prompt offers more flexible command-line control. And the DiskPart command allows you to select the partition table type, create partitions, and format the disk.
This avoids the limitations or compatibility issues that may arise with graphical interfaces. Here is how to initialize the disk using DiskPart:
Step 1: Type Command Prompt in the Windows search box, right-click the best match, and choose Run as administrator.
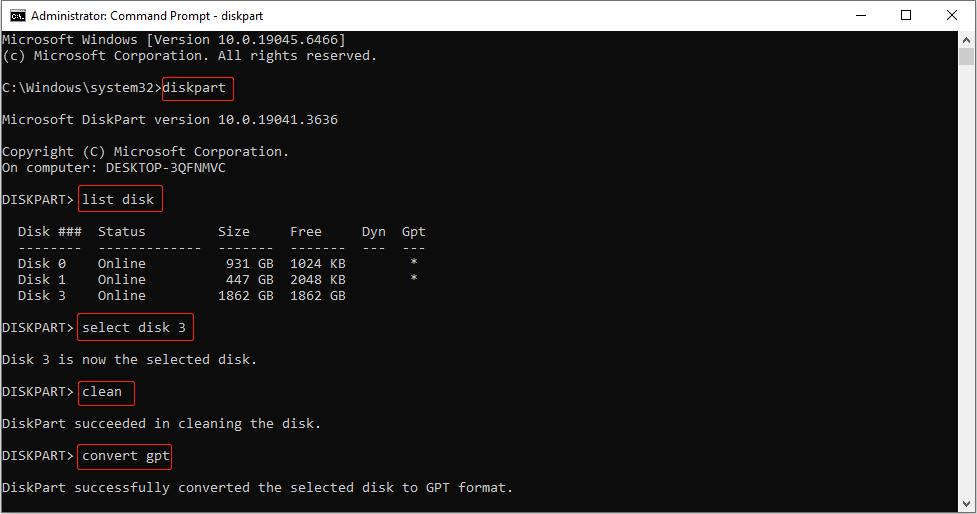
Step 2: Do the following in the prompt window:
- Type diskpart and press Enter to launch the tool.
- Type list disk and press Enter to display all drives.
- Type select disk # (replace # with your actual disk number) and press Enter.
- Type clean and press Enter to remove all partitions and signature, essentially initializing/wiping the disk.
- Type convert gpt or convert mbr and press Enter to set the partition table type.
Step 3: Then, input the following commands and press Enter after each to create and format partitions.
- create partition primary (make the disk usable)
- format fs=ntfs quick (format the drive to ntfs. ntfs can be replaced with fat32 or exfat)
- exit (close DiskPart)
Next, check another scenario when the external hard drive only shows unallocated.
Case 2: Create New Partitions When It Shows Unallocated
When an external hard drive shows unallocated space, creating new partitions is the solution.
Unallocated space cannot be used to store any data. By creating new partitions, you can establish a file system and logical structure for the disk.
This allows the operating system to access and manage this space. Here are two options to create new partitions.
Option 1: Use Disk Management
Disk Management is a built-in Windows tool that requires no third-party installation. It is suitable for quickly and systematically creating new partitions.
Step 1: Right-click the unallocated space and choose New Simple Volume.
Step 2: Specify the volume size, assign a drive letter, select the file system, and customize the volume name.
Step 3: After setting everything up, click Next, and finally click Finish to create a new partition.
Option 2: Use MiniTool Partition Wizard
We recommend using MiniTool Partition Wizard to create new partitions on unallocated space. It offers a more intuitive interface and more flexible operation than Windows’ built-in tool.
This software not only clearly displays the disk structure but also supports more advanced partitioning features. Furthermore, its wizard-driven process and user-friendly prompts reduce the risk of accidental operations.
Follow the steps to create new partitions using this partition tool.
Step 1: Download and then launch the software.
MiniTool Partition Wizard FreeClick to Download100%Clean & Safe
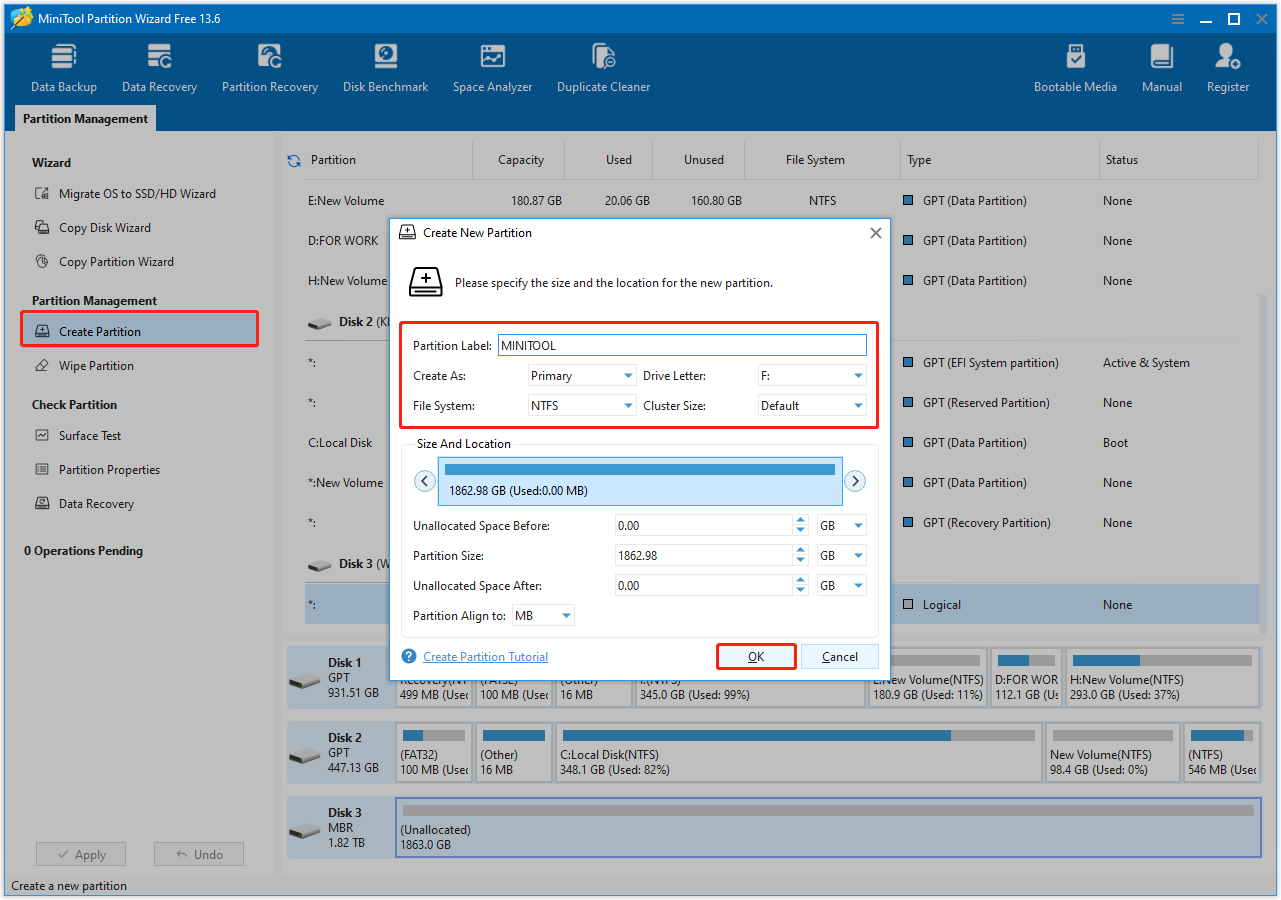
Step 2: In MiniTool Partition Wizard, select the unallocated space.
Step 3: Under Partition Management, click the Create Partition option.
Step 4: In the pop-up window, complete the following operations and click OK:
- set a partition name
- choose a drive letter
- select the desired file system
- fill in any other required configuration options
Step 5: Finally, click the Apply button in the bottom left corner of the main interface to make the change take effect.
After the external hard drive returns to normal operation, take some measures to prevent it from becoming unallocated again.
Best Practices to Avoid Unallocated Disk Errors
The following tips can help prevent your external hard drive from showing unallocated space again.
- Perform proper partitioning: Use reliable disk management tools and avoid frequently deleting or merging partitions.
- Avoid forced shutdowns/power outages: Sudden power outages can damage partition tables or file systems.
- Check disk health: Regularly run disk diagnostic tools (such as CHKDSK or SMART) to detect bad sectors or anomalies promptly.
- Use third-party tools with caution: Unsafe partitioning or recovery software may cause partition information loss.
- Maintain system stability: Update drivers and the operating system to reduce partition errors caused by compatibility issues.
In addition to preventing unallocated disk errors, data backup is also important. Ensure you have backed up your external hard drive so you can quickly recover data even if disk problems occur.
Final Words
When your external hard drive shows unallocated, follow the instructions above to fix it step by step. First, recover data or partitions from the unallocated disk. Then, repair it based on the situation.
- When it is accompanied by “Unknown” or “Not Initialized”, try initializing the disk.
- When it only shows “Unallocated”, try creating new partitions.
For any questions about our MiniTool products, contact us at [email protected].
About The Author

Position: Columnist
Chelsea graduated from university with a major in English. She has a strong interest in English writing. It is this passion for writing that led her to become an English editor. Her articles mainly foucus on data recovery and other computer industry news. As an energetic and outgoing girl, Chelsea enjoys listening to music, singing, riding bikes, and eating in her spare time.
User Comments :