

Hard drive errors can prevent Windows from properly reading or writing to a storage device. They can occur on internal HDDs, external hard drives, and other storage devices.
Depending on the underlying cause, you may encounter different error messages when accessing a drive.
What Are Common Hard Drive Errors
Here are six common hard disk errors you may encounter on Windows:
- I/O Device Error: Windows cannot perform read or write operations on the drive due to connection issues, power problems, or hardware failure.
- The Parameter Is Incorrect: Windows cannot access a drive because of file system corruption or other storage-related problems.
- Data Error (Cyclic Redundancy Check): Windows detects a data integrity problem or bad sectors while reading data from the drive.
- The Disk Is Write Protected: Windows prevents you from modifying, deleting, or saving files to a storage device.
- You Need to Format the Disk Before You Can Use It: Windows cannot recognize the drive’s file system or access its partition.
- SMART Hard Disk Error: The drive’s SMART system reports potential hardware failure.
Before trying any drive repair methods, it is important to protect your data.

How to Recover Data from a Hard Drive with Errors
Some hard drive repair operations may modify the file system or affect existing data. If the drive contains important files, recover them before attempting repairs.
MiniTool Power Data Recovery is a data recovery tool that can help retrieve inaccessible or deleted files from HDDs, SSDs, external hard drives, and removable storage devices.
As long as the hard drive is detected by the software, you have a good chance of recovering inaccessible data. You can try the free edition first to see if it works. MiniTool Power Data Recovery Free allows you to recover up to 1 GB of files for free.
MiniTool Power Data Recovery FreeClick to Download100%Clean & Safe
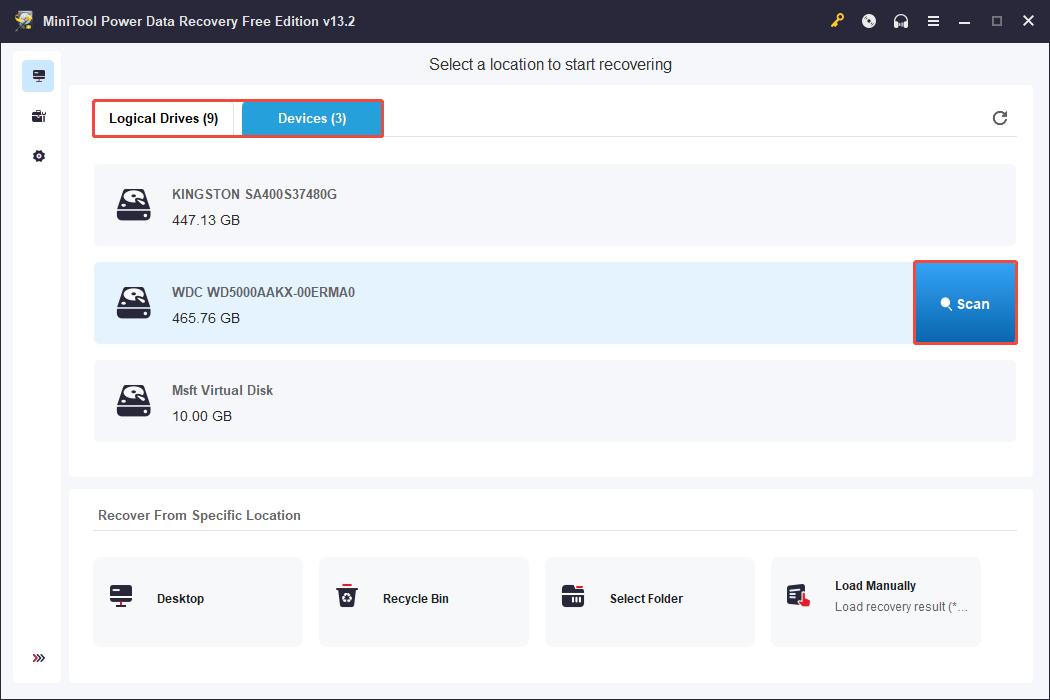
Step 1. Scan the Target Hard Drive
Launch MiniTool Power Data Recovery. Under the Logical Drives or Devices section, locate the problematic hard drive and click Scan.
Step 2. Locate Required Files
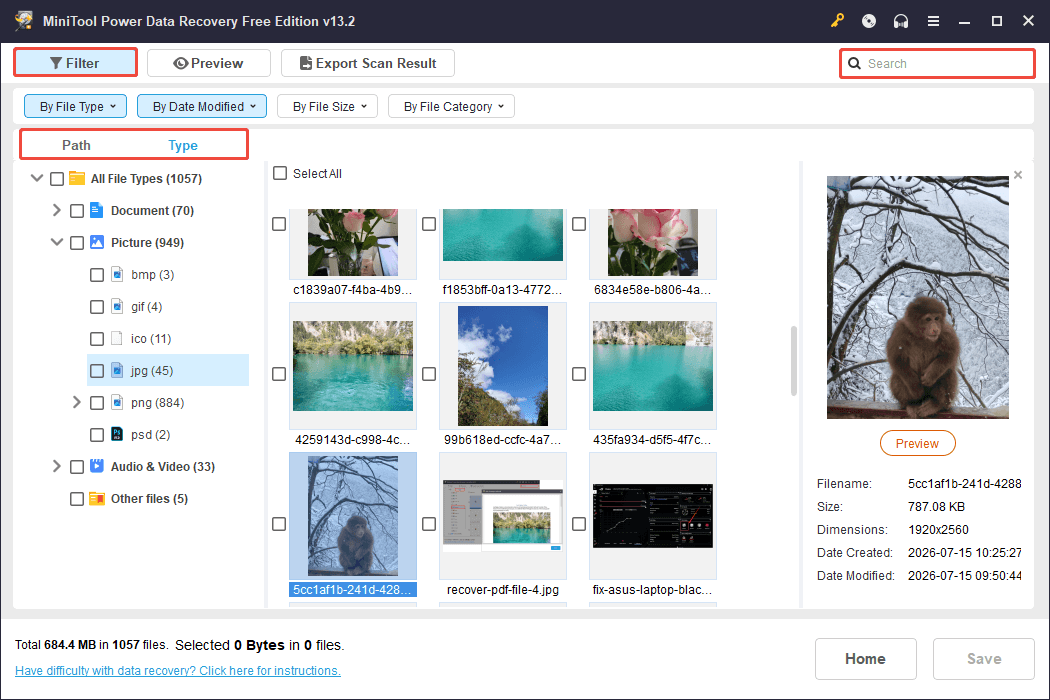
Wait for the scan to finish. After scanning, browse the discovered files using the Path or Type categories, or use the Search and Filter features to locate the files you want to recover.
- Path: Displays files according to their original folder structure.
- Type: Classifies files by file type and data format.
- Filter: Filters out unwanted files by file type, size, modification date, and file category.
- Search: Searches for certain files by using their file names.
Step 3. Save Desired Files
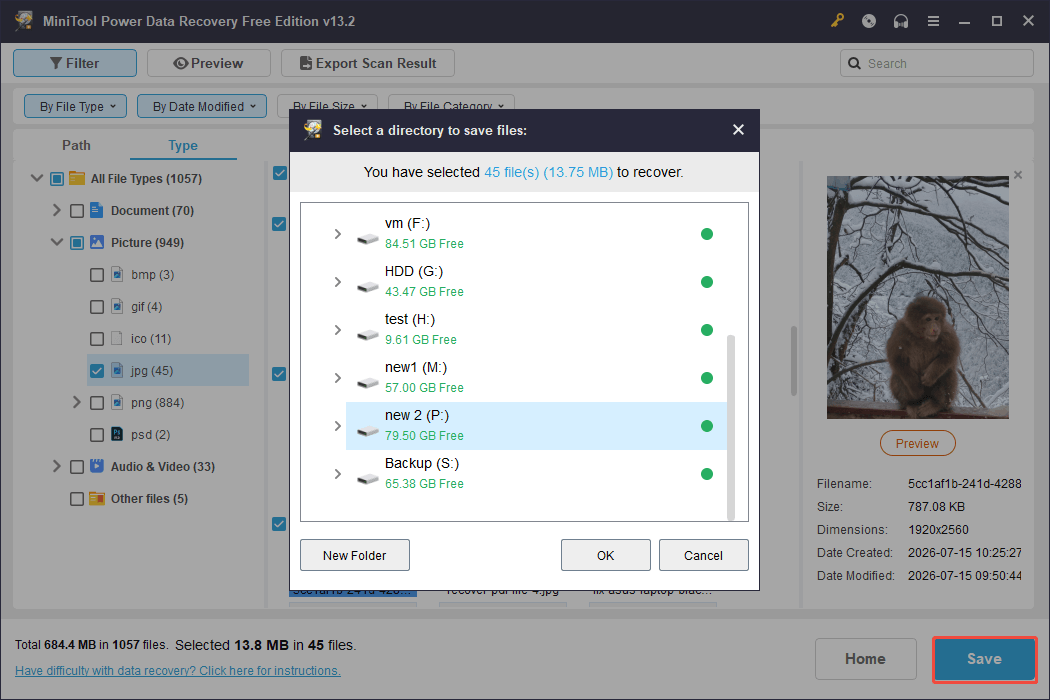
Finally, select the files you need and click Save. Choose a different healthy drive as the recovery destination.
If the drive is not detected by data recovery software, consider sending it to a professional data recovery center or trying the following repair methods to fix the drive before recovering your files.

Error 1. Hard Drive I/O Device Error
You may encounter the I/O device error when opening the drive, initializing the hard disk, or transferring files. Common causes include damaged SATA/USB cables, insufficient power, faulty ports, and hard drive failure.
If you are using an external drive, try reconnecting it or switching to a different cable or USB port. If this does not help, try the following solutions to troubleshoot the error.
Fix 1. Ensure Sufficient SATA Power Supply
Insufficient power supply can sometimes cause the I/O device error, especially when multiple devices share the same SATA power cable. For example, case fans, fan controllers, SSDs, and other components may draw power from the same power supply cable.
Before trying more complicated solutions or purchasing new hardware, check whether your SATA power connections are providing sufficient power.
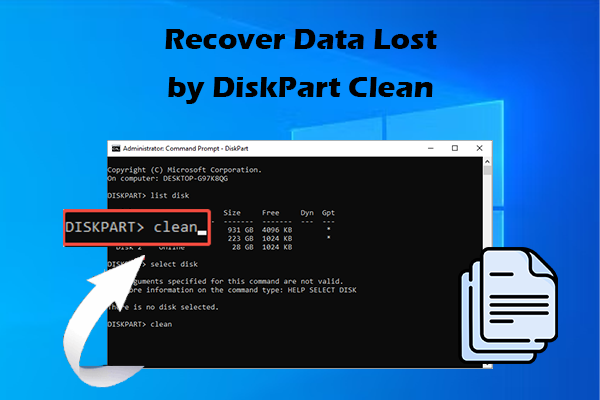
Fix 2. Use the DiskPart Clean Command
If the hard drive has corrupted partition information, you can use the DiskPart clean command to remove the existing partition information and repartition the drive.
Follow these steps:
Step 1. Press Win + S, type cmd, and select Run as administrator.
Step 2. Execute the following commands one by one and press Enter after each:
- diskpart
- list disk
- select disk x (replace x with the disk number of your hard drive)
- clean
- create partition primary
- select partition 1
- format fs=ntfs quick
- assign
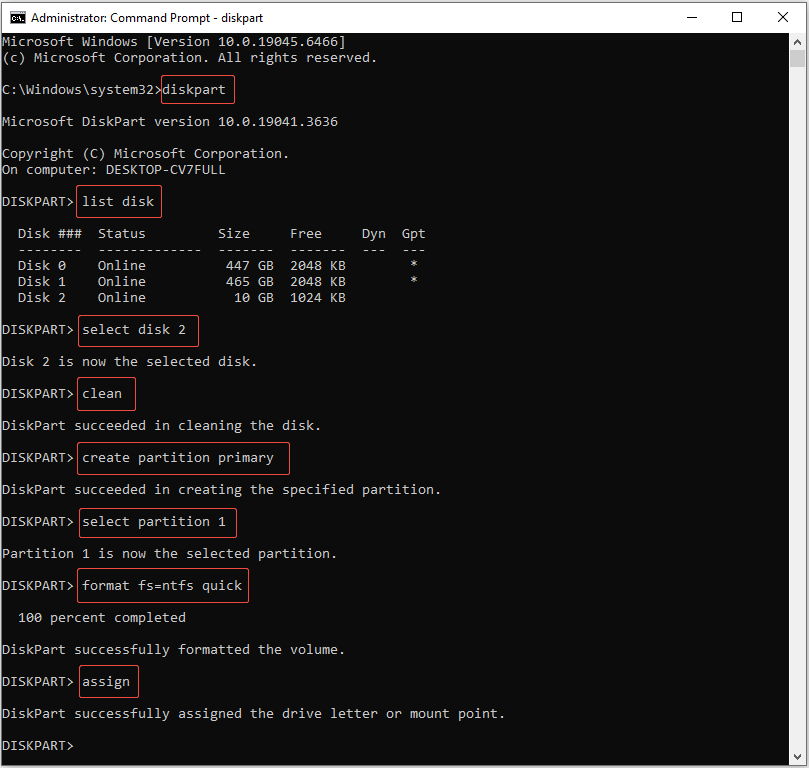
After cleaning, check whether your hard drive works normally.
Fix 3. Enable SATA Hot Plug in BIOS/UEFI
On some computers, SATA hot plug settings can affect how a SATA drive is detected and managed. Enabling this feature may help fix the problem.
To check this setting:
Step 1. Restart your computer and enter BIOS/UEFI. The required BIOS key varies by manufacturer and is commonly Del, F2, F10, or Esc.
Step 2. Navigate to the Advanced, Storage Configuration, or SATA Configuration section.
Step 3. Locate the SATA Hot Plug option and enable it.
Step 4. Save the changes and exit BIOS/UEFI. Then restart Windows and check whether the drive is accessible.
Error 2. Parameter Is Incorrect
Windows displays this message when it cannot process the requested operation. This error may be associated with file system corruption or bad sectors.
Fix 1. Run CHKDSK to Check File System Errors
CHKDSK is a Windows command-line utility that checks a partition for file system errors and repairs logical problems.
When the parameter is incorrect, try running the CHKDSK command.
Step 1. Run Command Prompt as an administrator.
Step 2. Type chkdsk X: /f /r and press Enter. Replace X with the drive letter of the problematic partition.
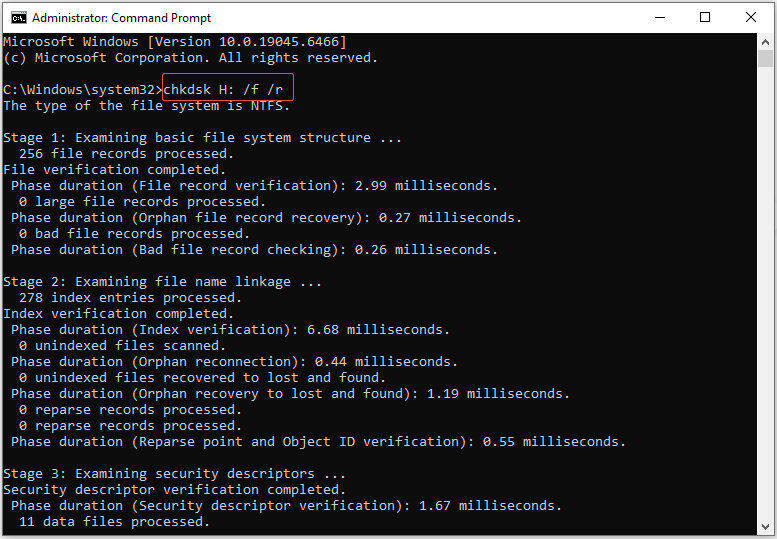
Step 3. Wait for Windows to check the file system and repair detected errors, then try accessing the hard drive again.
Fix 2. Format the Hard Drive
If CHKDSK does not resolve the problem and you have already recovered important files, formatting the drive may help resolve persistent file system problems.
Step 1. Open Disk Management.
Step 2. Locate the problematic hard drive, right-click the target partition, and choose Format.
Step 3. Choose a suitable file system, such as NTFS, specify a volume label, and keep the quick format option selected. Finally, click OK to start the formatting process.
If Disk Management fails to format the hard drive, try using the free disk formatter, MiniTool Partition Wizard.
MiniTool Partition Wizard FreeClick to Download100%Clean & Safe
Error 3. Data Error (Cyclic Redundancy Check)
A Data Error (Cyclic Redundancy Check), commonly called a CRC error, occurs when Windows detects that data read from a storage device does not pass its integrity check.
Possible causes include corrupted file system structures, unreadable sectors, and failing storage devices.
Fix 1. Run the CHKDSK Command
If the CRC error is related to file system corruption or unreadable sectors, CHKDSK may help identify and address the problem.
Open Command Prompt as an administrator and execute the chkdsk X: /f /r command to fix the error.
Fix 2. Scan and Remap Bad Sectors
Bad sectors can prevent Windows from reading data correctly, resulting in CRC errors when accessing or transferring files. You can use a disk diagnostic tool such as Victoria SSD/HDD to scan the hard drive and attempt to remap problematic sectors.
Step 1. Download Victoria SSD/HDD from Google and launch it.
Step 2. Make sure to select the problematic physical hard drive from the drive list.
Step 3. Click the Test & Repair tab.
Step 4. Select Verify as the scanning mode and choose Remap. Then click Quick to start the test.
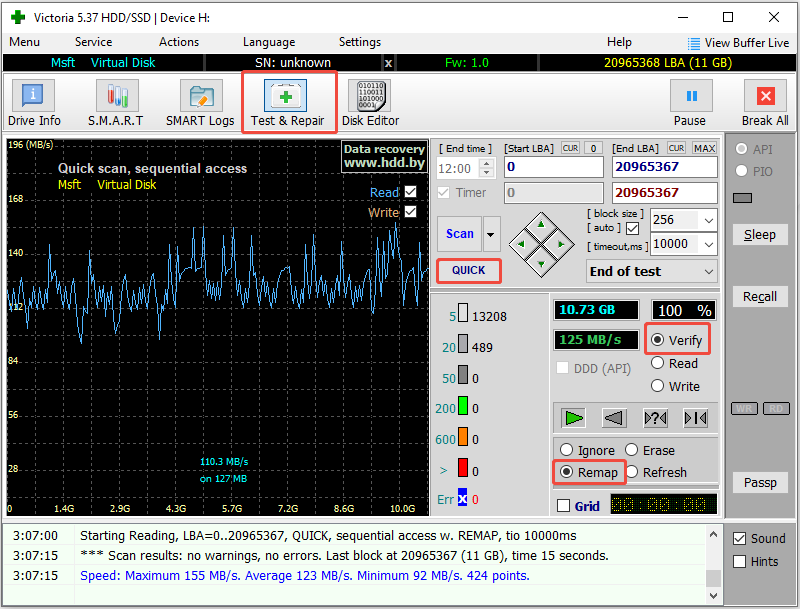
Step 5. After the first scan finishes, change the scanning mode from Verify to Read, keep Remap selected, and run another quick scan.
After the scan completes successfully, open Disk Management and check the drive status.
Error 4. The Disk Is Write Protected
When the “The disk is write-protected” error appears, you may be able to view existing files but cannot copy, delete, rename, or save new files to the drive.
This problem can be caused by a read-only disk attribute or registry settings. Try the following fixes to resolve it.
Fix 1. Modify the Registry
If the drive is write-protected due to incorrect registry settings, you can modify the relevant registry value to allow write access.
Step 1. Press Windows + R, type regedit, and press Enter to open Registry Editor.
Step 2. Navigate to the following path:
HKEY_LOCAL_MACHINE\SYSTEM\CurrentControlSet\Policies\Microsoft\FVE
Step 3. In the right pane, locate the DWORD value: FDVDenyWriteAccess. Double-click it and set its value data to 0.
Fix 2. Clear the Read-Only Attribute
If the disk has been marked as read-only, removing this attribute may restore write access. Follow these steps:
Step 1. Open Command Prompt as an administrator.
Step 2. Run the following commands one by one:
- diskpart
- list disk
- select disk x (replace x with the actual number of the target hard drive)
- attributes disk clear readonly
After that, check whether you can write files to the drive.
Error 5. You Need to Format the Disk Before You Can Use It
This disk not formatted message usually means Windows cannot recognize the file system on the drive. Possible causes include file system corruption, an interrupted write operation, or an unsupported file system.
Fix 1. Run CHKDSK
If the drive has a recognized file system and is stable, CHKDSK may help repair file system errors that prevent Windows from accessing it.
Simply open an administrative Command Prompt and run the chkdsk X: /f /r command.
Fix 2. Format the Hard Disk
If CHKDSK cannot repair the file system or if the hard drive does not have a valid file system, formatting the hard disk can help make it accessible again.
In Disk Management, right-click the partition and choose Format. Then follow the on-screen instructions to complete the formatting process.

Error 6. SMART Hard Disk Error
A SMART hard disk error is different from the previous errors. It is generally reported by the computer’s BIOS/UEFI during startup.
SMART stands for Self-Monitoring, Analysis, and Reporting Technology. It is a monitoring system built into storage devices that tracks various drive health indicators.
When the BIOS/UEFI displays the SMART hard disk error message, it indicates that the drive has detected signs of potential failure.
Unlike a file system error, a SMART warning cannot be resolved by running CHKDSK or changing registry settings. The priority should be to back up your files and replace the failing drive.
Fix – Back up Files and Replace the Disk
If Windows starts normally despite the SMART warning, copy your important files and paste them to an external hard drive or upload them to the cloud immediately.
If the SMART warning prevents Windows from starting, you can try connecting the hard disk to another computer as a secondary drive to access your files.
Once your files are backed up, replace the problematic drive.
How to Prevent Hard Drive Errors
Although not all hard drive errors can be prevented, good storage practices can reduce the risk of unexpected disk failures or data loss.
Here are several practical methods to keep your hard drive in good condition and protect your files:
- Back up important files regularly. Keep at least one copy of important data on another physical drive or a reliable cloud storage service.
- Safely eject external drives. Use the Safely Remove Hardware option before disconnecting an external hard drive.
- Avoid physical shocks. Keep HDDs away from drops, strong vibrations, and excessive movement while they are operating.
- Check drive health periodically. Monitor SMART information and pay attention to warnings or repeated read/write errors.
- Use reliable power connections. Make sure internal SATA power and data cables are securely connected.
- Replace aging or failing drives. If a drive repeatedly produces errors, back up its data and replace it rather than keep using it.
Wrapping Things Up
Hard drive errors can result from various problems, including file system corruption, bad sectors, connection issues, and physical damage. While some errors can be fixed using Windows tools such as CHKDSK and Disk Management, others may indicate that the hard drive is failing.
Before trying any drive repair method, prioritize recovering important files. If the drive shows signs of physical damage, stop using it and seek professional assistance.
If you need any help with MiniTool software, please send an email to the support team at [email protected].
About The Author

Position: Columnist
Shirley holds a bachelor’s degree in English and has been an editor at the MiniTool Team for many years. She specializes in IT-related content, with a focus on data recovery, file backup, disk management, and other technical topics. She is committed to delivering clear, accurate, and practical solutions to help users resolve common computer issues.
User Comments :