Quick Fixes for a Hard Drive Showing Half Capacity
| Causes | Fixes |
| Incorrect partition table | Convert MBR to GPT |
| Unallocated space | Create new partitionsExtend existing partitionsRestore lost partitions |
| Missing drive letter | Assign a drive letter |
| File system errors | Clean and format the disk |
When a hard drive only shows half capacity, it prevents the full use of the disk, resulting in wasted storage and an increased risk of running out of space.
The above fixes can help restore the full capacity of your disk and also apply to the following cases:
- SSD only showing half capacity after cloning
- 4 TB hard drive only showing 2 TB
- External hard drive only showing 32 GB
- Unallocated space on hard drive
Common Causes Why Your Hard Drive Only Shows Half Capacity
Several factors can cause a hard drive to display incorrect capacity.
- Incorrect partition table: The maximum usable capacity of an MBR disk is 2 TB. If a larger disk uses MBR, the extra space will not be recognized.
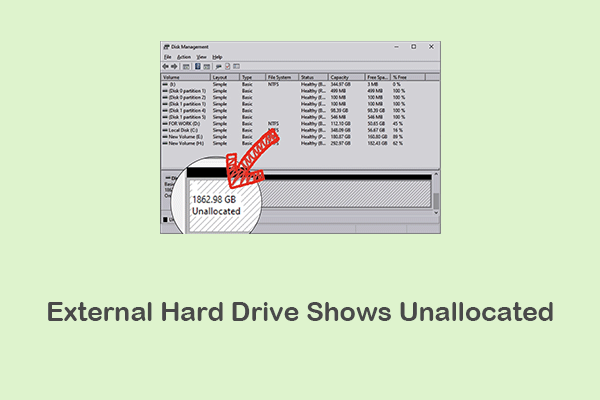
- Unallocated space: Part of the disk may not have been allocated any partitions and therefore not visible in File Explorer.
- Partition loss or deletion: A partition may be accidentally deleted, making its space appear missing.
- Hidden partitions: Some partitions may exist but are not assigned a drive letter.
- File system corruption or other disk errors: Corruption can prevent the system from reading the full disk capacity correctly.
How to Check What Is Causing the Half Capacity
The most direct method is to check the disk status in Disk Management.
Step 1. Right-click Start and select Disk Management.
Step 2. Locate your hard drive and check its status:
- If you see Unallocated space, the partition has been lost, or the space has not yet been allocated.
- If the disk shows a size limit over 2 TB, it may be using MBR.
- If a partition has no drive letter, it will not appear in File Explorer.
This step helps you identify the exact reason before applying the fixes.
Recover Data Before Fixing the Hard Drive
Before modifying partitions or disk structure, it is recommended to recover important data first. Some repair methods, such as repartitioning or cleaning, may overwrite existing data.
You can use a professional data recovery tool to scan the disk and restore files from lost or inaccessible partitions. MiniTool Power Data Recovery Free is a reliable option due to the following reasons.
| Feature | Description |
| Comprehensive recovery | Recovers all types of files from lost, inaccessible, or corrupted partitions. |
| Deep scan technology | Scans the disk sector by sector to find all files that are not overwritten. |
| Multiple device support | Works with HDDs, SSDs, USB drives, and SD cards. |
| User-friendly interface | Features an intuitive interface and simple recovery operations. |
| Preview before recovery | Allows free file preview before saving files. |
| Free recovery quota | Supports 1 GB of free recovery. |
MiniTool Power Data Recovery FreeClick to Download100%Clean & Safe
Full guide to recovering files:
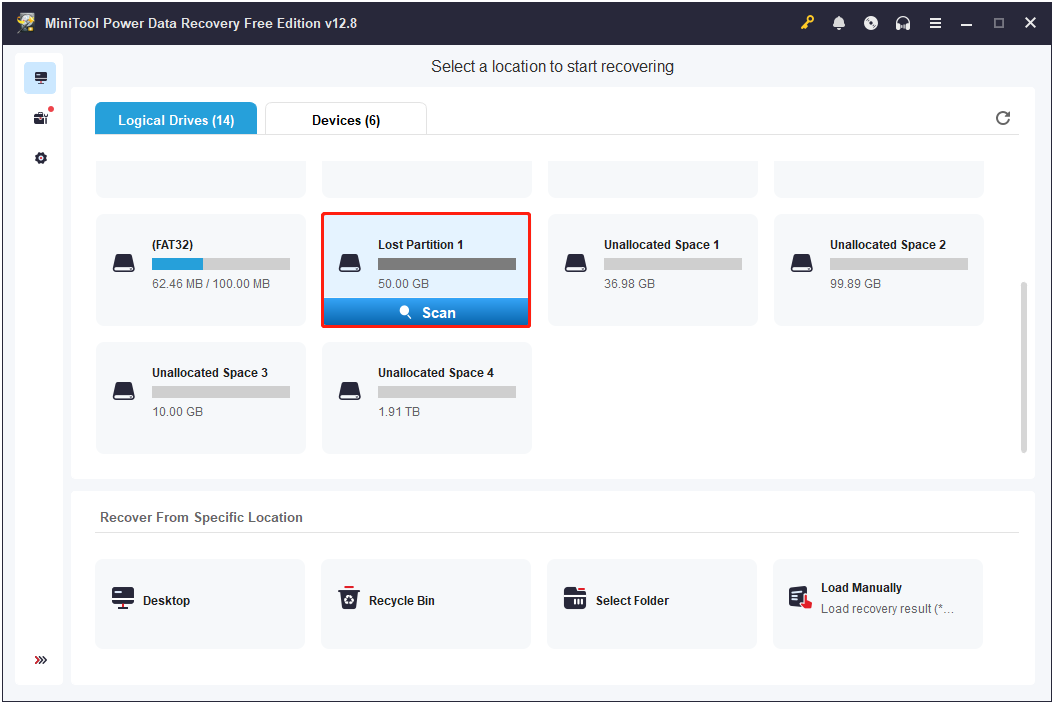
Step 1. Scan the disk.
Launch MiniTool Power Data Recovery. Select the lost partition, unallocated space, or corrupted drive from which you need to recover files and click Scan.
Step 2. Find the required files.
Typically, a large number of files will be listed under Path in the scan results. You can switch to the Type tab to view files by category.
In addition, use the Filter feature to narrow down results by file type, date modified, file size, or file category. If you remember the file name, use the search box to locate it quickly.
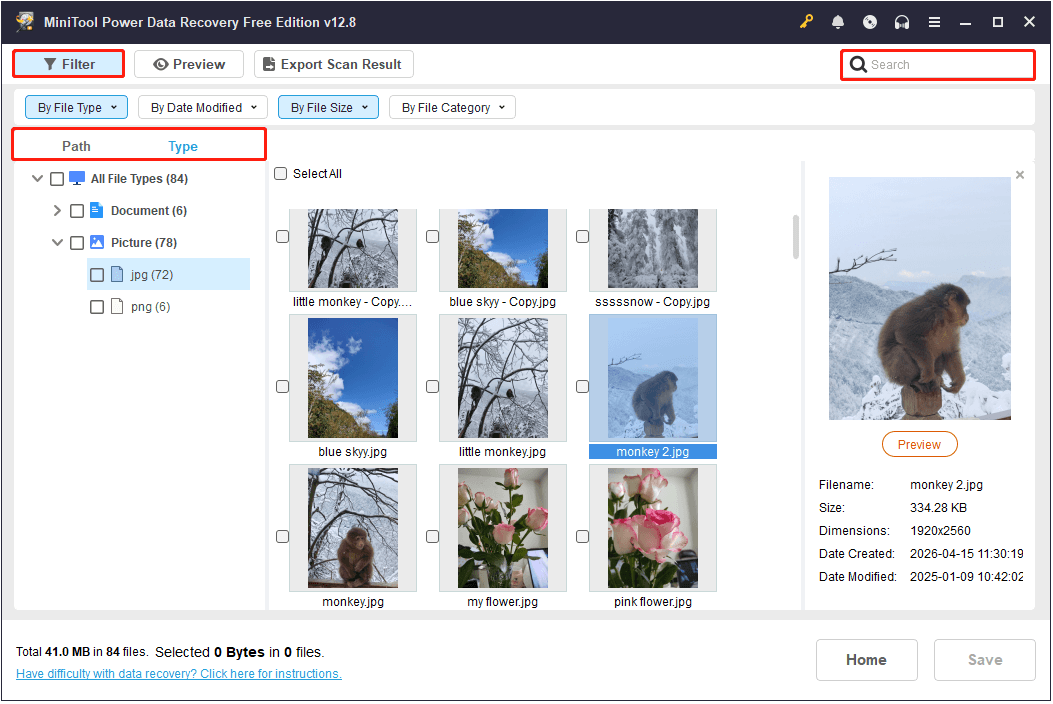
Step 3. Preview and save files.
Before saving the found files, double-click them to preview their contents.
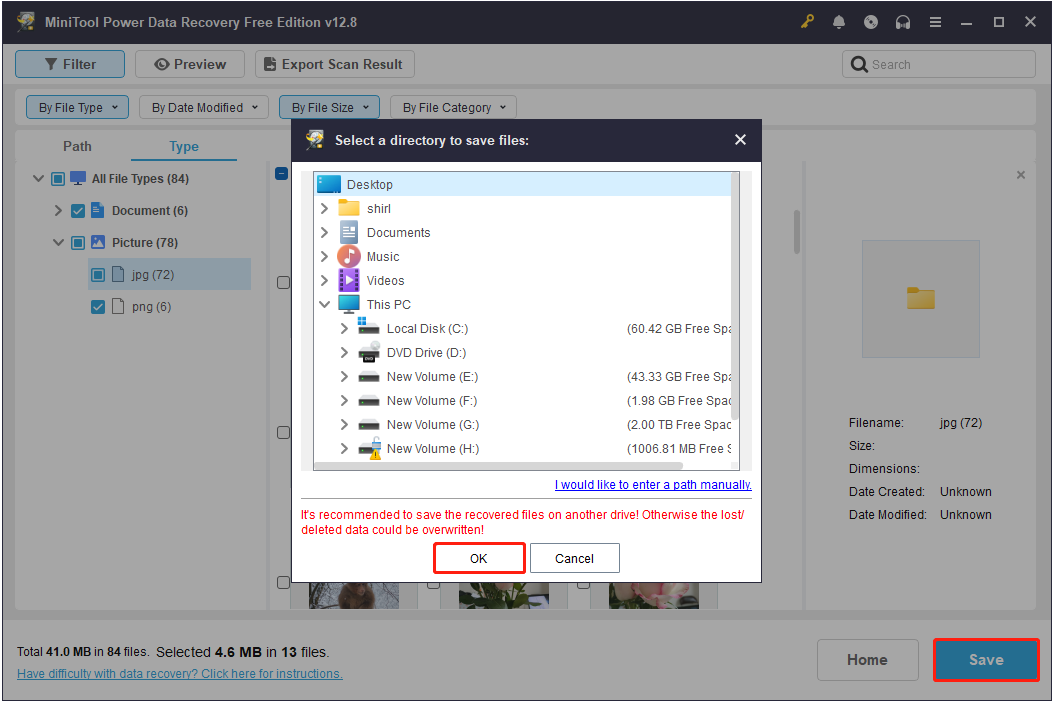
Finally, select all required items and click Save. Then choose a safe location and click OK to store them.
How to Fix HDD/SSD Not Showing Correct Size
Once your files are safe, apply the corresponding solution to fix the hard drive showing wrong capacity.
Fix 1. Convert MBR to GPT
Suitable case: Fix the wrong disk capacity caused by the MBR partition table limit.
MBR is a partition table that supports up to 2 TB of usable disk space. If your hard drive is 4 TB and uses MBR, only 2 TB will be available, while the remaining space will not be recognized.
To fix this issue, you can use MiniTool Partition Wizard to convert MBR to GPT. The process is simple and quick, and it does not cause data loss.
MiniTool Partition Wizard FreeClick to Download100%Clean & Safe
Steps to convert MBR to GPT:
Step 1. Select the MBR disk and click Convert MBR Disk to GPT Disk.
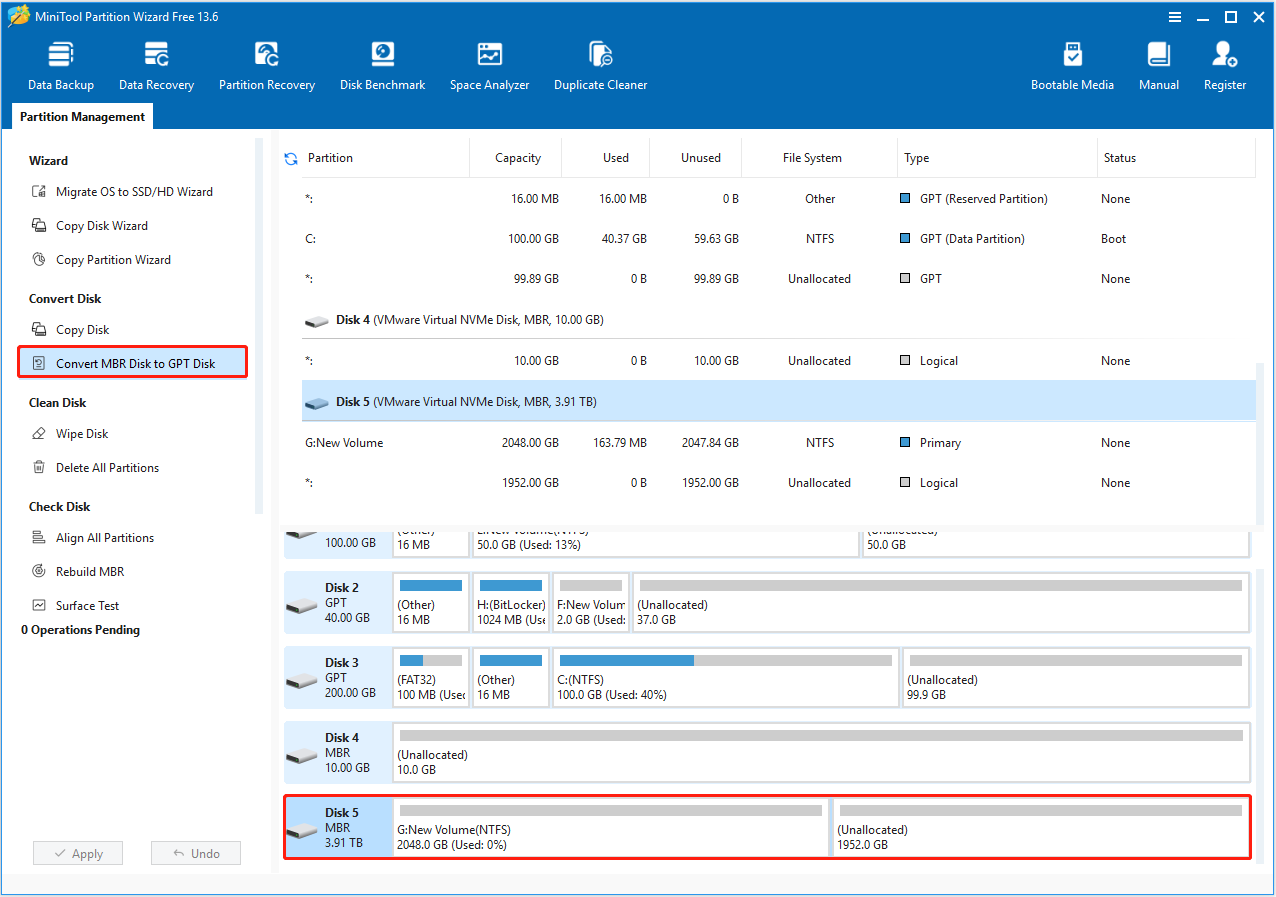
Step 2. Click Apply to confirm.
Once the MBR to GPT conversion process is complete, you will be able to use the full capacity of your hard disk.
Fix 2. Create Partitions on Unallocated Space
Suitable case: Utilize the full capacity of the hard disk by allocating unallocated space to a new partition.
When a disk shows Unallocated space in Disk Management, this space will not appear in File Explorer. To make full use of the disk capacity, you can create new volumes on the unallocated space.
Instructions to create new partitions:
Step 1. In Disk Management, right-click the unallocated space and choose New Simple Volume.
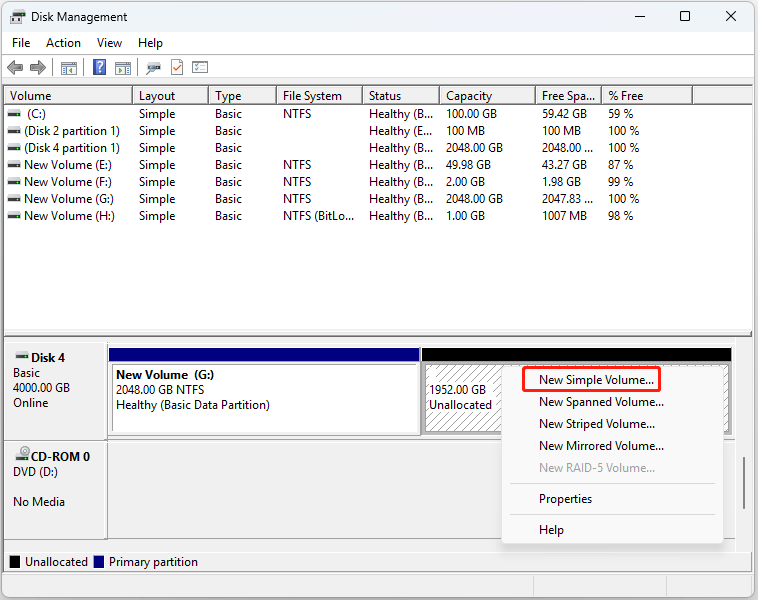
Step 2. Click Next.
Step 3. Follow the on-screen instructions to specify the volume size, drive letter, and file system.
Step 4. Finally, click Finish.
Once the new partition is created, it will appear in File Explorer with the specified size.
Fix 3. Extend Existing Partitions
Suitable case: Add unallocated space to an existing partition on the same disk to make full use of the disk capacity.
When a hard drive shows only half capacity, extending an existing partition with unallocated space is also a good option.
Case 1. Add Unallocated Space to an Adjacent Partition
If the unallocated space is adjacent to the right of the existing partition (NTFS required), use Disk Management to extend the volume.
Step 1. Right-click the existing partition and choose Extend Volume.
Step 2. Click Next.
Step 3. Specify the amount of space and click Next. By default, all available unallocated space is selected.
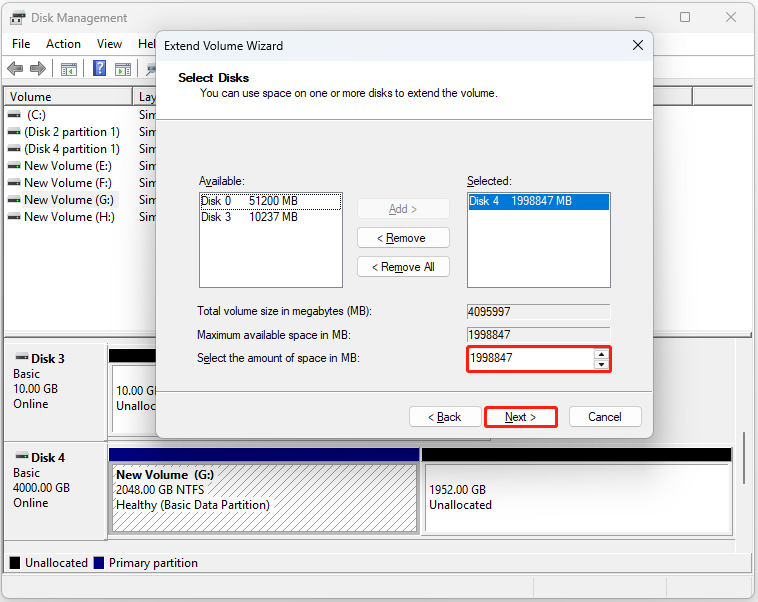
Step 4. Click Finish to complete.
Case 2. Add Unallocated Space to a Non-Adjacent Partition
If the unallocated space is not adjacent to the existing volume or is located on the left side, use MiniTool Partition Wizard to extend the partition.
The Extend Partition feature is free to use and supports both NTFS and FAT32 file systems.
Step 1. Select the existing partition and click Extend Partition.
Step 2. Choose the unallocated space from the Take Free Space from drop-down menu. Then drag the slider to adjust the amount of space. After that, click OK to confirm.
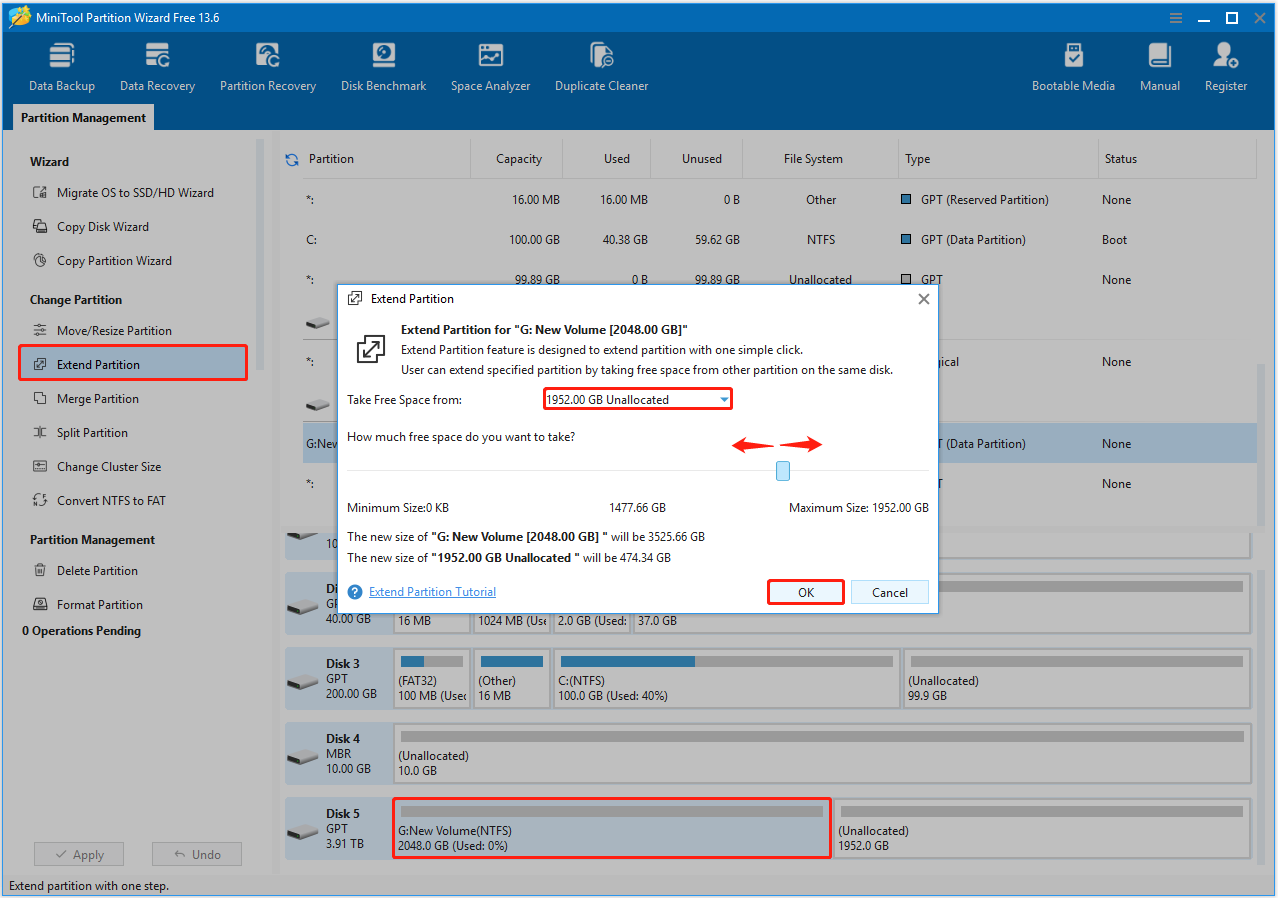
Step 3. Click Apply to complete the process.
Fix 4. Recover Lost Partitions
Suitable case: Recover lost or deleted partitions along with the data they contain.
Partitions may be deleted or lost due to human error or disk issues, which is also a common cause of a hard drive showing incorrect capacity.
In this case, you can not only recover files and recreate partitions as explained earlier, but also use MiniTool Partition Wizard to restore lost partitions along with data.
Detailed steps to recover partitions:
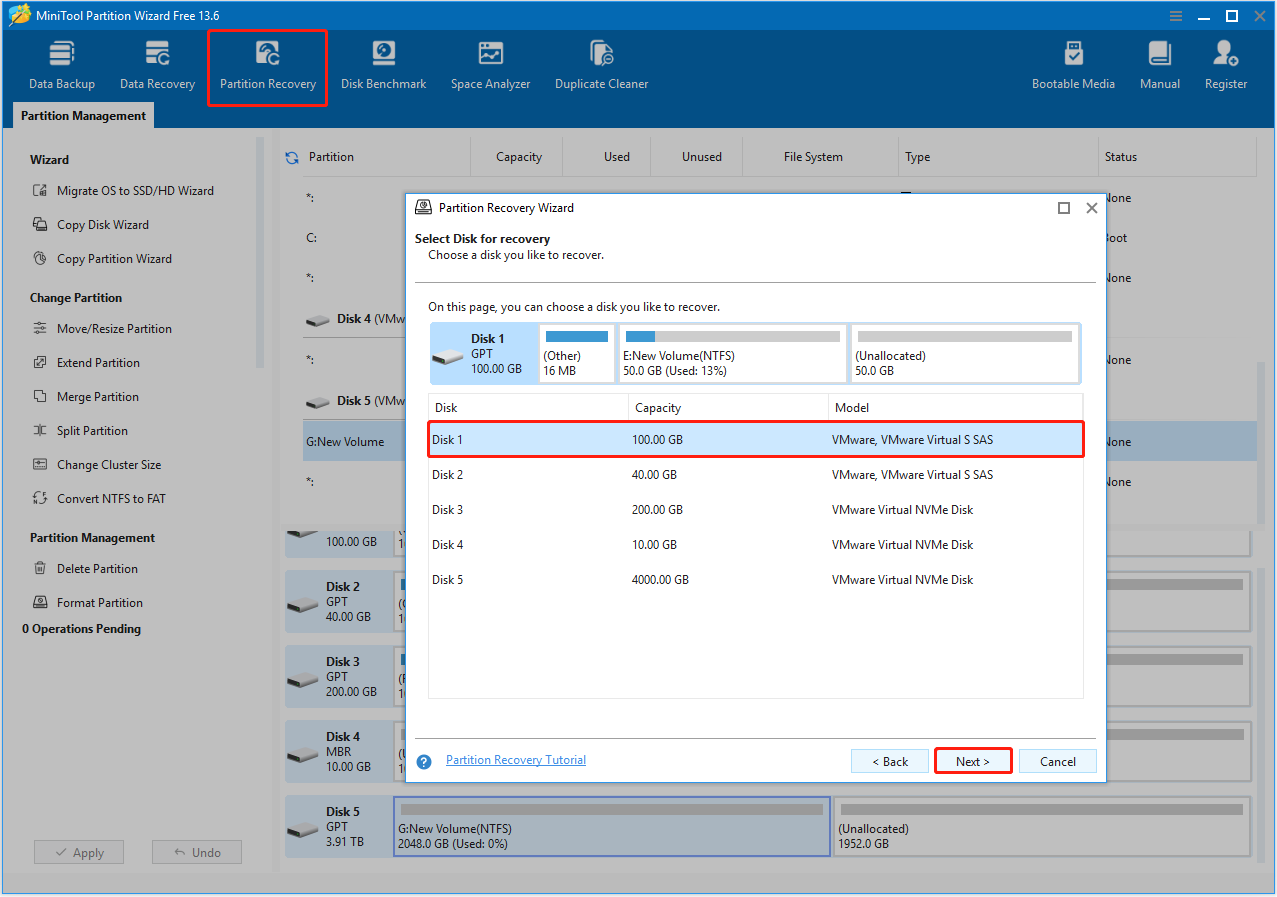
Step 1. Select the disk to scan.
On the main interface of MiniTool Partition Wizard, click Partition Recovery, then click Next.
Select the disk you want to recover and click Next.
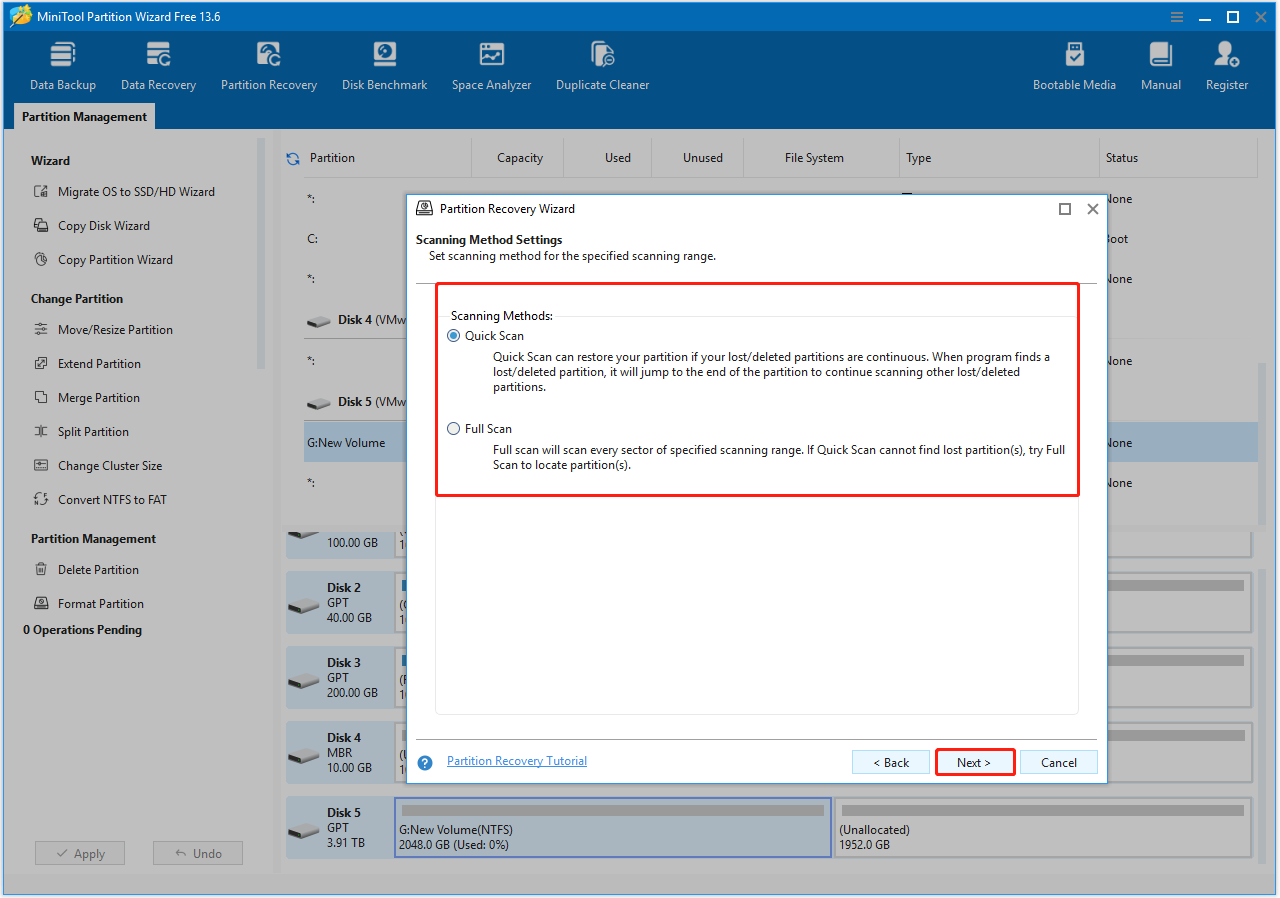
Step 2. Specify the scanning range and method.
Choose a scanning range from Full Disk, Unallocated Space, and Specified Range, and click Next.
Then choose a scanning method from Quick Scan and Full Scan. You can start with Quick Scan. If it does not find the lost partitions, proceed with Full Scan.
Step 3. Preview and save the partitions.
After scanning, double-click the found partition to preview its file structure. Make sure all required partitions, including the existing ones, are selected, then click Finish to complete the recovery.
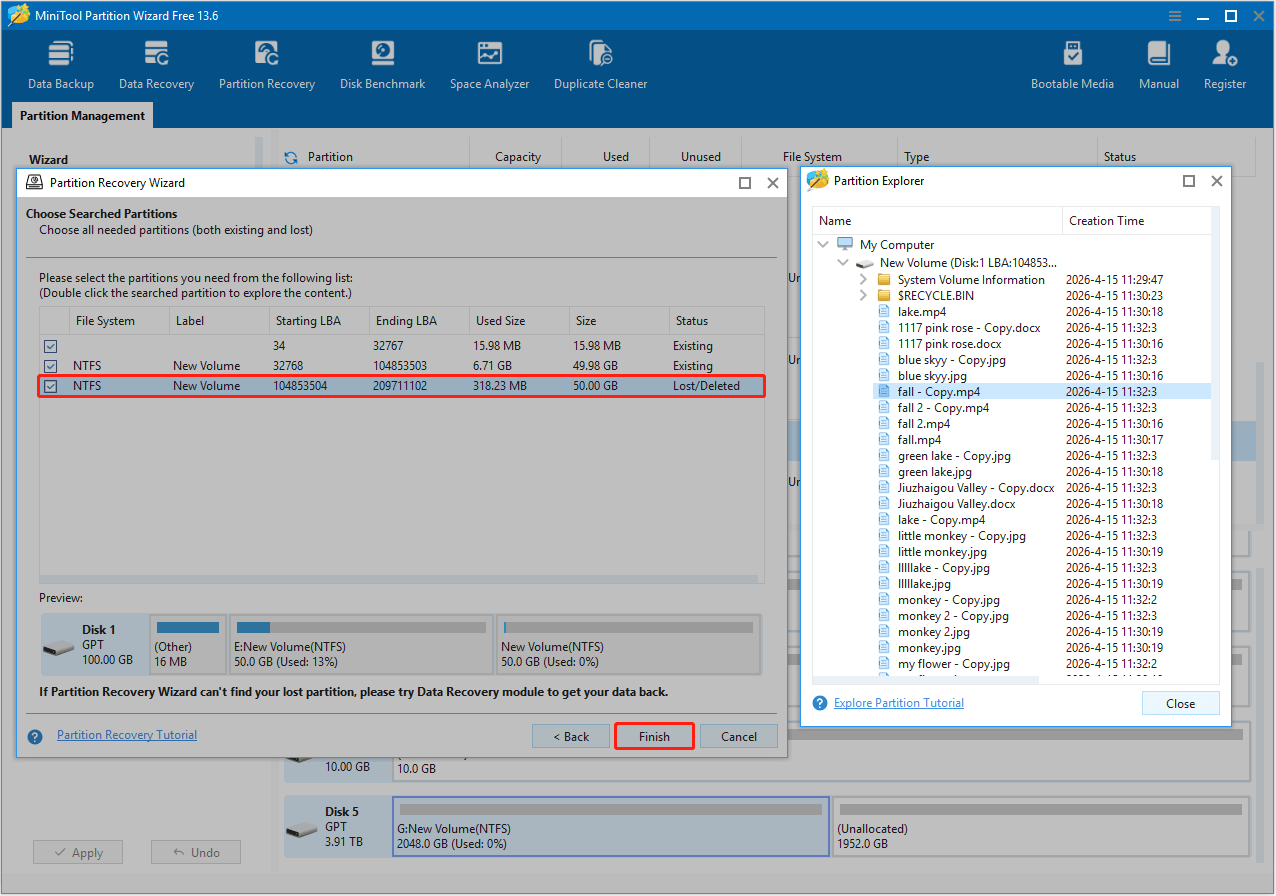
Preview the partition recovery effect. If it is satisfactory, click Apply.
Step 4. Add a drive letter.
To ensure the recovered partition appears in File Explorer, right-click it and select Change Letter.
Then assign an available drive letter and confirm the operation.
Fix 5. Add a Drive Letter
Suitable case: Fix a hard drive showing incorrect capacity due to a missing drive letter.
If a disk partition has no drive letter, it will not appear in File Explorer, which may make the drive seem to have only half of its capacity.
To resolve this issue, use Disk Management to assign a drive letter to the partition.
Step 1. Find the partition that does not have a drive letter and click Change Drive Letter and Paths.
Step 2. Click Add.
Step 3. Expand the drop-down menu and choose an available drive letter.
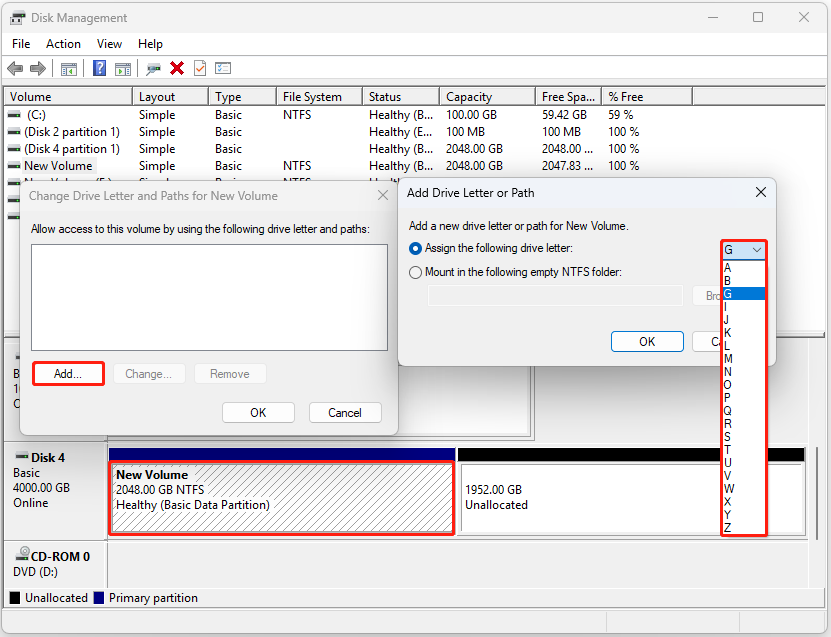
Step 4. Click OK to complete. With a drive letter assigned, the partition should appear normally in Windows Explorer.
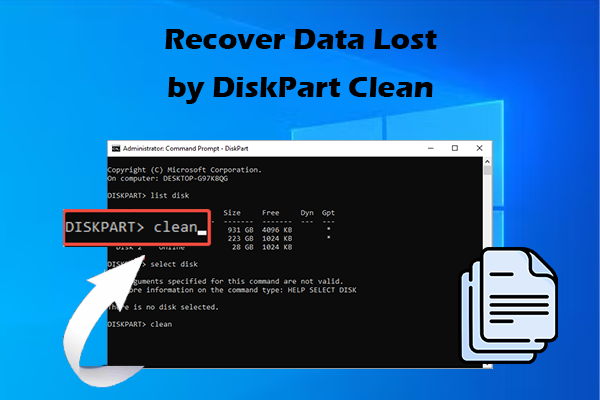
Fix 6. Clean the Disk
Suitable case: Fix disk errors that cause incorrect capacity recognition.
In some cases, underlying disk issues may prevent the system from detecting the full capacity of the drive.
In this situation, you can use DiskPart to clean the disk. This process removes existing partition information and allows you to repartition the disk properly.
Steps to clean a disk:
Step 1. Type Command Prompt in the Windows search box, then right-click it and choose Run as administrator.
Step 2. Type the following commands one by one and press Enter after each:
- diskpart
- list disk
- select disk # (replace # with the actual number of the problematic hard drive)
- clean
- create partition primary
- assign
- format fs=ntfs quick (you can replace ntfs with another file system, such as fat32 or exfat)

Conclusion
To sum up, this article explains why a hard drive may display only half of its total capacity.
When this issue occurs, first use MiniTool Power Data Recovery to recover important files. Then follow the methods above to convert the disk from MBR to GPT, recover lost partitions, create new volumes, or clean the disk.
If you encounter any issues while using MiniTool software, contact the support team at [email protected].
Hard Drive Only Shows Half Capacity FAQ
Manufacturers calculate disk space using decimal units (1 GB = 1000 MB), while Windows uses binary units (1 GiB = 1024 MiB). This difference results in a lower disk capacity, and this is normal.
To restore the full capacity, delete all partitions on the drive and recreate a new partition to allocate the entire disk space.
Converting the disk to GPT using MiniTool Partition Wizard allows the system to use the full 4 TB capacity.
In severe cases, the drive may become inaccessible or fail to be detected by the system. When an SSD shows signs of failure, back up your data immediately, then run CHKDSK to check and repair file system errors.
About The Author

Position: Columnist
Shirley holds a bachelor’s degree in English and has been an editor at the MiniTool Team for many years. She specializes in IT-related content, with a focus on data recovery, file backup, disk management, and other technical topics. She is committed to delivering clear, accurate, and practical solutions to help users resolve common computer issues.
User Comments :