Internal hard drives serve as the primary data storage devices in computers and are generally more stable than removable drives.
However, issues like “internal hard disk not detected” can also occur, preventing access to files.
Internal Hard Drive Not Showing Up in Windows 11/10
The problem may manifest in several symptoms, such as:
- Internal hard disk not appearing in File Explorer: This may be due to missing partitions, an uninitialized state, a missing drive letter, or the disk being offline.
- Internal disk not visible in Disk Management: This could be caused by connection issues or incompatible SATA controller drivers.
- Internal drive not detected in BIOS/UEFI: This is usually caused by hardware faults, such as a damaged data cable or physical damage to the disk itself. Additionally, a disabled SATA port in BIOS settings can also lead to this issue.
Follow the instructions below to determine whether the problem lies in the BIOS or the Windows system level and apply the appropriate solutions.
Part 1. BIOS/UEFI Troubleshooting Steps
When encountering a disk recognition issue, verifying whether the hard drive is detected in BIOS is an essential step.
Start by reconnecting the drive to a different port or checking if the SATA port is disabled in the BIOS settings. Additionally, enabling the SATA hot plug feature in BIOS may help refresh the disk detection status.
Fix 1. Check Physical Connections
First, power off your computer, open the case, and ensure that the SATA and power cables are securely and correctly connected to the motherboard. Verify that the cables are not physically damaged.
If possible, try connecting the drive to a different SATA port to eliminate potential port issues.
Fix 2. Enable SATA Ports
Some motherboard manufacturers disable unused SATA ports by default. This may prevent your internal hard drive from appearing, especially if it is the second drive connected to your computer.
In this case, access the BIOS settings to enable the target SATA port.
Step 1. Restart your computer. During the reboot process, press the BIOS key (typically Del, F2, or F12) repeatedly to enter BIOS.
Step 2. Use the keyboard to navigate to the menu labeled SATA Configuration, Storage Configuration, SATA Management, or a similar option.
Step 3. Locate the SATA port to which your hard disk is connected and ensure it is set to Enabled.
Step 4. Save the BIOS changes (usually by pressing F10), then restart your computer and check if the internal hard drive appears.
Fix 3. Enable SATA Hot Plug
Enabling the SATA Hot Plug feature allows SATA hard drives, especially newly installed ones, to be properly detected. Follow the steps below to enable this feature.
Step 1. Enter BIOS.
Step 2. Find the menu labeled SATA Configuration or Storage Configuration.
Step 3. Locate the SATA Hot Plug option and set it to Enabled.
Step 4. Save the changes and exit the BIOS. After that, restart your PC and check if the internal hard disk appears.
If the disk still does not show up after trying all the methods above, connect it to another computer to verify if the drive itself is damaged.
Part 2. Windows Troubleshooting Methods
If the internal hard drive is properly recognized in BIOS but still not visible in File Explorer, check its status in Disk Management. When it is unpartitioned, offline, or has no drive letter, it won’t show up in Windows Explorer.
The following sections outline different disk statuses in Disk Management and provide corresponding solutions. Follow the instructions in the relevant section.
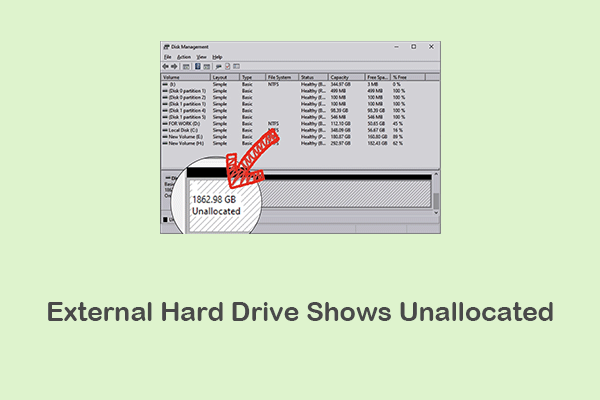
Case 1. The Internal Disk Shows as Unallocated
When a hard drive shows as Unallocated in Disk Management, it indicates that the partition table has been lost or deleted. To make the drive usable again, you need to create new volumes on it.
However, repartitioning the drive modifies the partition table and file system structure, which may overwrite data and make file recovery more difficult.
If the partition contains important files, recover the data first before repartitioning the disk.
Alternatively, professional partition recovery software can help recover lost partitions along with their data.
Fix 1. Recover Files and Partition the Disk
To recover files after partition loss, use MiniTool Power Data Recovery Free. This professional tool is designed for a wide range of data loss scenarios, such as missing partitions, RAW drives, file system corruption, and disk formatting.
It supports a variety of file types, including documents, videos, audio files, photos, emails, and more, and works with both SSDs and HDDs.
The free edition allows you to recover up to 1 GB of data at no cost.
MiniTool Power Data Recovery FreeClick to Download100%Clean & Safe
For partitioning a drive, you can use Windows’ built-in Disk Management tool.
>> How to recover files from unallocated space
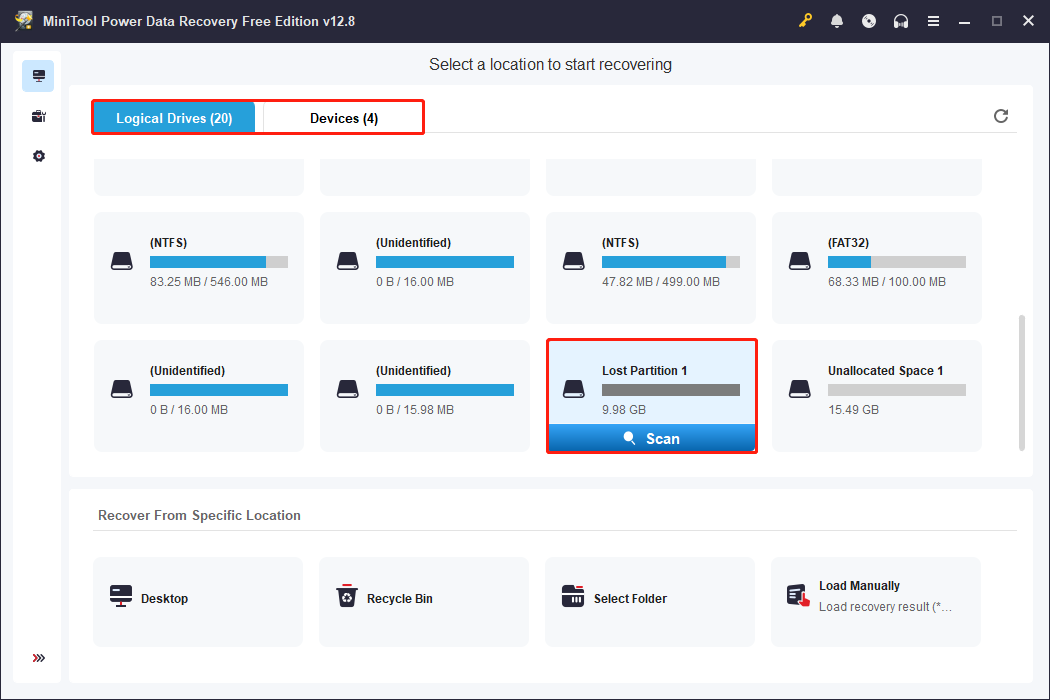
Step 1. Launch MiniTool Power Data Recovery to enter its main interface.
Under Logical Drives, select the lost partition or unallocated space and click Scan.
If you have trouble locating the target partition among multiple ones, switch to the Devices tab to scan the entire disk.
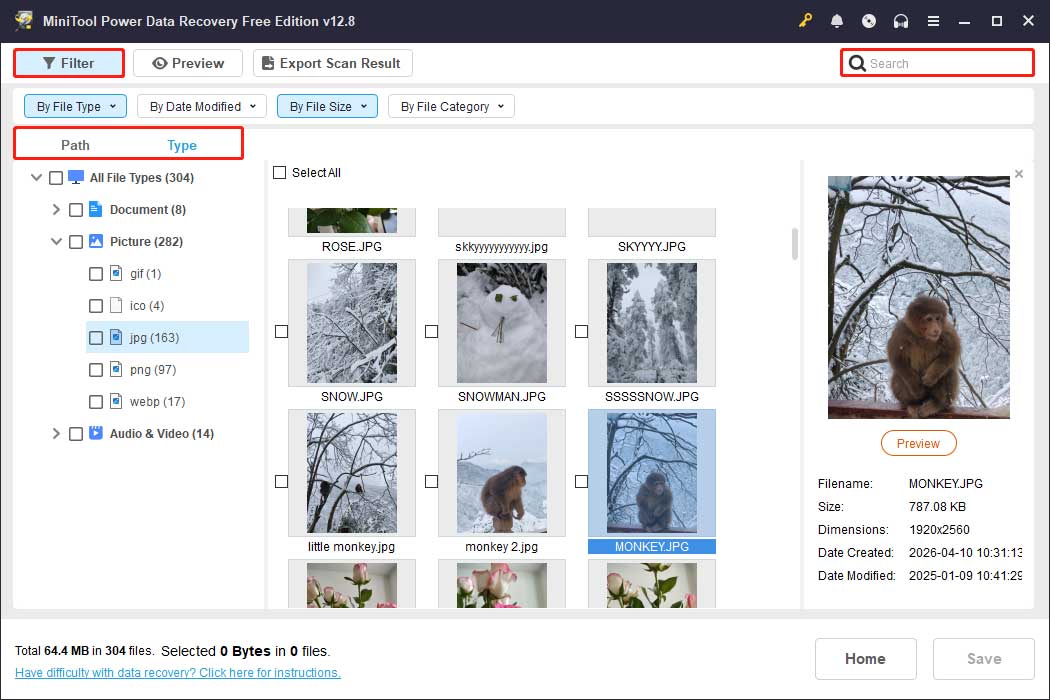
Step 2. Once the scan is complete, begin locating and selecting the files you want to recover. You can view files either by their original folder structure under Path or by file type under Type.
Additionally, the Filter option allows you to refine your search based on file type, modification date, file size, and category. You can also use the Search feature to locate specific files by their names.
Step 3. Double-click each file to preview its contents and verify its integrity. Finally, review the listed files and ensure that all necessary items are selected, then click Save and choose a secure location to store them.
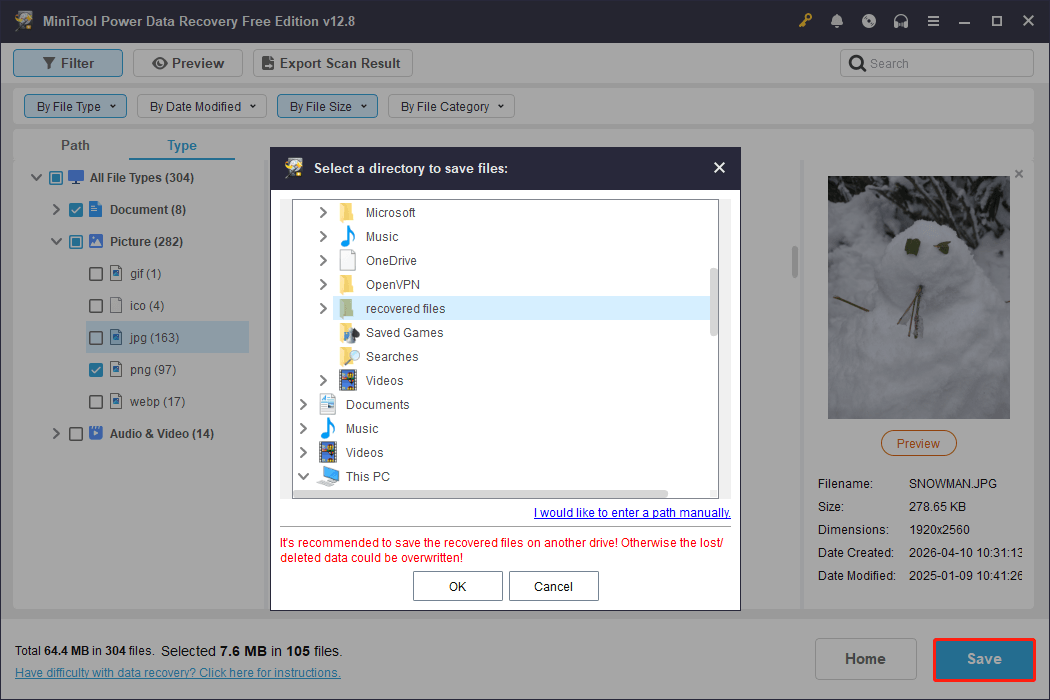
When the Recovery Completed window appears, the data recovery process is finished. Now you can proceed with partitioning the disk.
>> How to create new partitions on unallocated space
Step 1. Right-click the Start button and choose Disk Management.
Step 2. Right-click the unallocated space and click New Simple Volume.
Step 3. Click Next.
Step 4. Specify the volume size and click Next.
Step 5. Assign a drive letter and click Next.
Step 6. Set up the file system and volume label, then click Next.

Step 7. Click Finish. Now the internal hard drive should be displayed in File Explorer.
Fix 2. Recover Lost Partitions
MiniTool Partition Wizard allows you to recover lost partitions along with the data they contain in a single process. It is more convenient than recovering files first and then partitioning the disk.
This free partition manager uses advanced algorithms to scan the disk and rebuild the partition table, thereby restoring the original partitions.
It supports the recovery of FAT32, exFAT, and NTFS partitions.
MiniTool Partition Wizard FreeClick to Download100%Clean & Safe
>> How to recover lost partitions
Step 1. Launch MiniTool Partition Wizard. On the main interface, select Partition Recovery, then click Next.
Step 2. Select the disk you want to recover and click Next.
Step 3. Choose a scanning range from Full Disk, Unallocated Space, and Specified Range, then click Next.
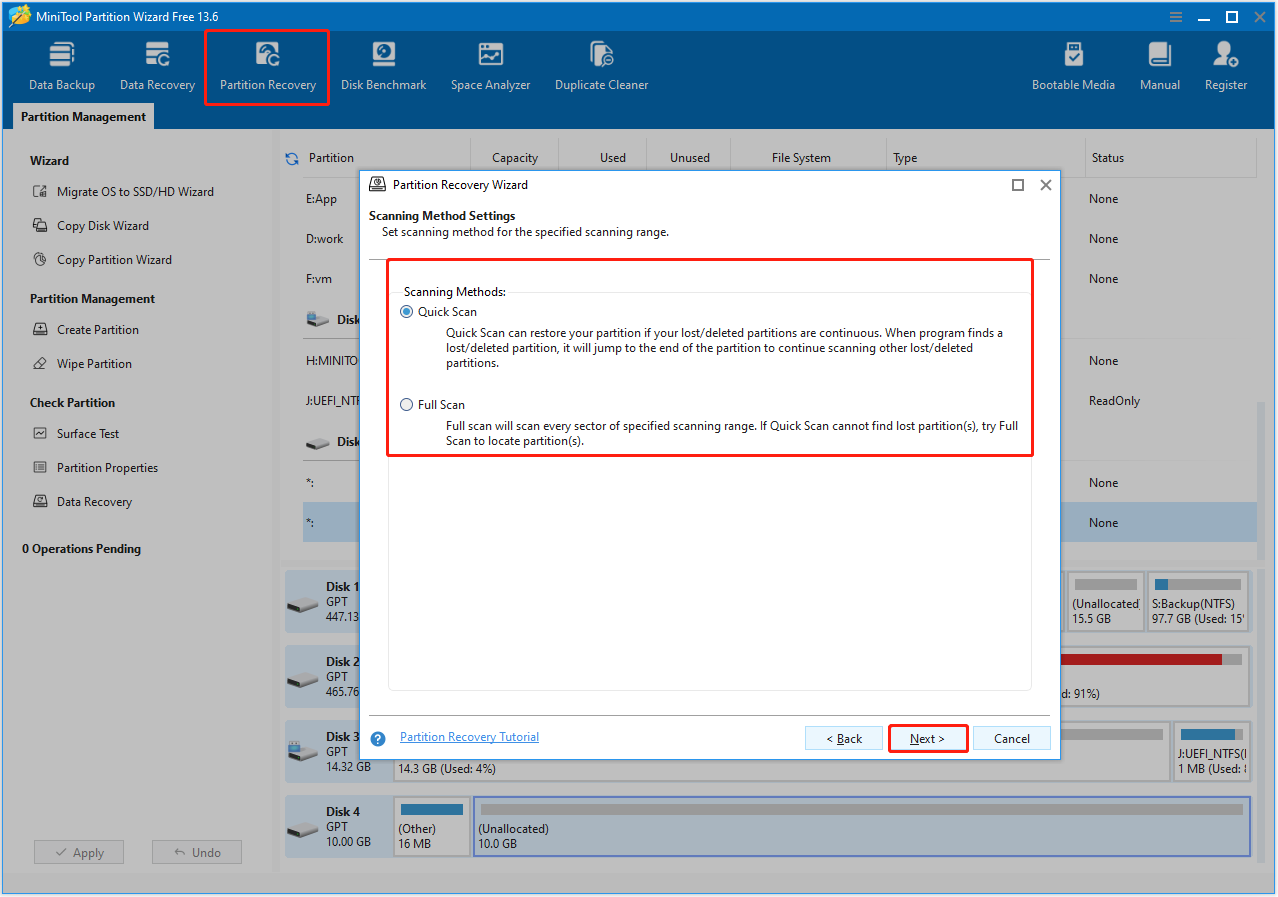
Step 4. Choose a scanning method from Quick Scan and Full Scan, then click Next. It is recommended to start with a quick scan.
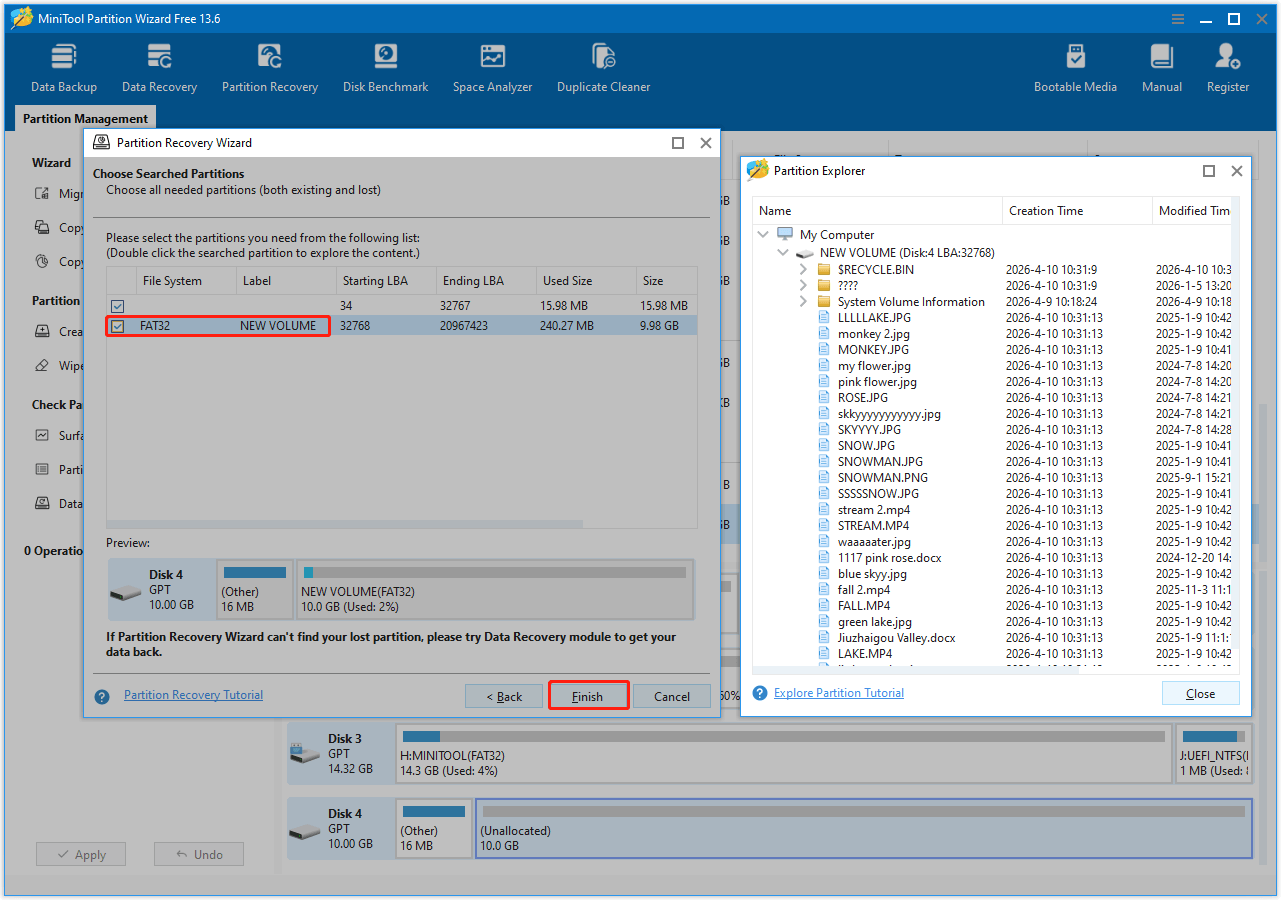
Step 5. After the scan, double-click the listed partitions to view their contents. Finally, select all required partitions and click Finish.
Step 6. To make the recovered partition appear in File Explorer, right-click it and select Change Letter.
In the new window, choose a drive letter and click OK. Finally, click Apply to confirm.
Case 2. The Volume Has No Drive Letter
If your internal hard drive does not have a drive letter due to accidental letter removal or other reasons, it won’t appear in File Explorer.
In this case, assigning a new drive letter can quickly resolve the issue.
Fix – Assign a Drive Letter
Step 1. In Disk Management, right-click the partition and choose Change Drive Letter and Paths.
Step 2. Click Add. Then choose an available drive letter from the drop-down menu.
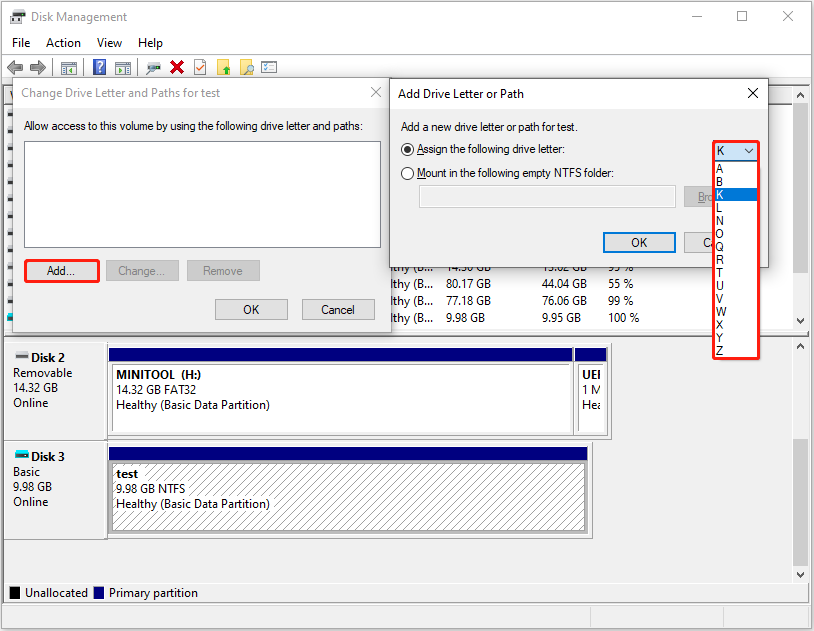
Step 3. Click OK > OK to confirm.
Case 3. The Disk Is Not Initialized
An uninitialized disk lacks a valid signature, preventing Windows from reading its partition table. To make it visible and usable, you need to initialize it.
This situation typically occurs with a brand-new drive when it is first connected to your computer. However, it can also happen with older drives due to partition table corruption or bad sectors.
Fix – Initialize the Disk
Step 1. Right-click the uninitialized hard drive and click Initialize Disk.
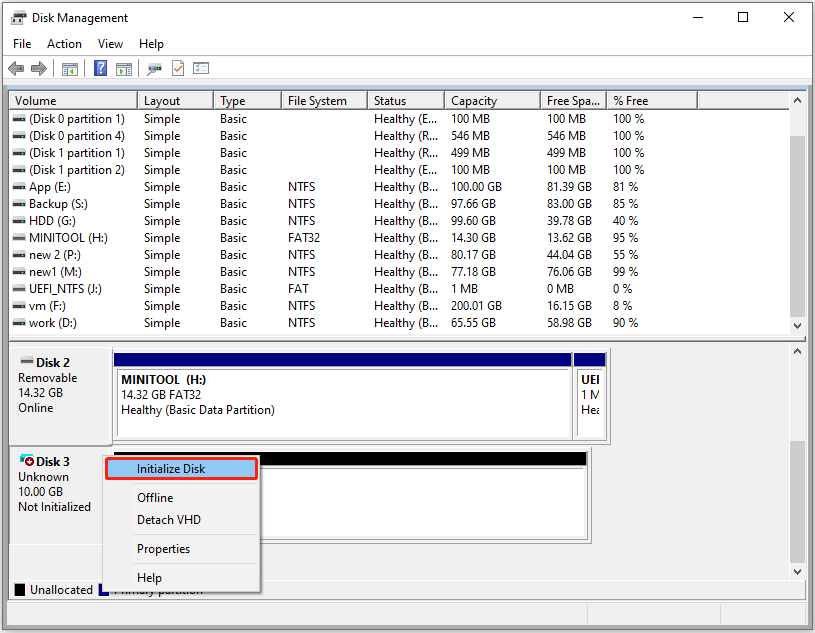
Step 2. Choose a partition style from MBR and GPT (MBR vs GPT) and click OK.
Step 3. Right-click the unallocated space and choose New Simple Volume. Then follow the on-screen instructions to partition the disk.
Case 4. The Hard Drive Is Offline
A hard drive may become Offline due to a signature collision or other issues, which can prevent it from appearing in File Explorer. To resolve this, you can manually set it Online.
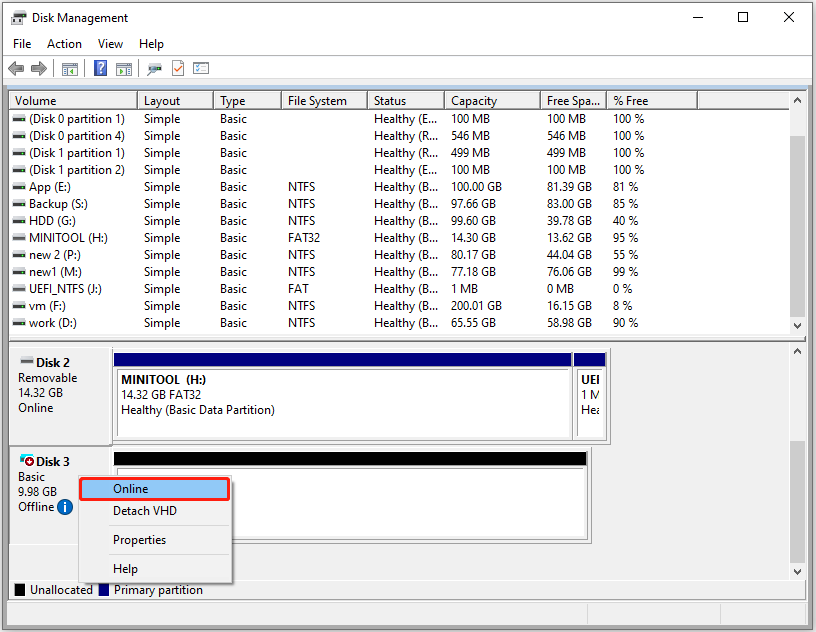
Fix – Set the Disk Online
Right-click the hard drive labeled Offline and click Online. Then the disk should appear normally in Windows Explorer.
Case 5. The Disk Is Not Displayed in Disk Management
In some cases, the disk may not even appear in Disk Management due to partition table corruption or interface incompatibility.
If this happens, try the following two methods to clean the drive or change the SATA controller driver.
Fix 1. Clean the Disk
Cleaning the disk wipes the partition table and resets the disk to a fresh state, removing any conflicting configurations or damaged partition information.
Follow the steps below to clean the internal hard drive.
Step 1. Type cmd in the Windows search box. Right-click Command Prompt and choose Run as administrator.
Step 2. Type the following commands one by one, and press Enter after each:
- diskpart
- list disk
- select disk # (replace # with the actual number of your internal hard disk)
- clean
- create partition primary
- assign
- format fs=ntfs quick (you can replace ntfs with another preferred file system, such as exfat or fat32)
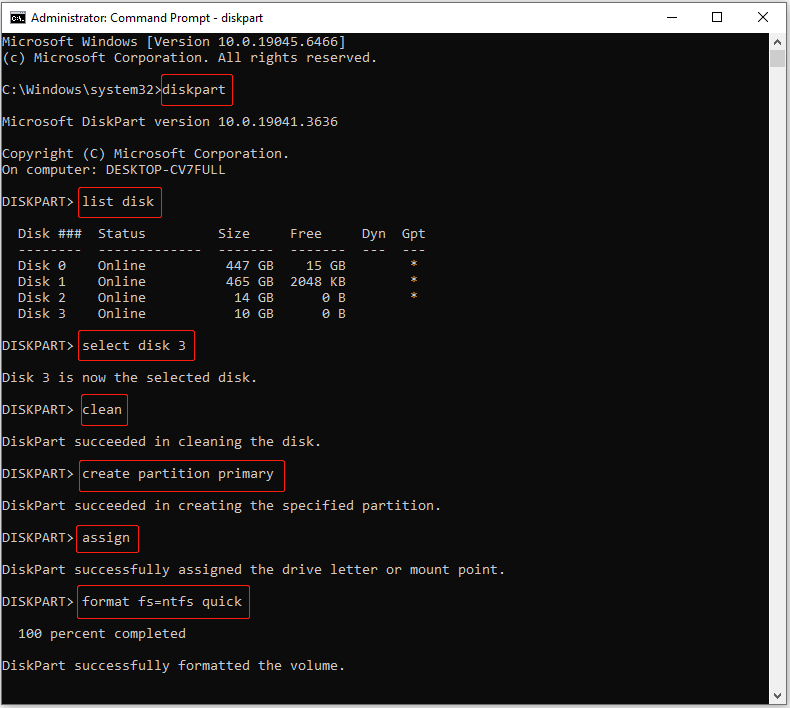
Once DiskPart successfully formats your drive, the disk should function normally in Windows Explorer.
See Also: A Comprehensive Guide to DiskPart Clean VS Clean All Commands
Fix 2. Switch the SATA Controller Driver to AHCI
A missing internal hard disk, especially after a BIOS update, may be caused by an incompatible SATA controller driver. Updating it to the standard AHCI driver can help the system properly recognize the disk.
Step 1. Right-click Start and choose Device Manager.
Step 2. Expand IDE ATA/ATAPI controllers, then right-click Standard ATA Controller and choose Update driver.
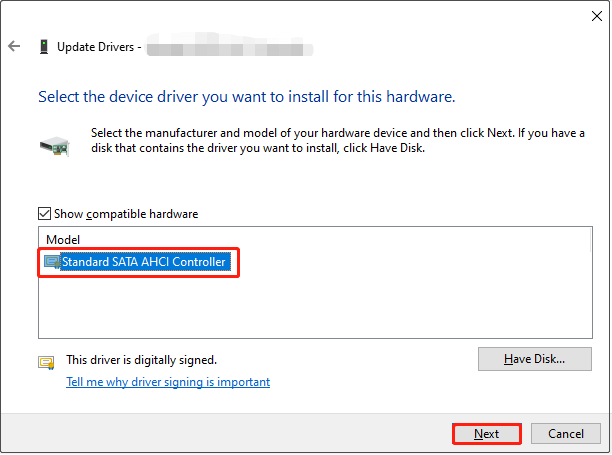
Step 3. Select Browse my computer for drivers > Let me pick from a list of available drivers on my computer.
Step 4. Select Standard SATA AHCI Controller and click Next. The device driver will now be installed on your computer. After that, your disk should appear properly.
Bottom Line
If your internal HDD is not showing up in Disk Management, start by checking the physical connections or switching the SATA controller driver to AHCI. Cleaning the disk using DiskPart may also help.
If the disk appears in Disk Management but not in File Explorer, try repartitioning it, assigning a drive letter, or setting it Online manually.
If you encounter any issues while using MiniTool products, please contact the support team at [email protected].
About The Author

Position: Columnist
Shirley holds a bachelor’s degree in English and has been an editor at the MiniTool Team for many years. She specializes in IT-related content, with a focus on data recovery, file backup, disk management, and other technical topics. She is committed to delivering clear, accurate, and practical solutions to help users resolve common computer issues.
User Comments :