

If your Samsung T7 is not showing up on Windows, check the USB connection and Disk Management first. The issue may be caused by missing drive letters, driver or firmware problems, or file system errors. Recover important data before formatting or initializing the drive.
Quick Answer: Why Is My Samsung T7 Not Showing Up?
A Samsung T7 may not show up in Windows because of a faulty USB connection, missing drive letter, outdated or corrupted drivers, firmware issues, file system errors, or disk problems.
First, try another USB cable or port and check Disk Management. If the T7 contains important files, recover them before initializing, repartitioning, or formatting the SSD.
Why Is My Samsung T7 Not Showing Up on Windows
The Samsung T7 is a portable SSD commonly used to store and transfer files. However, Windows may sometimes fail to detect the T7 or show it in File Explorer. This is not a rare problem, according to the reports of users:
I have a Samsung PSSD T7, and when I plug it into my PC, it does not appear in File Explorer. I know the device is read, however, because it appears in my Disk Management (without a letter). In Disk Management, the options to create a new volume and to change the letter and path are both greyed out. Other possibly relevant information is that the drive was initially used on a Mac. Any recommendations? All help is greatly appreciated!reddit.com
This example highlights a common situation: the Samsung T7 is detected by Windows but does not appear in File Explorer because it has no drive letter.
Why Is My Samsung T7 Not Showing Up
This issue can occur because of connection problems, missing drive letters, driver issues, file system errors, or other disk problems.
| Possible Cause | What You May See |
| USB connection problem | T7 is not detected or keeps disconnecting |
| Missing drive letter | T7 appears in Disk Management but not File Explorer |
| Driver issue | Windows does not recognize the T7 correctly |
| File system corruption | T7 may appear as RAW or become inaccessible |
| Uninitialized disk | T7 appears as Unknown or Not Initialized |
| Other disk errors | T7 may not be detected or accessed properly |
How to Recover Data from an Unrecognized Samsung T7
You may find the Samsung T7 SSD not showing up on File Explorer but appearing in Disk Management without a drive letter or displaying as unallocated, unknown, or uninitialized. If this is your case, do not hustle to fix the problem. You should recover data from the undetected Samsung T7 SSD to avoid further data damage during the SSD fix.
Most SSD drives contain the TRIM command that is used to manage data on the drive. However, SSD TRIM will erase data stored on the free data blocks and make them irrecoverable. With this default enabled feature, SSD data recovery is much more difficult than HDD data recovery.
Though with the SSD TRIM feature, you can still try to recover files from the Samsung T7 with MiniTool Power Data Recovery. This free file recovery software assists in retrieving files from diverse data storage devices, including SSDs, HDDs, SD cards, USB drives, and more.
You can get MiniTool Power Data Recovery Free to scan the Samsung T7 SSD first to see whether your files can be found. If yes, go on with this software to retrieve data from the device.
MiniTool Power Data Recovery FreeClick to Download100%Clean & Safe
1. Scan the partition of Samsung T7 using MiniTool Power Data Recovery
Connect your Samsung SSD T7 to the computer where you have installed MiniTool Power Data Recovery. Afterward, you can launch the software to check whether your SSD is detected by the tool. If not, reconnect it or click on the Refresh button.
Select the partition where the lost files were stored and click Scan. Alternatively, you can change to the Devices tab to select your SSD and scan the entire disk at once. Obviously, scanning a whole drive requires a longer time than scanning a partition because of the larger disk capacity and more files.
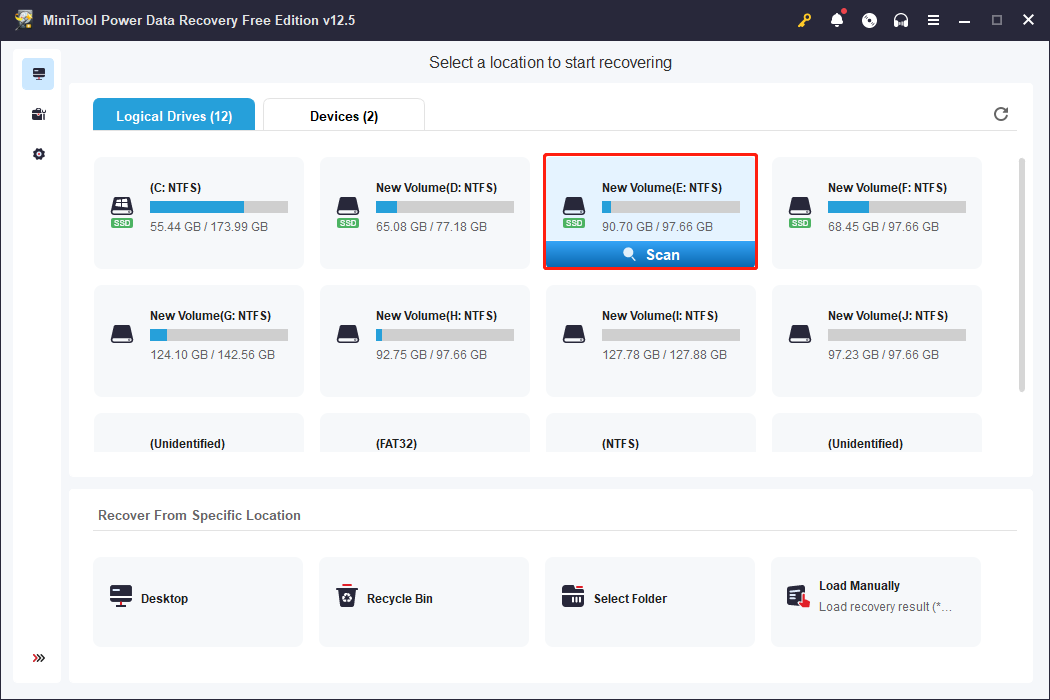
In order to detect all your files, please wait patiently until the scan duration completes.
2. Locate files on the result page with multiple features
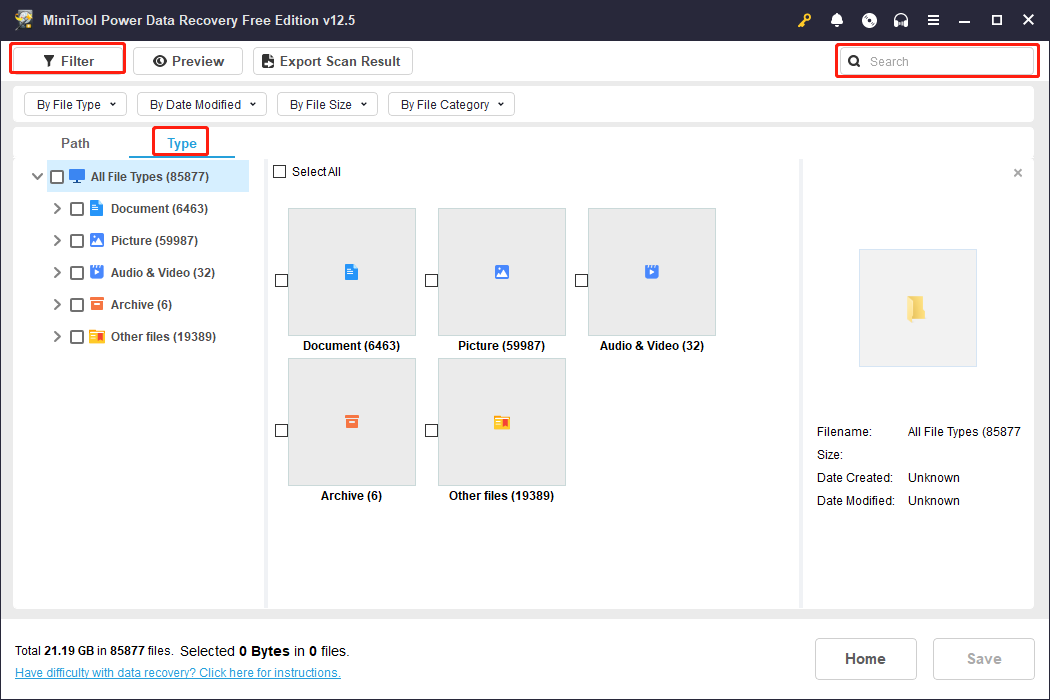
There will be piles of files on the result page, assorted into three folders under the Path tab by default. You can expand the Deleted Files, Lost Files, or Existing Files folder to find your wanted files and select them to restore.
In case you just want to restore certain files, you can utilize the following three features to filter them swiftly.
- Type: Next to the Path tab, files are classified by their types and formats. You can discover a specific type of file quickly under this tab. Expand the file type selection and pinpoint files according to their formats precisely.
- Filter: You can use this feature to screen out unnecessary files with more filter conditions according to your individual requirements, such as file size, file type, file category, and file last modified date.
- Search: In addition to filtering out a certain type of file, you can also locate one file by searching its file name. Type the file name into the search box, either the complete name or the partial one, and hit Enter to get the matched items.
3. Recover files to a new destination
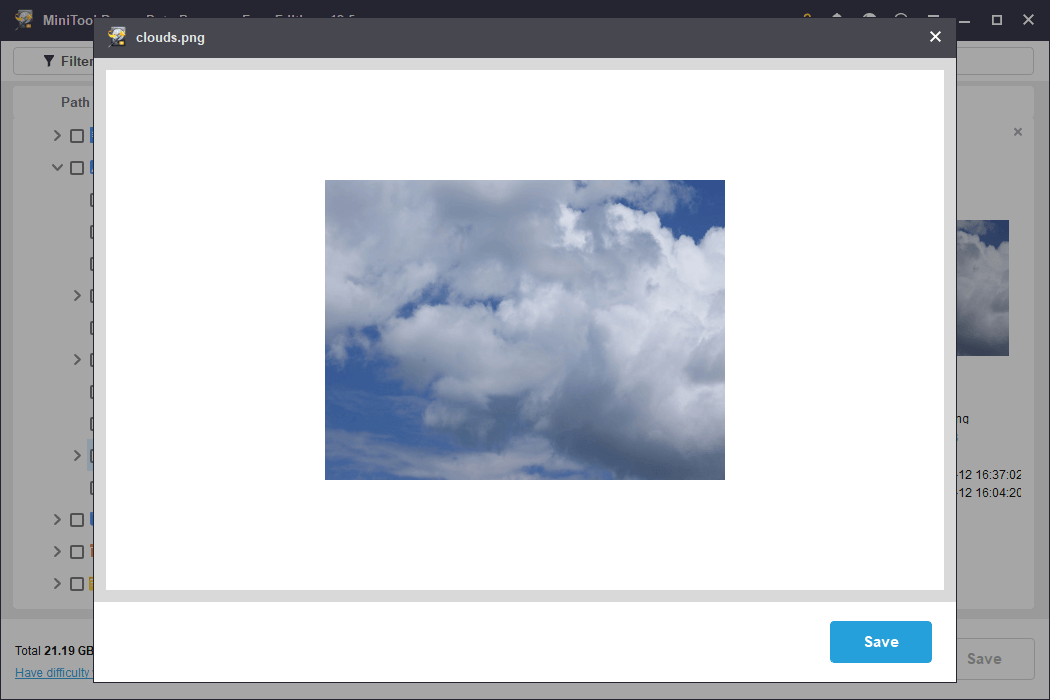
As you are running with the free edition of this software, you can only retrieve files of no more than 1 GB. Thus, the Preview feature matters significantly. When finding a file, double-click on it to preview its file content. You can check pictures, documents, videos, audio, and other supported preview files before saving.
Afterward, tick your files and click the Save button in the lower left corner. Owing to your Samsung T7 SSD cannot save files, you should choose one location to save the recovered files properly.
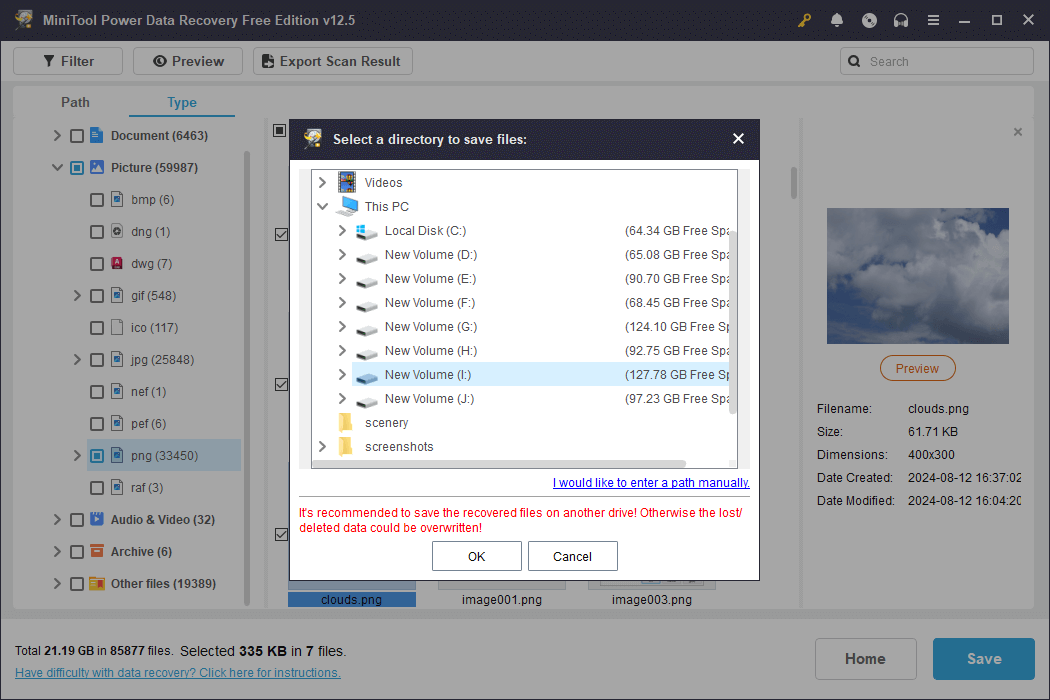
It is worth noting that you should upgrade to an advanced edition when you need to recover more than 1GB of files. Go to the License Comparison page to select one that suits your demands best.
How to Fix Samsung T7 Not Showing Up on Windows
After rescuing data from the Samsung T7 SSD, you can now carry out methods to fix the Samsung T7 not showing up issue on your computer. Without knowing the definite cause of your case, you are advised to try the following methods one by one to find which works best for you.
Basic Checks on the Samsung T7 Connection
Before trying advanced fixes, rule out a connection problem:
- Disconnect and reconnect the Samsung T7.
- Try another USB cable that supports data transfer.
- Connect the T7 to another USB port, preferably without a USB hub.
- If possible, test the T7 on another computer.
If the T7 works on another computer, the issue may be related to the original USB port, driver, or Windows configuration.
After examining those extra factors, work with the next methods to find the culprit of the Samsung T7 issue.
Way 1. Update the Device Driver
An outdated or corrupted device driver can prevent your computer from recognizing a connected device properly. Therefore, it is necessary to check the device driver in Device Manager. If necessary, you can update or reinstall the driver.
Step 1. Right-click on the Windows icon and choose Device Manager from the WinX menu.
Step 2. Expand the Disk drives selection to find the Samsung SSD T7.
Step 3. Right-click on it and choose Update driver from the context menu.
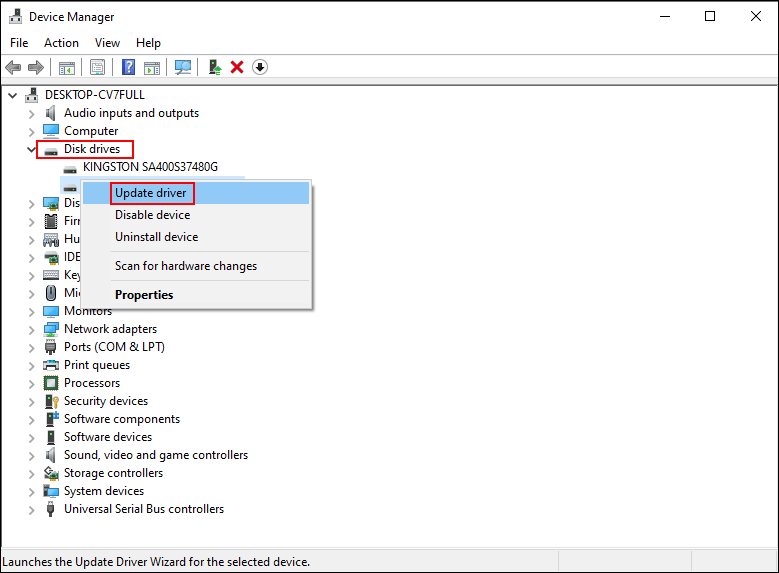
Step 4. Choose Search automatically for drivers from the following window.
You can wait for your computer to install the latest compatible driver on itself. Optionally, you can choose Uninstall device from the same right-click menu and click Uninstall again to confirm. Afterward, just remove and reconnect the external drive to your computer. The computer will reinstall the driver automatically.
Way 2. Assign a Drive Letter
You can go to the Disk Management utility to check the status of your Samsung T7. Sometimes, it doesn’t show up in File Explorer because of a lack of a drive letter. In this case, you can resolve the problem easily by assigning a proper drive letter to it.
Step 1. Press Win + X and select Disk Management on your computer.
Step 2. Locate your SSD and right-click on the partition to choose Change Drive Letter and Paths.
Step 3. Click Add in the prompt window. You need to choose a drive letter from the dropdown menu of the Assign the following drive letter option.
Step 4. Click OK to confirm your selection.
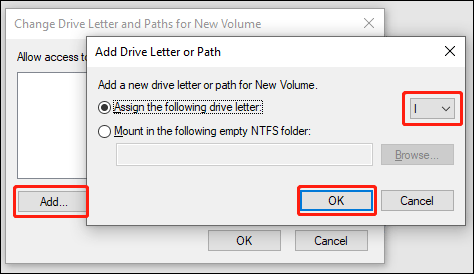
After that, you can head to File Explorer to check whether the drive appears. Some of you may encounter the issue that the Change Drive Letter and Paths option is greyed out. You need to right-click on the partition and choose Delete Volume. Then, recreate a new partition to resolve your problem.
Way 3. Upgrade the Samsung T7 Firmware
You should also check whether the Samsung T7 firmware is outdated. An incompatible issue might be triggered between the outdated Samsung T7 firmware and the computer operating system. Fortunately, you can easily check the current firmware version of your disk by running the Magician software, which is developed by Samsung. You can head to the Samsung support page to check how to upgrade the Samsung SSD firmware.
Way 4. Initialize the Samsung T7
If the Samsung T7 appears as Unknown or Not Initialized in Disk Management, initializing and repartitioning the disk may make it usable again.
However, these operations can overwrite existing partition information and make data recovery more difficult. If the T7 contains important files, recover them before initializing the disk.
Step 1. Open Disk Management on your computer.
Step 2. Find and right-click on the Samsung T7 drive and choose Initialize Disk.
Step 3. You should choose the partition style of the disk, MBR or GPT. If you prefer to create more partitions on your disk, you can select GPT and click OK to confirm.
Step 4. Right-click on the unallocated space and choose New Simple Volume.
Step 5. You should configure the partition size, partition label, and file system in the following windows. Click Next.
Step 6. You should check all the information about the partition and click Finish to create a new partition.
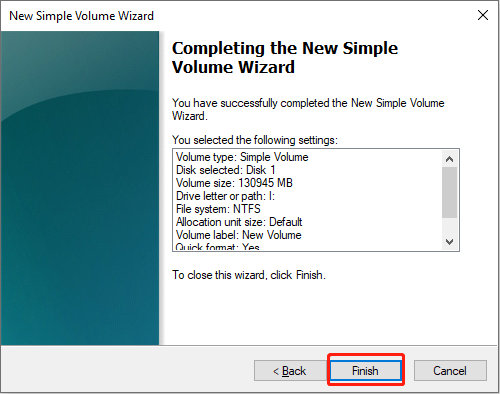
You can repeat steps 4-6 to create the rest new partitions on the Samsung T7 disk.
Way 5. Format the Samsung T7
Formatting the Samsung T7 can resolve some file system and disk errors, but it will erase the data on the drive. Therefore, use this method only after recovering any important files and when the other fixes do not work.
MiniTool Power Data Recovery FreeClick to Download100%Clean & Safe
After file recovery, you can start the format task.
>> Format via Disk Management
Step 1. Open Disk Management to find the Samsung T7 disk.
Step 2. Right-click on it and choose Format.
Step 3. You should set the file system and volume label of the disk and click OK to start the disk format process.
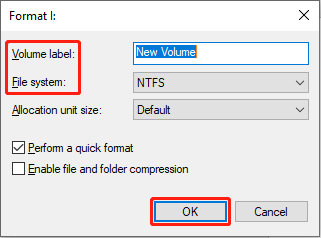
After that, check whether your Samsung T7 appears and can be accessed properly.
>> Format via MiniTool Partition Wizard
Occasionally, you may be stuck by the unable to format in Disk Management issue. Don’t worry; you can work with a reliable partition manager to handle the issue. MiniTool Partition Wizard is a trustworthy and comprehensive tool that can format disks, resize partitions, change the partition table, detect bad sectors, and more. You can run this free software to format the disk without getting errors.
MiniTool Partition Wizard FreeClick to Download100%Clean & Safe
Step 1. Launch the software to find your Samsung T7 on the disk list.
Step 2. Select the partition and choose Format Partition from the left side bar.
Step 3. Configure a proper file system and volume label.
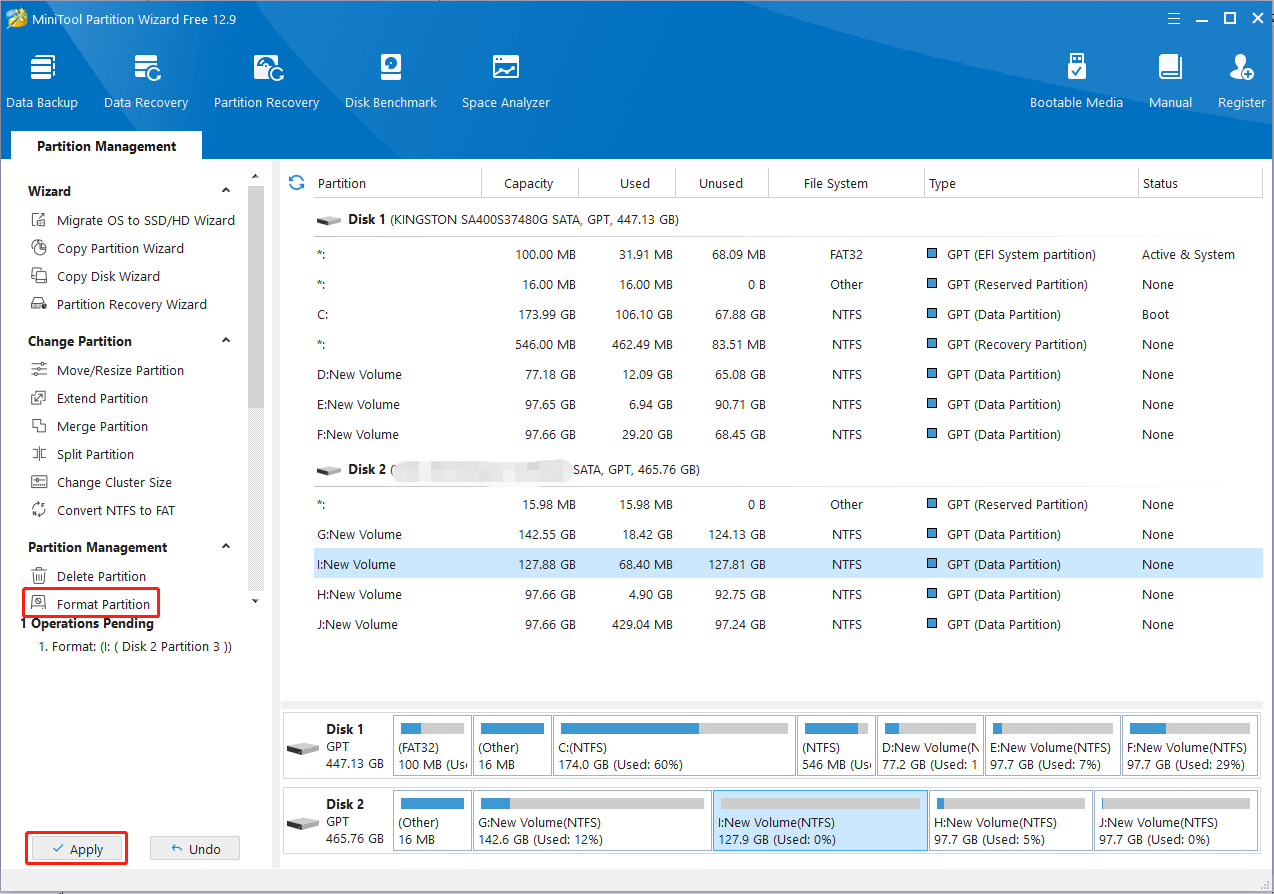
Step 4. You can preview the disk status after the above operations. If no mistakes, click Apply to complete the suspended process.
Samsung T7 Not Showing Up FAQ
Conclusion
When your Samsung T7 is not showing up on Windows, first check the USB connection and Disk Management to see how the SSD is detected. Then try basic fixes such as updating the driver, assigning a drive letter, or updating the firmware. If needed, you can initialize or format the drive.
If the T7 contains important files, recover the data before making any changes like initializing or formatting. MiniTool Power Data Recovery can help retrieve files when the SSD is still detectable. If you need further assistance, please contact us at [email protected].
User Comments :