

ASUS laptop black screen issues can occur during startup, after the Windows logo appears, or even after login. This guide provides a structured troubleshooting process, starting from device-level fixes and moving to Windows-level solutions.
Quick Solutions to ASUS Laptop Black Screen:
| Scenarios | Solutions |
| The laptop does not display anything | Perform a hard reset Check the power source Reseat RAM (if removable) |
| The laptop powers on, but the screen remains black | Reset the graphics driver Check the display and backlight Switch display output Change GPU mode Test by using an external monitor or TV |
| The ASUS logo appears, but the screen turns black afterward | Run Startup Repair Roll back or reinstall the graphics card driver Run an SFC scan Perform a System Restore Reset or reinstall Windows |
Part 1. Symptoms and Main Causes of ASUS Laptop Black Screen
The ASUS laptop black screen issue can appear in several different forms.
Common symptoms of ASUS black screen:
- A completely black screen after pressing the Power button
- A black screen with a cursor
- The ASUS logo appears, but the system fails to load Windows
- The Windows logo appears, and the screen turns black
In some cases, the laptop powers on with fan noise, Windows Hello sound, and keyboard backlight, but no display output is visible.
Common reasons for a black screen:
The causes are usually grouped into three categories.
- Hardware-related issues include loose display cables, faulty RAM, damaged GPU, or a broken laptop screen.
- Display-related issues often involve backlight failure or incorrect display output.
- System-level problems are commonly related to corrupted graphics drivers, problematic Windows updates, a failed BIOS update, or damaged boot configuration data.
After understanding the possible causes, follow the methods below to troubleshoot ASUS laptop not turning on issues.
Part 2. Device-Level Solutions to ASUS Black Screen
Device-level fixes should be performed first because they address the most fundamental hardware and firmware issues.
Method 1. Perform a Hard Reset
A hard reset clears residual power and resets temporary hardware states that may prevent the system from booting properly. To hard reset your ASUS laptop:
Step 1. Shut down the laptop completely, then disconnect the charger and any unnecessary external devices. If the battery is removable, take it out.
Step 2. Press and hold the Power button for 30 to 40 seconds. Then reconnect power and restart the device.
Method 2. Reset Graphics Driver
Sometimes the display system freezes due to a crashed graphics driver.
Press Shift + Ctrl + Windows + B simultaneously to reset the graphics driver. The screen may flicker, or a beep sound may occur. This indicates the graphics driver has been restarted.
If the black screen is caused by a temporary GPU problem, the display should return to normal immediately.
Method 3. Check Display Issues
Use a flashlight and shine it at the display at an angle. If faint images or icons are visible, the backlight may be damaged. In this case, you need to replace the screen panel.
If possible, connect the laptop to an external monitor or TV. If the external display works normally, the issue is likely related to the built-in screen or its cable rather than the system itself.
Method 4. Reconnect the Display Connector
A loose or damaged display cable can interrupt signal transmission between the motherboard and the screen. This may happen particularly if the laptop was dropped or physically impacted.
To fix this, power off the laptop completely and disconnect all power sources first.
Next, open the back panel carefully and locate the display connector on the motherboard. Disconnect it and reconnect it securely.
After that, restart the laptop and check whether the display is restored.

Method 5. Switch GPU Mode
Some ASUS laptops use dual GPU configurations that can cause display issues.
To resolve this:
Step 1. Connect the laptop to an external display using an HDMI cable.
Step 2. Open Armoury Crate and navigate to GPU settings. Then switch the GPU Mode to Ultimate, and the system will prompt a restart.
After rebooting, the laptop should reinitialize the graphics output correctly, restoring the display.
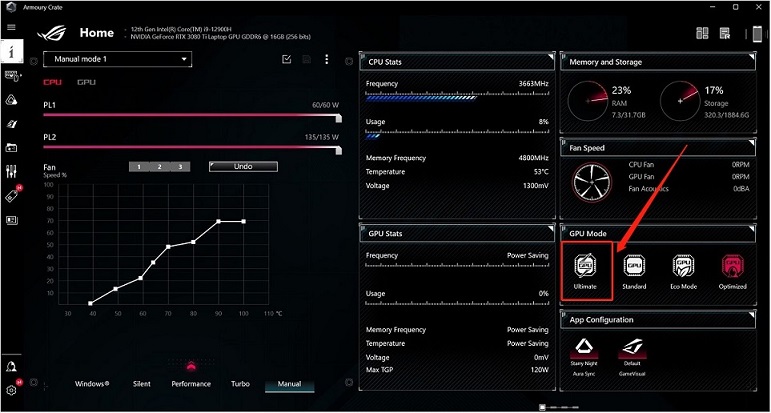
Image source: rog.asus.com
Method 6. Change Display Output
Sometimes the system is sending output to the wrong display source. To fix it:
Step 1. Connect an external monitor or TV, then press Fn + F4 or Fn + F7 depending on the model. Wait a few seconds and observe whether the display switches.
Step 2. Press the shortcut again to toggle back to the internal screen.
Method 7. Reseat Hardware Components
Loose internal components can also trigger ASUS laptop black screen issues.
If your RAM is removable, power off the device and reseat the memory modules.
In addition, if you recently upgraded RAM, remove the added module and test the display using only the original memory.
Additionally, check other removable components to ensure they are firmly seated.
Part 3. Windows-Level Fixes for ASUS Laptop Black Screen
Windows-level solutions are required when the hardware appears functional, but the system fails to load properly.
Typical scenarios include:
- The Windows logo appears, but the screen turns black
- System shows login screen but turns black after login
- ASUS laptop black screen with cursor
- Black screen after Windows update
These symptoms usually indicate operating system corruption or driver failure rather than hardware damage. The following solutions focus on system-level methods to repair system issues.
Recover Lost or Inaccessible Data (if Necessary)
To reduce the risk of permanent data loss during further troubleshooting, it is recommended to recover important files before performing advanced fixes. If your files are not needed, you can skip this section.
When an ASUS laptop fails to boot into Windows, MiniTool Power Data Recovery Bootable can help access and recover files without starting Windows.
It includes a WinPE-based Bootable Media Builder, which allows you to create a bootable USB drive for data recovery purposes. This method does not require removing the internal hard drive or connecting it to another computer.
MiniTool Power Data Recovery FreeClick to Download100%Clean & Safe
Follow the steps below to recover data from an unbootable ASUS laptop:
Step 1. Create a bootable USB drive
Connect a blank USB flash drive to a working computer. Recommended size: 4 GB to 64 GB.
Launch the registered MiniTool Power Data Recovery on the working PC.
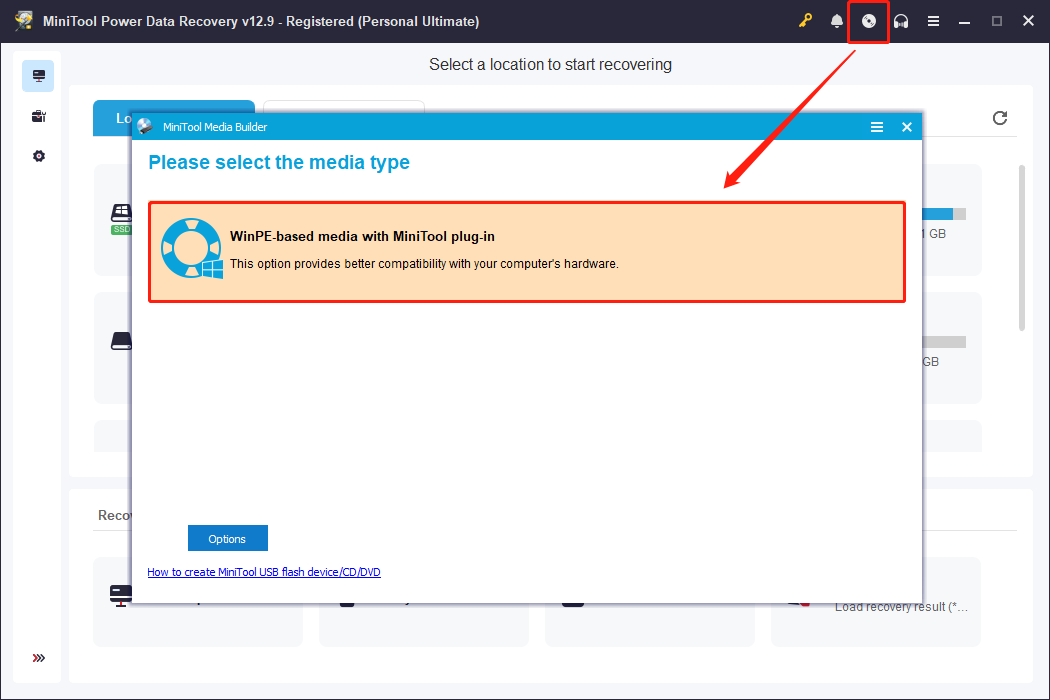
On the main interface, click the Bootable Media Builder icon. Then select WinPE-based media with MiniTool plug-in and follow the on-screen instructions to create the bootable USB drive.
Step 2. Boot the unbootable ASUS laptop from USB
Insert the newly created bootable USB drive into the unbootable ASUS laptop.
Power on the laptop and immediately press the BIOS access key (commonly F2, F10, F12, Esc, or Del, depending on the model) to enter BIOS setup.
Navigate to the Boot menu and set the USB drive as the first boot device. Save the settings and restart the computer to boot from the USB drive.
Step 3. Scan the disk and recover files
After booting into the WinPE environment, follow the on-screen instructions to open MiniTool Power Data Recovery.
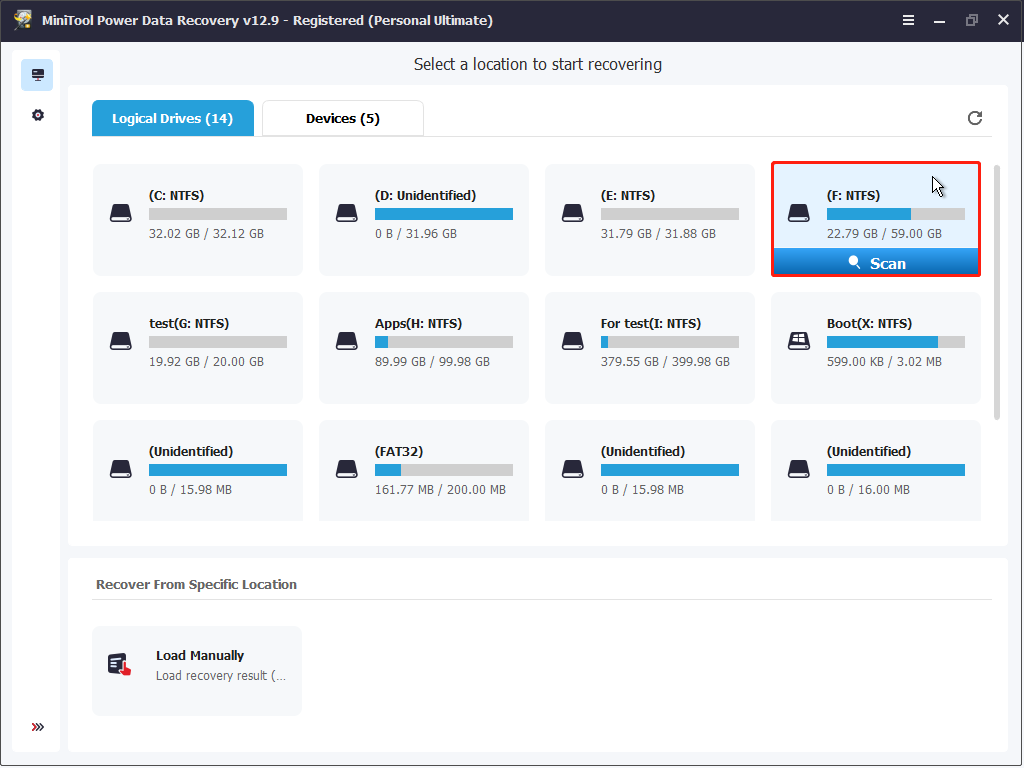
On the main interface, select the target drive or disk from which you want to recover files and click Scan to start the data scanning process.
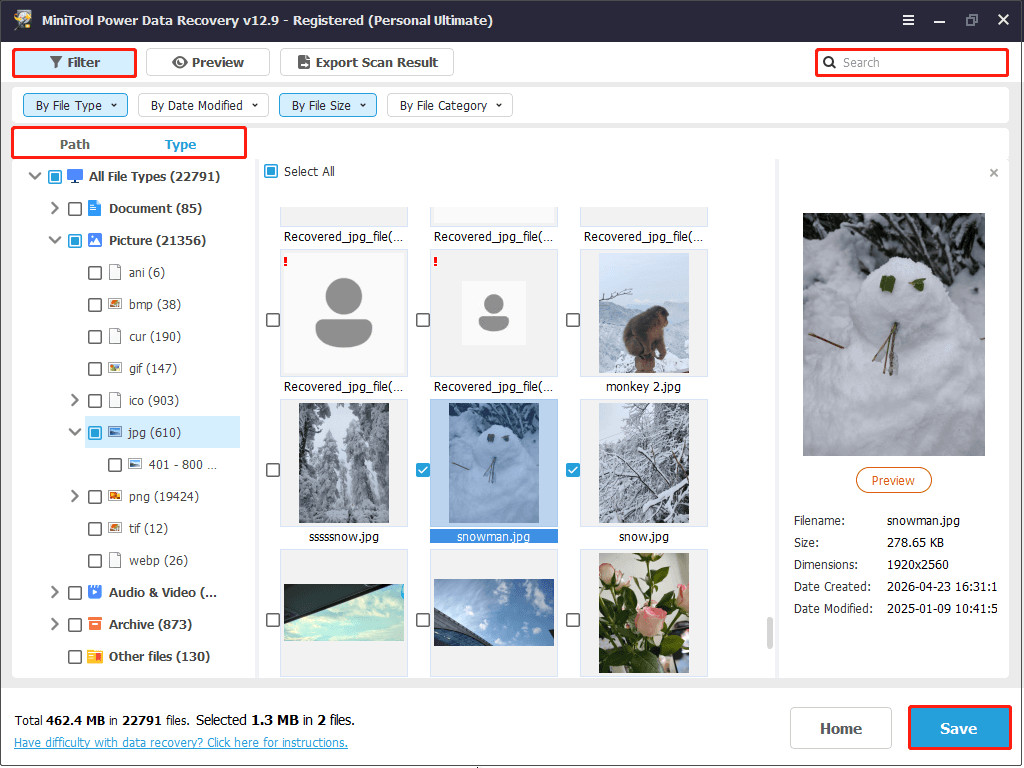
After the scan is finished, browse the results to locate the files you need. You can view recovered files in two different modes:
- Path: displays files in their original folder structure
- Type: organizes files by file type and format
To refine search results, use the following tools:
- Filter: narrows scan results by file type, size, modification date, or category
- Search: locates specific files by entering full or partial file names
Double-click any file to preview its contents before recovery. Once you have confirmed the required files, select them, click Save, and store them to a removable device.
Method 1. Run Startup Repair
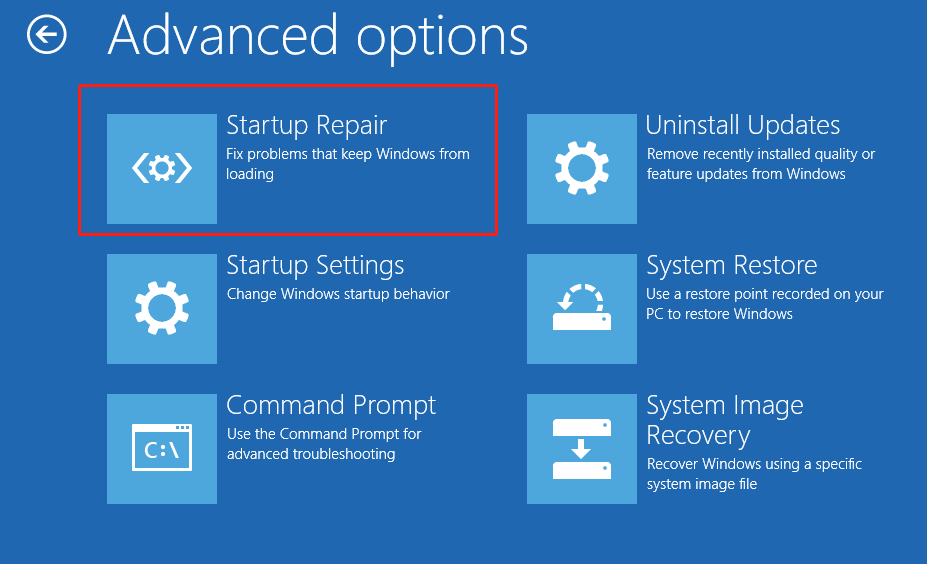
Windows Startup Repair can automatically detect and fix boot-related issues. To fix an ASUS laptop black screen on startup, follow the steps below to run it.
Step 1. Hold the Power button for 10 seconds to turn off the laptop. Press Power again to turn on the computer. When the manufacturer’s logo appears, hold the Power button for 10 seconds to turn off the computer again.
Step 2. Repeat this process 3 times, and your device should access Windows Recovery Environment.
Step 3. Select Troubleshoot > Advanced options > Startup Repair.
Method 2. Roll Back or Reinstall Graphics Card Driver
A faulty or incompatible graphics card driver can also trigger a black screen issue. If an external monitor is available, connect it to the laptop and access Windows.
Next, roll back the graphics driver if the issue appeared after a driver or Windows update. Otherwise, reinstall the driver to repair potential corruption or compatibility issues.
Roll back the graphics card driver:
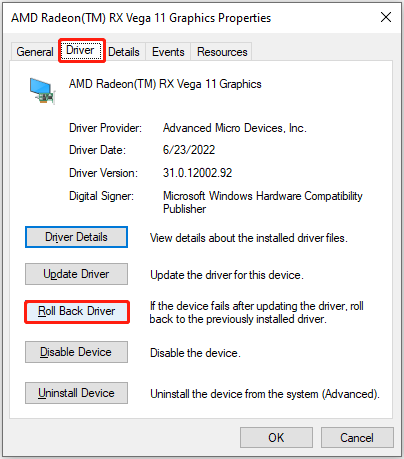
Step 1. Right-click Start and choose Device Manager.
Step 2. Expand Display adapters, right-click the graphics card, and choose Properties.
Step 3. Go to the Driver tab and click Roll Back Driver.
Reinstall the graphics card driver:
Step 1. In Device Manager, right-click the graphics card and choose Uninstall device.
Step 2. Restart the computer, and Windows should reinstall the driver automatically.
Method 3. Run an SFC Scan
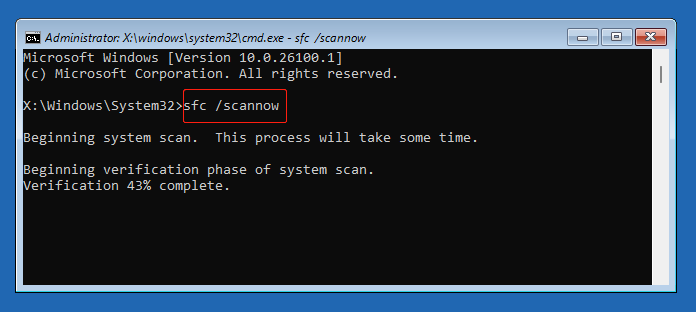
Corrupted system files can also lead to display failure. Running the SFC scanning tool can help repair or replace corrupted system files with a cached copy and restore stability.
Step 1. In WinRE, select Troubleshoot > Advanced options > Command Prompt.
Step 2. Type sfc /scannow and press Enter.

Method 4. Perform a System Restore
If restore points are available, reverting the system to a previous stable state can resolve software-related black screen issues. This is particularly useful after failed system updates or driver installations.
Step 1. Boot into WinRE, then select Troubleshoot > Advanced options > System Restore.
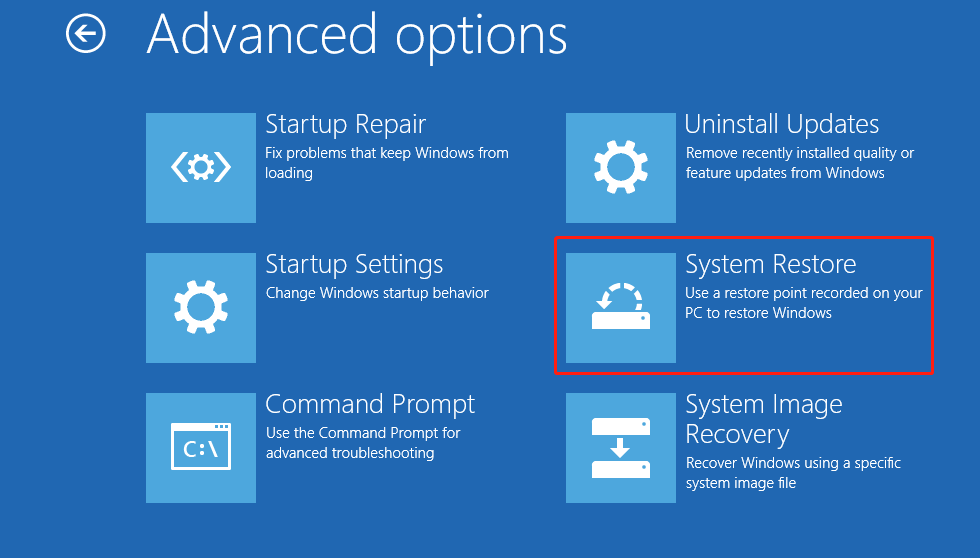
Step 2. Select a restore point recorded on your laptop to restore Windows to a previous healthy version.
Method 5. Factory Reset the Laptop
A factory reset restores Windows to its original state. This method removes installed applications and system modifications and can often fix persistent software issues causing startup problems.
Step 1. In WinRE, click Troubleshoot > Reset this PC.
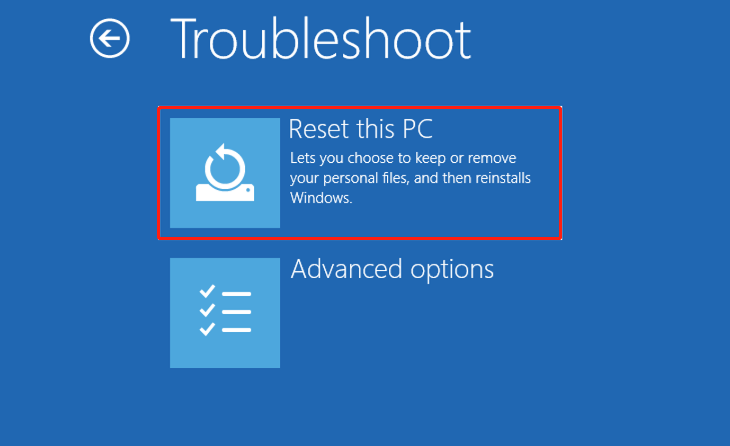
Step 2. Choose to keep your files or remove anything.
Step 3. Choose how to download Windows, and follow the on-screen instructions to complete Windows reinstallation.
Method 6. Do a Clean Installation
If all other methods fail, a clean installation of Windows may be required. This completely replaces the operating system, permanently erases all files on the system disk, and eliminates deep system-level corruption. It should be considered the final solution.
Step 1. Plug a blank USB drive (8 GB+) into a working computer. Download the Windows installation media creation tool and use it to create an installation USB drive.
Step 2. Insert the USB drive into the ASUS laptop you need to clean install and boot from the USB.
Step 3. Follow the instructions to set up your language, time, and keyboard preferences, and then complete the installation process.
Part 4. How to Prevent ASUS Laptop Startup Problems
Preventing ASUS laptop startup issues mainly depends on maintaining both system stability and hardware health. Most laptop boot failures are caused by software errors, driver issues, hardware failures, and system issues.
Here are some useful tips.
- Keep Windows, graphics drivers, and other device drivers up to date.
- Install BIOS updates from ASUS when recommended for your model and ensure the laptop remains connected to a stable power source.
- Keep sufficient free space on the system drive to ensure stable Windows operation.
- Run antivirus scans regularly to prevent malware-related startup issues.
- Monitor hard drive health and replace failing drives promptly.
- Check RAM health periodically using memory diagnostic tools.
- Keep the laptop’s cooling vents clean and free of dust.
- Shut down the laptop properly instead of frequently forcing a power-off.
Additionally, to avoid data loss after startup issues, regularly back up important files to an external drive or cloud storage. As a professional Windows backup tool, MiniTool ShadowMaker can help.
MiniTool ShadowMaker TrialClick to Download100%Clean & Safe
Part 5. Bottom Line
ASUS laptop black screen issues can originate from either hardware failure or Windows system corruption. Start with simple hard resets and display checks, then proceed with hardware inspection and system-level repair.
To avoid losing important data, recover files before advanced repairs. In addition, if important files are missing after repair, use MiniTool Power Data Recovery Free to recover 1 GB of files for free.
If you have any questions when using MiniTool products, send an email to the tech support team at [email protected].
About The Author

Position: Columnist
Shirley holds a bachelor’s degree in English and has been an editor at the MiniTool Team for many years. She specializes in IT-related content, with a focus on data recovery, file backup, disk management, and other technical topics. She is committed to delivering clear, accurate, and practical solutions to help users resolve common computer issues.
User Comments :